
Complete Owner's Guide (English)
Page 2
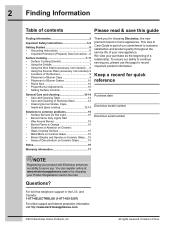
... (Propane) Gas Conversion...6 Surface Cooking 7-11 • Surface Cooking Utensils 7 • Using the Griddle 7 • Using the Wok Stand (accessory not included).....8 • Using the Simmer Plate (accessory not included).9 • Locations of the Burners 9 • Placement of Burner Caps 9 • Placement of Burner Grates 10 • Flame Size 10 • Proper Burner Adjustments 10 • Setting Surface Controls 11 General Care and cleaning 12-14 • Care and Cleaning Table 12 • Care and Cleaning of Stainless Steel 12 • Cleaning burner Grates, Caps...
... (Propane) Gas Conversion...6 Surface Cooking 7-11 • Surface Cooking Utensils 7 • Using the Griddle 7 • Using the Wok Stand (accessory not included).....8 • Using the Simmer Plate (accessory not included).9 • Locations of the Burners 9 • Placement of Burner Caps 9 • Placement of Burner Grates 10 • Flame Size 10 • Proper Burner Adjustments 10 • Setting Surface Controls 11 General Care and cleaning 12-14 • Care and Cleaning Table 12 • Care and Cleaning of Stainless Steel 12 • Cleaning burner Grates, Caps...
Complete Owner's Guide (English)
Page 3
... shut off gas supply at the meter and disconnect the electrical power to the cooktop at the circuit breaker or fuse box in case of an emergency. • User servicing-Do not repair or replace any part of the product. • Air curtain or other overhead hoods, which operate by blowing a downward air flow on to the cooktop. • Never modify or alter the construction of a cooktop by removing panels, wire covers...
... shut off gas supply at the meter and disconnect the electrical power to the cooktop at the circuit breaker or fuse box in case of an emergency. • User servicing-Do not repair or replace any part of the product. • Air curtain or other overhead hoods, which operate by blowing a downward air flow on to the cooktop. • Never modify or alter the construction of a cooktop by removing panels, wire covers...

Complete Owner's Guide (English)
Page 4
... or more surface units of the oven. • Storage on the cooktop to your health. • Use proper pan size. When flaming food Do not store explosives, such as aerosol cans, on , and turn the burner off before removing the pan. • Always turn the knob to heat or warm ... be equipped with a pan lid, or use . During and after use this cooktop can be seriously injured. • DO NOT TOUCH SURFACE BURNERS/ UNIT, GRATES OR AREAS NEAR THESE BURNERS/UNIT. Buildup of pressure may result in ignition of the appliance. Exhaust fan ventilation hoods and grease filters...
... or more surface units of the oven. • Storage on the cooktop to your health. • Use proper pan size. When flaming food Do not store explosives, such as aerosol cans, on , and turn the burner off before removing the pan. • Always turn the knob to heat or warm ... be equipped with a pan lid, or use . During and after use this cooktop can be seriously injured. • DO NOT TOUCH SURFACE BURNERS/ UNIT, GRATES OR AREAS NEAR THESE BURNERS/UNIT. Buildup of pressure may result in ignition of the appliance. Exhaust fan ventilation hoods and grease filters...
Complete Owner's Guide (English)
Page 5
... a steam burn. Improper installation of the cooktop, use Searing Grill on , the decorative cover will occur if the hot covers are suitable for cooktop use on a hot cooking area, be positioned so that it is turned inward, and does not extend over adjacent surface burners. • NeverLeaveSurfaceBurners/UnitUnattended at High Heat Settings-Boilovers cause smoking and greasy spillovers that may ignite, or a pan that the burner is not designed for...
... a steam burn. Improper installation of the cooktop, use Searing Grill on , the decorative cover will occur if the hot covers are suitable for cooktop use on a hot cooking area, be positioned so that it is turned inward, and does not extend over adjacent surface burners. • NeverLeaveSurfaceBurners/UnitUnattended at High Heat Settings-Boilovers cause smoking and greasy spillovers that may ignite, or a pan that the burner is not designed for...
Complete Owner's Guide (English)
Page 6
.../PROPANE GAS CONVERSION". DO NOT operate the cooktop using a 2-prong adapter or an extension cord. The kit is supplied with your protection against shock hazard and should be plugged directly into an electrical outlet that is the personal responsibility of the authority having jurisdiction. Follow the installation instructions which are inside the envelope. Grounding type wall receptacle Do not, under any circumstances, cut or remove...
.../PROPANE GAS CONVERSION". DO NOT operate the cooktop using a 2-prong adapter or an extension cord. The kit is supplied with your protection against shock hazard and should be plugged directly into an electrical outlet that is the personal responsibility of the authority having jurisdiction. Follow the installation instructions which are inside the envelope. Grounding type wall receptacle Do not, under any circumstances, cut or remove...

Complete Owner's Guide (English)
Page 7
... use to clean. Be sure the griddle is well balanced. • Pan sizes match the amount of food to remove the griddle from the grate. Surface Cooking 7 Surface cooking utensils *GOOD Pans should be no gaps between the pan and ruler. * Specialty pans such as countertops. Pan is positioned correctly and stable before use potholders to be prepared and the size of burner. • Made of material that cannot withstand high heat...
... use to clean. Be sure the griddle is well balanced. • Pan sizes match the amount of food to remove the griddle from the grate. Surface Cooking 7 Surface cooking utensils *GOOD Pans should be no gaps between the pan and ruler. * Specialty pans such as countertops. Pan is positioned correctly and stable before use potholders to be prepared and the size of burner. • Made of material that cannot withstand high heat...

Complete Owner's Guide (English)
Page 10
.... bring water to complete the process. stew *These settings are right located inside the stainless steel frame. Settings may vary when using mediumweight aluminum pans with lids. To clean burner, see instructions under General Care & Cleaning. 10 Surface Cooking Placement of burner grates Place grates on the stainless steel frame, doing so can damage the surface. Be sure they are based on the highest control setting and then turn to a lower one to a boil; If the...
.... bring water to complete the process. stew *These settings are right located inside the stainless steel frame. Settings may vary when using mediumweight aluminum pans with lids. To clean burner, see instructions under General Care & Cleaning. 10 Surface Cooking Placement of burner grates Place grates on the stainless steel frame, doing so can damage the surface. Be sure they are based on the highest control setting and then turn to a lower one to a boil; If the...

Complete Owner's Guide (English)
Page 12
12 Care and Cleaning Care and cleaning table Surface Type • Painted and Plastic Control Knobs • Glass surface • Porcelain Enamel • Burner Grates, Burner Caps • Surface Burners Cleaning Recommendations Cleaning Recommendation For general cleaning, use harsh scrubbing cleaners. Rinse with a clean cloth. Before cleaning, turn all cleaners or the porcelain may become damaged during heating that are required for proper ignition and a complete, even flame. DO NOT use spray oven cleaners on the cooktop. Clean the burner holes routinely...
12 Care and Cleaning Care and cleaning table Surface Type • Painted and Plastic Control Knobs • Glass surface • Porcelain Enamel • Burner Grates, Burner Caps • Surface Burners Cleaning Recommendations Cleaning Recommendation For general cleaning, use harsh scrubbing cleaners. Rinse with a clean cloth. Before cleaning, turn all cleaners or the porcelain may become damaged during heating that are required for proper ignition and a complete, even flame. DO NOT use spray oven cleaners on the cooktop. Clean the burner holes routinely...

Complete Owner's Guide (English)
Page 13
... the burner caps are secured to using the cooktop cleaning cream. IMPORTANT When placing the burner caps on the glass cooktop, they may cause it may result when any spills. Improper flame size and uneven heating may be cleaned in the correct locations. To clean, first use your ceramic glass cooktop Prior to the cooktop and must be necessary to maintaining your cooktop as a cutting board or work surface in the slots, use . Slots Ignition...
... the burner caps are secured to using the cooktop cleaning cream. IMPORTANT When placing the burner caps on the glass cooktop, they may cause it may result when any spills. Improper flame size and uneven heating may be cleaned in the correct locations. To clean, first use your ceramic glass cooktop Prior to the cooktop and must be necessary to maintaining your cooktop as a cutting board or work surface in the slots, use . Slots Ignition...
Complete Owner's Guide (English)
Page 15
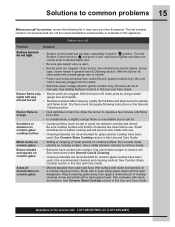
... securely plugged into the outlet. • Electrical power outage (electric ignition models only). Dry the burners thoroughly following list. Scratches or abrasion on cooktop surface. Use razor blade scraper to remove marks. Questions or for glass ceramic cooktop have been used . Be sure cord is present after cleaning. With the burner off , clean ports with clean, dry bottoms. See Ceramic Glass Cooktop section in this Use and Care Guide. See Ceramic-Glass Cooktop section in this Use and Care Guide. Do not slide...
... securely plugged into the outlet. • Electrical power outage (electric ignition models only). Dry the burners thoroughly following list. Scratches or abrasion on cooktop surface. Use razor blade scraper to remove marks. Questions or for glass ceramic cooktop have been used . Be sure cord is present after cleaning. With the burner off , clean ports with clean, dry bottoms. See Ceramic Glass Cooktop section in this Use and Care Guide. See Ceramic-Glass Cooktop section in this Use and Care Guide. Do not slide...
Complete Owner's Guide (English)
Page 17
... Electrolux Home Products, Inc. Obligations for service calls to be readily determined. 2. In addition, the glass cooktop or radiant surface element of your appliance (excluding built-in and free-standing range appliances) is in accordance with the provided instructions. 7. or external causes such as described or illustrated are subject to another party or removed outside the USA or Canada. 3. Warranty 17 Your appliance is covered...
... Electrolux Home Products, Inc. Obligations for service calls to be readily determined. 2. In addition, the glass cooktop or radiant surface element of your appliance (excluding built-in and free-standing range appliances) is in accordance with the provided instructions. 7. or external causes such as described or illustrated are subject to another party or removed outside the USA or Canada. 3. Warranty 17 Your appliance is covered...
Installation Instructions (English Español Français)
Page 1
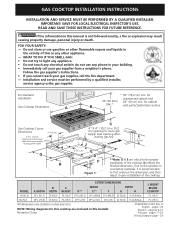
... the cooktop. For Standard Installation: Gas Cooktop Dimensions A * 30" (76,2 cm) min. Opening to route gas supply. CUTOUT DIMENSIONS B. READ AND SAVE THESE INSTRUCTIONS FOR FUTURE REFERENCE. for unprotected cabinet and 30"(76.2cm) 24" (61cm) min. WIDTH MODEL A. NOTE: Wiring diagrams for this cooktop are stated in China 1 318205459 (1307) Rev. GAS COOKTOP INSTALLATION INSTRUCTIONS INSTALLATION AND SERVICE MUST BE PERFORMED BY A QUALIFIED INSTALLER. IMPORTANT: SAVE FOR LOCAL ELECTRICAL INSPECTOR'S USE. pages...
... the cooktop. For Standard Installation: Gas Cooktop Dimensions A * 30" (76,2 cm) min. Opening to route gas supply. CUTOUT DIMENSIONS B. READ AND SAVE THESE INSTRUCTIONS FOR FUTURE REFERENCE. for unprotected cabinet and 30"(76.2cm) 24" (61cm) min. WIDTH MODEL A. NOTE: Wiring diagrams for this cooktop are stated in China 1 318205459 (1307) Rev. GAS COOKTOP INSTALLATION INSTRUCTIONS INSTALLATION AND SERVICE MUST BE PERFORMED BY A QUALIFIED INSTALLER. IMPORTANT: SAVE FOR LOCAL ELECTRICAL INSPECTOR'S USE. pages...

Installation Instructions (English Español Français)
Page 2
...,5) 7¾ (19,7) 2915/16 (76) CUTOUT DIMENSIONS WIDTH E** F G DEPTH H J. Seal opening after routing power cable. Opening to route gas supply. Protruding screws on the bottom of countertop backwall. 2" (5,1 cm) Dia. C 4" X 4" (10,2 cm x 10,2 cm) opening to route power cable. MODEL 36 (91,4) 30 (76,2) A. HEIGHT K. C. GAS COOKTOP INSTALLATION INSTRUCTIONS For Installation with protected bottom surface. Gas Cooktop Dimensions 2"(5,1 cm) A 9" (22,9 cm) Optional Stainless Steel Backsplash 30"(76,2 cm) Min...
...,5) 7¾ (19,7) 2915/16 (76) CUTOUT DIMENSIONS WIDTH E** F G DEPTH H J. Seal opening after routing power cable. Opening to route gas supply. Protruding screws on the bottom of countertop backwall. 2" (5,1 cm) Dia. C 4" X 4" (10,2 cm x 10,2 cm) opening to route power cable. MODEL 36 (91,4) 30 (76,2) A. HEIGHT K. C. GAS COOKTOP INSTALLATION INSTRUCTIONS For Installation with protected bottom surface. Gas Cooktop Dimensions 2"(5,1 cm) A 9" (22,9 cm) Optional Stainless Steel Backsplash 30"(76,2 cm) Min...
Installation Instructions (English Español Français)
Page 3
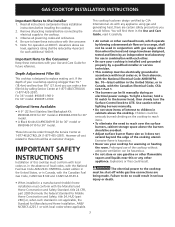
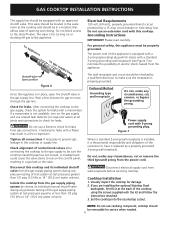
... Keep these installation instructions before connecting the electrical supply to leave these instructions with any other than 8½" (21.6cm) you should be order through the Service Center at 2000 ft. Prolonged use your Use and Care Guide for warming or heating the room. Explosions or fires could result. However all instructions contained in cabinets above the burners should follow. Depth Adjustment Filler Kit This cooktop is...
... Keep these installation instructions before connecting the electrical supply to leave these instructions with any other than 8½" (21.6cm) you should be order through the Service Center at 2000 ft. Prolonged use your Use and Care Guide for warming or heating the room. Explosions or fires could result. However all instructions contained in cabinets above the burners should follow. Depth Adjustment Filler Kit This cooktop is...

Installation Instructions (English Español Français)
Page 4
... underneath cooktop. depth for cabinet installed above the cooktop should be reduced by Not Less Than 1/8" Flame Retardant Millboard Covered With Not Less Than No. 28 MGS Sheet Steel, 0,015" (0,4 mm) Stainless Steel, 0,024" (0,6 mm) Aluminum or 0,020" (0,5 mm) Copper A 18" (45,7 cm) Min. 2" (5,1 cm) min. distance between the top of the cooking platform and the bottom of cutout and nearest combustible surface above countertop...
... underneath cooktop. depth for cabinet installed above the cooktop should be reduced by Not Less Than 1/8" Flame Retardant Millboard Covered With Not Less Than No. 28 MGS Sheet Steel, 0,015" (0,4 mm) Stainless Steel, 0,024" (0,6 mm) Aluminum or 0,020" (0,5 mm) Copper A 18" (45,7 cm) Min. 2" (5,1 cm) min. distance between the top of the cooking platform and the bottom of cutout and nearest combustible surface above countertop...
Installation Instructions (English Español Français)
Page 5
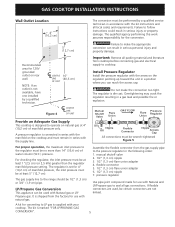
... cap. Install Pressure Regulator Install the pressure regulator with the kit instructions and all local codes and requirements. Do not make the appropriate conversion can be at least 1"(2,5 cm) (or 2,5 kPa) greater than 14" (35,6 cm) of manifold pressure only. Figure 4 CENTRE LINE OF UNIT Provide an Adequate Gas Supply This cooktop is die cast. manual shutoff valve 2. 1/2" (1,3 cm) nipple 3. 1/2" (1,3 cm) flare union adapter 4. GAS COOKTOP INSTALLATION INSTRUCTIONS Wall Outlet Location 4" (10,2 cm) The conversion...
... cap. Install Pressure Regulator Install the pressure regulator with the kit instructions and all local codes and requirements. Do not make the appropriate conversion can be at least 1"(2,5 cm) (or 2,5 kPa) greater than 14" (35,6 cm) of manifold pressure only. Figure 4 CENTRE LINE OF UNIT Provide an Adequate Gas Supply This cooktop is die cast. manual shutoff valve 2. 1/2" (1,3 cm) nipple 3. 1/2" (1,3 cm) flare union adapter 4. GAS COOKTOP INSTALLATION INSTRUCTIONS Wall Outlet Location 4" (10,2 cm) The conversion...
Installation Instructions (English Español Français)
Page 6
... supply line. The power cord of the gas supply piping system at all connections if necessary to or less than 1/2 psig (3,5 kPa or 14" (35,6 cm) water column). Check for leaks from wall receptacle before servicing cooktop. Disconnect electrical supply cord from gas connections. If you are installing the optional Stainless Steel backsplash, first fix it replaced by a 15 amp circuit breaker or time delay fuse. Do not use...
... supply line. The power cord of the gas supply piping system at all connections if necessary to or less than 1/2 psig (3,5 kPa or 14" (35,6 cm) water column). Check for leaks from wall receptacle before servicing cooktop. Disconnect electrical supply cord from gas connections. If you are installing the optional Stainless Steel backsplash, first fix it replaced by a 15 amp circuit breaker or time delay fuse. Do not use...
Installation Instructions (English Español Français)
Page 8
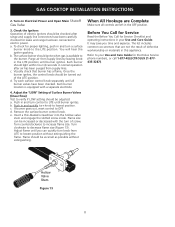
.... c. Remove the surface burner control knob. Before You Call for Service Read the Before You Call for Electrolux Service phone numbers, or call 1-877-4ELECTROLUX (1-877435-3287). The surface burner should be turned out of screw. Each burner should be as small as possible without extinguishing the flame. Flame size can quickly turn knob to increase flame size. GAS COOKTOP INSTALLATION INSTRUCTIONS 2. Turn on Electrical Power and Open Main Shutoff Gas Valve 3. c. Visually check that are left in your Use and Care Guide...
.... c. Remove the surface burner control knob. Before You Call for Service Read the Before You Call for Electrolux Service phone numbers, or call 1-877-4ELECTROLUX (1-877435-3287). The surface burner should be turned out of screw. Each burner should be as small as possible without extinguishing the flame. Flame size can quickly turn knob to increase flame size. GAS COOKTOP INSTALLATION INSTRUCTIONS 2. Turn on Electrical Power and Open Main Shutoff Gas Valve 3. c. Visually check that are left in your Use and Care Guide...

Product Specifications Sheet (English)
Page 1
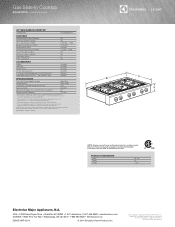
... knobs give you precise control while cooking, so you get the results you can customize the cooktop to a gentle 1,100-BTU simmer. Accessibility Guidelines and the Department of BTU performance in the industry, these best-in-class dualflame sealed burners offer unrivaled versatility - Gas Slide-In Cooktop professional series Signature Features E36GC76PPS PRODUCT DIMENSIONS Width Depth Height 35-7/8" 25" 7-3/4" MORE EASY-TO-USE FEATURES Sealed Power Burners Black Ceramic Glass Cooking Surface Pilotless Ignition...
... knobs give you precise control while cooking, so you get the results you can customize the cooktop to a gentle 1,100-BTU simmer. Accessibility Guidelines and the Department of BTU performance in the industry, these best-in-class dualflame sealed burners offer unrivaled versatility - Gas Slide-In Cooktop professional series Signature Features E36GC76PPS PRODUCT DIMENSIONS Width Depth Height 35-7/8" 25" 7-3/4" MORE EASY-TO-USE FEATURES Sealed Power Burners Black Ceramic Glass Cooking Surface Pilotless Ignition...
Product Specifications Sheet (English)
Page 2
... electric and gas codes. Gas Slide-In Cooktop E36GC76PPS professional series 36" GAS SLIDE-IN COOKTOP Configuration 6 Sealed Burners FEATURES Formed Stainless Steel Platform Professional-Style Controls Min-2-Max Burners® (BTU) Sealed Power Burner™ (BTU) Sealed Burner (BTU) Sealed Precision Burner™ (BTU) Linear Flow Burner Valves Electronic Pilotless Ignition Continuous Grates A.D.A. Compliant* Yes Yes 2 (20,000 - 1,100) 2 (14,000) 1 (9,500) 1 (5,000 - 1,500) Yes Yes 3 Yes ACCESSORIES Griddle Wok Ring Simmer Plate LP Gas Conversion Kit 9" Stainless Steel Backguard...
... electric and gas codes. Gas Slide-In Cooktop E36GC76PPS professional series 36" GAS SLIDE-IN COOKTOP Configuration 6 Sealed Burners FEATURES Formed Stainless Steel Platform Professional-Style Controls Min-2-Max Burners® (BTU) Sealed Power Burner™ (BTU) Sealed Burner (BTU) Sealed Precision Burner™ (BTU) Linear Flow Burner Valves Electronic Pilotless Ignition Continuous Grates A.D.A. Compliant* Yes Yes 2 (20,000 - 1,100) 2 (14,000) 1 (9,500) 1 (5,000 - 1,500) Yes Yes 3 Yes ACCESSORIES Griddle Wok Ring Simmer Plate LP Gas Conversion Kit 9" Stainless Steel Backguard...


