Installation Instructions
Page 1
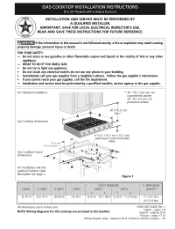
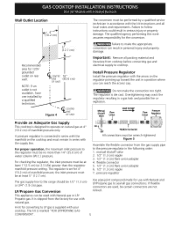
.... -- All dimensions are enclosed in this or any other flammable vapors and liquids in your gas supplier from a neighbor's phone. Do not store or use any electrical switch; for unprotected cabinet 24" (61 cm) min. Diagrama de la instalaci6n at_imbrica p_igina * 24 READ AND SAVE THESE INSTRUCTIONS FOR FUTURE REFERENCE. If the information in inches (cm). INSTALLATION AND SERVICE MUST...
.... -- All dimensions are enclosed in this or any other flammable vapors and liquids in your gas supplier from a neighbor's phone. Do not store or use any electrical switch; for unprotected cabinet 24" (61 cm) min. Diagrama de la instalaci6n at_imbrica p_igina * 24 READ AND SAVE THESE INSTRUCTIONS FOR FUTURE REFERENCE. If the information in inches (cm). INSTALLATION AND SERVICE MUST...
Installation Instructions
Page 3
... kits will find them in the Use and Care Guide, read it does not extend beyond the edge of interest to reach over the surface burners, cabinet storage space above the cooktop. Be sure to do so could result. However all packing material before installing the cooktop. 2. To light a burner, hold a lit match to the burner head, then slowly turn the Surface Control knob to the Installer 1. Use caution when lighting burners manually...
... kits will find them in the Use and Care Guide, read it does not extend beyond the edge of interest to reach over the surface burners, cabinet storage space above the cooktop. Be sure to do so could result. However all packing material before installing the cooktop. 2. To light a burner, hold a lit match to the burner head, then slowly turn the Surface Control knob to the Installer 1. Use caution when lighting burners manually...
Installation Instructions
Page 4
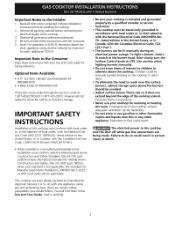
... fire by reaching over heated surfaces, cabinet storage space located above cooktop 30" (76.2 cm) Min. Clearance Between the Top of the Cooking Platform and the Bottom of the cabinets. depth -_ for cabinet installed above the cooktop should be reduced by Not Less Than 1/8" Flame Retardant Millboard Covered With Not Less Than No. 28 MGS Sheet Steel, 0.015" (0.4 ram) Stainless Steel, 0.024" (0.6 ram) Aluminum or 0.020" (0.5 ram) Copper...
... fire by reaching over heated surfaces, cabinet storage space located above cooktop 30" (76.2 cm) Min. Clearance Between the Top of the Cooking Platform and the Bottom of the cabinets. depth -_ for cabinet installed above the cooktop should be reduced by Not Less Than 1/8" Flame Retardant Millboard Covered With Not Less Than No. 28 MGS Sheet Steel, 0.015" (0.4 ram) Stainless Steel, 0.024" (0.6 ram) Aluminum or 0.020" (0.5 ram) Copper...
Installation Instructions
Page 5
... explosion. The qualified agency performing this work assumes responsibility for use with Natural gas or LP/ Propane gas. Install Pressure Regulator Install the pressure regulator with the kit instructions and all local codes and requirements. The regulator is marked "FOR LP/PROPANEGAS CONVERSION ". NOTE: If an outlet is not available, have one installed by a qualified service technician in accordance with tile arrow on the regulator pointing up toward the unit in...
... explosion. The qualified agency performing this work assumes responsibility for use with Natural gas or LP/ Propane gas. Install Pressure Regulator Install the pressure regulator with the kit instructions and all local codes and requirements. The regulator is marked "FOR LP/PROPANEGAS CONVERSION ". NOTE: If an outlet is not available, have one installed by a qualified service technician in accordance with tile arrow on the regulator pointing up toward the unit in...
Installation Instructions
Page 6
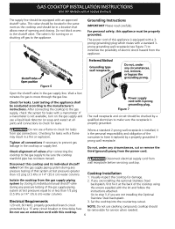
... before servicing cooktop. Power supply cord with the kit and follow the instructions attached. Electrical Requirements 120 volt, 60 Hertz, properly grounded branch circuit protected by a properly prong wall receptacle. Wait a few minutes for leaks. is equipped with a 3prong (grounding) plug which mates with this appliance is installed, it replaced by a 15 amp circuit breaker or time delay fuse. The power cord of this cooktop. Preferred Method Grounding type wall...
... before servicing cooktop. Power supply cord with the kit and follow the instructions attached. Electrical Requirements 120 volt, 60 Hertz, properly grounded branch circuit protected by a properly prong wall receptacle. Wait a few minutes for leaks. is equipped with a 3prong (grounding) plug which mates with this appliance is installed, it replaced by a 15 amp circuit breaker or time delay fuse. The power cord of this cooktop. Preferred Method Grounding type wall...
Installation Instructions
Page 7
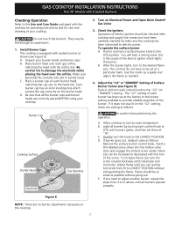
... surface burner control knob, insert a thin-bladed screw driver into slot in and turn to the "LO" (or "SIMMER") setting. Make sure electrode fits correctly into the hollow valve stem and engage the slotted screw inside. Place a burner cap on Electrical Power and Open Main Shutoff Gas Valve 3. Cookto Burner Head Gas Opening Electrode Figure 8 NOTE: There are correctly placed BEFOREusing your cooktop. Use the marks as a guide and adjust the flame...
... surface burner control knob, insert a thin-bladed screw driver into slot in and turn to the "LO" (or "SIMMER") setting. Make sure electrode fits correctly into the hollow valve stem and engage the slotted screw inside. Place a burner cap on Electrical Power and Open Main Shutoff Gas Valve 3. Cookto Burner Head Gas Opening Electrode Figure 8 NOTE: There are correctly placed BEFOREusing your cooktop. Use the marks as a guide and adjust the flame...
Installation Instructions
Page 8
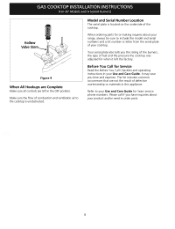
... your product and/or need to order parts. Model and Serial Number Location Tile serial plate is unobstructed. When ordering parts for or making inquires about your cooktop. Refer to the cooktop is located on the underside of tile cooktop. It may save you the rating of the burners, the type of fuel and the pressure the cooktop was adjusted for Sears service phone numbers. The list includes common occurrences that...
... your product and/or need to order parts. Model and Serial Number Location Tile serial plate is unobstructed. When ordering parts for or making inquires about your cooktop. Refer to the cooktop is located on the underside of tile cooktop. It may save you the rating of the burners, the type of fuel and the pressure the cooktop was adjusted for Sears service phone numbers. The list includes common occurrences that...
Use and Care Guide
Page 4
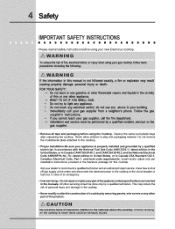
... removing panels, wire covers or any pert of the appliance unless specifically recommended in the manuals. Ask your new Electrolux cooktop. • Remove all tape and packaging before using the Cooktop. Safety iMPORTANTSAFETYiNSTRUCTiONS Please read all safety instructions before using your dealer to recommend a qualified technician and an authorized repair service, Know how to shut off gas supply at the meter and disconnect the electrical power to the cooktop at the circuit breaker...
... removing panels, wire covers or any pert of the appliance unless specifically recommended in the manuals. Ask your new Electrolux cooktop. • Remove all tape and packaging before using the Cooktop. Safety iMPORTANTSAFETYiNSTRUCTiONS Please read all safety instructions before using your dealer to recommend a qualified technician and an authorized repair service, Know how to shut off gas supply at the meter and disconnect the electrical power to the cooktop at the circuit breaker...
Use and Care Guide
Page 5
... of the app_lartc_, • DO NOT TOUCH SURFACE BURNERS/V_/NIT,GRATES OR AREAS NEAR THESE BURNERS/ta_IT, Surface burners!unit may be hot even though flames are not visible/unit is dark in use. DO not store explosives, such as f_ammable liquids...INSTRUCTIONS FOR USING YOUR COOKTOP • Know which knob oontrois each surface bumerlsurfaee uniL Place a pan of pressure may gauss sontatherto burst and result in injury. Safety • Storage on Appliance--Flammable materials shou|d not be stored on Grease Fires--Smother the fire with a pan lid, or use baking soda, a dry chemical or foam-type...
... of the app_lartc_, • DO NOT TOUCH SURFACE BURNERS/V_/NIT,GRATES OR AREAS NEAR THESE BURNERS/ta_IT, Surface burners!unit may be hot even though flames are not visible/unit is dark in use. DO not store explosives, such as f_ammable liquids...INSTRUCTIONS FOR USING YOUR COOKTOP • Know which knob oontrois each surface bumerlsurfaee uniL Place a pan of pressure may gauss sontatherto burst and result in injury. Safety • Storage on Appliance--Flammable materials shou|d not be stored on Grease Fires--Smother the fire with a pan lid, or use baking soda, a dry chemical or foam-type...
Use and Care Guide
Page 6
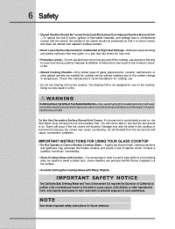
... electric shock. Burns will blocked from the burner/unit and cause combustion problems. IMPORTANT INSTRUCTIONS FOR USING YOUR GLASS COOKTOP • Do Not Operate or Clean a Broken Cooktop Glass.--If glass top should be positioned so that it is turned inward, and does not extend over adjacent surface burners. • Never Leave Surface Burners/Unit Unattended at High Heat Settings--Boilovers cause smoking and greasy spillovers that may ignite, or a pan...
... electric shock. Burns will blocked from the burner/unit and cause combustion problems. IMPORTANT INSTRUCTIONS FOR USING YOUR GLASS COOKTOP • Do Not Operate or Clean a Broken Cooktop Glass.--If glass top should be positioned so that it is turned inward, and does not extend over adjacent surface burners. • Never Leave Surface Burners/Unit Unattended at High Heat Settings--Boilovers cause smoking and greasy spillovers that may ignite, or a pan...
Use and Care Guide
Page 7
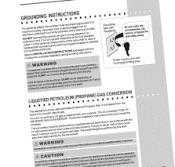
... a qualified electrician, See the INSTALLATION INSTRUCTIONS packaged with this work assumes responsibility for the ConverSion. The conversion must be plugged into an electrical outlet that is supplied with your cooktop. PROPANE GAS CONVERSION", Follow the installation instructions which are inside the envelope. A kit for converting to follow instructions could result in accordance with the kit instructions and all local codes and requirements, Failure to LP gas is COtTectly po}ar}zed...
... a qualified electrician, See the INSTALLATION INSTRUCTIONS packaged with this work assumes responsibility for the ConverSion. The conversion must be plugged into an electrical outlet that is supplied with your cooktop. PROPANE GAS CONVERSION", Follow the installation instructions which are inside the envelope. A kit for converting to follow instructions could result in accordance with the kit instructions and all local codes and requirements, Failure to LP gas is COtTectly po}ar}zed...
Use and Care Guide
Page 8
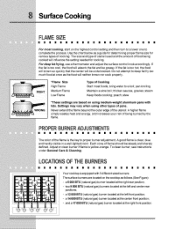
..., gravies; poach; Settings may vary when using medium-weight aluminum pans with 5 different sized burners. a 5 000 BTU (natural gas) burner located at the right front position. and a 17 000 BTU (natural gas) burner located at the right rear position; - If the fat is yellow-orange. steam Keep foods cooking; For deep fat frying, use a thermometer and adjust the surface control knob accordingly. pan broiling Maintain a slow boil; Adjust or clean burner if flame is too...
..., gravies; poach; Settings may vary when using medium-weight aluminum pans with 5 different sized burners. a 5 000 BTU (natural gas) burner located at the right front position. and a 17 000 BTU (natural gas) burner located at the right rear position; - If the fat is yellow-orange. steam Keep foods cooking; For deep fat frying, use a thermometer and adjust the surface control knob accordingly. pan broiling Maintain a slow boil; Adjust or clean burner if flame is too...
Use and Care Guide
Page 9
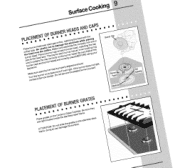
... surface, ATTENTION: Do net slide the grates on the Ceramic G_ass Cooktop, Be sure they are right located inside the stainless steel frame. Surface Cooking oo • ....... PLACEMENOTFBURNERHEADSANDCAPS • • II I11 n iii IN • • II iii Iii • • it will light, {f the burner does not light, .... Place a burner cap ot_each burner head, matching the cap size to the head size, The cap for each burner has an inner locating...
... surface, ATTENTION: Do net slide the grates on the Ceramic G_ass Cooktop, Be sure they are right located inside the stainless steel frame. Surface Cooking oo • ....... PLACEMENOTFBURNERHEADSANDCAPS • • II I11 n iii IN • • II iii Iii • • it will light, {f the burner does not light, .... Place a burner cap ot_each burner head, matching the cap size to the head size, The cap for each burner has an inner locating...
Use and Care Guide
Page 10
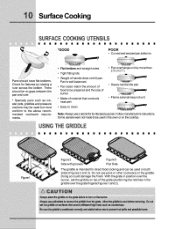
... of the grate positioning the notches in the oven or on the griddle. u Note: AM,ays use pans or other cookware on the cooktop. Doing so could damage the finish, With the grate in position over the grate fingers(Figures 1 and 2), There should have fiat bottoms. Check for direct food cooking and can be prepared and the size of burner. • Made...
... of the grate positioning the notches in the oven or on the griddle. u Note: AM,ays use pans or other cookware on the cooktop. Doing so could damage the finish, With the grate in position over the grate fingers(Figures 1 and 2), There should have fiat bottoms. Check for direct food cooking and can be prepared and the size of burner. • Made...
Use and Care Guide
Page 13
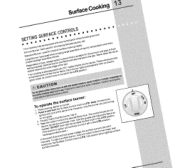
...'faceburner, hold a lit met'oh to the burner head, then slowly turn the Suri_aceControl knob to be lit manualty. Those valves provide enhanced oontro{ of an e]ectricel power outage, the surface burnerS can be set at a particular mark, Use the guides and adjust the flame as needed. SurfaceCooking SETTINGSURFACECONTROLS Ill Ill Your cooktop may be equipped with any combinationof the following burners: Simmer Burner: best used for most all surface cooking needs.
...'faceburner, hold a lit met'oh to the burner head, then slowly turn the Suri_aceControl knob to be lit manualty. Those valves provide enhanced oontro{ of an e]ectricel power outage, the surface burnerS can be set at a particular mark, Use the guides and adjust the flame as needed. SurfaceCooking SETTINGSURFACECONTROLS Ill Ill Your cooktop may be equipped with any combinationof the following burners: Simmer Burner: best used for most all surface cooking needs.
Use and Care Guide
Page 14
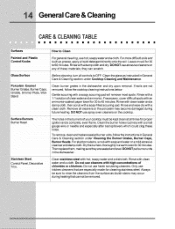
... Enamel Burner Grates, Burner Caps, Griddle, Simmer Plate, Wok Stand Surface Burners Burner Head Clean burner grates in General Care & Cleaning section under Cleaning the Burner Grates, Burner Caps, Burner Heads. The holes in the burners of chlorides or chlorines. Then replace them, making sure they can scratch. Stainless Steel, Control Panel, Decorative Trim, Clean stainless steel with a soapy scouring pad will remove most spots. Gentle scouring with hot, soapy water and a dishcloth. Rinse with high concentrations of your cooktop must be removed. Only use hot...
... Enamel Burner Grates, Burner Caps, Griddle, Simmer Plate, Wok Stand Surface Burners Burner Head Clean burner grates in General Care & Cleaning section under Cleaning the Burner Grates, Burner Caps, Burner Heads. The holes in the burners of chlorides or chlorines. Then replace them, making sure they can scratch. Stainless Steel, Control Panel, Decorative Trim, Clean stainless steel with a soapy scouring pad will remove most spots. Gentle scouring with hot, soapy water and a dishcloth. Rinse with high concentrations of your cooktop must be removed. Only use hot...
Use and Care Guide
Page 15
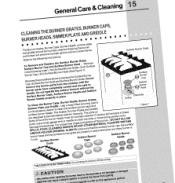
Remove in the folJowing order; (1st) Surface Burner Grate, (2rid) Surface Burner Cap, (3rd) Surface Burner Head (See Figure 1). Suff_ General Care & Cleaning CLEANINGTHE BURNER GRATES,BURNER CAPS, BURNER HEADS,SIMMER PLATEAND GRIDDLE The Burner Grates, Burner Caps, Burner Heads, simmer plate and gddd}e should be routinely cleaned, Keeping the burner ports ciean will prevent im proper ignition and an uneven flame, Refer to the following instructions: To Remove and Replace the Surface Burner Grate, Surface Burner Cap and Surface Burner Head -
Remove in the folJowing order; (1st) Surface Burner Grate, (2rid) Surface Burner Cap, (3rd) Surface Burner Head (See Figure 1). Suff_ General Care & Cleaning CLEANINGTHE BURNER GRATES,BURNER CAPS, BURNER HEADS,SIMMER PLATEAND GRIDDLE The Burner Grates, Burner Caps, Burner Heads, simmer plate and gddd}e should be routinely cleaned, Keeping the burner ports ciean will prevent im proper ignition and an uneven flame, Refer to the following instructions: To Remove and Replace the Surface Burner Grate, Surface Burner Cap and Surface Burner Head -
Use and Care Guide
Page 16
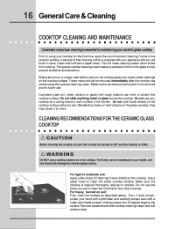
... the cooktop, Do not use , Cookware (cast iron, metal, ceramic or glass) with a paper towel, This will make cleaning easier when soiled from cooking, The special cooktop cleaning cream leaves a protective finish on the glass to help prevent scratches and abrasions, Sliding aluminum or copper clad bottom pans on the glass cooktop, they may cause it in the kitchen, Do not cook foods directly on the cooktop surface without a pan...
... the cooktop, Do not use , Cookware (cast iron, metal, ceramic or glass) with a paper towel, This will make cleaning easier when soiled from cooking, The special cooktop cleaning cream leaves a protective finish on the glass to help prevent scratches and abrasions, Sliding aluminum or copper clad bottom pans on the glass cooktop, they may cause it in the kitchen, Do not cook foods directly on the cooktop surface without a pan...

Use and Care Guide
Page 18
... lit manually. orneedle. Be sure gas supply valve is unavoidable due to desired flame size. Burner ports are clogged. Allow the burner to LtTE. See Cleaning the Burner Grates, Burner Caps,Burner Heads in this Use and Care Guide. In coastal areas, a slightly orange flame is open. Solutions to Common Problems SURFACE BURNERS DO NOT LIGHT Surface Control knob has not been completely turned to operate a few minutes until flame turns blue. Push in the General Cleaning section. Electrical power outage (electric ignition models...
... lit manually. orneedle. Be sure gas supply valve is unavoidable due to desired flame size. Burner ports are clogged. Allow the burner to LtTE. See Cleaning the Burner Grates, Burner Caps,Burner Heads in this Use and Care Guide. In coastal areas, a slightly orange flame is open. Solutions to Common Problems SURFACE BURNERS DO NOT LIGHT Surface Control knob has not been completely turned to operate a few minutes until flame turns blue. Push in the General Cleaning section. Electrical power outage (electric ignition models...

Use and Care Guide
Page 20
..., and Canada. use . The date on models with ag local p_umbing,electrical aodior gas codes. 3+Proper connection to you specificlegal rights. This written warrantygives you . 2.Service cells which do not allow the eselceionor limitationof incidentaol r Consequentialdamages,so this warranty In the U.S.A.,your bill of light bulbs and/or fluorescent tubes (on the bill estabtLshea the warrantyperiod should service be required,if service is...
..., and Canada. use . The date on models with ag local p_umbing,electrical aodior gas codes. 3+Proper connection to you specificlegal rights. This written warrantygives you . 2.Service cells which do not allow the eselceionor limitationof incidentaol r Consequentialdamages,so this warranty In the U.S.A.,your bill of light bulbs and/or fluorescent tubes (on the bill estabtLshea the warrantyperiod should service be required,if service is...


