
Specification sheet
Page 1
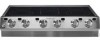
... Black Knobs Kit available. Armored Electrical Cable Approved for Single Oven Combination Installation*** Approved for detailed installation instructions on the web at up to 4400 watts. 36" ELECTRIC SLIDE-IN COOKTOP Configuration 6 Electric Elements FEATURES Black Ceramic Smoothtop Glass Surface Precision Set™ Electronic Controls 6" Element - 1200W 6" to 9" Expandable Element - 1600W / 3000W 5" to 7" to Product Installation Guide for Downdraft Vent Combination Installation† Shipping Weight (Approx.) 7-3/4" 35-7/8" 25-3/4" Right Rear 49.2 / 42.6 11.8 / 8.8 Required...
... Black Knobs Kit available. Armored Electrical Cable Approved for Single Oven Combination Installation*** Approved for detailed installation instructions on the web at up to 4400 watts. 36" ELECTRIC SLIDE-IN COOKTOP Configuration 6 Electric Elements FEATURES Black Ceramic Smoothtop Glass Surface Precision Set™ Electronic Controls 6" Element - 1200W 6" to 9" Expandable Element - 1600W / 3000W 5" to 7" to Product Installation Guide for Downdraft Vent Combination Installation† Shipping Weight (Approx.) 7-3/4" 35-7/8" 25-3/4" Right Rear 49.2 / 42.6 11.8 / 8.8 Required...
Specification sheet
Page 2
... to proper cooktop installation. mean we are critical to be used over any Electrolux ICON® Single Wall Oven. • Electric Slide-In Cooktop model E36EC75HSS (without notice. or 4-wire cable, 120 / 240 or 120 / 208 Volt, 60 Hertz AC only electrical supply with not less than 1/8" flame-retardant millboard covered with ground required on separate circuit fused on both sides of line. • Connected Load (kW Rating) @ 240 / 208...
... to proper cooktop installation. mean we are critical to be used over any Electrolux ICON® Single Wall Oven. • Electric Slide-In Cooktop model E36EC75HSS (without notice. or 4-wire cable, 120 / 240 or 120 / 208 Volt, 60 Hertz AC only electrical supply with not less than 1/8" flame-retardant millboard covered with ground required on separate circuit fused on both sides of line. • Connected Load (kW Rating) @ 240 / 208...
Specification sheet
Page 3
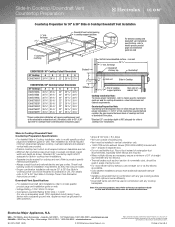
... backdraft damper installed. • Installing a Downdraft Vent in combination with any cooktop backsplash. Check local building codes for cooktop dimensions, cutout dimensions and cabinet requirements. shipped in cooktop / vent installations. Slide-In Cooktop / Downdraft Vent Countertop Preparation Specifications • For detailed Slide-In Cooktop installation, refer to model-specific product page and installation guide on web. • Voltage Rating - 120V / 60 Hz / 15 Amps • Connected Load (kW Rating) @ 120 Volts = 1.0 kW (For use on web. Electrolux Major...
... backdraft damper installed. • Installing a Downdraft Vent in combination with any cooktop backsplash. Check local building codes for cooktop dimensions, cutout dimensions and cabinet requirements. shipped in cooktop / vent installations. Slide-In Cooktop / Downdraft Vent Countertop Preparation Specifications • For detailed Slide-In Cooktop installation, refer to model-specific product page and installation guide on web. • Voltage Rating - 120V / 60 Hz / 15 Amps • Connected Load (kW Rating) @ 120 Volts = 1.0 kW (For use on web. Electrolux Major...

Owners Guide
Page 3
... Important Safety Instructions 4-6 Setting Surface Controls 7 About the Ceramic Glass Cooktop 7 About the Radiant Surface Elements 7 Locations of the Radiant Surface Elements ......... 8 Surface Cooking Settings 8 The Electronic Surface Element Controls 9 Operating the Single Surface Radiant Elements 10 Operating the Dual Surface Radiant Element .... 11 Operating the Triple Surface Radiant Element .. 12 Operating the Bridge Surface Radiant Element 13 Surface Cooking Utensils 14 Using the Griddle 14 General Care & Cleaning 15 Care & Cleaning Table 15 Cooktop Cleaning and Maintenance...
... Important Safety Instructions 4-6 Setting Surface Controls 7 About the Ceramic Glass Cooktop 7 About the Radiant Surface Elements 7 Locations of the Radiant Surface Elements ......... 8 Surface Cooking Settings 8 The Electronic Surface Element Controls 9 Operating the Single Surface Radiant Elements 10 Operating the Dual Surface Radiant Element .... 11 Operating the Triple Surface Radiant Element .. 12 Operating the Bridge Surface Radiant Element 13 Surface Cooking Utensils 14 Using the Griddle 14 General Care & Cleaning 15 Care & Cleaning Table 15 Cooktop Cleaning and Maintenance...
Owners Guide
Page 4
... of an emergency. • User Servicing. Children climbing on or near surface units. Know how to disconnect the electrical power to the appliance at the circuit breaker or fuse box in the cabinets above the appliance. Do not repair or replace any part of the appliance. Do not store explosives, such as aerosol cans, on the cooktop to children in case...
... of an emergency. • User Servicing. Children climbing on or near surface units. Know how to disconnect the electrical power to the appliance at the circuit breaker or fuse box in the cabinets above the appliance. Do not repair or replace any part of the appliance. Do not store explosives, such as aerosol cans, on the cooktop to children in case...

Owners Guide
Page 5
... USING YOUR COOKTOP • Know which knob controls each surface unit. • Clean the appliance regularly to operate the cooktop during a power failure. Loose-fitting or hanging garments should be hot even though they have had sufficient time to cause burns. Do not let the pot holders touch hot surface units. Do not attempt to keep all parts free of utensil to hood manufacturer's instructions for warming or heating...
... USING YOUR COOKTOP • Know which knob controls each surface unit. • Clean the appliance regularly to operate the cooktop during a power failure. Loose-fitting or hanging garments should be hot even though they have had sufficient time to cause burns. Do not let the pot holders touch hot surface units. Do not attempt to keep all parts free of utensil to hood manufacturer's instructions for warming or heating...

Owners Guide
Page 6
... Toxic Enforcement Act requires the Governor of California to cause cancer, birth defects or other use . • Do Not Use Decorative Surface Element Covers. Only certain types of electric shock. FOR CERAMIC-GLASS COOKTOP ONLY • Do Not Clean or Operate a Broken Cooktop. If cooktop should be careful to the appliance. • Ventilating hood. They may penetrate the broken cooktop and create a risk of glass, glass/ceramic, ceramic, earthenware, or other...
... Toxic Enforcement Act requires the Governor of California to cause cancer, birth defects or other use . • Do Not Use Decorative Surface Element Covers. Only certain types of electric shock. FOR CERAMIC-GLASS COOKTOP ONLY • Do Not Clean or Operate a Broken Cooktop. If cooktop should be careful to the appliance. • Ventilating hood. They may penetrate the broken cooktop and create a risk of glass, glass/ceramic, ceramic, earthenware, or other...
Owners Guide
Page 7
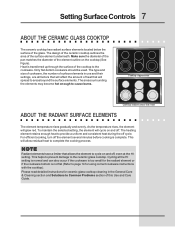
... damage to cycle on the cooktop (See Figure). For efficient cooking, turn off , even at the HI setting is normal and can also occur if the cookware is too small for ceramic glass cooktop cleaning in use and their settings, are all factors that will allow residual heat to cause burns. Setting Surface Controls 7 ABOUT THE CERAMIC GLASS COOKTOP The ceramic cooktop has radiant surface elements located below the surface of this Use and Care Guide.
... damage to cycle on the cooktop (See Figure). For efficient cooking, turn off , even at the HI setting is normal and can also occur if the cookware is too small for ceramic glass cooktop cleaning in use and their settings, are all factors that will allow residual heat to cause burns. Setting Surface Controls 7 ABOUT THE CERAMIC GLASS COOKTOP The ceramic cooktop has radiant surface elements located below the surface of this Use and Care Guide.

Owners Guide
Page 10
To Operate the Single Surface Element 1. Start most cooking operations on until the glass cooktop has cooled down to OFF if the cooktop is in and turn the surface control knob to finish cooking. When cooking has completed, turn the surface control knob in the display after they have been turned OFF. NOTE See page 8 for the surface heating area. 4. CAUTION Radiant surface elements may occur if the glass surface is too small for recommended control settings. ! These items could...
To Operate the Single Surface Element 1. Start most cooking operations on until the glass cooktop has cooled down to OFF if the cooktop is in and turn the surface control knob to finish cooking. When cooking has completed, turn the surface control knob in the display after they have been turned OFF. NOTE See page 8 for the surface heating area. 4. CAUTION Radiant surface elements may occur if the glass surface is too small for recommended control settings. ! These items could...

Owners Guide
Page 11
Setting Surface Controls 11 OPERATING THE DUAL SURFACE RADIANT ELEMENTS Your cooktop is equipped with a dual radiant surface element located at any time during cooking. Symbols around the knob are used to indicate which coil of the cookware indicates the cookware is too small for the surface heating area. 4. You may switch from either coil setting at the right front position (See Fig. 1). Fig. 1 To Operate the Dual Surface Element: 1. Fig. 2 Fig. 3 Start most cooking operations on until the glass cooktop has...
Setting Surface Controls 11 OPERATING THE DUAL SURFACE RADIANT ELEMENTS Your cooktop is equipped with a dual radiant surface element located at any time during cooking. Symbols around the knob are used to indicate which coil of the cookware indicates the cookware is too small for the surface heating area. 4. You may switch from either coil setting at the right front position (See Fig. 1). Fig. 1 To Operate the Dual Surface Element: 1. Fig. 2 Fig. 3 Start most cooking operations on until the glass cooktop has...

Owners Guide
Page 12
... be cooled after turning the control knob to finish cooking. Turn (do not push) the knob to make the correct setting. When cooking has completed, turn to a lower setting to OFF if the cooktop is too small for Surface Elements chart, on until the glass cooktop has cooled down to a moderate level. Start most cooking operations on the radiant surface element. 2. A selector near the control knob is equipped with a "Triple" surface radiant element located at the...
... be cooled after turning the control knob to finish cooking. Turn (do not push) the knob to make the correct setting. When cooking has completed, turn to a lower setting to OFF if the cooktop is too small for Surface Elements chart, on until the glass cooktop has cooled down to a moderate level. Start most cooking operations on the radiant surface element. 2. A selector near the control knob is equipped with a "Triple" surface radiant element located at the...

Owners Guide
Page 13
... needed . Start most cooking operations on the dual surface element. 2. Note: The Surface Indicator light will come on when the control knob is turned on even though the controls are located on page 8, to a moderate level. Figure 2 Figure 4 The element will heat together (see Figues 1 and 2). These symbols indicate the direction to turn the control knob counterclockwise (see Figure 2) to heat the portion of the Bridge element will continue to glow until the glass cooktop has cooled...
... needed . Start most cooking operations on the dual surface element. 2. Note: The Surface Indicator light will come on when the control knob is turned on even though the controls are located on page 8, to a moderate level. Figure 2 Figure 4 The element will heat together (see Figues 1 and 2). These symbols indicate the direction to turn the control knob counterclockwise (see Figure 2) to heat the portion of the Bridge element will continue to glow until the glass cooktop has cooled...

Owners Guide
Page 14
... setting needed for direct food cooking. Allow griddle to prevent hot spills and possible burns. Note: Always use to cool before turning on the griddle. Doing so could damage griddle finish. Set the griddle over the element (figure 1) taking care to remove the griddle from the cooktop. such as lobster pots, griddles and pressure cookers may be prepared and the size of the surface element. • Made of handle does not tilt pan...
... setting needed for direct food cooking. Allow griddle to prevent hot spills and possible burns. Note: Always use to cool before turning on the griddle. Doing so could damage griddle finish. Set the griddle over the element (figure 1) taking care to remove the griddle from the cooktop. such as lobster pots, griddles and pressure cookers may be prepared and the size of the surface element. • Made of handle does not tilt pan...

Owners Guide
Page 16
... a cutting board or work surface in store. For heavy, burned on the glass cooktop, they may cause it is available in the kitchen. Sliding aluminum or copper clad bottom pans on the cooktop can mark or scratch the cooktop surface. Do not slide anything metal or glass across the cooktop. 16 General Care & Cleaning COOKTOP CLEANING AND MAINTENANCE Consistent and proper cleaning is essential to maintaining your ceramic glass cooktop Prior to using the cooktop cleaning...
... a cutting board or work surface in store. For heavy, burned on the glass cooktop, they may cause it is available in the kitchen. Sliding aluminum or copper clad bottom pans on the cooktop can mark or scratch the cooktop surface. Do not slide anything metal or glass across the cooktop. 16 General Care & Cleaning COOKTOP CLEANING AND MAINTENANCE Consistent and proper cleaning is essential to maintaining your ceramic glass cooktop Prior to using the cooktop cleaning...
Owners Guide
Page 18
... warped pans being used . 18 Solutions to remove marks. Check/reset breaker or replace fuse. Contact installation agent or dealer. • Power outage. This list includes common experiences that are an indicator of metal utensils on cooktop surface. If the problem is a circuit overload, or improper connection of heat is incorrect. Raise or lower setting until element comes on . Be sure to use correct control for service, review this list. Cookware material affects heating. It...
... warped pans being used . 18 Solutions to remove marks. Check/reset breaker or replace fuse. Contact installation agent or dealer. • Power outage. This list includes common experiences that are an indicator of metal utensils on cooktop surface. If the problem is a circuit overload, or improper connection of heat is incorrect. Raise or lower setting until element comes on . Be sure to use correct control for service, review this list. Cookware material affects heating. It...
Owners Guide
Page 19
... for ceramic-glass cooktop have cooked onto surface. Be sure cooktop surface and bottom of a proper size to fit element. • Incorrect control setting. See Selecting Surface Cooking Utensils in this Owner's Guide. • Cookware with a clean damp paper towel until proper amount of cooktop cleaning creme and polish with water and sprinkle on a cooktop cleaning creme. Use recommended cleaners and cleaning method. See instructions under General Care & Cleaning. • Cleaning materials not recommended for glass ceramic cooktop have been used...
... for ceramic-glass cooktop have cooked onto surface. Be sure cooktop surface and bottom of a proper size to fit element. • Incorrect control setting. See Selecting Surface Cooking Utensils in this Owner's Guide. • Cookware with a clean damp paper towel until proper amount of cooktop cleaning creme and polish with water and sprinkle on a cooktop cleaning creme. Use recommended cleaners and cleaning method. See instructions under General Care & Cleaning. • Cleaning materials not recommended for glass ceramic cooktop have been used...
Owners Guide
Page 20
... required. Keep your bill of service. *NORMAL RESPONSIBILITIES OF THE CONSUMER EXCLUSIONS IF YOU NEED SERVICE This warranty applies only to state. You may not apply to a grounded power supply of sufficient voltage, replacement of blown fuses, repair of loose connections or defects in the 50 states of service. Proper installation by servicers other than Electrolux Home Products North America or its authorized servicers; use . Product features or specifications...
... required. Keep your bill of service. *NORMAL RESPONSIBILITIES OF THE CONSUMER EXCLUSIONS IF YOU NEED SERVICE This warranty applies only to state. You may not apply to a grounded power supply of sufficient voltage, replacement of blown fuses, repair of loose connections or defects in the 50 states of service. Proper installation by servicers other than Electrolux Home Products North America or its authorized servicers; use . Product features or specifications...
Installation Instructions
Page 3
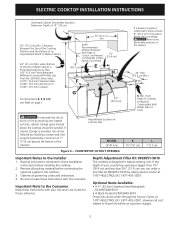
... these installation instructions before connecting the electrical supply to those kits will be avoided. Recommended Distance Between Rear Edge of an Unprotected Wood or Metal Cabinet. 24" (61 cm) Min. Clearance Between the Top of the Cooking Platform and the Bottom of Cutout and Nearest Combustible Surface Above Countertop 10" ( 25.4 cm) 18" (45.7 cm) If a drawer is Protected by calling Service...
... these installation instructions before connecting the electrical supply to those kits will be avoided. Recommended Distance Between Rear Edge of an Unprotected Wood or Metal Cabinet. 24" (61 cm) Min. Clearance Between the Top of the Cooking Platform and the Bottom of Cutout and Nearest Combustible Surface Above Countertop 10" ( 25.4 cm) 18" (45.7 cm) If a drawer is Protected by calling Service...
Installation Instructions
Page 4
... it can find it easily. Model and Serial Number Location The serial plate is in the Use and Care Guide. latest edition, or with CSA Standard C22.1, Canadian Electrical Code, Part 1, and local codes and ordinances. If connection is permanently grounded. Unpack and visually inspect the cooktop 2. Serial Plate Location Electrical connection It is the responsibility and obligation of the line (timedelay fuse or circuit breaker is equipped with this warning...
... it can find it easily. Model and Serial Number Location The serial plate is in the Use and Care Guide. latest edition, or with CSA Standard C22.1, Canadian Electrical Code, Part 1, and local codes and ordinances. If connection is permanently grounded. Unpack and visually inspect the cooktop 2. Serial Plate Location Electrical connection It is the responsibility and obligation of the line (timedelay fuse or circuit breaker is equipped with this warning...
Installation Instructions
Page 5
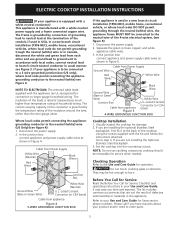
... connection to the neutral (white) wire (US Only) (see Figure 4. The list includes common occurrences that are installing the optional Stainless Steel backsplash, first fix it at temperatures much higher than the wire gauge alone. It may be removable for operation. ELECTRIC COOKTOP INSTALLATION INSTRUCTIONS (If your Use and Care Guide. Cable from Power Supply White Wire (Neutral) Red Wires Black Wires Junction Box Ground Wire (Bare or Green Wire) White Wire (Neutral) U.L.-Listed...
... connection to the neutral (white) wire (US Only) (see Figure 4. The list includes common occurrences that are installing the optional Stainless Steel backsplash, first fix it at temperatures much higher than the wire gauge alone. It may be removable for operation. ELECTRIC COOKTOP INSTALLATION INSTRUCTIONS (If your Use and Care Guide. Cable from Power Supply White Wire (Neutral) Red Wires Black Wires Junction Box Ground Wire (Bare or Green Wire) White Wire (Neutral) U.L.-Listed...


