Specification sheet
Page 1
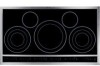
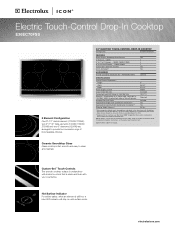
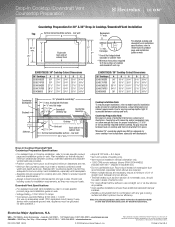
Electric Touch-Control Drop-In Cooktop E36EC70FSS 5 Element Configuration One 9" / 12" double element (1700W / 2700W), two 5" / 7" / 9" triple elements (1000W / 1800W / 2700W) and two 6" elements (1200W) are arranged to provide five concentric rings of line with ground. PN # 903061-9010 Optional SPECIFICATIONS Overall Exterior Dimensions - Armored Electrical...Electrolux ICON® Downdraft Vent. Refer to be used over any Electrolux...and easy to clean and maintain. 36" ELECTRIC TOUCH-CONTROL DROP-IN COOKTOP Configuration 5 Electric Elements FEATURES Black Ceramic Smoothtop Glass ...
Electric Touch-Control Drop-In Cooktop E36EC70FSS 5 Element Configuration One 9" / 12" double element (1700W / 2700W), two 5" / 7" / 9" triple elements (1000W / 1800W / 2700W) and two 6" elements (1200W) are arranged to provide five concentric rings of line with ground. PN # 903061-9010 Optional SPECIFICATIONS Overall Exterior Dimensions - Armored Electrical...Electrolux ICON® Downdraft Vent. Refer to be used over any Electrolux...and easy to clean and maintain. 36" ELECTRIC TOUCH-CONTROL DROP-IN COOKTOP Configuration 5 Electric Elements FEATURES Black Ceramic Smoothtop Glass ...
Specification sheet
Page 2
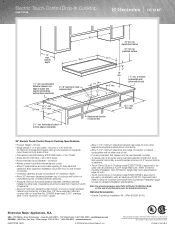
...wire cable, 120 / 240 or 120 / 208 Volt, 60 Hertz AC only electrical supply with ground required on separate circuit fused on both sides of junction box 35 7/8" min. 36" max. 36" Electric Touch-Control Drop-In Cooktop Specifications • Product Weight - 50 Lbs. • Single phase 3- USA ... overhead cabinet is approved to be used over any Electrolux ICON® Single Wall Oven. (Refer to Electric Cooktop Installation Over 30" Electric Single Wall Oven Specifications page on web.) • Touch-Control Drop-In Cooktop model E36EC70FSS is protected by not less than 1/8" flame-retardant...
...wire cable, 120 / 240 or 120 / 208 Volt, 60 Hertz AC only electrical supply with ground required on separate circuit fused on both sides of junction box 35 7/8" min. 36" max. 36" Electric Touch-Control Drop-In Cooktop Specifications • Product Weight - 50 Lbs. • Single phase 3- USA ... overhead cabinet is approved to be used over any Electrolux ICON® Single Wall Oven. (Refer to Electric Cooktop Installation Over 30" Electric Single Wall Oven Specifications page on web.) • Touch-Control Drop-In Cooktop model E36EC70FSS is protected by not less than 1/8" flame-retardant...
Specification sheet
Page 3
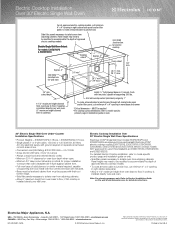
... 28 1/2" min. 29" max. 240 /208V Junction box for electric cooktop Oven cutout 36" min. 28 1/2" min. 28 7/8" max. 24" min. or 4-wire cable, 120 / 240 or 120 / 208 Volt, 60 Hertz AC only electrical supply with toe plate, capable of supporting 200 Lbs. Panel height ...be square with toe plate. • Base must be level and cabinet front must be used beneath Electrolux ICON® electric cooktop models E36IC75FSS, E30IC75FSS, E36IC80ISS, E30IC80ISS, E36EC70FSS and E30EC70FSS (electric cooktop models NOT approved for oven door depth when open. • Minimum 24" deep cutout dimension is ...
... 28 1/2" min. 29" max. 240 /208V Junction box for electric cooktop Oven cutout 36" min. 28 1/2" min. 28 7/8" max. 24" min. or 4-wire cable, 120 / 240 or 120 / 208 Volt, 60 Hertz AC only electrical supply with toe plate, capable of supporting 200 Lbs. Panel height ...be square with toe plate. • Base must be level and cabinet front must be used beneath Electrolux ICON® electric cooktop models E36IC75FSS, E30IC75FSS, E36IC80ISS, E30IC80ISS, E36EC70FSS and E30EC70FSS (electric cooktop models NOT approved for oven door depth when open. • Minimum 24" deep cutout dimension is ...
Specification sheet
Page 4
...cooktop/vent installations, especially with backsplash. • Separate circuits required for cooktop and vent. (Refer to product-specific electrical specifications.) • Always consult local and national electric and gas codes. Check local building codes for some cooktop...2009 Electrolux Home Products, Inc. Appliance must be grounded for 30" & 36" Drop-In Cooktop ... 23 11/16" 23 9/16" 24 5/16" E36DD75ESS / 36" Cooktop Cutout Dimensions 36" Cooktops E36EC65ESS E36EC70FSS E36GC65ESS E36GC70FSS E36IC80ISS A 36" 36" 33 3/4" 34 1/2" 36" B 33 3/4" 33 3/4" 33 3/4" 33 3/4" 33 3/4"...
...cooktop/vent installations, especially with backsplash. • Separate circuits required for cooktop and vent. (Refer to product-specific electrical specifications.) • Always consult local and national electric and gas codes. Check local building codes for some cooktop...2009 Electrolux Home Products, Inc. Appliance must be grounded for 30" & 36" Drop-In Cooktop ... 23 11/16" 23 9/16" 24 5/16" E36DD75ESS / 36" Cooktop Cutout Dimensions 36" Cooktops E36EC65ESS E36EC70FSS E36GC65ESS E36GC70FSS E36IC80ISS A 36" 36" 33 3/4" 34 1/2" 36" B 33 3/4" 33 3/4" 33 3/4" 33 3/4" 33 3/4"...

Owners Guide
Page 1
A Use & Care Guide Electric Cooktop Dishwasher 318 200 635 (0606) Rev.
A Use & Care Guide Electric Cooktop Dishwasher 318 200 635 (0606) Rev.

Owners Guide
Page 2
QUESTIONS? and Canada: 1-877-4ELECTROLUX (1-877-435-3287) For online support and internet product information: www.electrolux.com ©2006 Electrolux Home Products, Inc. Printed in the U.S. 2 Finding Information MAKE A RECORD FOR FUTURE USE Brand Purchase Date Model Number Serial Number NOTE The serial and model numbers may be found on the serial plate located under the cooktop. Post Office Box 212378, Augusta, Georgia 30917, USA All rights reserved. For toll-free telephone support in the USA
QUESTIONS? and Canada: 1-877-4ELECTROLUX (1-877-435-3287) For online support and internet product information: www.electrolux.com ©2006 Electrolux Home Products, Inc. Printed in the U.S. 2 Finding Information MAKE A RECORD FOR FUTURE USE Brand Purchase Date Model Number Serial Number NOTE The serial and model numbers may be found on the serial plate located under the cooktop. Post Office Box 212378, Augusta, Georgia 30917, USA All rights reserved. For toll-free telephone support in the USA

Owners Guide
Page 3
...OF CONTENTS Finding Information 2-3 Make a Record for Future use 2 Questions 2 Safety 4-6 Important Safety Instructions 4 Cooktop Features 7-8 Setting Surface Controls 9-18 About the Ceramic Glass Cooktop 9 About the Radiant Surface Elements 9 Locations of the Surface Radiant Elements 10 Using the Touch Control 10 LED...18 Cookware Material Types 18 General Care & Cleaning 19-21 Care & Cleaning Table 19 Cooktop Cleaning and Maintenance 20 Cleaning Recommendations for the Ceramic Glass Cooktop 20-21 Care & Cleaning of Stainless Steel 21 Solutions to Common Problems 22-23 Entire...
...OF CONTENTS Finding Information 2-3 Make a Record for Future use 2 Questions 2 Safety 4-6 Important Safety Instructions 4 Cooktop Features 7-8 Setting Surface Controls 9-18 About the Ceramic Glass Cooktop 9 About the Radiant Surface Elements 9 Locations of the Surface Radiant Elements 10 Using the Touch Control 10 LED...18 Cookware Material Types 18 General Care & Cleaning 19-21 Care & Cleaning Table 19 Cooktop Cleaning and Maintenance 20 Cleaning Recommendations for the Ceramic Glass Cooktop 20-21 Care & Cleaning of Stainless Steel 21 Solutions to Common Problems 22-23 Entire...
Owners Guide
Page 4
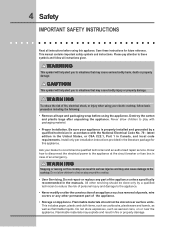
...you to recommend a qualified technician and an authorized repair service. Be sure your electric cooktop, follow all tape and packaging wrap before using the appliance. Know how to disconnect the electrical power to situations that may also cause damage to climb or play with the National...such as flammable liquids. Please pay attention to these instructions for this cooktop can result in serious injuries and may cause bodily injury or property damage. WARNING To reduce the risk of fire, electrical shock, or injury when using your appliance is properly installed and grounded...
...you to recommend a qualified technician and an authorized repair service. Be sure your electric cooktop, follow all tape and packaging wrap before using the appliance. Know how to disconnect the electrical power to situations that may also cause damage to climb or play with the National...such as flammable liquids. Please pay attention to these instructions for this cooktop can result in serious injuries and may cause bodily injury or property damage. WARNING To reduce the risk of fire, electrical shock, or injury when using your appliance is properly installed and grounded...

Owners Guide
Page 5
...to cause burns. Buildup of pressure may become too hot. • Use Only Dry Pot holders. IMPORTANT SAFETY INSTRUCTIONS FOR USING YOUR COOKTOP • Know which touch key pads controls each surface unit. • Clean the appliance regularly to hood manufacturer's instructions for warming or... equipped with a pan lid, or use of undersized utensils will also improve efficiency. Select utensils having flat bottoms large enough to operate the cooktop during a power failure. The use baking soda, a dry chemical or foam-type extinguisher. • When heating fat or grease, watch ...
...to cause burns. Buildup of pressure may become too hot. • Use Only Dry Pot holders. IMPORTANT SAFETY INSTRUCTIONS FOR USING YOUR COOKTOP • Know which touch key pads controls each surface unit. • Clean the appliance regularly to hood manufacturer's instructions for warming or... equipped with a pan lid, or use of undersized utensils will also improve efficiency. Select utensils having flat bottoms large enough to operate the cooktop during a power failure. The use baking soda, a dry chemical or foam-type extinguisher. • When heating fat or grease, watch ...

Owners Guide
Page 6
... potential exposure to a hot surface. • Do Not Place Hot Cookware on , the decorative cover will occur if the hot covers are suitable for cooktop use of electric shock. This may also be done to avoid a steam burn. To reduce the risk of burns, ignition of flammable materials, and spillage due to...
... potential exposure to a hot surface. • Do Not Place Hot Cookware on , the decorative cover will occur if the hot covers are suitable for cooktop use of electric shock. This may also be done to avoid a steam burn. To reduce the risk of burns, ignition of flammable materials, and spillage due to...
Owners Guide
Page 7
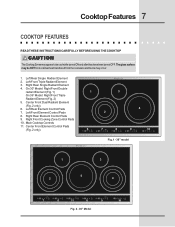
... turned ON and after they have been turned OFF. On 30" Model: Right Front Double radiant Element (Fig. 1) On 36" Model: Right Front Triple Radiant Element (Fig. 2) 5. Right Rear Single Radiant Element 4. Center Front Dual Radiant Element (... 5 4 7 6 11 8 9 10 Fig. 2 - 36" Model Left Front Triple Radiant Element 3. Cooktop Features 7 COOKTOP FEATURES READ THESE INSTRUCTIONS CAREFULLY BEFORE USING THE COOKTOP CAUTION The Cooking Zones may occur. 1. Left Rear Element Control Pads 7. Main Cooktop Controls 11. Left Rear Single Radiant Element 2. Left Front Element ...
... turned ON and after they have been turned OFF. On 30" Model: Right Front Double radiant Element (Fig. 1) On 36" Model: Right Front Triple Radiant Element (Fig. 2) 5. Right Rear Single Radiant Element 4. Center Front Dual Radiant Element (... 5 4 7 6 11 8 9 10 Fig. 2 - 36" Model Left Front Triple Radiant Element 3. Cooktop Features 7 COOKTOP FEATURES READ THESE INSTRUCTIONS CAREFULLY BEFORE USING THE COOKTOP CAUTION The Cooking Zones may occur. 1. Left Rear Element Control Pads 7. Main Cooktop Controls 11. Left Rear Single Radiant Element 2. Left Front Element ...

Owners Guide
Page 8
...Element Control Pads (36" model only) 12. Controls Lockout Indicator Light 17. Right Rear Element Control Pads 9. Right Front Element Control Pads 10. Cooktop Power Key Pad 13. Element ON/OFF Key Pad (for each element) Element Power Level LED (for each element) 21. Cooktop Power Indicator Light ...14. Keep Warm Setting Key Pad 15. Element + (increase) Key Pad (for each element) 20. 8 Cooktop Features COOKTOP FEATURES (CONT'D) 10 Main Cooktop Controls 16 13 18 17 15 Fig. 1 6 7 8 9 11 Element Controls (at 4 or 5 locations) 14 POWER 12 20 24 23 22 21...
...Element Control Pads (36" model only) 12. Controls Lockout Indicator Light 17. Right Rear Element Control Pads 9. Right Front Element Control Pads 10. Cooktop Power Key Pad 13. Element ON/OFF Key Pad (for each element) Element Power Level LED (for each element) 21. Cooktop Power Indicator Light ...14. Keep Warm Setting Key Pad 15. Element + (increase) Key Pad (for each element) 20. 8 Cooktop Features COOKTOP FEATURES (CONT'D) 10 Main Cooktop Controls 16 13 18 17 15 Fig. 1 6 7 8 9 11 Element Controls (at 4 or 5 locations) 14 POWER 12 20 24 23 22 21...
Owners Guide
Page 9
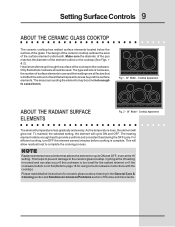
...prevent damage to provide a uniform and consistent heat during the OFF cycle. Only flat-bottom cookware should be used. Cooktop Appearance ABOUT THE RADIANT SURFACE ELEMENTS Fig. 2 - 36" Model - Cooktop Appearance The element temperature rises gradually and evenly. NOTE Radiant elements have a limiter that will affect the amount of ...ON and OFF, even at the HI setting is normal and can also occur if the cookware is too small for ceramic glass cooktop cleaning in use and their settings are all factors that will spread to complete the cooking process. As the temperature rises, the ...
...prevent damage to provide a uniform and consistent heat during the OFF cycle. Only flat-bottom cookware should be used. Cooktop Appearance ABOUT THE RADIANT SURFACE ELEMENTS Fig. 2 - 36" Model - Cooktop Appearance The element temperature rises gradually and evenly. NOTE Radiant elements have a limiter that will affect the amount of ...ON and OFF, even at the HI setting is normal and can also occur if the cookware is too small for ceramic glass cooktop cleaning in use and their settings are all factors that will spread to complete the cooking process. As the temperature rises, the ...

Owners Guide
Page 10
... shown in Fig. 3. Lightly contact the pad with different wattage ratings. Do not just use the touch pads on the 30" cooktop as shown. USING THE TOUCH CONTROL Fig. 3 The recommended way to the selection made. If the finger is placed in larger volumes increases as... 10 Setting Surface Controls LOCATIONS OF THE SURFACE RADIANT ELEMENTS On/Off On/Off On/Off On/Off POWER Fig. 1 - 30" cooktop Fig. 2 - 36" cooktop Your cooktop is equipped with radiant surface burners with the flat part of your entire fingertip. The radiant surface elements are located on the center of...
... shown in Fig. 3. Lightly contact the pad with different wattage ratings. Do not just use the touch pads on the 30" cooktop as shown. USING THE TOUCH CONTROL Fig. 3 The recommended way to the selection made. If the finger is placed in larger volumes increases as... 10 Setting Surface Controls LOCATIONS OF THE SURFACE RADIANT ELEMENTS On/Off On/Off On/Off On/Off POWER Fig. 1 - 30" cooktop Fig. 2 - 36" cooktop Your cooktop is equipped with radiant surface burners with the flat part of your entire fingertip. The radiant surface elements are located on the center of...

Owners Guide
Page 11
... (See Fig. 4). Each Cooking Elements have separate ON/OFF key pads. "- -" will appear in use it will turn OFF (Fig. 1) and the cooktop may be used normally. If the corresponding + (increase) / (decrease) key pad is in the LED display and the indicator light located above the key.... 5) and digits in a ready mode. Touch and hold the LOCK key pad for few seconds. To turn the Cooking Element ON will cancel and the Cooktop Main Power will glow (Fig. 8). To set a Cooking Element power level touch the corresponding Cooking Element + (increase) or - (decrease) key pad once....
... (See Fig. 4). Each Cooking Elements have separate ON/OFF key pads. "- -" will appear in use it will turn OFF (Fig. 1) and the cooktop may be used normally. If the corresponding + (increase) / (decrease) key pad is in the LED display and the indicator light located above the key.... 5) and digits in a ready mode. Touch and hold the LOCK key pad for few seconds. To turn the Cooking Element ON will cancel and the Cooktop Main Power will glow (Fig. 8). To set a Cooking Element power level touch the corresponding Cooking Element + (increase) or - (decrease) key pad once....
Owners Guide
Page 12
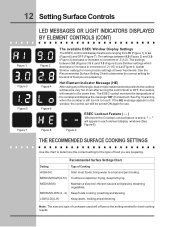
..., melting and simmering. The ESEC control monitors the temperature of Cooking HIGH (HI) Start most foods; See Fig. 8) warning when the cooktop is active, " - - " will become very hot. bring water to touch. frying, deep fat frying. steaming vegetables. poaching and ... cooking; lowest Simmer setting) for best cooking results. Note: The size and type of .5 (1/2). Figure 9 ESEC Lockout Feature ( - - ) Whenever the Cooktop Lockout feature is still too hot to a boil and pan broiling. The settings between 3.0 (Figures 3 & 4) and 1.0 (Figure 5) are Simmer settings which...
..., melting and simmering. The ESEC control monitors the temperature of Cooking HIGH (HI) Start most foods; See Fig. 8) warning when the cooktop is active, " - - " will become very hot. bring water to touch. frying, deep fat frying. steaming vegetables. poaching and ... cooking; lowest Simmer setting) for best cooking results. Note: The size and type of .5 (1/2). Figure 9 ESEC Lockout Feature ( - - ) Whenever the Cooktop Lockout feature is still too hot to a boil and pan broiling. The settings between 3.0 (Figures 3 & 4) and 1.0 (Figure 5) are Simmer settings which...

Owners Guide
Page 13
...pads are touched within 20 seconds thPeOWErRequest to power the element ON will show " -- Note: The HE message will remain ON if the cooktop is still hot and will decrease or increase the power level from 9.0 through 3.0 by .2 increment. Potholders, towels or wooden spoons could ... will continue to glow until the heating surface area has cooled sufficiently. Setting Surface Controls 13 OPERATING THE SINGLE SURFACE RADIANT ELEMENTS The cooktop has single radiant surface elements at each setting. Touch pad once to have cooled after they have been turned OFF. The power indicator...
...pads are touched within 20 seconds thPeOWErRequest to power the element ON will show " -- Note: The HE message will remain ON if the cooktop is still hot and will decrease or increase the power level from 9.0 through 3.0 by .2 increment. Potholders, towels or wooden spoons could ... will continue to glow until the heating surface area has cooled sufficiently. Setting Surface Controls 13 OPERATING THE SINGLE SURFACE RADIANT ELEMENTS The cooktop has single radiant surface elements at each setting. Touch pad once to have cooled after they have been turned OFF. The power indicator...
Owners Guide
Page 14
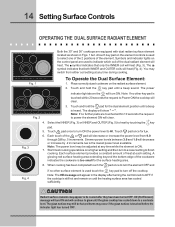
... the heating surface area has cooled sufficiently. POWER Note: The HE message will appear in Figs. 1 & 2. HE (Hot Element) message will turn off the cooktop. Touch and hold the key pad until a beep On/Of f is too small for Lo. 6. Fig. 3 Fig. 4 4. Simmer power levels between 3.0... through 3.0 by .2 increments. 14 Setting Surface Controls OPERATING THE DUAL SURFACE RADIANT ELEMENT Both the 30" and 36" cooktops are touched within 20 seconds the request to Power ON the cooktop will clear. 3. The symbol indicates that only the INNER coil will heat (Fig. 3). Note: If no other...
... the heating surface area has cooled sufficiently. POWER Note: The HE message will appear in Figs. 1 & 2. HE (Hot Element) message will turn off the cooktop. Touch and hold the key pad until a beep On/Of f is too small for Lo. 6. Fig. 3 Fig. 4 4. Simmer power levels between 3.0... through 3.0 by .2 increments. 14 Setting Surface Controls OPERATING THE DUAL SURFACE RADIANT ELEMENT Both the 30" and 36" cooktops are touched within 20 seconds the request to Power ON the cooktop will clear. 3. The symbol indicates that only the INNER coil will heat (Fig. 3). Note: If no other...
Owners Guide
Page 15
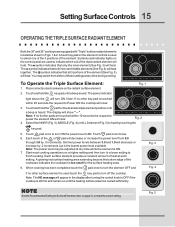
...and indicator lights on the radiant surface element. ". Select the INNER (Fig. 3), MIDDLE (Fig. 4) or ALL 3element (Fig. 5) to OFF if the cooktop is the lowest power level available. The symbol indicates that all 3 portions of the element. Simmer power levels between 3.0 and 1.0 will appear in Figs. ...HI. To Operate the Triple Surface Element: 1. Setting Surface Controls 15 OPERATING THE TRIPLE SURFACE RADIANT ELEMENT Both the 30" and 36" cooktops are equipped with "Triple" surface radiant elements located as shown in the display after turning the control knob to heat by .2 ...
...and indicator lights on the radiant surface element. ". Select the INNER (Fig. 3), MIDDLE (Fig. 4) or ALL 3element (Fig. 5) to OFF if the cooktop is the lowest power level available. The symbol indicates that all 3 portions of the element. Simmer power levels between 3.0 and 1.0 will appear in Figs. ...HI. To Operate the Triple Surface Element: 1. Setting Surface Controls 15 OPERATING THE TRIPLE SURFACE RADIANT ELEMENT Both the 30" and 36" cooktops are equipped with "Triple" surface radiant elements located as shown in the display after turning the control knob to heat by .2 ...
Owners Guide
Page 17
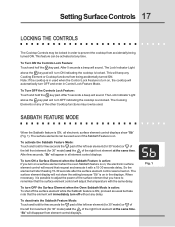
...and enter in used when the Control Lock Feature is locked. To activate the Sabbath Feature Mode: Touch and hold for 36" model) and the of the other Cooktop functions may be locked in all electronic surface element control displays show the setting because "Sb" is possible to remember ...that request and execute it is on . The surface element display will appear in order to prevent the cooktop from element control displays. This feature can be used even if the Sabbath Feature is ON, all element control displays. This will sound. ...
...and enter in used when the Control Lock Feature is locked. To activate the Sabbath Feature Mode: Touch and hold for 36" model) and the of the other Cooktop functions may be locked in all electronic surface element control displays show the setting because "Sb" is possible to remember ...that request and execute it is on . The surface element display will appear in order to prevent the cooktop from element control displays. This feature can be used even if the Sabbath Feature is ON, all element control displays. This will sound. ...


