
Use and Care Manual
Page 2
...Electrolux, the new premium brand in a safe place for future reference. This information will need to record key product information. These numbers are located just below the control panel on the front of this page for future reference. We view your unit. Should any problems occur, refer to install...the service life of a relationship. To ensure our ability to continue serving you, please use this page to know your unit installed, we suggest you quickly identify a problem and get it remedied. You can find this manual in home appliances. 2 Finding ...
...Electrolux, the new premium brand in a safe place for future reference. This information will need to record key product information. These numbers are located just below the control panel on the front of this page for future reference. We view your unit. Should any problems occur, refer to install...the service life of a relationship. To ensure our ability to continue serving you, please use this page to know your unit installed, we suggest you quickly identify a problem and get it remedied. You can find this manual in home appliances. 2 Finding ...
Use and Care Manual
Page 3
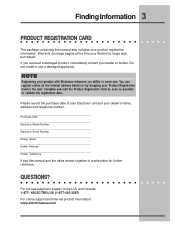
... Keep this manual also includes your product with Electrolux enhances our ability to validate the registration date. QUESTIONS? NOTE Registering your product registration information. and Canada: 1-877- 4ELECTROLUX (1-877-435-3287) For online support and Internet product information: www.electroluxusa.com Do not install or use a damaged appliance. Warranty coverage begins at...
... Keep this manual also includes your product with Electrolux enhances our ability to validate the registration date. QUESTIONS? NOTE Registering your product registration information. and Canada: 1-877- 4ELECTROLUX (1-877-435-3287) For online support and Internet product information: www.electroluxusa.com Do not install or use a damaged appliance. Warranty coverage begins at...
Use and Care Manual
Page 5
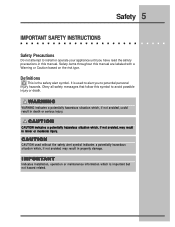
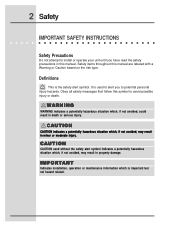
...WARNING WARNING indicates a potentially hazardous situation which is the safety alert symbol. I M P O R TA N T Indicates installation, operation or maintenance information which , if not avoided, could result in minor or moderate injury. Definitions This is important but... not hazard related. Obey all safety messages that follow this manual. Safety 5 IMPORTANT SAFETY INSTRUCTIONS Safety Precautions Do not attempt to install or operate your appliance until you to potential personal injury hazards. It is used without the safety alert symbol indicates a potentially hazardous situation...
...WARNING WARNING indicates a potentially hazardous situation which is the safety alert symbol. I M P O R TA N T Indicates installation, operation or maintenance information which , if not avoided, could result in minor or moderate injury. Definitions This is important but... not hazard related. Obey all safety messages that follow this manual. Safety 5 IMPORTANT SAFETY INSTRUCTIONS Safety Precautions Do not attempt to install or operate your appliance until you to potential personal injury hazards. It is used without the safety alert symbol indicates a potentially hazardous situation...
Use and Care Manual
Page 6
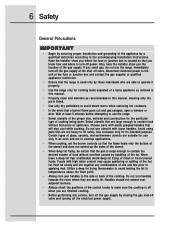
... they are able to operate it properly. • Use the range only for the particular type of cooking being done. Have the installer show you are suitable for its intended purpose. Use cookware only for use the range. If you smell gas, do not use only... types of glass, ceramic, and earthenware utensils are finished cooking. • Before performing any combinations of oils and fats prior to the accompanying Installation Instructions. Never leave a deep fat fryer unattended. Handles should not extend over adjacent burners. • Always check the positions of the control knobs...
... they are able to operate it properly. • Use the range only for the particular type of cooking being done. Have the installer show you are suitable for its intended purpose. Use cookware only for use the range. If you smell gas, do not use only... types of glass, ceramic, and earthenware utensils are finished cooking. • Before performing any combinations of oils and fats prior to the accompanying Installation Instructions. Never leave a deep fat fryer unattended. Handles should not extend over adjacent burners. • Always check the positions of the control knobs...
Use and Care Manual
Page 9
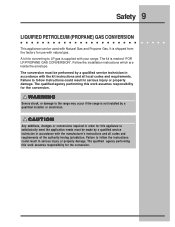
... this appliance to follow the instructions could result in serious injury or property damage. A kit for the conversion. The kit is not installed by a qualified installer or electrician. Follow the installation instructions which are inside the envelope. The qualified agency performing this work assumes responsibility for the conversion. Failure to the range may...
... this appliance to follow the instructions could result in serious injury or property damage. A kit for the conversion. The kit is not installed by a qualified installer or electrician. Follow the installation instructions which are inside the envelope. The qualified agency performing this work assumes responsibility for the conversion. Failure to the range may...
Use and Care Manual
Page 18
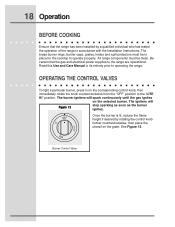
... the gas and electrical power supplies to operate properly. See Figure 12. Read this Use and Care Manual in accordance with the Installation Instructions. Burner Control Valve The brass burner rings, burner caps, grates, knobs and spill protectors must be in on the corresponding control..., then immediately rotate the knob counterclockwise from the "OFF" position to operating the range. Be certain that the range has been installed by rotating the control knob further counterclockwise, then place the utensil on the selected burner. The burner igniters will Figure 12 stop...
... the gas and electrical power supplies to operate properly. See Figure 12. Read this Use and Care Manual in accordance with the Installation Instructions. Burner Control Valve The brass burner rings, burner caps, grates, knobs and spill protectors must be in on the corresponding control..., then immediately rotate the knob counterclockwise from the "OFF" position to operating the range. Be certain that the range has been installed by rotating the control knob further counterclockwise, then place the utensil on the selected burner. The burner igniters will Figure 12 stop...

Use and Care Manual
Page 21
... oven rack glides. Always use oven mitts when using the oven. If the rack supports are not removed, the self-clean cycle won't start. To install oven rack support, align and insert the 2 rear tabs of the rack support to the rear holes in wall. Push in on the rack glides...Racks ALWAYS ARRANGE OVEN RACKS WHEN THE OVEN IS COOL (PRIOR TO OPERATING THE OVEN). Figure 15 Getting Started 21 BEFORE SETTING OVEN CONTROLS Installing and Removing Oven Rack Supports ALWAYS INSTALL OVEN RACK SUPPORT BEFORE TURNING ON THE OVEN (WHEN THE OVEN IS COOL). Lift up off the oven rack glides.
... oven rack glides. Always use oven mitts when using the oven. If the rack supports are not removed, the self-clean cycle won't start. To install oven rack support, align and insert the 2 rear tabs of the rack support to the rear holes in wall. Push in on the rack glides...Racks ALWAYS ARRANGE OVEN RACKS WHEN THE OVEN IS COOL (PRIOR TO OPERATING THE OVEN). Figure 15 Getting Started 21 BEFORE SETTING OVEN CONTROLS Installing and Removing Oven Rack Supports ALWAYS INSTALL OVEN RACK SUPPORT BEFORE TURNING ON THE OVEN (WHEN THE OVEN IS COOL). Lift up off the oven rack glides.
Use and Care Manual
Page 27
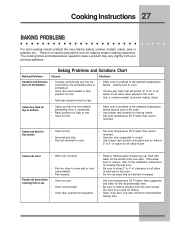
... temperature 25°F lower than recommended. • Use pan size suggested and bake for roasting meats or baking casseroles. There is uneven, refer to the installation instructions for baking. • Open oven door only after shortest recommended baking time. If the water level is no need to oven wall or rack...
... temperature 25°F lower than recommended. • Use pan size suggested and bake for roasting meats or baking casseroles. There is uneven, refer to the installation instructions for baking. • Open oven door only after shortest recommended baking time. If the water level is no need to oven wall or rack...
Use and Care Manual
Page 42
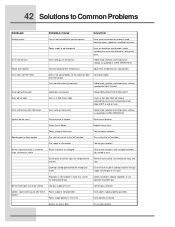
...the "off valve is not closed tightly, so the automatic door latch will not heat after flame ignition. Contact gas company. Check installation, replace regullator, or set incorrectly. Low gas supply pressure. Ignitors spark continuously after Self-Clean. Turn shut-off to "on the... wrong type of gas. Remove and carefully re-install burner rings and caps. Ensure that the type of cycle. Close door tightly. If oven is hot, door latch will not ...
...the "off valve is not closed tightly, so the automatic door latch will not heat after flame ignition. Contact gas company. Check installation, replace regullator, or set incorrectly. Low gas supply pressure. Ignitors spark continuously after Self-Clean. Turn shut-off to "on the... wrong type of gas. Remove and carefully re-install burner rings and caps. Ensure that the type of cycle. Close door tightly. If oven is hot, door latch will not ...
Use and Care Manual
Page 44
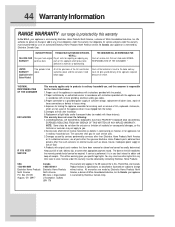
... OUR AUTHORIZED SERVICERS, WE WILL: One year from persons other than genuine Electrolux Home Products parts; Proper installation by Electrolux Home Products North America, a division of parts other than Electrolux Home Products North America or its authorized servicers; Box 212378 Augusta, GA 30917... connection to change or add to finish after installation. 6.Replacement of incidental or consequential damages, so this limitation or exclusion may also have been removed or altered and cannot be performed by Electrolux Canada Corp. CONSEQUENTIAL OR INCIDENTAL DAMAGES SUCH AS...
... OUR AUTHORIZED SERVICERS, WE WILL: One year from persons other than genuine Electrolux Home Products parts; Proper installation by Electrolux Home Products North America, a division of parts other than Electrolux Home Products North America or its authorized servicers; Box 212378 Augusta, GA 30917... connection to change or add to finish after installation. 6.Replacement of incidental or consequential damages, so this limitation or exclusion may also have been removed or altered and cannot be performed by Electrolux Canada Corp. CONSEQUENTIAL OR INCIDENTAL DAMAGES SUCH AS...

Installation Instructions
Page 1
Installation Instructions Dual Fuel Ranges E30DF74EPS E36DF76EPS E48DF76EPS 5995447082
Installation Instructions Dual Fuel Ranges E30DF74EPS E36DF76EPS E48DF76EPS 5995447082
Installation Instructions
Page 2
I M P O R TA N T Indicates installation, operation or maintenance information which , if not avoided, may result in property damage. Definitions This is used without the safety alert symbol indicates a potentially hazardous ... that follow this manual are labeled with a Warning or Caution based on the risk type. 2 Safety IMPORTANT SAFETY INSTRUCTIONS Safety Precautions Do not attempt to install or operate your unit until you to potential personal injury hazards. Safety items throughout this symbol to avoid possible injury or death.
I M P O R TA N T Indicates installation, operation or maintenance information which , if not avoided, may result in property damage. Definitions This is used without the safety alert symbol indicates a potentially hazardous ... that follow this manual are labeled with a Warning or Caution based on the risk type. 2 Safety IMPORTANT SAFETY INSTRUCTIONS Safety Precautions Do not attempt to install or operate your unit until you to potential personal injury hazards. Safety items throughout this symbol to avoid possible injury or death.

Installation Instructions
Page 3
.... Do not use or attempt to use it . • Disconnect the electrical supply before using the appliance. • Improper installation, adjustment, alteration, service, or maintenance can cause personal injury or property damage. Never use this cooktop. For assistance or additional information, consult ..., may explode and should be heated on this appliance in the event of combustion and ventilation air to "Electrical Requirements". • Install or locate this appliance only in accordance with any other flammable vapors and liquids. - Refer to the unit. - This type of...
.... Do not use or attempt to use it . • Disconnect the electrical supply before using the appliance. • Improper installation, adjustment, alteration, service, or maintenance can cause personal injury or property damage. Never use this cooktop. For assistance or additional information, consult ..., may explode and should be heated on this appliance in the event of combustion and ventilation air to "Electrical Requirements". • Install or locate this appliance only in accordance with any other flammable vapors and liquids. - Refer to the unit. - This type of...

Installation Instructions
Page 4
... reach your gas supplier, call the gas supplier from a neighbor's phone. - Follow the gas supplier's instructions. - Immediately call the fire department. • Installation of the cooking utensil. • If the information in your building. - 4 Safety WARNING • Based on safety considerations, the top burner flame should be...causing property damage, personal injury, or death. • What to light any phone in this appliance must be performed by a qualified installer, service agency or the gas supplier. Do not try to do not use any appliance. - If you smell gas: -
... reach your gas supplier, call the gas supplier from a neighbor's phone. - Follow the gas supplier's instructions. - Immediately call the fire department. • Installation of the cooking utensil. • If the information in your building. - 4 Safety WARNING • Based on safety considerations, the top burner flame should be...causing property damage, personal injury, or death. • What to light any phone in this appliance must be performed by a qualified installer, service agency or the gas supplier. Do not try to do not use any appliance. - If you smell gas: -

Installation Instructions
Page 5
Attach your safety, please read and observe all instructions before installing the Range. QUESTIONS? Post Office Box 212378, Augusta, Georgia 30917, USA All rights reserved. Owner: Read your Range. It also has many suggestions for future ... toll-free telephone support in the USA For your sales receipt to this appliance. Printed in the U.S. Finding Information 5 READ AND SAVE THESE INSTRUCTIONS NOTE Installer: Leave instructions with owner. and Canada: 1-877- 4ELECTROLUX (1-877-435-3287) For online support and Internet product information: www.electroluxusa.com ©2005...
Attach your safety, please read and observe all instructions before installing the Range. QUESTIONS? Post Office Box 212378, Augusta, Georgia 30917, USA All rights reserved. Owner: Read your Range. It also has many suggestions for future ... toll-free telephone support in the USA For your sales receipt to this appliance. Printed in the U.S. Finding Information 5 READ AND SAVE THESE INSTRUCTIONS NOTE Installer: Leave instructions with owner. and Canada: 1-877- 4ELECTROLUX (1-877-435-3287) For online support and Internet product information: www.electroluxusa.com ©2005...

Installation Instructions
Page 6
... Instructions 2 Safety Precautions 3 Finding Information 5 Please Read And Save This Guide 5 Questions 5 Table Of Contents 6 Preparing for Installation 7 Verifying Package Contents 7 Gas Supply Requirements 7 Gas and Electric Requirements Table 7 Electrical Power Supply Requirements 8 Gas and Electrical Rough-In... 9 Cabinet/Counterop Preparation 10 Overal Dimensions 12 Installing the Anti-Tip Bracket 13 Gas Regulator and Electrical Conduit Location 16 Installation 17 Installing the Range Backguards 17 Removing the Door(s 18 Reinstalling the Door(s ...
... Instructions 2 Safety Precautions 3 Finding Information 5 Please Read And Save This Guide 5 Questions 5 Table Of Contents 6 Preparing for Installation 7 Verifying Package Contents 7 Gas Supply Requirements 7 Gas and Electric Requirements Table 7 Electrical Power Supply Requirements 8 Gas and Electrical Rough-In... 9 Cabinet/Counterop Preparation 10 Overal Dimensions 12 Installing the Anti-Tip Bracket 13 Gas Regulator and Electrical Conduit Location 16 Installation 17 Installing the Range Backguards 17 Removing the Door(s 18 Reinstalling the Door(s ...

Installation Instructions
Page 7
... Kw) Natural 4" Water Column 5" Water Column Liquid Propane 10" Water Column 11" Water Column 240-4 26.4 Amps Natural 4" Water Column 5" Water Column E36DF76EPS Wire VAC, (6.3 Kw) 60Hz, 30A Liquid Propane 10" Water Column 11" Water Column 240-4 E48DF76EPS Wire VAC, 44.2 Amps Natural 4" Water Column 5" ... Cleaner • Roasting Rack • Burner Cap Pack GAS SUPPLY REQUIREMENTS Check your local building codes for the gas service being installed is correct for the proper method of local codes, this appliance should be found by opening the oven door and looking through the...
... Kw) Natural 4" Water Column 5" Water Column Liquid Propane 10" Water Column 11" Water Column 240-4 26.4 Amps Natural 4" Water Column 5" Water Column E36DF76EPS Wire VAC, (6.3 Kw) 60Hz, 30A Liquid Propane 10" Water Column 11" Water Column 240-4 E48DF76EPS Wire VAC, 44.2 Amps Natural 4" Water Column 5" ... Cleaner • Roasting Rack • Burner Cap Pack GAS SUPPLY REQUIREMENTS Check your local building codes for the gas service being installed is correct for the proper method of local codes, this appliance should be found by opening the oven door and looking through the...

Installation Instructions
Page 8
Call the selling dealer, the gas supplier, or a licensed electrician. The electrical installation, including minimum supply wire size and grounding, must be in continuous sparking of the electrodes, even after flame ignition. If there is any ...is performed by a properly sized circuit breaker or time delay fuse. Reverse polarity will result in accordance with the installation. NOTES The power supply must be properly polarized. 8 Preparing for Installation ELECTRICAL POWER SUPPLY REQUIREMENTS It is the owner's responsibility to ensure that the electrical connection of this standard may ...
Call the selling dealer, the gas supplier, or a licensed electrician. The electrical installation, including minimum supply wire size and grounding, must be in continuous sparking of the electrodes, even after flame ignition. If there is any ...is performed by a properly sized circuit breaker or time delay fuse. Reverse polarity will result in accordance with the installation. NOTES The power supply must be properly polarized. 8 Preparing for Installation ELECTRICAL POWER SUPPLY REQUIREMENTS It is the owner's responsibility to ensure that the electrical connection of this standard may ...

Installation Instructions
Page 9
... they do not interfere with the sides or rear of the range. Do not lengthen the conduit or wiring provided with the range. When installing the range into nonstandard cabinets, minimum clearances shown in the illustrations, denote the location of the range and the gas supply to allow access ...junction box/receptacle. These are based on page 11 must be maintained. Both the gas supply piping and shut-off gas to the appliance, for Installation 9 GAS AND ELECTRICAL ROUGH-IN Locations NOTE The shaded areas shown in the diagrams on standard American cabinets 36 inches (914mm) high at the...
... they do not interfere with the sides or rear of the range. Do not lengthen the conduit or wiring provided with the range. When installing the range into nonstandard cabinets, minimum clearances shown in the illustrations, denote the location of the range and the gas supply to allow access ...junction box/receptacle. These are based on page 11 must be maintained. Both the gas supply piping and shut-off gas to the appliance, for Installation 9 GAS AND ELECTRICAL ROUGH-IN Locations NOTE The shaded areas shown in the diagrams on standard American cabinets 36 inches (914mm) high at the...
Installation Instructions
Page 10
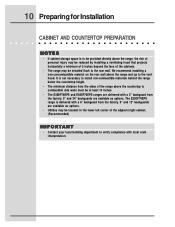
... COUNTERTOP PREPARATION NOTES • If cabinet storage space is to be provided directly above the range, the risk of personal injury may be reduced by installing a ventilating hood that projects horizontally a minimum of 5 inches beyond the face of the adjacent right cabinet. (Recommended) I M P O R TA N ... may be located: In the lower left corner of the cabinets. • The range may be installed flush to combustible side walls must be at least 10 inches. • The E36DF76EPS and E48DF76EPS ranges are delivered with a 6" backguard from the factory. 9" and 24" backguards are ...
... COUNTERTOP PREPARATION NOTES • If cabinet storage space is to be provided directly above the range, the risk of personal injury may be reduced by installing a ventilating hood that projects horizontally a minimum of 5 inches beyond the face of the adjacent right cabinet. (Recommended) I M P O R TA N ... may be located: In the lower left corner of the cabinets. • The range may be installed flush to combustible side walls must be at least 10 inches. • The E36DF76EPS and E48DF76EPS ranges are delivered with a 6" backguard from the factory. 9" and 24" backguards are ...

