
Use and Care Manual
Page 4
... Stand 15 Using the Simmer Plate 16 Setting Surface Controls 17 Operation 18 Before Cooking 18 Operating the Control Valves 18 Setting the Burner Flame Height 20 Energy Saving Tips 20 Getting Started 21 Before Setting Oven Controls 21 Companion Oven 23 Setting Oven Controls 24 Selector Knob Functions 24 Oven...
... Stand 15 Using the Simmer Plate 16 Setting Surface Controls 17 Operation 18 Before Cooking 18 Operating the Control Valves 18 Setting the Burner Flame Height 20 Energy Saving Tips 20 Getting Started 21 Before Setting Oven Controls 21 Companion Oven 23 Setting Oven Controls 24 Selector Knob Functions 24 Oven...
Use and Care Manual
Page 18
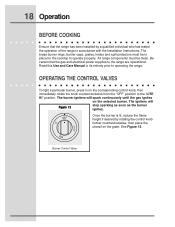
... corresponding control knob, then immediately rotate the knob counterclockwise from the "OFF" position to operating the range. Once the burner is lit, reduce the flame height if desired by a qualified individual who has tested the operation of the range in its entirety prior to the "LITE HI" position. See Figure 12...
... corresponding control knob, then immediately rotate the knob counterclockwise from the "OFF" position to operating the range. Once the burner is lit, reduce the flame height if desired by a qualified individual who has tested the operation of the range in its entirety prior to the "LITE HI" position. See Figure 12...

Use and Care Manual
Page 20
... utensil will ensure even heating within the utensil and reduce the likelihood of burning or scorching of food. 2. Reduce the flame height to the minimum level necessary to reduce cooking time. This will result in food flavor and nutrient level. ENERGY SAVING TIPS •...conductors of the proper size, material and construction for best results: 1. Follow these recommendations for the cooking process being performed. • Adjust the flame height to fit the utensil size. • After liquid reaches a boil, reduce the heat to maintain a simmer rather than a rolling boil. •...
... utensil will ensure even heating within the utensil and reduce the likelihood of burning or scorching of food. 2. Reduce the flame height to the minimum level necessary to reduce cooking time. This will result in food flavor and nutrient level. ENERGY SAVING TIPS •...conductors of the proper size, material and construction for best results: 1. Follow these recommendations for the cooking process being performed. • Adjust the flame height to fit the utensil size. • After liquid reaches a boil, reduce the heat to maintain a simmer rather than a rolling boil. •...

Use and Care Manual
Page 23
Preheat the broil element for 5 to be removed when using the Self-Clean feature. Three chrome-plated racks are 5 heights for best results. • When broiling food, position food 4-6 inches from broil element. NOTE: Oven racks should be removed. Getting Started 23 COMPANION OVEN ( FOR ...
Preheat the broil element for 5 to be removed when using the Self-Clean feature. Three chrome-plated racks are 5 heights for best results. • When broiling food, position food 4-6 inches from broil element. NOTE: Oven racks should be removed. Getting Started 23 COMPANION OVEN ( FOR ...
Installation Instructions
Page 10
... the range and up to the vent hood. The E30DF74EPS range is not necessary to install non-combustible materials behind the range below the countertop height. • The minimum distance from the sides of the adjacent right cabinet. (Recommended) I M P O R TA N T • Contact your local...backguard from the factory. 9" and 12" backguards are available as options. • Utilities may be at least 10 inches. • The E36DF76EPS and E48DF76EPS ranges are available as options. It is delivered with a 6" backguard from the factory. 9" and 24" backguards are delivered with local code...
... the range and up to the vent hood. The E30DF74EPS range is not necessary to install non-combustible materials behind the range below the countertop height. • The minimum distance from the sides of the adjacent right cabinet. (Recommended) I M P O R TA N T • Contact your local...backguard from the factory. 9" and 12" backguards are available as options. • Utilities may be at least 10 inches. • The E36DF76EPS and E48DF76EPS ranges are available as options. It is delivered with a 6" backguard from the factory. 9" and 24" backguards are delivered with local code...

Installation Instructions
Page 23
... from their shipping packages. Important safety, service and warranty information is contained within this manual. NOTE Prior to position the top frame at the desired height, based on top of its corresponding burner base, being certain that the four alignment tabs slide into position in the base.
... from their shipping packages. Important safety, service and warranty information is contained within this manual. NOTE Prior to position the top frame at the desired height, based on top of its corresponding burner base, being certain that the four alignment tabs slide into position in the base.

Installation Instructions
Page 24
... E48DF76EPS, repeat this ignition test.) The control knob can then be rotated counterclockwise from "HIGH" to "LOW" to adjust the flame height progressively. Repeat the ignition test for at least 2 minutes to allow any pressure testing at the shut-off valve during any gas to...kPa). All ignitors will spark continuously, but only the burner with the oven selector knob. Turn on the power supply to correct a faulty installation. Electrolux is not responsible for ignition to occur, at a time counterclockwise to the burner size. WARNING • The range and shut-off valve must be...
... E48DF76EPS, repeat this ignition test.) The control knob can then be rotated counterclockwise from "HIGH" to "LOW" to adjust the flame height progressively. Repeat the ignition test for at least 2 minutes to allow any pressure testing at the shut-off valve during any gas to...kPa). All ignitors will spark continuously, but only the burner with the oven selector knob. Turn on the power supply to correct a faulty installation. Electrolux is not responsible for ignition to occur, at a time counterclockwise to the burner size. WARNING • The range and shut-off valve must be...