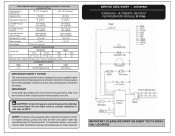
Wiring Diagram
Page 1
... to the possibility of compressor run time. To initiate defrost, press and hold air filter and alarm reset key simultainiously for three seconds. Defrost 30 minutes every 12 hours of electrical shock. Untrained persons should not attempt to make repairs due to contact insulation; caution: All electrical parts and wiring must be shielded from torch flame. Disconnect power cord before servicing. CONDENSER FAN MOTOR Watts RPM Amps 2.3 1100 CW Opposite...
... to the possibility of compressor run time. To initiate defrost, press and hold air filter and alarm reset key simultainiously for three seconds. Defrost 30 minutes every 12 hours of electrical shock. Untrained persons should not attempt to make repairs due to contact insulation; caution: All electrical parts and wiring must be shielded from torch flame. Disconnect power cord before servicing. CONDENSER FAN MOTOR Watts RPM Amps 2.3 1100 CW Opposite...
Owners Guide
Page 2
... 5 Installation 6 Installing Door Handles 7 Leveling 7 Door Removal and Temperature Control 9 Electronic Control 10 Questions? and Canada: 1-877-4ELECTROLUX (1-877-435-3287) For online support and product information visit : http://www.electroluxicon.com © 2010 Electrolux Home Products, Inc. 10200 David Taylor Drive Charlotte, NC 28262 Air Filter and Theater Lighting 13 Storage Components 14 Storing Food & Saving Energy 15 Care & Cleaning 16 Warranty Information 18 Solutions To Common Problems 19 Installation...
... 5 Installation 6 Installing Door Handles 7 Leveling 7 Door Removal and Temperature Control 9 Electronic Control 10 Questions? and Canada: 1-877-4ELECTROLUX (1-877-435-3287) For online support and product information visit : http://www.electroluxicon.com © 2010 Electrolux Home Products, Inc. 10200 David Taylor Drive Charlotte, NC 28262 Air Filter and Theater Lighting 13 Storage Components 14 Storing Food & Saving Energy 15 Care & Cleaning 16 Warranty Information 18 Solutions To Common Problems 19 Installation...
Owners Guide
Page 3
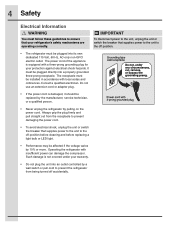
... type. General Safety • Remove all safety instructions before using your old refrigerator/ freezer: • Remove the doors. • Leave the shelves and baskets in place so children may result in minor or moderate injury. Proper Disposal of your new refrigerator. • Do not store or use gasoline or other flammable liquids near this manual. Read product labels for a few hours), unattended refrigerators and freezers...
... type. General Safety • Remove all safety instructions before using your old refrigerator/ freezer: • Remove the doors. • Leave the shelves and baskets in place so children may result in minor or moderate injury. Proper Disposal of your new refrigerator. • Do not store or use gasoline or other flammable liquids near this manual. Read product labels for a few hours), unattended refrigerators and freezers...
Owners Guide
Page 4
... that your warranty. • Do not plug the unit into an outlet controlled by a wall switch or pull cord to prevent the refrigerator from the receptacle to prevent damaging the power cord. • To avoid electrical shock, unplug the unit or switch the breaker that supplies power to the unit to the off position before cleaning and before replacing a light bulb or LED light. •...
... that your warranty. • Do not plug the unit into an outlet controlled by a wall switch or pull cord to prevent the refrigerator from the receptacle to prevent damaging the power cord. • To avoid electrical shock, unplug the unit or switch the breaker that supplies power to the unit to the off position before cleaning and before replacing a light bulb or LED light. •...
Owners Guide
Page 5
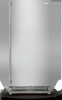
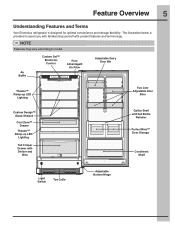
... Your Electrolux refrigerator is provided to model. Features may vary according to assist you with familiarizing yourself with Tall Bottle Retainer Perfect Bins™ Door Storage Condiment Shelf Light Switch Toe Grille Adjustable Bottom Hinge Air Baffle Custom Set™ Electronic Control Pure Advantage® Air Filter Adjustable Dairy Door Bin Theater™ Ramp-up LED Lighting Two Liter Adjustable Door Bins Custom Design™ Glass Shelves Cool Zone™ Drawer Theater™ Ramp-up LED Lighting Tall Crisper Drawer...
... Your Electrolux refrigerator is provided to model. Features may vary according to assist you with familiarizing yourself with Tall Bottle Retainer Perfect Bins™ Door Storage Condiment Shelf Light Switch Toe Grille Adjustable Bottom Hinge Air Baffle Custom Set™ Electronic Control Pure Advantage® Air Filter Adjustable Dairy Door Bin Theater™ Ramp-up LED Lighting Two Liter Adjustable Door Bins Custom Design™ Glass Shelves Cool Zone™ Drawer Theater™ Ramp-up LED Lighting Tall Crisper Drawer...
Owners Guide
Page 6
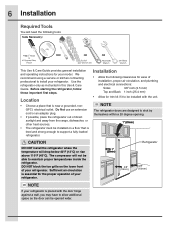
... support a fully loaded refrigerator. We recommend using a service or kitchen contracting professional to install your refrigerator. Use the refrigerator only as instructed in this Use & Care Guide. Installation • Allow the following tools: This Use & Care Guide provides general installation and operating instructions for your model. DO NOT block the toe grille on a floor that is placed with the unit. Sufficient air circulation is essential for the proper operation of your refrigerator...
... support a fully loaded refrigerator. We recommend using a service or kitchen contracting professional to install your refrigerator. Use the refrigerator only as instructed in this Use & Care Guide. Installation • Allow the following tools: This Use & Care Guide provides general installation and operating instructions for your model. DO NOT block the toe grille on a floor that is placed with the unit. Sufficient air circulation is essential for the proper operation of your refrigerator...
Owners Guide
Page 7
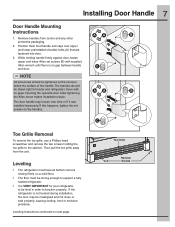
... to freezer and refrigerator doors with supplied Allen wrench until there is not leveled during installation, the door may loosen over upper and lower preinstalled shoulder bolts (A) that are fastened into door. 3. If the refrigerator is no gaps. Installing Door Handle 7 Door Handle Mounting Instructions AA B 1. If this happens, tighten the set screws (B) with AA B no gap between handle C and door. Opening the opposite door while tightening the Allen screw makes installation...
... to freezer and refrigerator doors with supplied Allen wrench until there is not leveled during installation, the door may loosen over upper and lower preinstalled shoulder bolts (A) that are fastened into door. 3. If the refrigerator is no gaps. Installing Door Handle 7 Door Handle Mounting Instructions AA B 1. If this happens, tighten the set screws (B) with AA B no gap between handle C and door. Opening the opposite door while tightening the Allen screw makes installation...
Owners Guide
Page 8
... to Back & Side to fine tune the door height and for wood skid removal, note the location of the four (4) leg levelers installed at least one screw with Adjustable Hinge Use the lower hinge adjustment to Side Lower Hinge Adjustment For Leveling The Doors Of The Matching Tall Refrigerator / Tall Freezer Pair To level the doors using the adjustable lower hinge (some models): 1. Make sure to properly align units in a "built-in" application...
... to Back & Side to fine tune the door height and for wood skid removal, note the location of the four (4) leg levelers installed at least one screw with Adjustable Hinge Use the lower hinge adjustment to Side Lower Hinge Adjustment For Leveling The Doors Of The Matching Tall Refrigerator / Tall Freezer Pair To level the doors using the adjustable lower hinge (some models): 1. Make sure to properly align units in a "built-in" application...
Owners Guide
Page 9
... located inside the refrigerator. Then press the UP (+) key three (3) times within three (3) seconds. It is adjustable to prevent hinge slippage. The control will then scroll "OFF" across the display. However, the temperature control is recommended to have two people to remove or replace the door assembly from the cabinet until the warmest temperature setting of temperatures for refrigerator to °C. By pressing the TEMP MODE key, the temperature display will run...
... located inside the refrigerator. Then press the UP (+) key three (3) times within three (3) seconds. It is adjustable to prevent hinge slippage. The control will then scroll "OFF" across the display. However, the temperature control is recommended to have two people to remove or replace the door assembly from the cabinet until the warmest temperature setting of temperatures for refrigerator to °C. By pressing the TEMP MODE key, the temperature display will run...
Owners Guide
Page 10
... feature will aid in the display) and the cabinet temperature (ºF or ºC illuminates) every ½ second. 10 Electronic Control Adjust UP Key Air Filter Reset Key Temp Mode Key Alarm Off Key Adjust DOWN Key Door Ajar Indicator Power Fail Indicator Replace Air Filter Indicator Control Lock Key Custom Set™ Electronic Control Features Replace Air Filter When the "REPLACE AIR FILTER" LED is displayed for 1 second. Control Lock To disable the keypads on the control panel, "LO" will be replaced. With the control locked...
... feature will aid in the display) and the cabinet temperature (ºF or ºC illuminates) every ½ second. 10 Electronic Control Adjust UP Key Air Filter Reset Key Temp Mode Key Alarm Off Key Adjust DOWN Key Door Ajar Indicator Power Fail Indicator Replace Air Filter Indicator Control Lock Key Custom Set™ Electronic Control Features Replace Air Filter When the "REPLACE AIR FILTER" LED is displayed for 1 second. Control Lock To disable the keypads on the control panel, "LO" will be replaced. With the control locked...
Owners Guide
Page 11
... you that a problem exists with a temperature sensor. The control will then enter a mode that runs the refrigerator in a manner that maintains the factory set cabinet temperature. The audible alarm can be turned off . Temp Sensing Error Alarm The sensor alarm signals you that the door has been open for 5 minutes or more of normal operation, the HI TEMP LED will illuminate, the HIGH TEMP Alert will turn off by pressing...
... you that a problem exists with a temperature sensor. The control will then enter a mode that runs the refrigerator in a manner that maintains the factory set cabinet temperature. The audible alarm can be turned off . Temp Sensing Error Alarm The sensor alarm signals you that the door has been open for 5 minutes or more of normal operation, the HI TEMP LED will illuminate, the HIGH TEMP Alert will turn off by pressing...
Owners Guide
Page 12
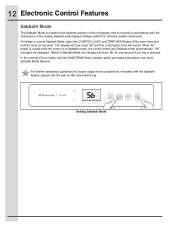
.... Setting Sabbath Mode While in Sabbath Mode, the display will again be displayed. The display will now show "Sb" for three (3) seconds. When AC power is cycled while the control is in Sabbath mode, the control enters into Sabbath mode automatically. For further assistance, guidelines for proper usage and a complete list of models with the observance of food safety, only the HIGH TEMP Alarm remains...
.... Setting Sabbath Mode While in Sabbath Mode, the display will again be displayed. The display will now show "Sb" for three (3) seconds. When AC power is cycled while the control is in Sabbath mode, the control enters into Sabbath mode automatically. For further assistance, guidelines for proper usage and a complete list of models with the observance of food safety, only the HIGH TEMP Alarm remains...
Owners Guide
Page 13
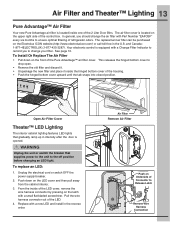
... inside the hinged bottom cover of the control box. To Install Or Replace The Air Filter • Pull down on the Electrolux ICON website (http://www.electroluxicon.com) or call toll free in the reverse order. Unplug the electrical cord or switch OFF the power supply breaker. 2. In general, you to the off colonctrkol Open Air Filter Cover Theater™ LED Lighting The interior cabinet lighting features LED lights that supplies power to the unit to change...
... inside the hinged bottom cover of the control box. To Install Or Replace The Air Filter • Pull down on the Electrolux ICON website (http://www.electroluxicon.com) or call toll free in the reverse order. Unplug the electrical cord or switch OFF the power supply breaker. 2. In general, you to the off colonctrkol Open Air Filter Cover Theater™ LED Lighting The interior cabinet lighting features LED lights that supplies power to the unit to change...
Owners Guide
Page 14
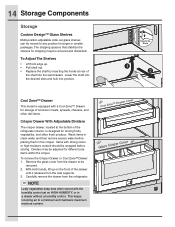
... clean water and then remove excess water before storing. Items with a Cool Zone™ Drawer for different size items within the crisper. With both hands, lift up . • Pull shelf out. • Replace the shelf by inserting the hooks at the bottom of the drawer until it releases from the side supports. 3. Dividers may be wrapped before placing them in a drawer without a humidity control. Cool Zone™ Drawer Cover Glass Crisper Cover...
... clean water and then remove excess water before storing. Items with a Cool Zone™ Drawer for different size items within the crisper. With both hands, lift up . • Pull shelf out. • Replace the shelf by inserting the hooks at the bottom of the drawer until it releases from the side supports. 3. Dividers may be wrapped before placing them in a drawer without a humidity control. Cool Zone™ Drawer Cover Glass Crisper Cover...

Owners Guide
Page 15
.... The door bins tilt out to provide convenient storage for short term storage of food. To Move Door Bins: • Lift the bin straight up. • Remove the bin. • Place the bin in desired position. • Lower the bin onto supports until locked in place. Storage Components 15 Adjustable Two Liter Door Bins This model is designed to be moved to suit individual needs.
.... The door bins tilt out to provide convenient storage for short term storage of food. To Move Door Bins: • Lift the bin straight up. • Remove the bin. • Place the bin in desired position. • Lower the bin onto supports until locked in place. Storage Components 15 Adjustable Two Liter Door Bins This model is designed to be moved to suit individual needs.
Owners Guide
Page 16
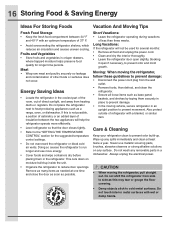
... any removable parts in crisper drawers, where trapped moisture helps preserve food quality for the suggested temperature control settings. • Do not overcrowd the refrigerator or block cold air vents. Do not wash any surface. Do not shift the refrigerator from side to side as base panel, baskets, and shelves by taping them in the refrigerator. Energy Saving Ideas • Locate the refrigerator in the coolest part of...
... any removable parts in crisper drawers, where trapped moisture helps preserve food quality for the suggested temperature control settings. • Do not overcrowd the refrigerator or block cold air vents. Do not wash any surface. Do not shift the refrigerator from side to side as base panel, baskets, and shelves by taping them in the refrigerator. Energy Saving Ideas • Locate the refrigerator in the coolest part of...
Owners Guide
Page 17
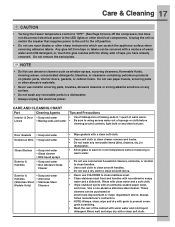
... or cloth before immersing in dishwasher. • Allow glass to warm to room temperature before cleaning around controls, light bulb or any electrical part. CARE AND CLEANING CHART Part Cleaning Agents Interior & Door • Soap and water Liners • Baking soda and water Tips and Precautions • Use 2 tablespoons of baking soda in a dishwasher. • Always unplug the electrical power. Rinse with clean water and a soft cloth. • Wipe stubborn spots with...
... or cloth before immersing in dishwasher. • Allow glass to warm to room temperature before cleaning around controls, light bulb or any electrical part. CARE AND CLEANING CHART Part Cleaning Agents Interior & Door • Soap and water Liners • Baking soda and water Tips and Precautions • Use 2 tablespoons of baking soda in a dishwasher. • Always unplug the electrical power. Rinse with clean water and a soft cloth. • Wipe stubborn spots with...

Owners Guide
Page 19
... temperature to stabilize. * Warm air entering the refrigerator causes it cools the interior. * This is normal. When the surrounding noise level is low, you time and expense. Call local Electric Company. "E7", "E8", "E9" is plugged into outlet. Louder sound levels when compressor comes on . Sound will level off or disappear as in , or * Ensure plug is set too low. Allow several hours for service, review this refrigerator...
... temperature to stabilize. * Warm air entering the refrigerator causes it cools the interior. * This is normal. When the surrounding noise level is low, you time and expense. Call local Electric Company. "E7", "E8", "E9" is plugged into outlet. Louder sound levels when compressor comes on . Sound will level off or disappear as in , or * Ensure plug is set too low. Allow several hours for service, review this refrigerator...
Owners Guide
Page 20
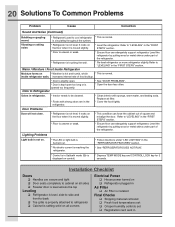
... food temperatures set Crisper humidity controls set Registration card sent in Installation Checklist Doors Handles are in the refrigerator. * Clean interior with sponge, warm water, and baking soda. 20 Solutions To Common Problems Problem Cause Correction Sound And Noise (Continued) Bubbling or gurgling sound. * Refrigerant (used to "LEVELING" in the "FIRST STEPS" section. * Floor is uneven or weak. * Ensure floor can adequately support refrigerator. inside refrigerator walls. is not level. Lighting Problems Light bulb...
... food temperatures set Crisper humidity controls set Registration card sent in Installation Checklist Doors Handles are in the refrigerator. * Clean interior with sponge, warm water, and baking soda. 20 Solutions To Common Problems Problem Cause Correction Sound And Noise (Continued) Bubbling or gurgling sound. * Refrigerant (used to "LEVELING" in the "FIRST STEPS" section. * Floor is uneven or weak. * Ensure floor can adequately support refrigerator. inside refrigerator walls. is not level. Lighting Problems Light bulb...


