Specification sheet
Page 1
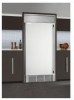
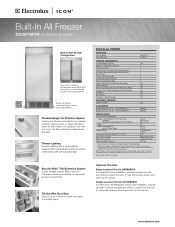
...Out Wire Door Bins Help you store a variety of the freezer with leveling system and side / top trim pieces. Height - Double Louvered Trim Kit (DUORSRKIT) For All-Freezer / All-Refrigerator side-by -Side Configuration Shown with grounded three-prong receptacle...-Extension System Freezer storage drawers slide in All Refrigerator. ‡ An electrical supply with companion, All-Refrigerator model E32AR7FPS and optional coordinated Double Louvered Trim Kit (DUORSRKIT). Specifications subject to maintain a fresher, cleaner interior. Built-In All Freezer E32AF75FPS professional series ...
...Out Wire Door Bins Help you store a variety of the freezer with leveling system and side / top trim pieces. Height - Double Louvered Trim Kit (DUORSRKIT) For All-Freezer / All-Refrigerator side-by -Side Configuration Shown with grounded three-prong receptacle...-Extension System Freezer storage drawers slide in All Refrigerator. ‡ An electrical supply with companion, All-Refrigerator model E32AR7FPS and optional coordinated Double Louvered Trim Kit (DUORSRKIT). Specifications subject to maintain a fresher, cleaner interior. Built-In All Freezer E32AF75FPS professional series ...
Specification sheet
Page 2
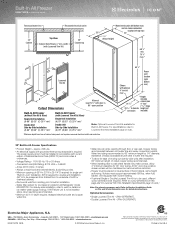
The power supply circuit must be installed in All-Refrigerator model E32AR7FPS. Water line tubing recommended is required. High standards of National Electrical Code (NFPA 70) and local codes & ordinances. • Voltage Rating - ...Louvered Trim Kits Installation page on the web at Electrolux Home Products, Inc. Installation of easily accessible shutoff valve in the U.S.A. For specifications, refer to wall where handle may make contact, allow for 90° door swing. Built-In All Freezer E32AF75FPS professional series Recessed water line Recessed electrical outlet 24"...
The power supply circuit must be installed in All-Refrigerator model E32AR7FPS. Water line tubing recommended is required. High standards of National Electrical Code (NFPA 70) and local codes & ordinances. • Voltage Rating - ...Louvered Trim Kits Installation page on the web at Electrolux Home Products, Inc. Installation of easily accessible shutoff valve in the U.S.A. For specifications, refer to wall where handle may make contact, allow for 90° door swing. Built-In All Freezer E32AF75FPS professional series Recessed water line Recessed electrical outlet 24"...
Specification sheet
Page 3
... Appliances, N.A. Printed in the U.S.A. We reserve the right to web for details on the web at Electrolux Home Products, Inc. Louvered Trim Kits Installation E32AF75FPS, E32AR75FPS Louvered Trim Kits Single All-Freezer Kit (SFRRSRKIT) Single All-Refrigerator Kit (SRRRSRKIT) Single Kits include: Louvered top grille and vented, louvered toe kick, 4" riser with minimum cabinet...
... Appliances, N.A. Printed in the U.S.A. We reserve the right to web for details on the web at Electrolux Home Products, Inc. Louvered Trim Kits Installation E32AF75FPS, E32AR75FPS Louvered Trim Kits Single All-Freezer Kit (SFRRSRKIT) Single All-Refrigerator Kit (SRRRSRKIT) Single Kits include: Louvered top grille and vented, louvered toe kick, 4" riser with minimum cabinet...
Owners Guide
Page 2
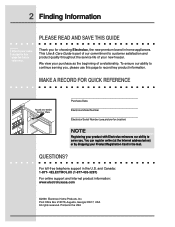
...freezer. and Canada: 1-877- 4ELECTROLUX (1-877-435-3287) For online support and Internet product information: www.electroluxusa.com ©2006 Electrolux Home Products, Inc. To ensure our ability to continue serving you, please use this page for location) NOTE Registering your product with Electrolux...For toll-free telephone support in home appliances. Printed in the mail. MAKE A RECORD FOR QUICK REFERENCE Purchase Date Electrolux Model Number Electrolux Serial Number (see picture for future reference. You can register online (at the Internet address below) or by dropping...
...freezer. and Canada: 1-877- 4ELECTROLUX (1-877-435-3287) For online support and Internet product information: www.electroluxusa.com ©2006 Electrolux Home Products, Inc. To ensure our ability to continue serving you, please use this page for location) NOTE Registering your product with Electrolux...For toll-free telephone support in home appliances. Printed in the mail. MAKE A RECORD FOR QUICK REFERENCE Purchase Date Electrolux Model Number Electrolux Serial Number (see picture for future reference. You can register online (at the Internet address below) or by dropping...
Owners Guide
Page 3
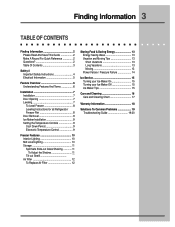
... 4 Electrical Information 5 Feature Overview 6 Understanding Features And Terms 6 Installation 7 Installation 7 Door Opening 7 Leveling 7 To Level Freezer 8 Leveling Instructions for all Refrigerator/ Freezer Pair 8 Door Removal 9 Ice Maker Installation 9 Setting the Temperature Controls 9 Cool Down Period 9 Electronic Temperature Control 9 Freezer Features 10 Interior Lighting 10 Mid Level Lighting 10 Storage 11 Spill Safe Slide-out...
... 4 Electrical Information 5 Feature Overview 6 Understanding Features And Terms 6 Installation 7 Installation 7 Door Opening 7 Leveling 7 To Level Freezer 8 Leveling Instructions for all Refrigerator/ Freezer Pair 8 Door Removal 9 Ice Maker Installation 9 Setting the Temperature Controls 9 Cool Down Period 9 Electronic Temperature Control 9 Freezer Features 10 Interior Lighting 10 Mid Level Lighting 10 Storage 11 Spill Safe Slide-out...
Owners Guide
Page 4
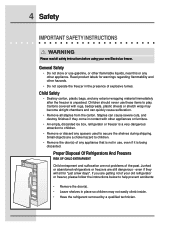
...; Do not store or use gasoline, or other appliances or furniture. • An empty, discarded ice box, refrigerator or freezer is a very dangerous attraction to help prevent accidents: • Remove the door(s). • Leave shelves in the...freezer in place so children may become airtight chambers and can cause severe cuts, and destroy finishes if they will sit for warnings regarding flammability and other appliance. Read product labels for "just a few days". Staples can quickly cause suffocation. • Remove all safety instructions before using your new Electrolux freezer...
...; Do not store or use gasoline, or other appliances or furniture. • An empty, discarded ice box, refrigerator or freezer is a very dangerous attraction to help prevent accidents: • Remove the door(s). • Leave shelves in the...freezer in place so children may become airtight chambers and can cause severe cuts, and destroy finishes if they will sit for warnings regarding flammability and other appliance. Read product labels for "just a few days". Staples can quickly cause suffocation. • Remove all safety instructions before using your new Electrolux freezer...
Owners Guide
Page 5
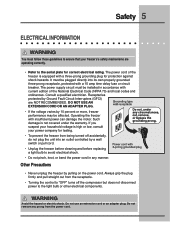
...being turned off accidentally, do not plug the unit into its own properly grounded three-prong receptacle, protected with current edition of the freezer is not covered under the warranty. Receptacles protected by pulling on the power cord. Do not use an extension cord or an adapter ...breaker. Such damage is equipped with insufficient power can damage the motor. If you suspect your household voltage is high or low, consult your freezer's's safety mechanisms are NOT RECOMMENDED. WARNING Avoid fire hazard or electric shock. The power cord of the National Electrical Code (NFPA 70) ...
...being turned off accidentally, do not plug the unit into its own properly grounded three-prong receptacle, protected with current edition of the freezer is not covered under the warranty. Receptacles protected by pulling on the power cord. Do not use an extension cord or an adapter ...breaker. Such damage is equipped with insufficient power can damage the motor. If you suspect your household voltage is high or low, consult your freezer's's safety mechanisms are NOT RECOMMENDED. WARNING Avoid fire hazard or electric shock. The power cord of the National Electrical Code (NFPA 70) ...
Owners Guide
Page 6
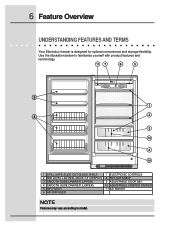
6 Feature Overview UNDERSTANDING FEATURES AND TERMS Your Electrolux freezer is designed for optimal convenience and storage flexibility. Use the illustration below to familiarize yourself with product features and terminology. 1 SPILL SAFE SLIDE OUT GLASS SHELF 7 ELECTRONIC CONTROLS 2 MID LEVEL LIGHTING (BACK OF CRISPER) 8 TILT-OUT SHELF 3 SMOOTH GLIDE DRAWER (UPPER) 9 ADJUSTABLE DOOR BIN 4 SMOOTH GLIDE DRAWER (LOWER) 10 ADJUSTABLE CRISPER DIVIDER 5 AIR FILTER 11 ICE MAKER 6 AIR DIFFUSER NOTE Features may vary according to model.
6 Feature Overview UNDERSTANDING FEATURES AND TERMS Your Electrolux freezer is designed for optimal convenience and storage flexibility. Use the illustration below to familiarize yourself with product features and terminology. 1 SPILL SAFE SLIDE OUT GLASS SHELF 7 ELECTRONIC CONTROLS 2 MID LEVEL LIGHTING (BACK OF CRISPER) 8 TILT-OUT SHELF 3 SMOOTH GLIDE DRAWER (UPPER) 9 ADJUSTABLE DOOR BIN 4 SMOOTH GLIDE DRAWER (LOWER) 10 ADJUSTABLE CRISPER DIVIDER 5 AIR FILTER 11 ICE MAKER 6 AIR DIFFUSER NOTE Features may vary according to model.
Owners Guide
Page 7
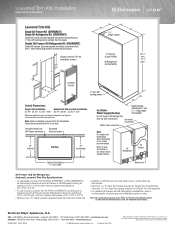
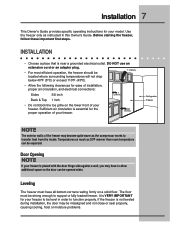
... (25mm) Back & Top 1 inch • Do not block the toe grille on a solid floor. Door Opening NOTE If your freezer is VERY IMPORTANT for your freezer. 3/8" (10mm) Refrigerator Freezer NOTE The exterior walls of your model. Temperatures as much as instructed in order to support a fully loaded... freezer. The floor must have to transfer heat from the inside. It is placed with the door hinge side...
... (25mm) Back & Top 1 inch • Do not block the toe grille on a solid floor. Door Opening NOTE If your freezer is VERY IMPORTANT for your freezer. 3/8" (10mm) Refrigerator Freezer NOTE The exterior walls of your model. Temperatures as much as instructed in order to support a fully loaded... freezer. The floor must have to transfer heat from the inside. It is placed with the door hinge side...
Owners Guide
Page 8
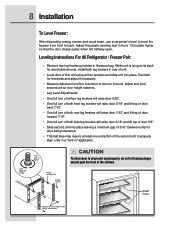
... and tilt top of door 3/8". • Slide second unit into place. 8 Installation To Level Freezer: After discarding crating screws and wood base, use a carpenter's level to level the freezer from floor to bottom of door on its back for wood skid removal, install both side leg ... minimum gap of 3/16" between units for levelness and adjust if necessary. • Measure distance from front to back. Leveling Instructions For All Refrigerator / Freezer Pair: • Remove two leg levelers provided in front, 1/2 bubble higher, so that the door closes easily when left halfway open. While...
... and tilt top of door 3/8". • Slide second unit into place. 8 Installation To Level Freezer: After discarding crating screws and wood base, use a carpenter's level to level the freezer from floor to bottom of door on its back for wood skid removal, install both side leg ... minimum gap of 3/16" between units for levelness and adjust if necessary. • Measure distance from front to back. Leveling Instructions For All Refrigerator / Freezer Pair: • Remove two leg levelers provided in front, 1/2 bubble higher, so that the door closes easily when left halfway open. While...

Owners Guide
Page 9
...from clips on bottom of temperatures for colder temperature on a rug or blanket. • Remove two base screws and base panel. The freezer will run continuously for the temperature to stabilize between adjustments. However, the temperature control is adjustable to provide a range of cabinet, if ...required. • Unplug connector, if required, by holding the cabinet connector in the bond pack that came with your freezer (CONNECTING ICE MAKER TO WATER SUPPLY) to prevent hinge slippage. To adjust the temperature setting, move the UP (V) button for warmer temperature...
...from clips on bottom of temperatures for colder temperature on a rug or blanket. • Remove two base screws and base panel. The freezer will run continuously for the temperature to stabilize between adjustments. However, the temperature control is adjustable to provide a range of cabinet, if ...required. • Unplug connector, if required, by holding the cabinet connector in the bond pack that came with your freezer (CONNECTING ICE MAKER TO WATER SUPPLY) to prevent hinge slippage. To adjust the temperature setting, move the UP (V) button for warmer temperature...
Owners Guide
Page 10
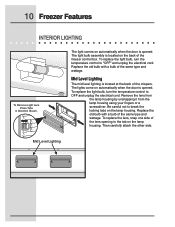
... crispers. To replace the light bulb, turn the temperature control to the tab on automatically when the door is located at the back of the freezer control box. To replace the lens, snap one side of the lens opening to "OFF" and unplug the electrical cord. To replace the light ... OFF and unplug the electrical cord. Replace the old bulb with a bulb of the same type and wattage. Then carefully attach the other side. 10 Freezer Features INTERIOR LIGHTING To Remove Light Lens Press Tabs in Direction Shown. Remove the lens from the lamp housing by unsnapping it from the lamp...
... crispers. To replace the light bulb, turn the temperature control to the tab on automatically when the door is located at the back of the freezer control box. To replace the lens, snap one side of the lens opening to "OFF" and unplug the electrical cord. To replace the light ... OFF and unplug the electrical cord. Replace the old bulb with a bulb of the same type and wattage. Then carefully attach the other side. 10 Freezer Features INTERIOR LIGHTING To Remove Light Lens Press Tabs in Direction Shown. Remove the lens from the lamp housing by unsnapping it from the lamp...
Owners Guide
Page 11
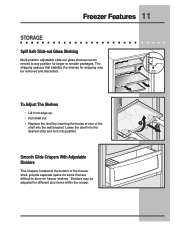
... and discarded. Smooth Glide Crispers With Adjustable Dividers The crispers, located at rear of the freezer shelf, provide separate space for items that stabilize the shelves for shipping may be moved to store on freezer shelves. To Adjust The Shelves • Lift front edge up. • Pull shelf... out • Replace the shelf by inserting the hooks at the bottom of the shelf into position. Freezer Features 11 STORAGE Spill Safe Slide-out Glass Shelving Multi-position adjustable slide out glass shelves can be adjusted for different size items within ...
... and discarded. Smooth Glide Crispers With Adjustable Dividers The crispers, located at rear of the freezer shelf, provide separate space for items that stabilize the shelves for shipping may be moved to store on freezer shelves. To Adjust The Shelves • Lift front edge up. • Pull shelf... out • Replace the shelf by inserting the hooks at the bottom of the shelf into position. Freezer Features 11 STORAGE Spill Safe Slide-out Glass Shelving Multi-position adjustable slide out glass shelves can be adjusted for different size items within ...
Owners Guide
Page 12
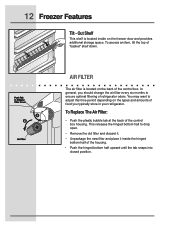
... filter and discard it. • Unpackage the new filter and place it inside on the freezer door and provides additional storage space. You may want to ensure optimal filtering of food you typically store in your refrigerator. In general, you should change the air filter every six months to adjust this time... position. To access an item, tilt the top of the control box housing. Out Shelf This shelf is located on the types and amounts of refrigerator odors. To Replace The Air Filter: • Push the plastic bubble tab at the back of "basket" shelf down.
... filter and discard it. • Unpackage the new filter and place it inside on the freezer door and provides additional storage space. You may want to ensure optimal filtering of food you typically store in your refrigerator. In general, you should change the air filter every six months to adjust this time... position. To access an item, tilt the top of the control box housing. Out Shelf This shelf is located on the types and amounts of refrigerator odors. To Replace The Air Filter: • Push the plastic bubble tab at the back of "basket" shelf down.
Owners Guide
Page 13
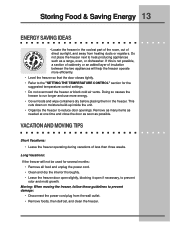
... several months: • Remove all food and unplug the power cord. • Clean and dry the interior thoroughly. • Leave the freezer door open slightly, blocking it open if necessary, to prevent damage: • Disconnect the power cord plug from heating ducts or registers. Moving...: When moving the freezer, follow these guidelines to prevent odor and mold growth. Long Vacations: If the freezer will help the freezer operate more energy. • Cover foods and wipe containers dry before placing them in...
... several months: • Remove all food and unplug the power cord. • Clean and dry the interior thoroughly. • Leave the freezer door open slightly, blocking it open if necessary, to prevent damage: • Disconnect the power cord plug from heating ducts or registers. Moving...: When moving the freezer, follow these guidelines to prevent odor and mold growth. Long Vacations: If the freezer will help the freezer operate more energy. • Cover foods and wipe containers dry before placing them in...
Owners Guide
Page 14
...handling dry ice. Look in the "TROUBLESHOOTING GUIDE" section. POWER FAILURE / FREEZER FAILURE NOTE Do not open freezer door unnecessarily if freezer is off for local dry ice suppliers. If the freezer has stopped operating, see "FREEZER DOES NOT RUN" in the Yellow Pages under Frozen Food Locker Plants. If... Pages under Dry Ice, Dairies or Ice Cream Manufacturers for several hours. If the power failure continues, pack seven or eight pounds of freezer with a blanket, or similar item. Always wear gloves and use of dry ice during a power failure. If you cannot solve the ...
...handling dry ice. Look in the "TROUBLESHOOTING GUIDE" section. POWER FAILURE / FREEZER FAILURE NOTE Do not open freezer door unnecessarily if freezer is off for local dry ice suppliers. If the freezer has stopped operating, see "FREEZER DOES NOT RUN" in the Yellow Pages under Frozen Food Locker Plants. If... Pages under Dry Ice, Dairies or Ice Cream Manufacturers for several hours. If the power failure continues, pack seven or eight pounds of freezer with a blanket, or similar item. Always wear gloves and use of dry ice during a power failure. If you cannot solve the ...
Owners Guide
Page 15
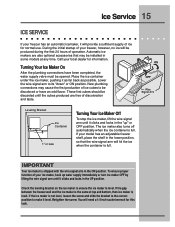
... leveling bracket on the ice maker to make it as far back as possible. IMPORTANT Your ice maker is level. If the gap between the freezer wall and the ice maker is the same at any time. Automatic ice makers are free of ice cubes to its "down" or ON position... until it clicks and locks in the "up" or OFF position. You will need a 1/4 inch socket wrench for information. If your model has an adjustable freezer shelf, place the shelf in the lower position, so that may cause the first production of discoloration and taste. To ensure proper function of operation...
... leveling bracket on the ice maker to make it as far back as possible. IMPORTANT Your ice maker is level. If the gap between the freezer wall and the ice maker is the same at any time. Automatic ice makers are free of ice cubes to its "down" or ON position... until it clicks and locks in the "up" or OFF position. You will need a 1/4 inch socket wrench for information. If your model has an adjustable freezer shelf, place the shelf in the lower position, so that may cause the first production of discoloration and taste. To ensure proper function of operation...
Owners Guide
Page 16
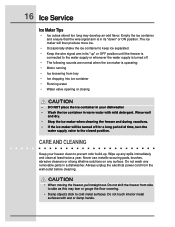
...ice container • Running water • Water valve opening or closing ! Rinse well and dry. • Stop the ice maker when cleaning the freezer and during vacations. • If the ice maker will then produce more ice. • Occasionally shake the ice container to keep ice separated. ..., brushes, abrasive cleaners or strong alkaline solutions on any spills immediately and clean at least twice a year. CAUTION • When moving the freezer, pull straight out. Do not touch interior metal surfaces with mild detergent. CAUTION • DO NOT place the ice container in warm water ...
...ice container • Running water • Water valve opening or closing ! Rinse well and dry. • Stop the ice maker when cleaning the freezer and during vacations. • If the ice maker will then produce more ice. • Occasionally shake the ice container to keep ice separated. ..., brushes, abrasive cleaners or strong alkaline solutions on any spills immediately and clean at least twice a year. CAUTION • When moving the freezer, pull straight out. Do not touch interior metal surfaces with mild detergent. CAUTION • DO NOT place the ice container in warm water ...
Owners Guide
Page 17
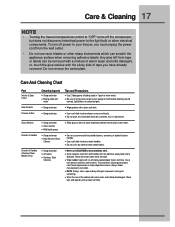
... or other sharp instruments which can scratch the appliance surface when removing adhesive labels. Care & Cleaning 17 NOTE • Turning the freezer temperature control to "OFF" turns off power to your freezer, you have already removed. Do not remove the serial plate. Always follow manufacturer's instruction. • NOTE: Always, clean, wipe and...
... or other sharp instruments which can scratch the appliance surface when removing adhesive labels. Care & Cleaning 17 NOTE • Turning the freezer temperature control to "OFF" turns off power to your freezer, you have already removed. Do not remove the serial plate. Always follow manufacturer's instruction. • NOTE: Always, clean, wipe and...
Owners Guide
Page 18
...only applies in house wiring. 4. All warranties are subject to change or add to any parts in the cabinet liner or sealed refrigeration system (compressor, condenser, evaporator, dryer or tubing) which prove to be defective in materials or workmanship. Original and replacement cartridges are... use of incidental or consequential damages, so this warranty. or Electrolux Canada Corp. and Puerto Rico, and Canada. USA 800-944-9044 Electrolux Home Products, Inc. 18 Warranty Information FREEZER WARRANTY Your freezer is protected by this appliance which prove to be defective in ...
...only applies in house wiring. 4. All warranties are subject to change or add to any parts in the cabinet liner or sealed refrigeration system (compressor, condenser, evaporator, dryer or tubing) which prove to be defective in materials or workmanship. Original and replacement cartridges are... use of incidental or consequential damages, so this warranty. or Electrolux Canada Corp. and Puerto Rico, and Canada. USA 800-944-9044 Electrolux Home Products, Inc. 18 Warranty Information FREEZER WARRANTY Your freezer is protected by this appliance which prove to be defective in ...


