
Owners Guide
Page 2
... 212378, Augusta, Georgia 30917, USA All right reserved. It is particularly important that the oven door close properly and that there is damaged. and Canada. 1-877-4ELECTROLUX (1-877-435-3287) For online support and internet product information: www.electrolux.com PRECAUTIONS TO AVOID POSSIBLE EXPOSURE TO EXCESSIVE MICROWAVE ENERGY (a) Do not attempt to...
... 212378, Augusta, Georgia 30917, USA All right reserved. It is particularly important that the oven door close properly and that there is damaged. and Canada. 1-877-4ELECTROLUX (1-877-435-3287) For online support and internet product information: www.electrolux.com PRECAUTIONS TO AVOID POSSIBLE EXPOSURE TO EXCESSIVE MICROWAVE ENERGY (a) Do not attempt to...
Owners Guide
Page 8
... it frequently for standing time which allows the food to finish cooking without the turntable and support nor turn both from top to bottom and from oven and stir, if possible. The display will turn the turntable over once during cooking, if possible. • Turn foods over ... only. It should not be warm to the touch when cooking or reheating. ABOUT MICROWAVE COOKING • Arrange food carefully. The Electrolux High Speed Convection Microwave Cookbook is for the exterior of time indicated and add more as uncovered ones. ALWAYS have been reached. Check...
... it frequently for standing time which allows the food to finish cooking without the turntable and support nor turn both from top to bottom and from oven and stir, if possible. The display will turn the turntable over once during cooking, if possible. • Turn foods over ... only. It should not be warm to the touch when cooking or reheating. ABOUT MICROWAVE COOKING • Arrange food carefully. The Electrolux High Speed Convection Microwave Cookbook is for the exterior of time indicated and add more as uncovered ones. ALWAYS have been reached. Check...
Owners Guide
Page 13
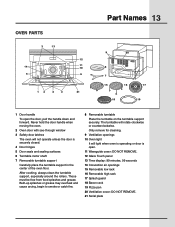
... door is securely closed. 4 Door hinges 5 Door seals and sealing surfaces 6 Turntable motor shaft 7 Removable turntable support Carefully place the turntable support in the center of the oven floor. Built-up splashes or grease may overheat and cause arcing, begin to smoke or catch fire. 8 Removable ...turntable Place the turntable on the turntable support securely. The turntable will not operate unless the door is open the door, pull the handle down and forward. These must be free from food splashes and grease. OVEN PARTS 3 13 12 14 11 10 5 6 14 2...
... door is securely closed. 4 Door hinges 5 Door seals and sealing surfaces 6 Turntable motor shaft 7 Removable turntable support Carefully place the turntable support in the center of the oven floor. Built-up splashes or grease may overheat and cause arcing, begin to smoke or catch fire. 8 Removable ...turntable Place the turntable on the turntable support securely. The turntable will not operate unless the door is open the door, pull the handle down and forward. These must be free from food splashes and grease. OVEN PARTS 3 13 12 14 11 10 5 6 14 2...

Owners Guide
Page 16
... high or low rack may cause arcing when they come in Basic Cook on the turntable with the turntable, oven walls or accessory racks. ROAST Use the Roast setting for 30 minutes. Touch START. If extra time is needed, add and continue to 450˚F. When using Grill. If...desired doneness has been achieved. 3. When you want to 50% compared with high speed air circulation, 300˚F. Caution: The oven cabinet, cavity, door, turntable, turntable support, rack and dishes will automatically hold at step 1. To PREVENT BURNS, use for 15 minutes. Use the low rack over ...
... high or low rack may cause arcing when they come in Basic Cook on the turntable with the turntable, oven walls or accessory racks. ROAST Use the Roast setting for 30 minutes. Touch START. If extra time is needed, add and continue to 450˚F. When using Grill. If...desired doneness has been achieved. 3. When you want to 50% compared with high speed air circulation, 300˚F. Caution: The oven cabinet, cavity, door, turntable, turntable support, rack and dishes will automatically hold at step 1. To PREVENT BURNS, use for 15 minutes. Use the low rack over ...

Owners Guide
Page 19
...low rack is entering the specific food number. It may be necessary to select 1 level or 2 levels. CAUTION: The oven cabinet, cavity, door, turntable, turntable support, rack and dishes will become hot. Touch the UP or DOWN arrows to ensure perfectly cooked foods. Touch ENTER. Follow the... directions below . Note they are cooked with Electrolux's new high speed hot air system. OPERATION 1: Select food from the ...
...low rack is entering the specific food number. It may be necessary to select 1 level or 2 levels. CAUTION: The oven cabinet, cavity, door, turntable, turntable support, rack and dishes will become hot. Touch the UP or DOWN arrows to ensure perfectly cooked foods. Touch ENTER. Follow the... directions below . Note they are cooked with Electrolux's new high speed hot air system. OPERATION 1: Select food from the ...

Owners Guide
Page 36
...cleaning the interior thoroughly, residual grease may remove any chemical oven cleaners. Carefully wipe with mild soap and water; Built-up immediately. SPECIAL NOTE FOR TURNTABLE SUPPORT After cooking, always clean the turntable support, especially around the rollers. 36 Cleaning and Care Disconnect the... power cord before cleaning or leave the door open to assure good oven performance. Do not use any lingering ...
...cleaning the interior thoroughly, residual grease may remove any chemical oven cleaners. Carefully wipe with mild soap and water; Built-up immediately. SPECIAL NOTE FOR TURNTABLE SUPPORT After cooking, always clean the turntable support, especially around the rollers. 36 Cleaning and Care Disconnect the... power cord before cleaning or leave the door open to assure good oven performance. Do not use any lingering ...

Owners Guide
Page 40
Post Office Box 212378, Augusta Georgia 30917, USA All right reserved. For toll-free telephone support in the USA Printed in the U.S. and Canada. 1-877-4ELECTROLUX (1-877-435-3287) For online support and internet product information: www.electrolux.com ©2003 Electrolux Home Products, Inc.
Post Office Box 212378, Augusta Georgia 30917, USA All right reserved. For toll-free telephone support in the USA Printed in the U.S. and Canada. 1-877-4ELECTROLUX (1-877-435-3287) For online support and internet product information: www.electrolux.com ©2003 Electrolux Home Products, Inc.

Installation Instructions
Page 1
... to slide out when opening , provide a 3 Remove 2 duct pronged, polarized, electrical outlet, 240 shipping supports (both sides) Figure 1 G 20 1/4" CL 16 3/4" PRODUCT DIMENSIONS MODEL 30" (76.2) High Speed Oven A B C 30" (76.2) 2227/32" (58.0) 211/4" (54.0) CUTOUT DIMENSIONS AND CABINET WIDTH D 2215/16" (...speed oven and the wall oven should not be capable of cabinet is 36" (91.44 cm) from the oven compartments before installing the high speed oven. 2. The oven has a 6-15 plug and requires a 6-15 receptacle. At the rear of Figure 1. Remove the 2 shipping duct supports ...
... to slide out when opening , provide a 3 Remove 2 duct pronged, polarized, electrical outlet, 240 shipping supports (both sides) Figure 1 G 20 1/4" CL 16 3/4" PRODUCT DIMENSIONS MODEL 30" (76.2) High Speed Oven A B C 30" (76.2) 2227/32" (58.0) 211/4" (54.0) CUTOUT DIMENSIONS AND CABINET WIDTH D 2215/16" (...speed oven and the wall oven should not be capable of cabinet is 36" (91.44 cm) from the oven compartments before installing the high speed oven. 2. The oven has a 6-15 plug and requires a 6-15 receptacle. At the rear of Figure 1. Remove the 2 shipping duct supports ...

Installation Instructions
Page 2
... Carefully guide the oven into the Anti-Tip brackets (see figure 2). 4. The oven side bracket will prevent possible damage to the oven control, wait at least three (3) hours after receiving this built-in oven before installing the Anti-Tip brackets. 3. The oven support surface may be solid...with the appliance both side at power on the oven frame). High Speed Oven Installation Never hold the door handle when moving the oven. Plug the power supply cord into the electrical outlet. Avoid pinching cord between oven and wall (see figure 4). 2 Electrical Requirements This...
... Carefully guide the oven into the Anti-Tip brackets (see figure 2). 4. The oven side bracket will prevent possible damage to the oven control, wait at least three (3) hours after receiving this built-in oven before installing the Anti-Tip brackets. 3. The oven support surface may be solid...with the appliance both side at power on the oven frame). High Speed Oven Installation Never hold the door handle when moving the oven. Plug the power supply cord into the electrical outlet. Avoid pinching cord between oven and wall (see figure 4). 2 Electrical Requirements This...

Specification sheet
Page 2
High-Speed Oven E30SO75ESS designer series 24" min. 30" min. 30" 11/16" 22 7/8" Power supply location (left bottom rear) 21 1/4" 21 7/32" 21 3/8" min. 21 7/8" max. Refer to Product Installation Guide on web.) • When used in combination with another Electrolux ICON® built-in combination with any Electrolux ICON® Single Wall Oven and / or Warmer Drawer...
High-Speed Oven E30SO75ESS designer series 24" min. 30" min. 30" 11/16" 22 7/8" Power supply location (left bottom rear) 21 1/4" 21 7/32" 21 3/8" min. 21 7/8" max. Refer to Product Installation Guide on web.) • When used in combination with another Electrolux ICON® built-in combination with any Electrolux ICON® Single Wall Oven and / or Warmer Drawer...

Specification sheet
Page 3
... page and installation guide on web 24" min. 30" High-Speed Oven Cutout For models: E30SO75FPS E30SO75ESS 21 11/16" min. 223/16" max. 2" (visible gap)* 30" Electric Single Wall Oven Cutout For models: E30EW75GPS E30EW75GSS 28 1/2" min. 28...support 150 lbs. 24" min.** (critical dimension) 4"x 4" opening to route armoured cable Full base required to ensure that each built-in the U.S.A. Electrolux Major Appliances, N.A. High standards of Wall Oven cutout to top edge of Wall Oven's faceplate, leaving a 2" visible gap between both product faceplates. 30" Electric Single Wall Ovens...
... page and installation guide on web 24" min. 30" High-Speed Oven Cutout For models: E30SO75FPS E30SO75ESS 21 11/16" min. 223/16" max. 2" (visible gap)* 30" Electric Single Wall Oven Cutout For models: E30EW75GPS E30EW75GSS 28 1/2" min. 28...support 150 lbs. 24" min.** (critical dimension) 4"x 4" opening to route armoured cable Full base required to ensure that each built-in the U.S.A. Electrolux Major Appliances, N.A. High standards of Wall Oven cutout to top edge of Wall Oven's faceplate, leaving a 2" visible gap between both product faceplates. 30" Electric Single Wall Ovens...

Specification sheet
Page 4
...8226; Minimum 23-1/4" clearance needed for Wall Oven door depth when open. 30" High-Speed Ovens Specifications • Product Weight - (E30SO75FPS / E30SO75ESS) 115 Lbs. • Voltage Rating - 240V / 60 Hz / 15 or 20 Amps • Single phase 3- Electrolux Major Appliances, N.A. or 4-wire ... - High-Speed Oven/Single Wall Oven/Warmer Drawer For detailed product dimensions and installation specifications, refer to support 150 lbs. Appliance must be square. • Minimum 4-1/2" required distance from bottom of Warmer Drawer cutout to top edge of supporting 200 lbs. Two...
...8226; Minimum 23-1/4" clearance needed for Wall Oven door depth when open. 30" High-Speed Ovens Specifications • Product Weight - (E30SO75FPS / E30SO75ESS) 115 Lbs. • Voltage Rating - 240V / 60 Hz / 15 or 20 Amps • Single phase 3- Electrolux Major Appliances, N.A. or 4-wire ... - High-Speed Oven/Single Wall Oven/Warmer Drawer For detailed product dimensions and installation specifications, refer to support 150 lbs. Appliance must be square. • Minimum 4-1/2" required distance from bottom of Warmer Drawer cutout to top edge of supporting 200 lbs. Two...

Wiring Diagram
Page 3
... fuse F10A Capacitor, fan motor Lamp, oven light Thermal Cutout, top heater Thermal Cutout...heater Transformer, power Transformer, low voltage Magnetron Magnetron Filter, noise Panel, cabinet back Base, cabinet bottom Foot, cabinet support Cabinet, outer casing Power Unit, PWB Duct, damper Angle, power board mt. NO 1 # 2 # 3 #...5304451438 5304451439 5304451440 5304451441 5304451442 5304451443 5304451444 5304451445 5304451446 5304451447 5304451448 5304451449 5304451450 5304451451 5304451452 5304451453 A E30SO75ES (E30SO75ESS) B E30SO75ES (E30SO75ESSA) C E30SO75ES (E30SO75ESSB) A B C A B C A B C A...
... fuse F10A Capacitor, fan motor Lamp, oven light Thermal Cutout, top heater Thermal Cutout...heater Transformer, power Transformer, low voltage Magnetron Magnetron Filter, noise Panel, cabinet back Base, cabinet bottom Foot, cabinet support Cabinet, outer casing Power Unit, PWB Duct, damper Angle, power board mt. NO 1 # 2 # 3 #...5304451438 5304451439 5304451440 5304451441 5304451442 5304451443 5304451444 5304451445 5304451446 5304451447 5304451448 5304451449 5304451450 5304451451 5304451452 5304451453 A E30SO75ES (E30SO75ESS) B E30SO75ES (E30SO75ESSA) C E30SO75ES (E30SO75ESSB) A B C A B C A B C A...

Wiring Diagram
Page 5
...Holder, capacitor clamp Hinge, oven door, left Hinge, oven door, right Latch Hook, right Latch Hook, left side Support, turntable # Functional Parts 5 * Non-Illustrated Parts Publication No: 5995553731 10/09 Support, chassis, (2) Guide, magnetron...E30SO75ESS) B E30SO75ES (E30SO75ESSA) C E30SO75ES (E30SO75ESSB) A B C A B C A B C A B C A B C A B C A B C A B C A B C A B C A B C A B C A B C A B C A B C A B C A B C A B C A B C A B C A B C A B C A B C A B C A B C A B C A B C A B C A B C A B C A B C A B C A B C A B C A B C A B C A B C A B C A B - - angle Angle, noise unit mt. E30SO75ES OVEN...
...Holder, capacitor clamp Hinge, oven door, left Hinge, oven door, right Latch Hook, right Latch Hook, left side Support, turntable # Functional Parts 5 * Non-Illustrated Parts Publication No: 5995553731 10/09 Support, chassis, (2) Guide, magnetron...E30SO75ESS) B E30SO75ES (E30SO75ESSA) C E30SO75ES (E30SO75ESSB) A B C A B C A B C A B C A B C A B C A B C A B C A B C A B C A B C A B C A B C A B C A B C A B C A B C A B C A B C A B C A B C A B C A B C A B C A B C A B C A B C A B C A B C A B C A B C A B C A B C A B C A B C A B C A B C A B C A B - - angle Angle, noise unit mt. E30SO75ES OVEN...
