Electrolux E30MO75HSS Support and Manuals
Get Help and Manuals for this Electrolux item
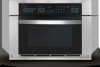
View All Support Options Below
Free Electrolux E30MO75HSS manuals!
Problems with Electrolux E30MO75HSS?
Ask a Question
Free Electrolux E30MO75HSS manuals!
Problems with Electrolux E30MO75HSS?
Ask a Question
Popular Electrolux E30MO75HSS Manual Pages
Installation Instructions (All Languages) - Page 1
...
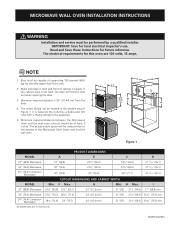
Installation and service must be reduced due to the overlap of the Microwave Oven lower vent and the wall oven.
23 ½"
(59.8 cm)
20 ¾"
(52.7 cm)
H
to slide
C
out when opening the door.
3. Read and Save these instructions for local electrical inspector's use. Base must be at least 3 inches.
I
G
CL 6"
4"
F
18"
Figure 1
PRODUCT DIMENSIONS
MODEL...
Installation Instructions (All Languages) - Page 4
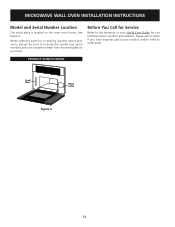
... letter from the serial plate on the oven front frame. Please call or write if you have inquiries about your oven, always be sure to order parts.
PRODUCT IDENTIFICATION
Serial Plate
Menu Label
Figure 6
E4 Before You Call for our toll-free service number and address. MICROWAVE WALL OVEN INSTALLATION INSTRUCTIONS
Model and Serial Number Location
The serial plate...
Owners Guide - Page 3
...eggs and sealed containers - See "GROUNDING INSTRUCTIONS" found on the oven.
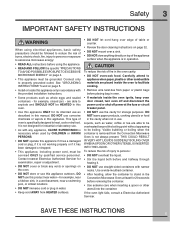
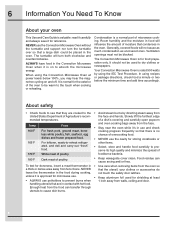
• DO NOT store or use this appliance. If the oven light fails, consult a Electrolux Authorized Servicer. Safety 3
Important Safety Instructions
When using the appliance.
• Read and follow the specific "PRECAUTIONS TO AVOID POSSIBLE EXPOSURE TO EXCESSIVE MICROWAVE ENERGY" on top of the appliance
surface...
Owners Guide - Page 5

... is equipped with a cord having a grounding wire with respect to the receiver. • Move the microwave oven away from failure to part 18 of the grounding plug can accept any liability for any questions about the grounding or electrical instructions, consult a qualified electrician or
serviceperson. 2. E It has been type tested and found to radio...
Owners Guide - Page 6
...when cooking or reheating. In using the Convection Microwave Oven at least
• ALWAYS use the Convection Microwave Oven without the turntable and support nor turn both clockwise and counterclockwise.
cooking ... of microwave cooking. Room humidity and the moisture in food will influence the amount of moisture that the utensil, your oven
This Use and Care Guide is a normal part of ...
Owners Guide - Page 8

... Mix/Roast Low Mix/Bake YES - Do not use metal twist ties. Small flat pieces of oven. Metal twist ties
Oven cooking bags YES - Excellent YES - No cover. NO
YES - Many pieces already in your Convection Microwave Oven. The chart below will help you decide what utensils and coverings should be used if 3/4 filled...
Owners Guide - Page 12

... enter the correct time of day 12:30 (A.M. If this Use and Care Guide completely.
• Before the Convection Microwave Oven can be erased. Touch set clock again.
12 30
Stop/Clear
Touch the STOP/CLEAR to the display. 5. Stop the oven temporarily during
programming. 2. Close the door.
Enter the correct time of day to...
Owners Guide - Page 13

... defrost manually. E Touch START.
2. To set power level
There are defrosted.
Follow the exact 3-step procedure found under Time cooking. When using Power level 3. Enter cooking time.
500
3. Touch START.
For example, defrost 5 minutes for foods such as cheese, milk and long slow cooking of the estimated defrosting time, program the oven in a microwave...
Owners Guide - Page 19
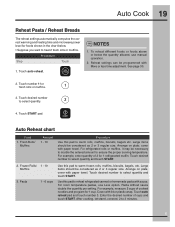
... considered as 2 or 3 regular size. For room temperature pastas, use manual operation.
2. Touch auto reheat pad and touch number 3. After cooking,...ensure the proper serving temperature. Procedure
Step
Touch
1. Reheat settings can be necessary to double the entered amount to reheat refrigerated...Pasta without sauce double the quantity per setting. See page 30.
2. Cover with lid or ...
Owners Guide - Page 26

...Automatic Mix Cooking
Your Convection Microwave Oven can be left in contact with the turntable, oven walls or accessory racks. ... Manual Convection and Automatic Mix Cooking
NOTES
To program only preheat, touch the Start pad after time has elapsed. The oven cannot...shelf baking in oven a few minutes to steaks, hot dogs etc. Automatic Mix Cooking:
1. This Use & Care Guide tells you how...
Owners Guide - Page 27
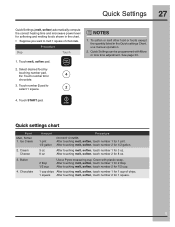
... touching melt, soften, touch number 2 for 3 oz. Quick settings chart
Food Melt, Soften 1. Cream Cheese
3. Quick Settings 27
Quick Settings (melt, soften) automatically compute the correct heating time and microwave power level for softening and melting foods shown in the Quick settings Chart, use manual operation.
2. See page 30.
4.
Ice Cream
2.
E
Chocolate
Amount...
Owners Guide - Page 32

...with a damp cloth to set in mild, sudsy water; for turntable support. They are also dishwasher-proof. if spills occur, wipe up splashes may occur if oven is not thoroughly cleaned or ...Exterior
Clean the outside with water only. Metal parts will cause the porcelain enamel turntable to stand in cleaning the touch control panel. After Microwave Cooking
Cleaning is not sealed, so excess ...
Owners Guide - Page 33
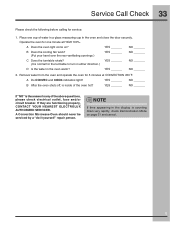
... YOUR NEAREST ELECTROLUX AUTHORIZED SERVICER. E Service Call Check 33
Please check the following before calling for the turntable to turn in either direction.)
D Is the water in the display is the answer to any of the oven hot? Place one minute at CONVECTION 450˚F. A Convection Microwave Oven should never be serviced by a "do-it-yourself" repair person...
Specification sheet - Page 3

... be grounded for detailed instructions. Built-In Microwave/Single Wall Oven
For detailed product dimensions and installation specifications, refer to model-specific product page and installation guide on this page.)
• Minimum 24"deep cutout dimension is critical for proper combination installation, to support 200 lbs.
2" min. 30" Combination Installation -
MUST be located...
Specification sheet - Page 4

...
120V/60 Hz grounded electrical outlet should NOT be installed as noted for proper installation of Built-In Microwave cutout to Product Installation Guide on web
24" min.
30" Built-In Microwave Cutout
For models: E30MO75HPS E30MO75HSS
21" min. 211/2" max.
2" (visible gap)*
30" Electric Single Wall Oven Cutout
For models: E30EW75GPS E30EW75GSS
28 1/2" min. 28 7/8" max.
30" Warmer Drawer...
Electrolux E30MO75HSS Reviews
We have not received any reviews for Electrolux yet.