
Installation Instructions
Page 13
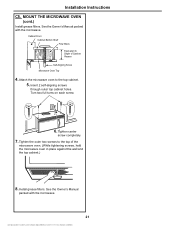
...top cabinet. NOTE: We recommend using filler blocks if the cabinet front hangs below the cabinet bottom shelf. Lift microwave, tilt it tight throughout Steps 1-3. Temporarily secure the oven by pulling cord. 1. Cabinet Front Cabinet Bottom Shelf ...MICROWAVE OVEN. IMPORTANT: Do not grip or use the nylon grommet around the power cord hole to the top cabinet. 5. NOTE: When mounting the microwave oven, thread power cord through hole in place against cabinet bottom 3. Insert 2 self-aligning screws through top center cabinet hole. See the Owner's Manual packed with the microwave...
...top cabinet. NOTE: We recommend using filler blocks if the cabinet front hangs below the cabinet bottom shelf. Lift microwave, tilt it tight throughout Steps 1-3. Temporarily secure the oven by pulling cord. 1. Cabinet Front Cabinet Bottom Shelf ...MICROWAVE OVEN. IMPORTANT: Do not grip or use the nylon grommet around the power cord hole to the top cabinet. 5. NOTE: When mounting the microwave oven, thread power cord through hole in place against cabinet bottom 3. Insert 2 self-aligning screws through top center cabinet hole. See the Owner's Manual packed with the microwave...
Installation Instructions
Page 17
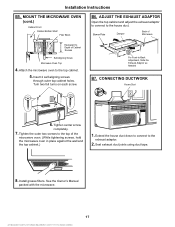
...to the top cabinet. 5. CONNECTING DUCTWORK House Duct 6. Seal exhaust duct joints using duct tape. 8. Attach the microwave oven to the exhaust adaptor. 2. MOUNT THE MICROWAVE OVEN (cont.) Cabinet Front Cabinet Bottom Shelf Filler Block B6. Tighten center screw completely. 7. Install grease filters.... duct. Tighten the outer two screws to Depth of the microwave oven. (While tightening screws, hold the microwave oven in place against the wall and the top cabinet.) 1. See the Owner's Manual packed with the microwave. 17 Turn two full turns on each screw. Blower-Plate...
...to the top cabinet. 5. CONNECTING DUCTWORK House Duct 6. Seal exhaust duct joints using duct tape. 8. Attach the microwave oven to the exhaust adaptor. 2. MOUNT THE MICROWAVE OVEN (cont.) Cabinet Front Cabinet Bottom Shelf Filler Block B6. Tighten center screw completely. 7. Install grease filters.... duct. Tighten the outer two screws to Depth of the microwave oven. (While tightening screws, hold the microwave oven in place against the wall and the top cabinet.) 1. See the Owner's Manual packed with the microwave. 17 Turn two full turns on each screw. Blower-Plate...
Installation Instructions
Page 21
...See the Owner's Manual packed with the microwave. Cabinet Front Cabinet Bottom Shelf Filler Block Equivalent to Depth of the microwave oven. (While tightening screws, hold the microwave oven in place against the wall and the top cabinet.) 8. See the Owner's Manual packed with the microwave. 21 Tighten... the outer two screws to the top cabinet. 5. Turn two full turns on each screw. 6. Attach the microwave oven to the top of Cabinet Recess Self-Aligning Screw Microwave Oven Top 4. Tighten center ...
...See the Owner's Manual packed with the microwave. Cabinet Front Cabinet Bottom Shelf Filler Block Equivalent to Depth of the microwave oven. (While tightening screws, hold the microwave oven in place against the wall and the top cabinet.) 8. See the Owner's Manual packed with the microwave. 21 Tighten... the outer two screws to the top cabinet. 5. Turn two full turns on each screw. 6. Attach the microwave oven to the top of Cabinet Recess Self-Aligning Screw Microwave Oven Top 4. Tighten center ...

Installation Instructions
Page 22
Read the Owner's Manual. 2. Make sure the microwave oven has been installed according to instructions. 6. Remove all packing material from the microwave oven. 3. Install turntable and ring in cavity. 4. Plug power cord into a dedicated 20 amp electrical outlet. KEEP INSTALLATION INSTRUCTIONS FOR THE LOCAL INSPECTOR'S USE. 5. Insure proper ground exists before use 22 Installation Instructions BEFORE YOU USE YOUR MICROWAVE 1. Replace house fuse or turn breaker back on. 7.
Read the Owner's Manual. 2. Make sure the microwave oven has been installed according to instructions. 6. Remove all packing material from the microwave oven. 3. Install turntable and ring in cavity. 4. Plug power cord into a dedicated 20 amp electrical outlet. KEEP INSTALLATION INSTRUCTIONS FOR THE LOCAL INSPECTOR'S USE. 5. Insure proper ground exists before use 22 Installation Instructions BEFORE YOU USE YOUR MICROWAVE 1. Replace house fuse or turn breaker back on. 7.