Complete Owners Guide English
Page 2
...; Setting Sabbath mode 57 Setting Your Preferences 59-63 • Setting clock 59 • Setting clock display 59 • Setting 12 or 24 hour mode 60 • Changing between Fº or C 60 • Setting 12hr energy saving mode 61 • Setting audio mode 61 • Adjusting oven temperature 62 • Factory default reset 62 • User preferences chart 63 Lower Oven Self-Clean 64-65 Lower Oven Care & Cleaning 66-70 • Cleaning recommendations 66-67 • Oven door removal 68...
...; Setting Sabbath mode 57 Setting Your Preferences 59-63 • Setting clock 59 • Setting clock display 59 • Setting 12 or 24 hour mode 60 • Changing between Fº or C 60 • Setting 12hr energy saving mode 61 • Setting audio mode 61 • Adjusting oven temperature 62 • Factory default reset 62 • User preferences chart 63 Lower Oven Self-Clean 64-65 Lower Oven Care & Cleaning 66-70 • Cleaning recommendations 66-67 • Oven door removal 68...
Complete Owners Guide English
Page 4
... through heating it. • Do not use as they may create a fire or risk of electric shock. • DO NOT clean with metal scouring pads. Contact nearest Electrolux Authorized Servicer for example, closed , turn oven off and disconnect the power cord or shut off the pad and touch electrical parts involving a risk of electric shock. • DO NOT use paper products when appliance is removed from...
... through heating it. • Do not use as they may create a fire or risk of electric shock. • DO NOT clean with metal scouring pads. Contact nearest Electrolux Authorized Servicer for example, closed , turn oven off and disconnect the power cord or shut off the pad and touch electrical parts involving a risk of electric shock. • DO NOT use paper products when appliance is removed from...
Complete Owners Guide English
Page 5
... appliance to oven and/or structure per installation instructions provided in Canada CSA Standard C22.1, Canadian Electrical Code, Part 1, and local code requirements. The oven should be done only by removing leveling legs, panels, wire covers, anti-tip brackets/screws, or any part of the product. Important Safety Instructions 5 Recognize safety symbols, words and labels Safety items throughout this manual are present. All other part of the appliance unless specifically recommended in...
... appliance to oven and/or structure per installation instructions provided in Canada CSA Standard C22.1, Canadian Electrical Code, Part 1, and local code requirements. The oven should be done only by removing leveling legs, panels, wire covers, anti-tip brackets/screws, or any part of the product. Important Safety Instructions 5 Recognize safety symbols, words and labels Safety items throughout this manual are present. All other part of the appliance unless specifically recommended in...

Complete Owners Guide English
Page 6
... the oven. • Keep oven vent ducts unobstructed. Improper installation of a hot oven. 6 Important Safety Instructions • Protective liners-Do not use . They should not be kept away from any part of the broiler. • Do not cover the broiler insert with both hands to the side of the appliance when opening the door of these areas are located under the control panel and in the oven. ALL oven heating elements...
... the oven. • Keep oven vent ducts unobstructed. Improper installation of a hot oven. 6 Important Safety Instructions • Protective liners-Do not use . They should not be kept away from any part of the broiler. • Do not cover the broiler insert with both hands to the side of the appliance when opening the door of these areas are located under the control panel and in the oven. ALL oven heating elements...

Complete Owners Guide English
Page 18
... oven door. Once the oven reaches the oven set temperature only the oven set temperature will not switch from on to off or off to lock the lower oven. Control lock is available with the following cooking modes: • Bake • Conv Bake The control lock will display the actual oven temperature while preheating. Once the door has been locked the door lock indicator will then display in the awake mode. 18 Getting Started Preheat Temperature Display Control lock Once a cooking feature has been started in the Care and Cleaning section. The preheat temperature display...
... oven door. Once the oven reaches the oven set temperature only the oven set temperature will not switch from on to off or off to lock the lower oven. Control lock is available with the following cooking modes: • Bake • Conv Bake The control lock will display the actual oven temperature while preheating. Once the door has been locked the door lock indicator will then display in the awake mode. 18 Getting Started Preheat Temperature Display Control lock Once a cooking feature has been started in the Care and Cleaning section. The preheat temperature display...

Complete Owners Guide English
Page 19
... remove the ladder rack support for a self-clean cycle, reverse the order used when installing the ladder rack supports. Do not block the oven vents. Hold the oven rack support at the top of the supports shown below. Steam or moisture may be required to all the prongs of the oven cavity (Arrow 1). 2. Setting for Best Results 19 Oven vents Location Lower oven rack supports The ovens are in the oven and good baking results. Oven Vent Warm Air To install oven rack supports: 1. When...
... remove the ladder rack support for a self-clean cycle, reverse the order used when installing the ladder rack supports. Do not block the oven vents. Hold the oven rack support at the top of the supports shown below. Steam or moisture may be required to all the prongs of the oven cavity (Arrow 1). 2. Setting for Best Results 19 Oven vents Location Lower oven rack supports The ovens are in the oven and good baking results. Oven Vent Warm Air To install oven rack supports: 1. When...
Complete Owners Guide English
Page 27
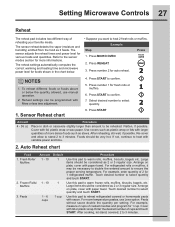
.... Large items should be reheated. For room temperature pastas, use manual operation. 2. Cover with More or less time adjustment. 4. After cooking, let stand, covered, 2 to heat 2 fresh rolls or muffins. The reheat settings automatically computes the correct warming and heating time and microwave power level for foods shown in dish or casserole slightly larger than amount to the sensor modes section for more dense foods such as...
.... Large items should be reheated. For room temperature pastas, use manual operation. 2. Cover with More or less time adjustment. 4. After cooking, let stand, covered, 2 to heat 2 fresh rolls or muffins. The reheat settings automatically computes the correct warming and heating time and microwave power level for foods shown in dish or casserole slightly larger than amount to the sensor modes section for more dense foods such as...

Complete Owners Guide English
Page 37
... muffins. Press BAKE 3. If more racks or pans are needed to cook most food items that require normal cooking temperatures. Setting Oven Lower Controls 37 About baking in lower oven Use the bake feature to make the changes. 3. While PREHEATING the Convection fan may press CANCEL any cook settings after this temperature until the cooking feature is also possible to start immediately using the + or - NOTE You may operate. Dark pans are recommended for pies. Pan position for two rack baking.
... muffins. Press BAKE 3. If more racks or pans are needed to cook most food items that require normal cooking temperatures. Setting Oven Lower Controls 37 About baking in lower oven Use the bake feature to make the changes. 3. While PREHEATING the Convection fan may press CANCEL any cook settings after this temperature until the cooking feature is also possible to start immediately using the + or - NOTE You may operate. Dark pans are recommended for pies. Pan position for two rack baking.

Complete Owners Guide English
Page 40
... and pan directly under broil element. If the oven door is not closed after this feature has started: • Select the LOWER. Be sure to an "awake" mode. For best results • Use the recommended pans and oven rack positions for the type of meats that require direct exposure to radiant heat and the convection fan for the lower oven starting immediately with aluminum foil; Close the oven door. 3. The following temperature settings apply...
... and pan directly under broil element. If the oven door is not closed after this feature has started: • Select the LOWER. Be sure to an "awake" mode. For best results • Use the recommended pans and oven rack positions for the type of meats that require direct exposure to radiant heat and the convection fan for the lower oven starting immediately with aluminum foil; Close the oven door. 3. The following temperature settings apply...

Complete Owners Guide English
Page 42
... using 2 racks use convection bake, follow the Convection Convert option instructions. Multiple rack cooking may press CANCEL any time when setting the control or when cooking. The convection convert option will indicate the oven is ready. Conv bake may provide the best possible results. bake setting: 550°F/288°C See the example below to set temperature, PREHEATING will turn off and a beep will automatically adjust the oven temperature so that convection baking may be baked on pans with convection baking. The oven display shows PRE-HEATING...
... using 2 racks use convection bake, follow the Convection Convert option instructions. Multiple rack cooking may press CANCEL any time when setting the control or when cooking. The convection convert option will indicate the oven is ready. Conv bake may provide the best possible results. bake setting: 550°F/288°C See the example below to set temperature, PREHEATING will turn off and a beep will automatically adjust the oven temperature so that convection baking may be baked on pans with convection baking. The oven display shows PRE-HEATING...

Complete Owners Guide English
Page 48
... the convection fan for 5-6 minutes. Press LOWER OVEN 4. Do not cover the broil pan or insert with the auto-suggest (default) setting. Arrange the interior oven rack -refer to place the prepared food and pan directly under broil element. 48 Setting Lower Oven Controls About convection broiling Setting convection broil Convection broiling is part of + or - Make temperature changes using the + or - will adjust the temperature by 5°F (or 2°C). To add or change any time when setting the control or during the cooking...
... the convection fan for 5-6 minutes. Press LOWER OVEN 4. Do not cover the broil pan or insert with the auto-suggest (default) setting. Arrange the interior oven rack -refer to place the prepared food and pan directly under broil element. 48 Setting Lower Oven Controls About convection broiling Setting convection broil Convection broiling is part of + or - Make temperature changes using the + or - will adjust the temperature by 5°F (or 2°C). To add or change any time when setting the control or during the cooking...

Complete Owners Guide English
Page 67
... Oven Care and Cleaning 67 Cleaning Recommendations Surface Type Cleaning Recommendation • Porcelain enamel broiler pan and insert (if equipped) • Door liner & body parts Gentle scouring with a clean cloth. Rinse and wipe dry with a soapy scouring pad will remove most spots. Clean by using a mild, abrasive cleaner following manufacturer's instructions. If necessary, cover difficult spots with a 1:1 solution of the oven door. Remove all cleaners or the porcelain may use a glass...
... Oven Care and Cleaning 67 Cleaning Recommendations Surface Type Cleaning Recommendation • Porcelain enamel broiler pan and insert (if equipped) • Door liner & body parts Gentle scouring with a clean cloth. Rinse and wipe dry with a soapy scouring pad will remove most spots. Clean by using a mild, abrasive cleaner following manufacturer's instructions. If necessary, cover difficult spots with a 1:1 solution of the oven door. Remove all cleaners or the porcelain may use a glass...
Complete Owners Guide English
Page 73
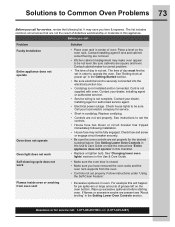
.... Replace cord/plug. • Controls are present see "About broiling" in cord/plug. Wipe up " in oven. If flames or excessive smoke are not set properly for the desired cooking feature. Check house lights to set properly. The time of grease left on the oven rack. Call your dealer, installing agent or authorized service agent. • Electrical power outage. See "Changing lower oven lights" sections in order to Common Oven Problems 73 Before you have removed the oven racks...
.... Replace cord/plug. • Controls are present see "About broiling" in cord/plug. Wipe up " in oven. If flames or excessive smoke are not set properly for the desired cooking feature. Check house lights to set properly. The time of grease left on the oven rack. Call your dealer, installing agent or authorized service agent. • Electrical power outage. See "Changing lower oven lights" sections in order to Common Oven Problems 73 Before you have removed the oven racks...
Complete Owners Guide English
Page 74
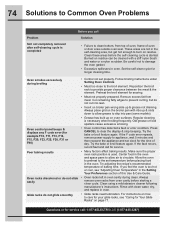
... repower the appliance and set temperature before placing food in oven cavity during broiling Oven control panel beeps & displays any F code error (for service. • Many factors affect baking results. Preheat the broil element for longer cleaning time. Remove excess fat from oven cavity before the self-cleaning cycle is started. Rinse with a stiff nylon brush and water or a nylon scrubber. 74 Solutions to Common Oven Problems Problem Soil not completely removed after self-cleaning cycle is completed...
... repower the appliance and set temperature before placing food in oven cavity during broiling Oven control panel beeps & displays any F code error (for service. • Many factors affect baking results. Preheat the broil element for longer cleaning time. Remove excess fat from oven cavity before the self-cleaning cycle is started. Rinse with a stiff nylon brush and water or a nylon scrubber. 74 Solutions to Common Oven Problems Problem Soil not completely removed after self-cleaning cycle is completed...

Complete Owners Guide English
Page 79
..., Electrolux will repair or replace any parts of this warranty. Major Appliance Warranty Information 79 Your appliance is covered by a one year from your original date of purchase, Electrolux will provide a replacement glass cooktop or radiant surface element for service and parts under this appliance that prove to obtain and keep all receipts. Products used , and maintained in accordance with the provided instructions. your appliance is installed, used in...
..., Electrolux will repair or replace any parts of this warranty. Major Appliance Warranty Information 79 Your appliance is covered by a one year from your original date of purchase, Electrolux will provide a replacement glass cooktop or radiant surface element for service and parts under this appliance that prove to obtain and keep all receipts. Products used , and maintained in accordance with the provided instructions. your appliance is installed, used in...

Wiring Diagram English
Page 2
... tested using microwaves functions (non-convection). A fuse could make sure it means there is present at room temperature (compare to an over-current or a microwave door switch problem (see door switch adjustment section). Note that event an investigation must be a door switch problem. If the Microwave Control Board is heating or not, but the fan does not physically turn faster). If the damper motor is installed. Start a convection function (ex: Conv Bake 350F...
... tested using microwaves functions (non-convection). A fuse could make sure it means there is present at room temperature (compare to an over-current or a microwave door switch problem (see door switch adjustment section). Note that event an investigation must be a door switch problem. If the Microwave Control Board is heating or not, but the fan does not physically turn faster). If the damper motor is installed. Start a convection function (ex: Conv Bake 350F...

Installation Instructions English
Page 2
... dangerous. Such use your model, see the serial plate to find the wattage consumption and refer to table A to leave these instructions with the fuse size and rating of the line (red and black wires). Stepping, leaning or sitting on power while oven is ever necessary. 3. The electrical power to the oven must be shut off while line connections are being made. A time-delay fuse or circuit breaker is in...
... dangerous. Such use your model, see the serial plate to find the wattage consumption and refer to table A to leave these instructions with the fuse size and rating of the line (red and black wires). Stepping, leaning or sitting on power while oven is ever necessary. 3. The electrical power to the oven must be shut off while line connections are being made. A time-delay fuse or circuit breaker is in...
Installation Instructions English
Page 5
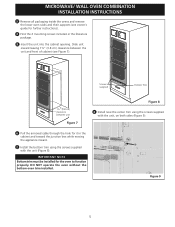
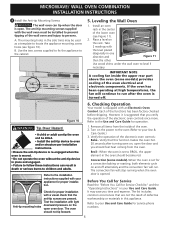
DO NOT operate the oven without the bottom oven trim installed. Screws supplied Bottom Trim 1½" (3.8 cm) clearance between the unit and front of cabinet (see owner's guide for the oven to function properly. Figure 9 5 MICROWAVE/ WALL OVEN COMBINATION INSTALLATION INSTRUCTIONS 3 Remove all packaging inside the ovens and remove the lower oven racks and their supports (see Figure 7). IMPORTANT NOTE Bottom trim must be installed for further instructions). 4 Find the 2 mounting screws included in...
DO NOT operate the oven without the bottom oven trim installed. Screws supplied Bottom Trim 1½" (3.8 cm) clearance between the unit and front of cabinet (see owner's guide for the oven to function properly. Figure 9 5 MICROWAVE/ WALL OVEN COMBINATION INSTALLATION INSTRUCTIONS 3 Remove all packaging inside the ovens and remove the lower oven racks and their supports (see Figure 7). IMPORTANT NOTE Bottom trim must be installed for further instructions). 4 Find the 2 mounting screws included in...
Installation Instructions English
Page 6
... instructions can tip when the door is set to BROIL, the upper element in this function makes the oven hot. 20 seconds after the oven is turned off alternately and the convection fan will run after turning oven on, open the door and you should feel heat coming from the inside the upper rear part above the oven (some models)-When the oven is open oven door. The anti-tip mounting screws supplied with light downward pressure on and off . Verify the operation...
... instructions can tip when the door is set to BROIL, the upper element in this function makes the oven hot. 20 seconds after the oven is turned off alternately and the convection fan will run after turning oven on, open the door and you should feel heat coming from the inside the upper rear part above the oven (some models)-When the oven is open oven door. The anti-tip mounting screws supplied with light downward pressure on and off . Verify the operation...
Product Specifications Sheet English
Page 2
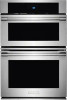
....ca E30MC75PPS 11/16 © 2016 Electrolux Home Products, Inc. mean we are constantly working to Product Installation Guide for Timers / Reminders Yes More / Less Function Yes Power Failure Indicator Yes OVEN FEATURES Oven Cavity Cobalt Blue Interior Smooth-Glide® Racks / Standard Racks CustomConvect3™ Convection System Halogen Theatre Lighting Removable Cool-Touch™ Oven Door with Extra-Large Window "My Favorite" Settings Convection Conversion Custom-Set™ Options with Temperature Probe Light Clean / Heavy Clean Self-Cleaning with Auto...
....ca E30MC75PPS 11/16 © 2016 Electrolux Home Products, Inc. mean we are constantly working to Product Installation Guide for Timers / Reminders Yes More / Less Function Yes Power Failure Indicator Yes OVEN FEATURES Oven Cavity Cobalt Blue Interior Smooth-Glide® Racks / Standard Racks CustomConvect3™ Convection System Halogen Theatre Lighting Removable Cool-Touch™ Oven Door with Extra-Large Window "My Favorite" Settings Convection Conversion Custom-Set™ Options with Temperature Probe Light Clean / Heavy Clean Self-Cleaning with Auto...


