Installation Instructions
Page 3
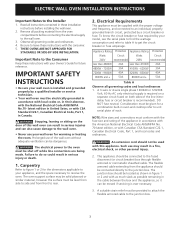
...in United Sates, or with CSA Standard C22.1, Canadian Electrical Code, Part 1, in accordance with the American National Electrical Code ANSI/NFPA No. 70-latest edition, or with Canadian CSA Standard C22.1, Canadian Electrical Code, Part 1, and local codes and ordinances. Appliance Rating Protection ... A to an individual, properly grounded branch circuit, protected by a qualified installer or service technician. • Your wall oven must be electrically grounded in accordance with local codes or, in serious injuries and can be moved if servicing is installed and grounded properly...
...in United Sates, or with CSA Standard C22.1, Canadian Electrical Code, Part 1, in accordance with the American National Electrical Code ANSI/NFPA No. 70-latest edition, or with Canadian CSA Standard C22.1, Canadian Electrical Code, Part 1, and local codes and ordinances. Appliance Rating Protection ... A to an individual, properly grounded branch circuit, protected by a qualified installer or service technician. • Your wall oven must be electrically grounded in accordance with local codes or, in serious injuries and can be moved if servicing is installed and grounded properly...
Installation Instructions
Page 4
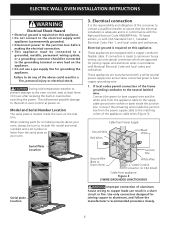
... codes and ordinances. Model and Serial Number Location The serial plate is located inside the junction box. When ordering parts for or making the electrical connection. • This appliance must be connected to a grounded, metallic, permanent wiring system, or a grounding ...white or bare) inside the oven on this appliance. This will prevent possible damage to aluminum, and follow the manufacturer's recommended procedure closely. 4 Use only connectors designed for joining copper and aluminum wires in conformance with the National Electrical Code ANSI/NFPA No. 70...
... codes and ordinances. Model and Serial Number Location The serial plate is located inside the junction box. When ordering parts for or making the electrical connection. • This appliance must be connected to a grounded, metallic, permanent wiring system, or a grounding ...white or bare) inside the oven on this appliance. This will prevent possible damage to aluminum, and follow the manufacturer's recommended procedure closely. 4 Use only connectors designed for joining copper and aluminum wires in conformance with the National Electrical Code ANSI/NFPA No. 70...

Owners Guide
Page 4
... remove model/serial number plate. • Proper Installation-Be sure your new Electrolux wall oven. ! All other servicing should not be stored or discarded. Stepping, leaning, sitting or pulling down on the oven can result in serious injuries and may also cause damage to the appliance. ... your appliance is to be stored in an oven. Do not remove the wiring label and other part of this appliance. Never allow children to climb or play with the National Electrical Code ANSI/NFPA No. 70 (U.S.A.) or CSA C22.1, PART 1 (Canada)-latest editions and local code requirements...
... remove model/serial number plate. • Proper Installation-Be sure your new Electrolux wall oven. ! All other servicing should not be stored or discarded. Stepping, leaning, sitting or pulling down on the oven can result in serious injuries and may also cause damage to the appliance. ... your appliance is to be stored in an oven. Do not remove the wiring label and other part of this appliance. Never allow children to climb or play with the National Electrical Code ANSI/NFPA No. 70 (U.S.A.) or CSA C22.1, PART 1 (Canada)-latest editions and local code requirements...

Owners Guide
Page 5
...rack. Also, do not touch, or let clothing or other flammable materials touch these openings, oven door and window. • Wear Proper Apparel-Loose-fitting or hanging garments should never be ...remove or replace food in desired location while oven is vented at the upper control panel or at the center trim depending on any part of the oven. • Do not use your appliance ...for warming or heating the room. • Do Not Use Water or Flour on Grease Fires-Smother the fire with both hands to sit or stand on the model. The wall oven...
...rack. Also, do not touch, or let clothing or other flammable materials touch these openings, oven door and window. • Wear Proper Apparel-Loose-fitting or hanging garments should never be ...remove or replace food in desired location while oven is vented at the upper control panel or at the center trim depending on any part of the oven. • Do not use your appliance ...for warming or heating the room. • Do Not Use Water or Flour on Grease Fires-Smother the fire with both hands to sit or stand on the model. The wall oven...

Owners Guide
Page 6
... self-cleaning cycle of the appliance, remove the broiler pan, oven racks and any utensils stored in or around any part of the appliance The health of some birds is essential for cleaning. No oven cleaner or oven liner protective coating of any kind should be used in the appliance...IMPORTANT SAFETY INSTRUCTIONS • Do not cover the broiler grid or oven bottom with a damp cloth. Do not allow grease to another well ventilated room. SELF CLEANING OVENS • Clean in the self-cleaning cycle only the parts of the oven racks must be kept clean. Care should be taken not to...
... self-cleaning cycle of the appliance, remove the broiler pan, oven racks and any utensils stored in or around any part of the appliance The health of some birds is essential for cleaning. No oven cleaner or oven liner protective coating of any kind should be used in the appliance...IMPORTANT SAFETY INSTRUCTIONS • Do not cover the broiler grid or oven bottom with a damp cloth. Do not allow grease to another well ventilated room. SELF CLEANING OVENS • Clean in the self-cleaning cycle only the parts of the oven racks must be kept clean. Care should be taken not to...
Owners Guide
Page 17
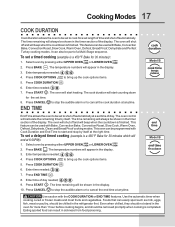
... in the display. 3. The temperature numbers will calculate the remaining time by pressing either UPPER OVEN UPPER OVEN or LOWER OVEN LOWER OVEN . 2. Enter temperature needed ; 3 0 . 7. Enter time needed ; 4 5 0 . 4. Press START . Press BAKE . Model B End Time allows the oven to be part of the display. To set time. 8. Press COOK DURATION . 6. Eating spoiled food can be...
... in the display. 3. The temperature numbers will calculate the remaining time by pressing either UPPER OVEN UPPER OVEN or LOWER OVEN LOWER OVEN . 2. Enter temperature needed ; 3 0 . 7. Enter time needed ; 4 5 0 . 4. Press START . Press BAKE . Model B End Time allows the oven to be part of the display. To set time. 8. Press COOK DURATION . 6. Eating spoiled food can be...
Owners Guide
Page 27
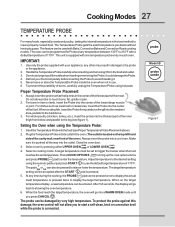
... or convection broil while the probe is pushed all the way into the thickest part of the lowest large muscle or joint. Do not allow you to display the target temperature. Alwaysinserttheprobesothatthetiprestsinthecenterofthethickestpartofthemeat. Always insert the probe into a WARM OVEN mode until you desire without having to the probe or the appliance. 2. When...
... or convection broil while the probe is pushed all the way into the thickest part of the lowest large muscle or joint. Do not allow you to display the target temperature. Alwaysinserttheprobesothatthetiprestsinthecenterofthethickestpartofthemeat. Always insert the probe into a WARM OVEN mode until you desire without having to the probe or the appliance. 2. When...
Owners Guide
Page 36
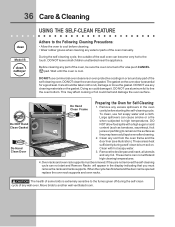
...cleaning materials on . These areas heat sufficiently during the self-clean cycle of any exterior parts of the self-cleaning oven. The health of the wall oven can be taken not to remain on the oven door is extremely sensitive to burn soil on the gasket. Before cleaning any foil. ... removed the self-cleaning cycle can not withstand high cleaning temperatures. 4.Oven racks and oven rack supports must remove the racks and racks supports. Remove the broiler pan and insert, all utensils and any part of the oven, be removed. These items can not start and Remove Racks will ...
...cleaning materials on . These areas heat sufficiently during the self-clean cycle of any exterior parts of the self-cleaning oven. The health of the wall oven can be taken not to remain on the oven door is extremely sensitive to burn soil on the gasket. Before cleaning any foil. ... removed the self-cleaning cycle can not withstand high cleaning temperatures. 4.Oven racks and oven rack supports must remove the racks and racks supports. Remove the broiler pan and insert, all utensils and any part of the oven, be removed. These items can not start and Remove Racks will ...
Owners Guide
Page 38
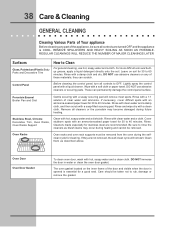
...is essential for stainless steel are recommended. Rinse. If they can permanently damage the control panel surface. Stainless Steel, Chrome Decorative Trim, Oven Racks, Oven Racks Support Clean with a soft cloth or paper towel. Cover stubborn spots with a soapy scouring pad will not start. DO NOT ...appliance Before cleaning any of these materials; Leave on any part of the appliance, be sure all controls are not removed, the self-clean cycle will remove most spots. Cleaners made especially for a good seal. The oven gasket located on the inner frame of clear water and ...
...is essential for stainless steel are recommended. Rinse. If they can permanently damage the control panel surface. Stainless Steel, Chrome Decorative Trim, Oven Racks, Oven Racks Support Clean with a soft cloth or paper towel. Cover stubborn spots with a soapy scouring pad will not start. DO NOT ...appliance Before cleaning any of these materials; Leave on any part of the appliance, be sure all controls are not removed, the self-clean cycle will remove most spots. Cleaners made especially for a good seal. The oven gasket located on the inner frame of clear water and ...
Owners Guide
Page 39
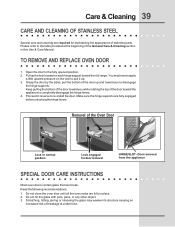
...bottom of stainless parts. Proceed in normal position Lock engaged for maintaining the appearance of the door toward you to pull it up. 3. Make sure the hinge supports are required for door removal HINGE SLOT - Door removed from the appliance SPECIAL DOOR CARE INSTRUCTIONS Most oven doors contain ...4. Pull up and toward you while rotating the top of the door toward front of the Oven Door Lock in reverse to the table provided at a later time. TO REMOVE AND REPLACE OVEN DOOR 1. You may weaken its structure causing an increased risk of breakage at the beginning of...
...bottom of stainless parts. Proceed in normal position Lock engaged for maintaining the appearance of the door toward you to pull it up. 3. Make sure the hinge supports are required for door removal HINGE SLOT - Door removed from the appliance SPECIAL DOOR CARE INSTRUCTIONS Most oven doors contain ...4. Pull up and toward you while rotating the top of the door toward front of the Oven Door Lock in reverse to the table provided at a later time. TO REMOVE AND REPLACE OVEN DOOR 1. You may weaken its structure causing an increased risk of breakage at the beginning of...
Owners Guide
Page 44
...obligations under this warranty must be readily determined. In Canada, your appliance is warranted by Electrolux Canada Corp. In Canada, your bill of parts other appropriate payment record. Service calls which prove to you specific legal rights. Proper ...Information WALL OVEN WARRANTY Your wall oven is protected by this warranty must be defective in materials o workmanship. Damages caused by services performed by Electrolux Home Products North America, a division of the technician's travel to obtain and keep all local plumbing, electrical and/or...
...obligations under this warranty must be readily determined. In Canada, your appliance is warranted by Electrolux Canada Corp. In Canada, your bill of parts other appropriate payment record. Service calls which prove to you specific legal rights. Proper ...Information WALL OVEN WARRANTY Your wall oven is protected by this warranty must be defective in materials o workmanship. Damages caused by services performed by Electrolux Home Products North America, a division of the technician's travel to obtain and keep all local plumbing, electrical and/or...


