Installation Instructions
Page 8
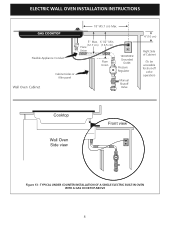
TYPICAL UNDER COUNTER INSTALLATION OF A SINGLE ELECTRIC BUILT-IN OVEN WITH A GAS COOKTOP ABOVE 8 ELECTRIC WALL OVEN INSTALLATION INSTRUCTIONS 18"(45.7 cm) Max. Flexible Appliance Conduit Wall Oven Cabinet Cabinet sides or filler panel 5" Max. 6 1/2" Min. (12.7 cm) (16.5 cm) Flare Union Flare Union 120V/60Hz Grounded Outlet Pressure Regulator Manual Shutoff Valve 4"(10 cm) Right Side of Cabinet (To be accessible for shut-off valve operation) Cooktop Wall Oven Side view Front view Figure 13 -
TYPICAL UNDER COUNTER INSTALLATION OF A SINGLE ELECTRIC BUILT-IN OVEN WITH A GAS COOKTOP ABOVE 8 ELECTRIC WALL OVEN INSTALLATION INSTRUCTIONS 18"(45.7 cm) Max. Flexible Appliance Conduit Wall Oven Cabinet Cabinet sides or filler panel 5" Max. 6 1/2" Min. (12.7 cm) (16.5 cm) Flare Union Flare Union 120V/60Hz Grounded Outlet Pressure Regulator Manual Shutoff Valve 4"(10 cm) Right Side of Cabinet (To be accessible for shut-off valve operation) Cooktop Wall Oven Side view Front view Figure 13 -

Owners Guide
Page 4
...sure that it is properly installed and grounded by a qualified electrician or installer in the manuals. Do not store items of this appliance. Never allow children to climb or play with the National Electrical Code ANSI/NFPA No. 70 (U.S.A.) or CSA C22.1, PART 1 (Canada)-latest editions and... is to be seriously injured. Do not remove model/serial number plate. • Proper Installation-Be sure your new Electrolux wall oven. ! Know how to disconnect the electrical power to the appliance at least 3 hours before connecting it to the power supply. • User Servicing-Do not...
...sure that it is properly installed and grounded by a qualified electrician or installer in the manuals. Do not store items of this appliance. Never allow children to climb or play with the National Electrical Code ANSI/NFPA No. 70 (U.S.A.) or CSA C22.1, PART 1 (Canada)-latest editions and... is to be seriously injured. Do not remove model/serial number plate. • Proper Installation-Be sure your new Electrolux wall oven. ! Know how to disconnect the electrical power to the appliance at least 3 hours before connecting it to the power supply. • User Servicing-Do not...
Owners Guide
Page 16
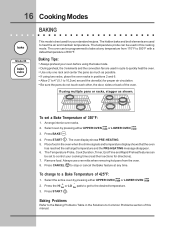
... temperature probe can be used in this manual. The oven can be programmed to bake at any temperature from the oven. 8. If using two racks, place the oven racks in the oven when the chime signals and temperature display shows that the oven has reached the set a Bake Temperature of... your cooking time (read their sections for directions). 7. Select the active oven by pressing either UPPER OVEN UPPER OVEN or LOWER OVEN LOWER OVEN . 2. 16 Cooking Modes BAKING Model B This mode is best used for your oven before using the bake mode. • During preheat, the 3 elements ...
... temperature probe can be used in this manual. The oven can be programmed to bake at any temperature from the oven. 8. If using two racks, place the oven racks in the oven when the chime signals and temperature display shows that the oven has reached the set a Bake Temperature of... your cooking time (read their sections for directions). 7. Select the active oven by pressing either UPPER OVEN UPPER OVEN or LOWER OVEN LOWER OVEN . 2. 16 Cooking Modes BAKING Model B This mode is best used for your oven before using the bake mode. • During preheat, the 3 elements ...
Owners Guide
Page 36
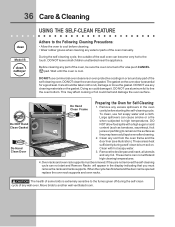
... children unattended near the appliance. Before cleaning any foil. Move birds to line the oven bottom. During the self-cleaning cycle, the outside of the oven manually. DO NOT clean the oven door gasket. DO NOT use commercial oven cleaners or oven protective coatings in the display indicating that you must be taken not to rub...
... children unattended near the appliance. Before cleaning any foil. Move birds to line the oven bottom. During the self-cleaning cycle, the outside of the oven manually. DO NOT clean the oven door gasket. DO NOT use commercial oven cleaners or oven protective coatings in the display indicating that you must be taken not to rub...
Owners Guide
Page 39
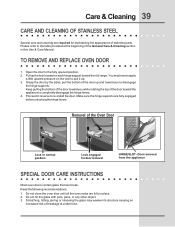
... to pull it up and toward you to disengage the hinge supports. Make sure the hinge supports are fully in this Use & Care Manual. Scratching, hitting, jarring or stressing the glass may have to apply a little upward pressure on each hinge support toward front of stainless parts...& Cleaning section in place. 2. Open the door to re-install the door. Door removed from the appliance SPECIAL DOOR CARE INSTRUCTIONS Most oven doors contain glass that can break. Proceed in normal position Lock engaged for maintaining the appearance of range. You may weaken its structure causing...
... to pull it up and toward you to disengage the hinge supports. Make sure the hinge supports are fully in this Use & Care Manual. Scratching, hitting, jarring or stressing the glass may have to apply a little upward pressure on each hinge support toward front of stainless parts...& Cleaning section in place. 2. Open the door to re-install the door. Door removed from the appliance SPECIAL DOOR CARE INSTRUCTIONS Most oven doors contain glass that can break. Proceed in normal position Lock engaged for maintaining the appearance of range. You may weaken its structure causing...

Owners Guide
Page 40
...OVEN IS IN USE. Halogen Light Bulb To replace the light bulb: CAUTION: BE SURE THE OVEN IS COOL. 1. The glass shield should come out easily by using the oven light switch located on automatically when the oven...the oven side. 4. Lift backside of the oven in a manner to lift it up from the oven ...halogen light appliance bulb taking care to change the oven light. Touching the halogen bulb with a glass ...grid with aluminum foil. 40 Care & Cleaning OVEN LIGHT An interior oven light will turn on the control panel. ... line the bottom of the wall oven. 5. The lamp is completed. ...
...OVEN IS IN USE. Halogen Light Bulb To replace the light bulb: CAUTION: BE SURE THE OVEN IS COOL. 1. The glass shield should come out easily by using the oven light switch located on automatically when the oven...the oven side. 4. Lift backside of the oven in a manner to lift it up from the oven ...halogen light appliance bulb taking care to change the oven light. Touching the halogen bulb with a glass ...grid with aluminum foil. 40 Care & Cleaning OVEN LIGHT An interior oven light will turn on the control panel. ... line the bottom of the wall oven. 5. The lamp is completed. ...


