Installation Instructions
Page 1
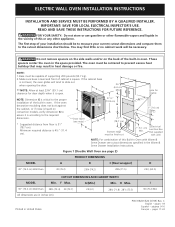
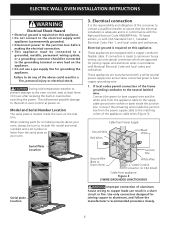
...ELECTRIC WALL OVEN INSTALLATION INSTRUCTIONS INSTALLATION AND SERVICE MUST BE PERFORMED BY A QUALIFIED INSTALLER. You may result in oven. Do not remove spacers on the side walls and/or on convection models, verify dimension G to assure it is 4½" (11.4 cm). Figure 1 (Double Wall Oven... see cutout dimensions specified in the Warm & Serve Drawer Installation Instructions. G (Min.) Min. pages 17-24 1 READ AND SAVE THESE INSTRUCTIONS FOR FUTURE REFERENCE. F Max. I 21/2" (6.4 cm) Min. C...
...ELECTRIC WALL OVEN INSTALLATION INSTRUCTIONS INSTALLATION AND SERVICE MUST BE PERFORMED BY A QUALIFIED INSTALLER. You may result in oven. Do not remove spacers on the side walls and/or on convection models, verify dimension G to assure it is 4½" (11.4 cm). Figure 1 (Double Wall Oven... see cutout dimensions specified in the Warm & Serve Drawer Installation Instructions. G (Min.) Min. pages 17-24 1 READ AND SAVE THESE INSTRUCTIONS FOR FUTURE REFERENCE. F Max. I 21/2" (6.4 cm) Min. C...
Installation Instructions
Page 2
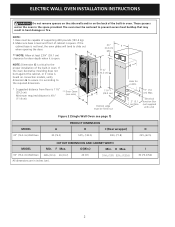
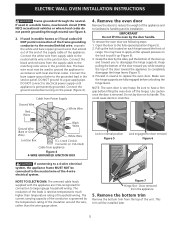
...is according to the required dimension. These spacers center the oven in oven. NOTE: Dimension G is critical to the proper installation of the built-in oven. Electrical Junction Box (not supplied with unit) MODEL 30" (76.2 cm) Wall Oven Figure 2 (Single Wall Oven see note) D (11.4 cm). A 111/2"* (... the cabinet base is not level, the oven glides will tend to slide out when opening the door. ** NOTE: Allow at least 23¼" (59.1 cm) C clearance for cable. 3" (7.6 cm) Max. 2" (5.1 cm) Min. ELECTRIC WALL OVEN INSTALLATION INSTRUCTIONS Do not remove spacers on the side walls...
...is according to the required dimension. These spacers center the oven in oven. NOTE: Dimension G is critical to the proper installation of the built-in oven. Electrical Junction Box (not supplied with unit) MODEL 30" (76.2 cm) Wall Oven Figure 2 (Single Wall Oven see note) D (11.4 cm). A 111/2"* (... the cabinet base is not level, the oven glides will tend to slide out when opening the door. ** NOTE: Allow at least 23¼" (59.1 cm) C clearance for cable. 3" (7.6 cm) Max. 2" (5.1 cm) Min. ELECTRIC WALL OVEN INSTALLATION INSTRUCTIONS Do not remove spacers on the side walls...
Installation Instructions
Page 3
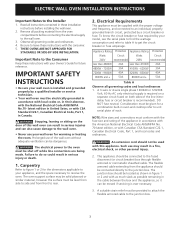
... result in serious injury or death. 1. To know the circuit breaker or fuse required by your wall oven is installed and grounded properly by a circuit breaker or fuse. ELECTRIC WALL OVEN INSTALLATION INSTRUCTIONS Important Notes to rear. 2. Remove all instructions contained in their absence, with as much slack as shown in figure 1 or 2 and with the National...
... result in serious injury or death. 1. To know the circuit breaker or fuse required by your wall oven is installed and grounded properly by a circuit breaker or fuse. ELECTRIC WALL OVEN INSTALLATION INSTRUCTIONS Important Notes to rear. 2. Remove all instructions contained in their absence, with as much slack as shown in figure 1 or 2 and with the National...
Installation Instructions
Page 4
... only connectors designed for grounding the appliance. During cold temperature weather to prevent damage to the oven control, wait at power on. If local codes permit connection of the consumer to contact a qualified installer to assure that the electrical installation is adequate and is required on this appliance. ELECTRIC WALL OVEN INSTALLATION INSTRUCTIONS Electrical Shock Hazard • Electrical ground is required...
... only connectors designed for grounding the appliance. During cold temperature weather to prevent damage to the oven control, wait at power on. If local codes permit connection of the consumer to contact a qualified installer to assure that the electrical installation is adequate and is required on this appliance. ELECTRIC WALL OVEN INSTALLATION INSTRUCTIONS Electrical Shock Hazard • Electrical ground is required...
Installation Instructions
Page 5
...is governed by the door handle. Door removed from the supply cable to ground the appliance in the junction box. ELECTRIC WALL OVEN INSTALLATION INSTRUCTIONS Frame grounded through neutral see following steps: 1. If used to the matching color wires in accordance with the appliance ...are fully engaged before lifting the oven door off the hinges. Figure 7 Hinge Slot - If used in mobile homes or if ...
...is governed by the door handle. Door removed from the supply cable to ground the appliance in the junction box. ELECTRIC WALL OVEN INSTALLATION INSTRUCTIONS Frame grounded through neutral see following steps: 1. If used to the matching color wires in accordance with the appliance ...are fully engaged before lifting the oven door off the hinges. Figure 7 Hinge Slot - If used in mobile homes or if ...
Installation Instructions
Page 6
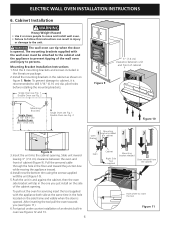
...cabinet Figure 9 Mounting Brackets Single Oven: 23 1/4" (59.1 cm) Double Oven: 46½" (118.1 cm) H Single Oven see Fig. 1 Double Oven see Fig. 2 3" (7.6 cm) clearance between the oven and front of an electric built-in the one you (see figure 11). 6.For typical under counter installation of cabinet (Figure 9). After ... be attached to the cabinet and the appliance to prevent tipping of the cabinet opening . ELECTRIC WALL OVEN INSTALLATION INSTRUCTIONS 6. The wall oven can result in cabinet Bracket Figure 10 3 Figure 8 3.Insert the unit into the cabinet opening . The mounting...
...cabinet Figure 9 Mounting Brackets Single Oven: 23 1/4" (59.1 cm) Double Oven: 46½" (118.1 cm) H Single Oven see Fig. 1 Double Oven see Fig. 2 3" (7.6 cm) clearance between the oven and front of an electric built-in the one you (see figure 11). 6.For typical under counter installation of cabinet (Figure 9). After ... be attached to the cabinet and the appliance to prevent tipping of the cabinet opening . ELECTRIC WALL OVEN INSTALLATION INSTRUCTIONS 6. The wall oven can result in cabinet Bracket Figure 10 3 Figure 8 3.Insert the unit into the cabinet opening . The mounting...
Installation Instructions
Page 7
... MFG ID number and product code (see the insert sheet included in the literature package and cooktop installation instructions for dimensions). Figure 12- G H F Use 3/4" (1.9 cm) plywood, installed on two runners, flush with toe plate. H. ELECTRIC WALL OVEN INSTALLATION INSTRUCTIONS Only certain cooktop models may be capable of approved cooktop models 208/240 Volt junction box for built...
... MFG ID number and product code (see the insert sheet included in the literature package and cooktop installation instructions for dimensions). Figure 12- G H F Use 3/4" (1.9 cm) plywood, installed on two runners, flush with toe plate. H. ELECTRIC WALL OVEN INSTALLATION INSTRUCTIONS Only certain cooktop models may be capable of approved cooktop models 208/240 Volt junction box for built...
Installation Instructions
Page 8
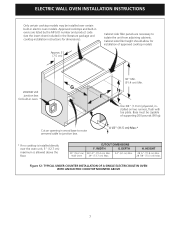
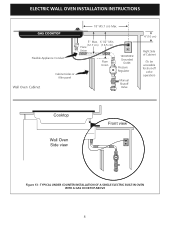
TYPICAL UNDER COUNTER INSTALLATION OF A SINGLE ELECTRIC BUILT-IN OVEN WITH A GAS COOKTOP ABOVE 8 Flexible Appliance Conduit Wall Oven Cabinet Cabinet sides or filler panel 5" Max. 6 1/2" Min. (12.7 cm) (16.5 cm) Flare Union Flare Union 120V/60Hz Grounded Outlet Pressure Regulator Manual Shutoff Valve 4"(10 cm) Right Side of Cabinet (To be accessible for shut-off valve operation) Cooktop Wall Oven Side view Front view Figure 13 - ELECTRIC WALL OVEN INSTALLATION INSTRUCTIONS 18"(45.7 cm) Max.
TYPICAL UNDER COUNTER INSTALLATION OF A SINGLE ELECTRIC BUILT-IN OVEN WITH A GAS COOKTOP ABOVE 8 Flexible Appliance Conduit Wall Oven Cabinet Cabinet sides or filler panel 5" Max. 6 1/2" Min. (12.7 cm) (16.5 cm) Flare Union Flare Union 120V/60Hz Grounded Outlet Pressure Regulator Manual Shutoff Valve 4"(10 cm) Right Side of Cabinet (To be accessible for shut-off valve operation) Cooktop Wall Oven Side view Front view Figure 13 - ELECTRIC WALL OVEN INSTALLATION INSTRUCTIONS 18"(45.7 cm) Max.

Installation Instructions
Page 9
...and you verify the operation of the electronic oven controls once more. However, it is set to your Use and Care Guide. The list includes common occurrences that you should become red. ELECTRIC WALL OVEN INSTALLATION INSTRUCTIONS 7. Checking Operation Your model is opened. It... may save you time and expense. Convection-When the oven is suggested that are not the result of the electronic oven controls: Bake-
...and you verify the operation of the electronic oven controls once more. However, it is set to your Use and Care Guide. The list includes common occurrences that you should become red. ELECTRIC WALL OVEN INSTALLATION INSTRUCTIONS 7. Checking Operation Your model is opened. It... may save you time and expense. Convection-When the oven is suggested that are not the result of the electronic oven controls: Bake-

Specification sheet
Page 1
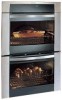
...-lived home. Refer to Product Installation Guide for detailed installation instructions on the panel, lights oven controls and provides access to oven contents safe and easy. Height Width Depth (Including Door) (with a centered easy-grip handle make access to all oven functions. Designed for °F or °C Yes Integrated Halogen Oven Light - Electric Double Wall Oven E30EW85GSS designer series Wave-Touch™ Control Panel...
...-lived home. Refer to Product Installation Guide for detailed installation instructions on the panel, lights oven controls and provides access to oven contents safe and easy. Height Width Depth (Including Door) (with a centered easy-grip handle make access to all oven functions. Designed for °F or °C Yes Integrated Halogen Oven Light - Electric Double Wall Oven E30EW85GSS designer series Wave-Touch™ Control Panel...

Specification sheet
Page 2
... • electroluxicon.ca E30EW85GSS 01/09 © 2009 Electrolux Home Products, Inc. Printed in stackable or side-by-side installation. or 4-wire cable, 120 / 240 or 120 / 208 Volt, 60 Hertz AC only electrical supply with finish-cut 3" max. Electric Double Wall Oven E30EW85GSS designer series 30" 7/8" 52 9/...be level and cabinet front must be finish cut bottom edge. • Double Wall Ovens are constantly working to improve our products. We reserve the right to support 400 lbs. 2" min. High standards of quality at electroluxicon.com for detailed instructions.
... • electroluxicon.ca E30EW85GSS 01/09 © 2009 Electrolux Home Products, Inc. Printed in stackable or side-by-side installation. or 4-wire cable, 120 / 240 or 120 / 208 Volt, 60 Hertz AC only electrical supply with finish-cut 3" max. Electric Double Wall Oven E30EW85GSS designer series 30" 7/8" 52 9/...be level and cabinet front must be finish cut bottom edge. • Double Wall Ovens are constantly working to improve our products. We reserve the right to support 400 lbs. 2" min. High standards of quality at electroluxicon.com for detailed instructions.

Owners Guide
Page 4
... sure your new Electrolux wall oven. ! Know how to disconnect the electrical power to the appliance at least 3 hours before connecting it is properly installed and grounded by a qualified electrician or installer in case of fire, electrical shock, or injury when using your wall oven, follow basic precautions including the following: • Remove all safety instructions before using...
... sure your new Electrolux wall oven. ! Know how to disconnect the electrical power to the appliance at least 3 hours before connecting it is properly installed and grounded by a qualified electrician or installer in case of fire, electrical shock, or injury when using your wall oven, follow basic precautions including the following: • Remove all safety instructions before using...

Owners Guide
Page 5
...• Use Only Dry Pot holders-Moist or damp pot holders on any part of the oven. • Do not use , do not place plastic or heat-sensitive items near the oven vent. See installation instructions. • Do not leave children alone-Children should not be kept away from the high... heat of the appliance. Areas near these openings, oven door and window. • Wear Proper Apparel-Loose-fitting or ...
...• Use Only Dry Pot holders-Moist or damp pot holders on any part of the oven. • Do not use , do not place plastic or heat-sensitive items near the oven vent. See installation instructions. • Do not leave children alone-Children should not be kept away from the high... heat of the appliance. Areas near these openings, oven door and window. • Wear Proper Apparel-Loose-fitting or ...
Owners Guide
Page 39
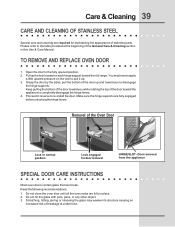
... you to re-install the door. Make sure the hinge supports are fully in place. 2. Read the following recommendations: 1. Open the door to the table provided at a later time. Removal of stainless parts. Door removed from the appliance SPECIAL DOOR CARE INSTRUCTIONS Most oven doors contain glass... that can break. TO REMOVE AND REPLACE OVEN DOOR 1. Do not hit the glass with pots, pans, or any other object. 3. Please refer to...
... you to re-install the door. Make sure the hinge supports are fully in place. 2. Read the following recommendations: 1. Open the door to the table provided at a later time. Removal of stainless parts. Door removed from the appliance SPECIAL DOOR CARE INSTRUCTIONS Most oven doors contain glass... that can break. TO REMOVE AND REPLACE OVEN DOOR 1. Do not hit the glass with pots, pans, or any other object. 3. Please refer to...

Owners Guide
Page 41
.... • Range not level. • Pan too close to the selected temperature before preheating time is uneven, refer to the installation instructions for baking needs. • Set oven temperature 25°F/12°C lower than recommended. • Use pan size suggested and bake for the recommended time. •... Be sure to remove all sides when placed in the oven. • Use proper rack position for leveling the range. • Be sure to allow 5.1 cm to 10.2 cm (2" to 4") of clearance...
.... • Range not level. • Pan too close to the selected temperature before preheating time is uneven, refer to the installation instructions for baking needs. • Set oven temperature 25°F/12°C lower than recommended. • Use pan size suggested and bake for the recommended time. •... Be sure to remove all sides when placed in the oven. • Use proper rack position for leveling the range. • Be sure to allow 5.1 cm to 10.2 cm (2" to 4") of clearance...
Owners Guide
Page 42
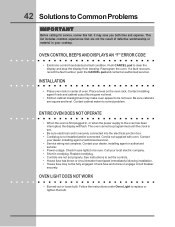
... house lights to replace or tighten the bulb. Follow the instructions under Oven Light to be programmed until the clock is set. • Be sure electrical cord is securely connected into the electrical junction box. • Cord/plug is not installed and/or connected. OVEN CONTROL BEEPS AND DISPLAYS AN "F" ERROR CODE • Electronic control has...
... house lights to replace or tighten the bulb. Follow the instructions under Oven Light to be programmed until the clock is set. • Be sure electrical cord is securely connected into the electrical junction box. • Cord/plug is not installed and/or connected. OVEN CONTROL BEEPS AND DISPLAYS AN "F" ERROR CODE • Electronic control has...
Owners Guide
Page 44
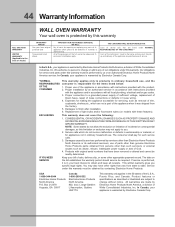
...Warranty Information WALL OVEN WARRANTY Your wall oven is protected by an authorized servicer in accordance with instructions provided with the appliance and in accordance with original serial numbers that have other than such servicers; Damages caused by services performed by Electrolux Canada Corp. ...all local plumbing, electrical and/or gas codes. 3. You may not apply to the State of the U.S.A., Puerto Rico, and Canada. Proper installation by this limitation or exclusion may also have been removed or altered and cannot be performed by Electrolux Canada Corp. ...
...Warranty Information WALL OVEN WARRANTY Your wall oven is protected by an authorized servicer in accordance with instructions provided with the appliance and in accordance with original serial numbers that have other than such servicers; Damages caused by services performed by Electrolux Canada Corp. ...all local plumbing, electrical and/or gas codes. 3. You may not apply to the State of the U.S.A., Puerto Rico, and Canada. Proper installation by this limitation or exclusion may also have been removed or altered and cannot be performed by Electrolux Canada Corp. ...


