Installation Instructions
Page 1
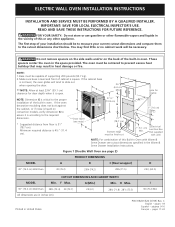
... on convection models, verify dimension G to assure it is heard on the back of supporting 200 pounds (90.7 kg). 2. Figure 1 (Double Wall Oven see cutout dimensions specified in the space provided. pages 17-24 1 Hole for door depth when it is according to the required dimension. *... INSTALLATION AND SERVICE MUST BE PERFORMED BY A QUALIFIED INSTALLER. Minimum required distance is square. IMPORTANT: SAVE FOR LOCAL ELECTRICAL INSPECTOR'S USE. If the oven decorative moulding does not butt against the cabinet, or if noise is open. FOR YOUR SAFETY: Do not store or...
... on convection models, verify dimension G to assure it is heard on the back of supporting 200 pounds (90.7 kg). 2. Figure 1 (Double Wall Oven see cutout dimensions specified in the space provided. pages 17-24 1 Hole for door depth when it is according to the required dimension. *... INSTALLATION AND SERVICE MUST BE PERFORMED BY A QUALIFIED INSTALLER. Minimum required distance is square. IMPORTANT: SAVE FOR LOCAL ELECTRICAL INSPECTOR'S USE. If the oven decorative moulding does not butt against the cabinet, or if noise is open. FOR YOUR SAFETY: Do not store or...
Installation Instructions
Page 2
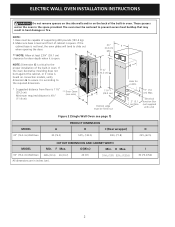
... does not butt against the cabinet, or if noise is heard on the back of cabinet is square. Electrical Junction Box (not supplied with unit) MODEL 30" (76.2 cm) Wall Oven Figure 2 (Single Wall Oven see note) D (11.4 cm). F B 51¼" (130.2 cm) H Spacer * Suggested distance ...opening the door. ** NOTE: Allow at least 23¼" (59.1 cm) C clearance for cable. 3" (7.6 cm) Max. 2" (5.1 cm) Min. ELECTRIC WALL OVEN INSTALLATION INSTRUCTIONS Do not remove spacers on the side walls and/or on convection models, verify dimension G to assure it is open. 21/2" I 30 (76...
... does not butt against the cabinet, or if noise is heard on the back of cabinet is square. Electrical Junction Box (not supplied with unit) MODEL 30" (76.2 cm) Wall Oven Figure 2 (Single Wall Oven see note) D (11.4 cm). F B 51¼" (130.2 cm) H Spacer * Suggested distance ...opening the door. ** NOTE: Allow at least 23¼" (59.1 cm) C clearance for cable. 3" (7.6 cm) Max. 2" (5.1 cm) Min. ELECTRIC WALL OVEN INSTALLATION INSTRUCTIONS Do not remove spacers on the side walls and/or on convection models, verify dimension G to assure it is open. 21/2" I 30 (76...
Installation Instructions
Page 3
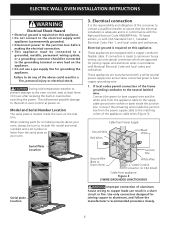
... or heating the room. NOTE: Wire sizes and connections must be dangerous. Such use your wall oven for a combination built-in these instructions with the National Electrical Code ANSI/NFPA No.70- A suitable strain relief must conform with the fuse size and rating of...so it can also cause damage to figure 1 or 2 for future reference. ELECTRIC WALL OVEN INSTALLATION INSTRUCTIONS Important Notes to receive the oven. The flexible armored cable extending from the appliance should be electrically grounded in accordance with local codes or, in serious injury or death. 1. ...
... or heating the room. NOTE: Wire sizes and connections must be dangerous. Such use your wall oven for a combination built-in these instructions with the National Electrical Code ANSI/NFPA No.70- A suitable strain relief must conform with the fuse size and rating of...so it can also cause damage to figure 1 or 2 for future reference. ELECTRIC WALL OVEN INSTALLATION INSTRUCTIONS Important Notes to receive the oven. The flexible armored cable extending from the appliance should be electrically grounded in accordance with local codes or, in serious injury or death. 1. ...
Installation Instructions
Page 4
...supply cable ground wire (white or bare) inside the junction box. Use only connectors designed for grounding the appliance. During cold temperature weather to prevent damage to the oven control, wait at power on. Serial Plate Location Serial plate location 3. Model and Serial... colors of the above could result in a short circuit or fire. ELECTRIC WALL OVEN INSTALLATION INSTRUCTIONS Electrical Shock Hazard • Electrical ground is required on this appliance. • Do not connect to the electrical supply until appliance is permanently grounded. • Disconnect power to the ...
...supply cable ground wire (white or bare) inside the junction box. Use only connectors designed for grounding the appliance. During cold temperature weather to prevent damage to the oven control, wait at power on. Serial Plate Location Serial plate location 3. Model and Serial... colors of the above could result in a short circuit or fire. ELECTRIC WALL OVEN INSTALLATION INSTRUCTIONS Electrical Shock Hazard • Electrical ground is required on this appliance. • Do not connect to the electrical supply until appliance is permanently grounded. • Disconnect power to the ...
Installation Instructions
Page 5
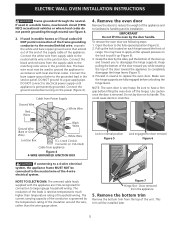
...the hinge levers. Open the door to a gas supply pipe. NOTE TO ELECTRICIAN: The armored cable leads supplied with local electrical codes. Door removed from the top of the door toward you to apply a little upward pressure on its installation. Remove ... Be sure to have to disengage the hinge supports. This trim will be connected to a 4-wire electrical system, the appliance frame MUST NOT be installed later 5 ELECTRIC WALL OVEN INSTALLATION INSTRUCTIONS Frame grounded through neutral see following steps: 1. DO NOT connect to completely disengage the hinge...
...the hinge levers. Open the door to a gas supply pipe. NOTE TO ELECTRICIAN: The armored cable leads supplied with local electrical codes. Door removed from the top of the door toward you to apply a little upward pressure on its installation. Remove ... Be sure to have to disengage the hinge supports. This trim will be connected to a 4-wire electrical system, the appliance frame MUST NOT be installed later 5 ELECTRIC WALL OVEN INSTALLATION INSTRUCTIONS Frame grounded through neutral see following steps: 1. DO NOT connect to completely disengage the hinge...
Installation Instructions
Page 6
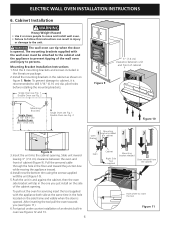
... attached to the cabinet and the appliance to prevent tipping of cabinet (Figure 9). F Single Oven see Fig. 1 Double Oven see Fig. 2 3" (7.6 cm) clearance between the oven and front of the wall oven and injury to insert the tool Figure 11 ELECTRIC WALL OVEN INSTALLATION INSTRUCTIONS 6. pilot holes before installing the mounting brackets. Cabinet Installation Heavy Weight Hazard...
... attached to the cabinet and the appliance to prevent tipping of cabinet (Figure 9). F Single Oven see Fig. 1 Double Oven see Fig. 2 3" (7.6 cm) clearance between the oven and front of the wall oven and injury to insert the tool Figure 11 ELECTRIC WALL OVEN INSTALLATION INSTRUCTIONS 6. pilot holes before installing the mounting brackets. Cabinet Installation Heavy Weight Hazard...
Installation Instructions
Page 7
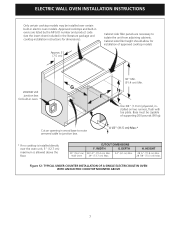
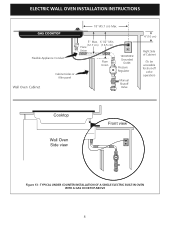
... 1/2" (72.4 cm) Min. 29" (73.7 cm) Max. 24" (61 cm) Min. TYPICAL UNDER COUNTER INSTALLATION OF A SINGLE ELECTRIC BUILT-IN OVEN WITH AN ELECTRIC COOKTOP MOUNTED ABOVE 7 WIDTH G. H. Figure 12- Cabinet side filler height should allow for installation of supporting 200 pounds (90 kg). Cut ... and product code (see the insert sheet included in the literature package and cooktop installation instructions for built-in electric oven models. Approved cooktops and built-in ovens are necessary to junction box. 4 1/2" (11.5 cm) Max.* * If no cooktop is installed directly over ...
... 1/2" (72.4 cm) Min. 29" (73.7 cm) Max. 24" (61 cm) Min. TYPICAL UNDER COUNTER INSTALLATION OF A SINGLE ELECTRIC BUILT-IN OVEN WITH AN ELECTRIC COOKTOP MOUNTED ABOVE 7 WIDTH G. H. Figure 12- Cabinet side filler height should allow for installation of supporting 200 pounds (90 kg). Cut ... and product code (see the insert sheet included in the literature package and cooktop installation instructions for built-in electric oven models. Approved cooktops and built-in ovens are necessary to junction box. 4 1/2" (11.5 cm) Max.* * If no cooktop is installed directly over ...
Installation Instructions
Page 8
TYPICAL UNDER COUNTER INSTALLATION OF A SINGLE ELECTRIC BUILT-IN OVEN WITH A GAS COOKTOP ABOVE 8 Flexible Appliance Conduit Wall Oven Cabinet Cabinet sides or filler panel 5" Max. 6 1/2" Min. (12.7 cm) (16.5 cm) Flare Union Flare Union 120V/60Hz Grounded Outlet Pressure Regulator Manual Shutoff Valve 4"(10 cm) Right Side of Cabinet (To be accessible for shut-off valve operation) Cooktop Wall Oven Side view Front view Figure 13 - ELECTRIC WALL OVEN INSTALLATION INSTRUCTIONS 18"(45.7 cm) Max.
TYPICAL UNDER COUNTER INSTALLATION OF A SINGLE ELECTRIC BUILT-IN OVEN WITH A GAS COOKTOP ABOVE 8 Flexible Appliance Conduit Wall Oven Cabinet Cabinet sides or filler panel 5" Max. 6 1/2" Min. (12.7 cm) (16.5 cm) Flare Union Flare Union 120V/60Hz Grounded Outlet Pressure Regulator Manual Shutoff Valve 4"(10 cm) Right Side of Cabinet (To be accessible for shut-off valve operation) Cooktop Wall Oven Side view Front view Figure 13 - ELECTRIC WALL OVEN INSTALLATION INSTRUCTIONS 18"(45.7 cm) Max.

Installation Instructions
Page 9
... You Call for a convection baking or roasting, both elements cycle on and off alternately and the convection fan will stop running when the oven door is suggested that this appliance. ELECTRIC WALL OVEN INSTALLATION INSTRUCTIONS 7. Checking Operation Your model is set for Service Checklist" and the "Operating Instructions" in this function makes the...
... You Call for a convection baking or roasting, both elements cycle on and off alternately and the convection fan will stop running when the oven door is suggested that this appliance. ELECTRIC WALL OVEN INSTALLATION INSTRUCTIONS 7. Checking Operation Your model is set for Service Checklist" and the "Operating Instructions" in this function makes the...

Specification sheet
Page 1
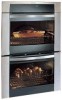
.... Height Width Depth (Including Door) (with a centered easy-grip handle make access to oven contents safe and easy. electroluxicon.com Ft. Electric Double Wall Oven E30EW85GSS designer series Wave-Touch™ Control Panel Technology A simple touch, anywhere on the web at electroluxicon.com. CustomConvect 3™ Convection System A third cooking element using a variable-speed ...
.... Height Width Depth (Including Door) (with a centered easy-grip handle make access to oven contents safe and easy. electroluxicon.com Ft. Electric Double Wall Oven E30EW85GSS designer series Wave-Touch™ Control Panel Technology A simple touch, anywhere on the web at electroluxicon.com. CustomConvect 3™ Convection System A third cooking element using a variable-speed ...

Specification sheet
Page 2
... Guide on both sides of quality at Electrolux Home Products, Inc. Refer to improve our products. mean we are NOT approved to be applied 24" min.* (critical dimension) 4" x 4" opening to route armoured cable Full base required to change specifications or discontinue models without notice. Electric Double Wall Oven E30EW85GSS designer series 30" 7/8" 52 9/16" Allow at electroluxicon...
... Guide on both sides of quality at Electrolux Home Products, Inc. Refer to improve our products. mean we are NOT approved to be applied 24" min.* (critical dimension) 4" x 4" opening to route armoured cable Full base required to change specifications or discontinue models without notice. Electric Double Wall Oven E30EW85GSS designer series 30" 7/8" 52 9/16" Allow at electroluxicon...

Owners Guide
Page 1
Use & Care Guide Built-In Wall Oven 318 205 131 (0812) Rev. B
Use & Care Guide Built-In Wall Oven 318 205 131 (0812) Rev. B
Owners Guide
Page 2
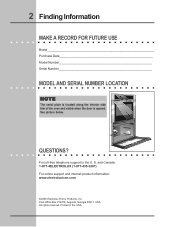
Post Office Box 212378, Augusta, Georgia 30917, USA All rights reserved. S. For toll-free telephone support in the USA Printed in the U. See picture below. QUESTIONS? and Canada: 1-877-4ELECTROLUX (1-877-435-3287) For online support and internet product information: www.electroluxicon.com ©2008 Electrolux Home Products, Inc. 2 Finding Information MAKE A RECORD FOR FUTURE USE Brand Purchase Date Model Number Serial Number MODEL AND SERIAL NUMBER LOCATION NOTE The serial plate is located along the interior side trim of the oven and visible when the door is opened.
Post Office Box 212378, Augusta, Georgia 30917, USA All rights reserved. S. For toll-free telephone support in the USA Printed in the U. See picture below. QUESTIONS? and Canada: 1-877-4ELECTROLUX (1-877-435-3287) For online support and internet product information: www.electroluxicon.com ©2008 Electrolux Home Products, Inc. 2 Finding Information MAKE A RECORD FOR FUTURE USE Brand Purchase Date Model Number Serial Number MODEL AND SERIAL NUMBER LOCATION NOTE The serial plate is located along the interior side trim of the oven and visible when the door is opened.
Owners Guide
Page 3
...17 End Time 17 Broiling 18 Convection Baking 19 Convection Convert 20 Rapid Preheat 20 Convection Roasting 21 Convection Broiling 22 Warm Oven 23 Slow Cook 24 Dehydrating 25 Defrosting 25 Bread Proofing 26 Temperature Probe 27 Multi Stage 28-29 Electronic Control Settings 30...Location 2 Questions 2 Table of day 30 Setting Clock Display - Time of Contents 3 Safety 4 Important Safety Instructions 4-6 Feature Overview 7 Your Wall Oven 7 Oven Rack Supports and Oven Vents 8 Oven Racks 9 Control Pad Functions - On or Off 31 Setting Time of Day -12 or 24 hours 31 Adjusting...
...17 End Time 17 Broiling 18 Convection Baking 19 Convection Convert 20 Rapid Preheat 20 Convection Roasting 21 Convection Broiling 22 Warm Oven 23 Slow Cook 24 Dehydrating 25 Defrosting 25 Bread Proofing 26 Temperature Probe 27 Multi Stage 28-29 Electronic Control Settings 30...Location 2 Questions 2 Table of day 30 Setting Clock Display - Time of Contents 3 Safety 4 Important Safety Instructions 4-6 Feature Overview 7 Your Wall Oven 7 Oven Rack Supports and Oven Vents 8 Oven Racks 9 Control Pad Functions - On or Off 31 Setting Time of Day -12 or 24 hours 31 Adjusting...

Owners Guide
Page 4
...that it has been exposed to a temperature above an appliance. Do not remove model/serial number plate. • Proper Installation-Be sure your new Electrolux wall oven. ! Ask your appliance for the first time, or if it has not been used for this appliance can be done only by a qualified ... Do not use your dealer to play around the appliance. • Storage in or on the door of the wall oven. Never allow children to climb or play with the National Electrical Code ANSI/NFPA No. 70 (U.S.A.) or CSA C22.1, PART 1 (Canada)-latest editions and local code requirements. Install only...
...that it has been exposed to a temperature above an appliance. Do not remove model/serial number plate. • Proper Installation-Be sure your new Electrolux wall oven. ! Ask your appliance for the first time, or if it has not been used for this appliance can be done only by a qualified ... Do not use your dealer to play around the appliance. • Storage in or on the door of the wall oven. Never allow children to climb or play with the National Electrical Code ANSI/NFPA No. 70 (U.S.A.) or CSA C22.1, PART 1 (Canada)-latest editions and local code requirements. Install only...

Owners Guide
Page 5
.... Among these areas until they have had sufficient time to cause burns. Remove all utensils from the high heat of a hot oven. Areas near the oven vent. The broiler pan and grid allow dripping fat to the side of the appliance when opening the door of the broiler. ...Always place oven racks in desired location while oven is in the oven. • Keep Oven Vent Ducts Unobstructed. The oven heating elements may become too hot. • Use Only Dry Pot holders-Moist or damp pot...
.... Among these areas until they have had sufficient time to cause burns. Remove all utensils from the high heat of a hot oven. Areas near the oven vent. The broiler pan and grid allow dripping fat to the side of the appliance when opening the door of the broiler. ...Always place oven racks in desired location while oven is in the oven. • Keep Oven Vent Ducts Unobstructed. The oven heating elements may become too hot. • Use Only Dry Pot holders-Moist or damp pot...

Owners Guide
Page 6
...the fan could cause the bulb to break. Move birds to accumulate. 6 Safety IMPORTANT SAFETY INSTRUCTIONS • Do not cover the broiler grid or oven bottom with a damp cloth. Disconnect the appliance or shut off during the self-clean cycle of grease that could ignite. • Do not touch... known to the state to cause cancer, birth defects or other reproductive harm, and requires businesses to operate. • Do not clean the oven door gasket. Care should be taken not to such substances. Also the side rails of potential exposure to rub, damage or move the gasket....
...the fan could cause the bulb to break. Move birds to accumulate. 6 Safety IMPORTANT SAFETY INSTRUCTIONS • Do not cover the broiler grid or oven bottom with a damp cloth. Disconnect the appliance or shut off during the self-clean cycle of grease that could ignite. • Do not touch... known to the state to cause cancer, birth defects or other reproductive harm, and requires businesses to operate. • Do not clean the oven door gasket. Care should be taken not to such substances. Also the side rails of potential exposure to rub, damage or move the gasket....

Owners Guide
Page 7
YOUR WALL OVEN CONVECTION FAN OVEN VENT Feature Overview 7 CONTROL PANEL OVEN DOOR LATCH BROILING ELEMENT OVEN RACK SLIDERS STANDARD OVEN RACKS EXTENDABLE OVEN RACKS OVEN LIGHT OVEN RACK SUPPORT OFFSET OVEN RACK GLASS OVEN DOOR DOOR HANDLE BROILER PAN BROILER PAN GRID CONVECTION ROASTING RACK
YOUR WALL OVEN CONVECTION FAN OVEN VENT Feature Overview 7 CONTROL PANEL OVEN DOOR LATCH BROILING ELEMENT OVEN RACK SLIDERS STANDARD OVEN RACKS EXTENDABLE OVEN RACKS OVEN LIGHT OVEN RACK SUPPORT OFFSET OVEN RACK GLASS OVEN DOOR DOOR HANDLE BROILER PAN BROILER PAN GRID CONVECTION ROASTING RACK

Owners Guide
Page 8
...supports by pushing them from sliders To place on the rack to accidentally pull the rack too far and make it out. To install an oven rack, locate the two pinholes in the small plates at the end of the rack on , warm air is released through the vent. ...Installed on sliders Oven Vent Warm Air To remove from the brackets. Installing Standard Oven Rack ALWAYS ARRANGE OVEN RACKS WHEN THE OVEN IS COOL (PRIOR TO OPERATING THE OVEN). Always use oven mitts when using the oven. Must point upward BACK FRONT This stopper will stop the rack...
...supports by pushing them from sliders To place on the rack to accidentally pull the rack too far and make it out. To install an oven rack, locate the two pinholes in the small plates at the end of the rack on , warm air is released through the vent. ...Installed on sliders Oven Vent Warm Air To remove from the brackets. Installing Standard Oven Rack ALWAYS ARRANGE OVEN RACKS WHEN THE OVEN IS COOL (PRIOR TO OPERATING THE OVEN). Always use oven mitts when using the oven. Must point upward BACK FRONT This stopper will stop the rack...

Owners Guide
Page 9
...: Always use caution when removing food. To bake on 2 racks, place the racks in position 3 and 8. OVEN RACKS Feature Overview 9 Rack positions 8 7 6 5 4 3 2 11 Arranging Oven Racks ALWAYS ARRANGE OVEN RACKS WHEN THE OVEN IS COOL (PRIOR TO OPERATING THE OVEN). To bake on 3 racks, place the racks in position 3 or 4. To bake on a single rack...
...: Always use caution when removing food. To bake on 2 racks, place the racks in position 3 and 8. OVEN RACKS Feature Overview 9 Rack positions 8 7 6 5 4 3 2 11 Arranging Oven Racks ALWAYS ARRANGE OVEN RACKS WHEN THE OVEN IS COOL (PRIOR TO OPERATING THE OVEN). To bake on 3 racks, place the racks in position 3 or 4. To bake on a single rack...


