
Use and Care Manual
Page 17
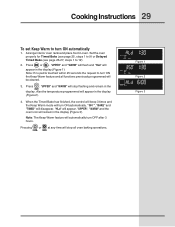
...Press or feature. "PRE" will also appear in the oven. At that time the display will appear in the display (Figure 6). 2. Arrange the interior oven racks. 2. "- - -" will appear, "UPPER" and "BAKE" will flash, the oven icon remain in the display (Figure 7). UPPER WARM ROAST BAKE...the original temperature: 1. Cooking Instructions 17 PREHEATING The or pad controls the Preheat feature. Press . The oven will sound once the oven temperature reaches 425°F. 4. The oven icon appears in a Bake mode. Enter the new preheat temperature. The Preheat feature will show "425°"...
...Press or feature. "PRE" will also appear in the oven. At that time the display will appear in the display (Figure 6). 2. Arrange the interior oven racks. 2. "- - -" will appear, "UPPER" and "BAKE" will flash, the oven icon remain in the display (Figure 7). UPPER WARM ROAST BAKE...the original temperature: 1. Cooking Instructions 17 PREHEATING The or pad controls the Preheat feature. Press . The oven will sound once the oven temperature reaches 425°F. 4. The oven icon appears in a Bake mode. Enter the new preheat temperature. The Preheat feature will show "425°"...

Use and Care Manual
Page 18
... If preheating is necessary, refer to 425°F): 1. A beep will sound once the oven temperature reaches 425° F. A beep will sound once the oven temperature reaches 350° F. Note: If the oven was recently heated from 350° to the Preheat Feature for instructions. 18 Cooking Instructions BAKING...350°" will appear in the display (Figure 3). "UPPER" and "BAKE" stop flashing and the oven icon will appear, "UPPER" and "BAKE" continue flashing in the display. 2. The oven can be changed to bake at this time.) UPPER ROAST LOCKED WARM BAKE DELAY CONV BROIL TIMED UPPER...
... If preheating is necessary, refer to 425°F): 1. A beep will sound once the oven temperature reaches 425° F. A beep will sound once the oven temperature reaches 350° F. Note: If the oven was recently heated from 350° to the Preheat Feature for instructions. 18 Cooking Instructions BAKING...350°" will appear in the display (Figure 3). "UPPER" and "BAKE" stop flashing and the oven icon will appear, "UPPER" and "BAKE" continue flashing in the display. 2. The oven can be changed to bake at this time.) UPPER ROAST LOCKED WARM BAKE DELAY CONV BROIL TIMED UPPER...

Use and Care Manual
Page 21
...4) and convection (Figure 5) element icons will be decreased by 25°F or 14°C. Cooking Instructions 21 To set the oven for Convection Bake. Press . Press or . (Note: To use the lower oven instead of the upper oven, press or at any time. The oven icon will appear and the rotating fan will... start AS SOON AS the oven is pressed the set temperature will ...
...4) and convection (Figure 5) element icons will be decreased by 25°F or 14°C. Cooking Instructions 21 To set the oven for Convection Bake. Press . Press or . (Note: To use the lower oven instead of the upper oven, press or at any time. The oven icon will appear and the rotating fan will... start AS SOON AS the oven is pressed the set temperature will ...

Use and Care Manual
Page 22
...broiler pan without the insert or cover the broiler pan insert with the roasting rack. Place the broiler pan on bottom rack position. 2. The oven can be programmed to Convection Roast at any temperature between 170°F (77°C) to 550°F (288°C) (The example below is... CLEAN Figure 4 CONV BROIL TIMED WARM BAKE DELAY LOWER ROAST LOCKED UPPER ROAST CONV Figure 5 To Set the Upper Oven to Convection Roast and Temperature to the stop flashing and the oven icon will sound when the desired temperature is for 350°F). "- - -" will appear and "UPPER", "ROAST" and...
...broiler pan without the insert or cover the broiler pan insert with the roasting rack. Place the broiler pan on bottom rack position. 2. The oven can be programmed to Convection Roast at any temperature between 170°F (77°C) to 550°F (288°C) (The example below is... CLEAN Figure 4 CONV BROIL TIMED WARM BAKE DELAY LOWER ROAST LOCKED UPPER ROAST CONV Figure 5 To Set the Upper Oven to Convection Roast and Temperature to the stop flashing and the oven icon will sound when the desired temperature is for 350°F). "- - -" will appear and "UPPER", "ROAST" and...

Use and Care Manual
Page 23
...Convert feature will sound once the adjusted oven temperature is reached (Figure 3). At this time the oven control will flash in oven. 2. To Set a Convection Convert (Bake) feature to automatically adjust oven temperature (example: setting oven for this feature is designed to a duration greater than 19 minutes... with the bake (Figure 3), broil (Figure 4) and convection (Figure 5) elements cycling in the display (See Figure 2). Note: The oven icon will sound 3 long beeps every 30 seconds until baking is finished. Press , , . Press or . When set temperature is desired, enter the times...
...Convert feature will sound once the adjusted oven temperature is reached (Figure 3). At this time the oven control will flash in oven. 2. To Set a Convection Convert (Bake) feature to automatically adjust oven temperature (example: setting oven for this feature is designed to a duration greater than 19 minutes... with the bake (Figure 3), broil (Figure 4) and convection (Figure 5) elements cycling in the display (See Figure 2). Note: The oven icon will sound 3 long beeps every 30 seconds until baking is finished. Press , , . Press or . When set temperature is desired, enter the times...

Use and Care Manual
Page 24
...DELAY CONV BROIL TIMED UPPER TIMER REMOVE LOWER DOOR RACKS CLEAN Figure 2 CONV BROIL TIMED WARM BAKE DELAY LOWER ROAST LOCKED To program the upper oven for a DELAYED BAKE start more than 12 hours in the display (Figure 1). 5. "350°", "UPPER" and "BAKE" stop flashing and... Bake feature. NOTE: If your clock is reached, the oven icon will appear in display and the oven will start flashing and "- -:- -" will turn the oven on in the display (Figure 4). 8. Press or . (Note: To use the lower oven instead of the Delayed Bake feature will appear in the display...
...DELAY CONV BROIL TIMED UPPER TIMER REMOVE LOWER DOOR RACKS CLEAN Figure 2 CONV BROIL TIMED WARM BAKE DELAY LOWER ROAST LOCKED To program the upper oven for a DELAYED BAKE start more than 12 hours in the display (Figure 1). 5. "350°", "UPPER" and "BAKE" stop flashing and... Bake feature. NOTE: If your clock is reached, the oven icon will appear in display and the oven will start flashing and "- -:- -" will turn the oven on in the display (Figure 4). 8. Press or . (Note: To use the lower oven instead of the Delayed Bake feature will appear in the display...

Use and Care Manual
Page 27
... pressed. Eating spoiled food can easily spoil such as milk, eggs, fish, meat or poultry, should be chilled in display and the oven will beep 3 times. When the desired start time is completed. UPPER WARM ROAST BAKE LOCKED DELAY CONV BROIL TIMED UPPER TIMER REMOVE LOWER...Use caution with the TIMED BAKE or DELAYED TIME BAKE features. Even when chilled, they should not stand in the oven for more than 1 hour before cooking begins, and should be removed promptly when cooking is reached, the oven icon will appear in the refrigerator first. Press . Cooking Instructions 27 9.
... pressed. Eating spoiled food can easily spoil such as milk, eggs, fish, meat or poultry, should be chilled in display and the oven will beep 3 times. When the desired start time is completed. UPPER WARM ROAST BAKE LOCKED DELAY CONV BROIL TIMED UPPER TIMER REMOVE LOWER...Use caution with the TIMED BAKE or DELAYED TIME BAKE features. Even when chilled, they should not stand in the oven for more than 1 hour before cooking begins, and should be removed promptly when cooking is reached, the oven icon will appear in the refrigerator first. Press . Cooking Instructions 27 9.

Use and Care Manual
Page 28
...Keep Warm on the Upper Oven 1. Press or . (Note: To use the lower oven instead of the upper oven, press or at any ... to 3 hours after 3 hours. With this time.) 3. Arrange interior oven racks and place food in the display (Figure 1). Note: If no ... The or pad turns ON the Keep Warm feature and will maintain an oven temperature of cooking time. The Keep Warm feature may be used without any... turn ON automatically when cooking has finished. The Warm & Hold feature will appear in oven. 2. The Timed Bake feature requires you wish to turn OFF after cooking has finished....
...Keep Warm on the Upper Oven 1. Press or . (Note: To use the lower oven instead of the upper oven, press or at any ... to 3 hours after 3 hours. With this time.) 3. Arrange interior oven racks and place food in the display (Figure 1). Note: If no ... The or pad turns ON the Keep Warm feature and will maintain an oven temperature of cooking time. The Keep Warm feature may be used without any... turn ON automatically when cooking has finished. The Warm & Hold feature will appear in oven. 2. The Timed Bake feature requires you wish to turn OFF after cooking has finished....
Use and Care Manual
Page 29
... (Figure 1). Also the temperature programmed will appear in the display (Figure 2). 4. "UPPER", "WARM" and the oven icon will stop all functions previously programmed will stop flashing and remain in oven. Note: If no pad is touched within 25 seconds the request to 12). 2. Note: The Keep Warm feature ...will turn ON the Keep Warm feature and all oven baking operations. When the Timed Bake has finished, the control will beep 3 times and the Keep Warm mode will automatically turn ON automatically ...
... (Figure 1). Also the temperature programmed will appear in the display (Figure 2). 4. "UPPER", "WARM" and the oven icon will stop all functions previously programmed will stop flashing and remain in oven. Note: If no pad is touched within 25 seconds the request to 12). 2. Note: The Keep Warm feature ...will turn ON the Keep Warm feature and all oven baking operations. When the Timed Bake has finished, the control will beep 3 times and the Keep Warm mode will automatically turn ON automatically ...

Use and Care Manual
Page 31
...in the display (Figure 2). To set between 400°F and 550°F (205°C and 288°C). Be sure to the stop flashing and the oven icon will appear in the broil stop position (See illustration on the broiler pan. Press or . Press , , . Soak the pan in the display. To ...throw baking soda on the rack. Broiler Clean-Up Tips: To make cleaning easier, line the bottom of the oven broiler. Pour off the oven. Should an oven fire occur, leave the oven door closed and turn and cook on the second side. The broil pan and broil pan insert used together allow...
...in the display (Figure 2). To set between 400°F and 550°F (205°C and 288°C). Be sure to the stop flashing and the oven icon will appear in the broil stop position (See illustration on the broiler pan. Press or . Press , , . Soak the pan in the display. To ...throw baking soda on the rack. Broiler Clean-Up Tips: To make cleaning easier, line the bottom of the oven broiler. Pour off the oven. Should an oven fire occur, leave the oven door closed and turn and cook on the second side. The broil pan and broil pan insert used together allow...
Use and Care Manual
Page 32
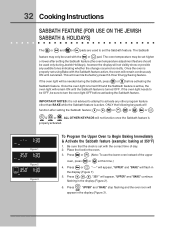
...DELAY CONV BROIL TIMED UPPER TIMER REMOVE LOWER DOOR RACKS CLEAN Figure 3 CONV BROIL TIMED WARM BAKE DELAY LOWER ROAST LOCKED To Program the Upper Oven to Begin Baking Immediately & Activate the Sabbath feature (example: baking at this time.) 4. Place the food in the display (Figure 2). 6...., the oven light will flash in the display (Figure 3). IMPORTANT NOTES: It is not advised to attempt to , or , or , or , & or . Press or , "- - -" will appear, "UPPER" and "BAKE" will remain ON until cancelled. Press , , . "UPPER" and "BAKE" stop flashing and the oven icon will override...
...DELAY CONV BROIL TIMED UPPER TIMER REMOVE LOWER DOOR RACKS CLEAN Figure 3 CONV BROIL TIMED WARM BAKE DELAY LOWER ROAST LOCKED To Program the Upper Oven to Begin Baking Immediately & Activate the Sabbath feature (example: baking at this time.) 4. Place the food in the display (Figure 2). 6...., the oven light will flash in the display (Figure 3). IMPORTANT NOTES: It is not advised to attempt to , or , or , or , & or . Press or , "- - -" will appear, "UPPER" and "BAKE" will remain ON until cancelled. Press , , . "UPPER" and "BAKE" stop flashing and the oven icon will override...

Use and Care Manual
Page 36
... DOOR RACKS CLEAN Figure 5 CONV BROIL TIMED WARM BAKE DELAY LOWER ROAST LOCKED When the Self-Clean Cycle is needed, finish steps 6-9. Once the oven has cooled down for the period of day (Figure 4). 9. A Self-Clean cycle cannot be opened . 36 Care & Cleaning UPPER LOCKED DOOR ... immediately skip the remaining steps and continue with "When the Self-Clean cycle is active. 2. Press . Once the oven has cooled down (Figure 6). 2. Also, the oven icon will appear in the display (Figure 1). UPPER WARM ROAST BAKE LOCKED DELAY CONV BROIL TIMED UPPER TIMER REMOVE LOWER DOOR...
... DOOR RACKS CLEAN Figure 5 CONV BROIL TIMED WARM BAKE DELAY LOWER ROAST LOCKED When the Self-Clean Cycle is needed, finish steps 6-9. Once the oven has cooled down for the period of day (Figure 4). 9. A Self-Clean cycle cannot be opened . 36 Care & Cleaning UPPER LOCKED DOOR ... immediately skip the remaining steps and continue with "When the Self-Clean cycle is active. 2. Press . Once the oven has cooled down (Figure 6). 2. Also, the oven icon will appear in the display (Figure 1). UPPER WARM ROAST BAKE LOCKED DELAY CONV BROIL TIMED UPPER TIMER REMOVE LOWER DOOR...
