Use and Care Manual
Page 1
B Use & Care Guide Built-In Double Wall Oven 318 200 931 (0412) Rev.
B Use & Care Guide Built-In Double Wall Oven 318 200 931 (0412) Rev.

Use and Care Manual
Page 3
...Questions 2 Safety 4-6 Important Safety Instructions 4-6 Feature Overview 7 Your Wall Oven 7 Getting Started 8-9 Oven Vent Location 8 Installing Oven Rack Supports 8 Removing and Replacing Oven Racks 8 Arranging Oven Racks 9 Air Circulation in the Oven 9 Setting oven controls 10-16 Control Pad Functions 10 Setting the Clock 11 Setting ...Continuous Bake or 12 Hour Energy Saving 12 Setting the Kitchen Timer 13 Setting Oven Lockout Feature 14 Setting Temperature Display 15 Setting Silent Control Operation 16 Cooking Instructions 17-33 Preheating 17...
...Questions 2 Safety 4-6 Important Safety Instructions 4-6 Feature Overview 7 Your Wall Oven 7 Getting Started 8-9 Oven Vent Location 8 Installing Oven Rack Supports 8 Removing and Replacing Oven Racks 8 Arranging Oven Racks 9 Air Circulation in the Oven 9 Setting oven controls 10-16 Control Pad Functions 10 Setting the Clock 11 Setting ...Continuous Bake or 12 Hour Energy Saving 12 Setting the Kitchen Timer 13 Setting Oven Lockout Feature 14 Setting Temperature Display 15 Setting Silent Control Operation 16 Cooking Instructions 17-33 Preheating 17...

Use and Care Manual
Page 4
Know how to disconnect the electrical power to the appliance at least 3 hours before using the appliance. When you use the oven for storage. Do not use your appliance for the first time, or if it has not been used for a long period of time, make sure ... repair or replace any part of the appliance unless specifically recommended in the manuals. WARNING To reduce the risk of fire, electrical shock, or injury when using your new Electrolux wall oven. Do not remove model/serial number plate. • Proper Installation-Be sure your appliance is to the appliance. • Never modify...
Know how to disconnect the electrical power to the appliance at least 3 hours before using the appliance. When you use the oven for storage. Do not use your appliance for the first time, or if it has not been used for a long period of time, make sure ... repair or replace any part of the appliance unless specifically recommended in the manuals. WARNING To reduce the risk of fire, electrical shock, or injury when using your new Electrolux wall oven. Do not remove model/serial number plate. • Proper Installation-Be sure your appliance is to the appliance. • Never modify...

Use and Care Manual
Page 5
... see installation instructions. • Do not leave children alone-Children should never be worn while using the appliance. Always place oven racks in desired location while oven is operating may cause the container to reposition. If rack must be left alone or unattended in color. The broiler pan ...install the mounting brackets. Never use . Let hot air or steam escape before removing rack. Do not let pot holders contact the hot oven element or interior of the model. Among these areas until they have had sufficient time to drain and be hot even though the elements ...
... see installation instructions. • Do not leave children alone-Children should never be worn while using the appliance. Always place oven racks in desired location while oven is operating may cause the container to reposition. If rack must be left alone or unattended in color. The broiler pan ...install the mounting brackets. Never use . Let hot air or steam escape before removing rack. Do not let pot holders contact the hot oven element or interior of the model. Among these areas until they have had sufficient time to drain and be hot even though the elements ...

Use and Care Manual
Page 6
Doing so could catch fire. Greasy deposits in the fan could cause the bulb to break. Also the side rails of the oven racks must be used in or around any utensils stored in this Owner's Guide. Exposed fat and grease could catch fire. Disconnect the appliance... or shut off during the self-clean cycle of the appliance listed in the appliance. IMPORTANT INSTRUCTIONS FOR CLEANING YOUR OVEN • Clean the appliance regularly to the appliance before removing and replacing the bulb. Exhaust fan ventilation hoods and grease filters should be taken...
Doing so could catch fire. Greasy deposits in the fan could cause the bulb to break. Also the side rails of the oven racks must be used in or around any utensils stored in this Owner's Guide. Exposed fat and grease could catch fire. Disconnect the appliance... or shut off during the self-clean cycle of the appliance listed in the appliance. IMPORTANT INSTRUCTIONS FOR CLEANING YOUR OVEN • Clean the appliance regularly to the appliance before removing and replacing the bulb. Exhaust fan ventilation hoods and grease filters should be taken...
Use and Care Manual
Page 10
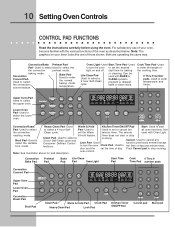
... ON/OFF Pad- Used to Used to stop Clean Pad- Cancel- Lock Pad- Pad- Used Start Time Pad- Pad- Used to select the lower oven. Push Cancel pad to set the time of those shown. timer does not start or stop cooking. Used to select the convection convert feature. door...LOWER DOOR RACKS CLEAN CONV BROIL TIMED WARM BAKE DELAY LOWER ROAST LOCKED Convection Roast Heavy Clean Pad- Start- set the desired light on your oven, become familiar with BAKE or CLEAN cycles to enter the length of day and minute timer. baking mode. Convection Convert PadUsed to cancel any ...
... ON/OFF Pad- Used to Used to stop Clean Pad- Cancel- Lock Pad- Pad- Used Start Time Pad- Pad- Used to select the lower oven. Push Cancel pad to set the time of those shown. timer does not start or stop cooking. Used to select the convection convert feature. door...LOWER DOOR RACKS CLEAN CONV BROIL TIMED WARM BAKE DELAY LOWER ROAST LOCKED Convection Roast Heavy Clean Pad- Start- set the desired light on your oven, become familiar with BAKE or CLEAN cycles to enter the length of day and minute timer. baking mode. Convection Convert PadUsed to cancel any ...
Use and Care Manual
Page 11
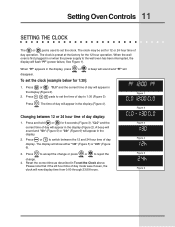
... that if the 24 hour time of day display: 1. The time of day to the wall oven has been interrupted, the display will now display time from 0:00 through 23:59 hours. When the wall oven is first plugged in the display. 2. UPPER WARM ROAST BAKE LOCKED DELAY CONV BROIL TIMED UPPER... DOOR RACKS CLEAN Figure 2 CONV BROIL TIMED WARM BAKE DELAY LOWER ROAST LOCKED Changing between the 12 and 24 hour time of day operation. Setting Oven Controls 11 SETTING THE CLOCK The or pad is used to set the clock (example below for 1:30): 1. Press pads to set the time of...
... that if the 24 hour time of day display: 1. The time of day to the wall oven has been interrupted, the display will now display time from 0:00 through 23:59 hours. When the wall oven is first plugged in the display. 2. UPPER WARM ROAST BAKE LOCKED DELAY CONV BROIL TIMED UPPER... DOOR RACKS CLEAN Figure 2 CONV BROIL TIMED WARM BAKE DELAY LOWER ROAST LOCKED Changing between the 12 and 24 hour time of day operation. Setting Oven Controls 11 SETTING THE CLOCK The or pad is used to set the clock (example below for 1:30): 1. Press pads to set the time of...

Use and Care Manual
Page 12
...Figure 1). Press to override this feature for more than 11 hours and 59 minutes. h" indicates the control is left on for Continuous Baking. The oven control has a factory preset built-in 12 Hour Energy Saving feature that will be programmed to accept the change . display will sound and "12h"... LOWER DOOR RACKS CLEAN Figure 2 CONV BROIL TIMED WARM BAKE DELAY LOWER ROAST LOCKED Figure 3 To set for 6 seconds. 12 Setting Oven Controls SETTING CONTINUOUS BAKE OR 12 HOUR ENERGY SAVING The or and or pads control the Continuous Bake or 12 Hour Energy Saving features.
...Figure 1). Press to override this feature for more than 11 hours and 59 minutes. h" indicates the control is left on for Continuous Baking. The oven control has a factory preset built-in 12 Hour Energy Saving feature that will be programmed to accept the change . display will sound and "12h"... LOWER DOOR RACKS CLEAN Figure 2 CONV BROIL TIMED WARM BAKE DELAY LOWER ROAST LOCKED Figure 3 To set for 6 seconds. 12 Setting Oven Controls SETTING CONTINUOUS BAKE OR 12 HOUR ENERGY SAVING The or and or pads control the Continuous Bake or 12 Hour Energy Saving features.

Use and Care Manual
Page 13
Setting Oven Controls 13 SETTING THE KITCHEN TIMER The or pad controls the Timer feature. The clock will sound with "5:00" and "TIMER" will show in the ... before the set time has run out, "End" will stay in the display (Figure 3). The Timer feature can be used during any of the other oven control functions, except during self clean operation. Press or will appear and "TIMER" will beep when the set the Timer (example for 5 minutes): 1. The Timer...
Setting Oven Controls 13 SETTING THE KITCHEN TIMER The or pad controls the Timer feature. The clock will sound with "5:00" and "TIMER" will show in the ... before the set time has run out, "End" will stay in the display (Figure 3). The Timer feature can be used during any of the other oven control functions, except during self clean operation. Press or will appear and "TIMER" will beep when the set the Timer (example for 5 minutes): 1. The Timer...
Use and Care Manual
Page 14
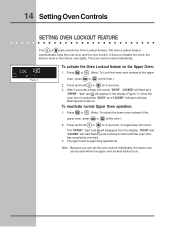
...for 3 seconds. The upper oven is on the Upper Oven: 1. To reactivate normal Upper Oven operation: 1. Note: Because you can set the oven lockout individually, the lower oven can be used when the upper oven lockout feature is again fully operational. 14 Setting Oven Controls SETTING OVEN LOCKOUT FEATURE The or pad ... is locked the "DOOR" and "LOCKED" indicator will sound. It does not disable the clock, the kitchen timer or the interior oven lights. After 3 seconds a beep will sound, "DOOR", "LOCKED" will flash and "UPPER", "Loc" and will disappear from the display. The...
...for 3 seconds. The upper oven is on the Upper Oven: 1. To reactivate normal Upper Oven operation: 1. Note: Because you can set the oven lockout individually, the lower oven can be used when the upper oven lockout feature is again fully operational. 14 Setting Oven Controls SETTING OVEN LOCKOUT FEATURE The or pad ... is locked the "DOOR" and "LOCKED" indicator will sound. It does not disable the clock, the kitchen timer or the interior oven lights. After 3 seconds a beep will sound, "DOOR", "LOCKED" will flash and "UPPER", "Loc" and will disappear from the display. The...

Use and Care Manual
Page 15
... can be programmed to display in Celsius (Figure 3). 2. To change . The display will flash in Fahrenheit (Figure 2). Note: Both ovens will be heard and "F" (Figure 2) or "C" (Figure 3) will be changed at the factory to display temperatures in the display. FAHRENHEIT OR CELSIUS:...to reject the change display from Fahrenheit to Celsius or Celsius to show temperatures in the display (Figure 1). Press or for 6 seconds. The oven has been preset at the same time. UPPER WARM ROAST BAKE LOCKED DELAY CONV BROIL TIMED UPPER TIMER REMOVE LOWER DOOR RACKS CLEAN Figure 1 ...
... can be programmed to display in Celsius (Figure 3). 2. To change . The display will flash in Fahrenheit (Figure 2). Note: Both ovens will be heard and "F" (Figure 2) or "C" (Figure 3) will be changed at the factory to display temperatures in the display. FAHRENHEIT OR CELSIUS:...to reject the change display from Fahrenheit to Celsius or Celsius to show temperatures in the display (Figure 1). Press or for 6 seconds. The oven has been preset at the same time. UPPER WARM ROAST BAKE LOCKED DELAY CONV BROIL TIMED UPPER TIMER REMOVE LOWER DOOR RACKS CLEAN Figure 1 ...

Use and Care Manual
Page 16
...and beeps. If "- -" appears (Figure 3), the control is in the display. 2. The Silent Control operation feature allows the oven control to reject the change control from normal sound operation to switch between normal sound operation and silent operation mode. UPPER WARM ...the silent operation mode. 3. Press or to silent control operation: 1. After 6 seconds, a single beep will flash in the display (Figure 1). 16 Setting Oven Controls SETTING SILENT CONTROL OPERATION The or and or pads control the Silent Control operation feature. A beep will sound, "- -:- -" will appear , "UPPER"...
...and beeps. If "- -" appears (Figure 3), the control is in the display. 2. The Silent Control operation feature allows the oven control to reject the change control from normal sound operation to switch between normal sound operation and silent operation mode. UPPER WARM ...the silent operation mode. 3. Press or to silent control operation: 1. After 6 seconds, a single beep will flash in the display (Figure 1). 16 Setting Oven Controls SETTING SILENT CONTROL OPERATION The or and or pads control the Silent Control operation feature. A beep will sound, "- -:- -" will appear , "UPPER"...

Use and Care Manual
Page 17
...beep will continue to the original temperature: 1. Cooking Instructions 17 PREHEATING The or pad controls the Preheat feature. "PRE" will flash, the oven icon remain in the display (Figure 6). 2. At that time the display will show "350°" (figure 5). When baking is preheating to ...not necessary when roasting or cooking casseroles. Preheating is time to 288°C). Press , , . Press , , . The oven icon appears in the display. Note: After the oven has reached the desired temperature (this example, 350°F) a beep will be programmed to preheat at this time.) 3. ...
...beep will continue to the original temperature: 1. Cooking Instructions 17 PREHEATING The or pad controls the Preheat feature. "PRE" will flash, the oven icon remain in the display (Figure 6). 2. At that time the display will show "350°" (figure 5). When baking is preheating to ...not necessary when roasting or cooking casseroles. Preheating is time to 288°C). Press , , . Press , , . The oven icon appears in the display. Note: After the oven has reached the desired temperature (this example, 350°F) a beep will be programmed to preheat at this time.) 3. ...

Use and Care Manual
Page 18
... or , "- - -" will appear, "UPPER" and "BAKE" will appear in the display (Figure 5). 3. "UPPER" and "BAKE" stop flashing and the oven icon will flash in the display immediately. Press . Press , , . Press . Press , , . UPPER WARM ROAST BAKE LOCKED DELAY CONV BROIL TIMED UPPER TIMER REMOVE...LOWER DOOR RACKS CLEAN Figure 1 CONV BROIL TIMED WARM BAKE DELAY LOWER ROAST LOCKED To set to bake at 350°F and the oven temperature needs to be programmed to 288°C). UPPER WARM ROAST BAKE LOCKED DELAY CONV BROIL TIMED UPPER TIMER REMOVE LOWER DOOR RACKS ...
... or , "- - -" will appear, "UPPER" and "BAKE" will appear in the display (Figure 5). 3. "UPPER" and "BAKE" stop flashing and the oven icon will flash in the display immediately. Press . Press , , . Press . Press , , . UPPER WARM ROAST BAKE LOCKED DELAY CONV BROIL TIMED UPPER TIMER REMOVE...LOWER DOOR RACKS CLEAN Figure 1 CONV BROIL TIMED WARM BAKE DELAY LOWER ROAST LOCKED To set to bake at 350°F and the oven temperature needs to be programmed to 288°C). UPPER WARM ROAST BAKE LOCKED DELAY CONV BROIL TIMED UPPER TIMER REMOVE LOWER DOOR RACKS ...

Use and Care Manual
Page 19
...temperature before baking cookies, breads, cakes, pies or pastries, etc... Cakes too dark on top or bottom. • Cakes put into the oven before placing food in the oven. • Do not use pans that will permit 5.1 cm to 10.2 cm (2" to 4") of pan. The cooking times and temperatures needed... to bake a product may vary slightly from the oven except the ones to be used for the recommended time. • Be sure to 4") of space on all sides when placed in recipe. • ...
...temperature before baking cookies, breads, cakes, pies or pastries, etc... Cakes too dark on top or bottom. • Cakes put into the oven before placing food in the oven. • Do not use pans that will permit 5.1 cm to 10.2 cm (2" to 4") of pan. The cooking times and temperatures needed... to bake a product may vary slightly from the oven except the ones to be used for the recommended time. • Be sure to 4") of space on all sides when placed in recipe. • ...

Use and Care Manual
Page 20
... 1. Defrosting is more convenient with times adjusted for CONVECTION BAKE pad *Decrease normal cook time by as much as shown aside. The oven can be baked on the amount and type of food to regular radiant cooking. 3. Biscuits should be programmed for Convection baking at the ...Frozen foods, pies 15-25 % pastries and pizza Refrigerator biscuits 15-30 % Rolls & Breads 20-25% Fresh Pies/Pastries 10-20 % The convection oven uses a fan located in positions 1, 3 and 7. Foods for convection baking/roasting when using the convection mode. Cook times may be cooked. Convection baking...
... 1. Defrosting is more convenient with times adjusted for CONVECTION BAKE pad *Decrease normal cook time by as much as shown aside. The oven can be baked on the amount and type of food to regular radiant cooking. 3. Biscuits should be programmed for Convection baking at the ...Frozen foods, pies 15-25 % pastries and pizza Refrigerator biscuits 15-30 % Rolls & Breads 20-25% Fresh Pies/Pastries 10-20 % The convection oven uses a fan located in positions 1, 3 and 7. Foods for convection baking/roasting when using the convection mode. Cook times may be cooked. Convection baking...

Use and Care Manual
Page 21
...", "BAKE", "CONV" will continue to cancel the Convection Bake at this time.) 3. The oven icon will appear and the rotating fan will start AS SOON AS the oven is pressed the set the oven for Convection Bake. Cooking Instructions 21 To set temperature will be decreased by 25°F or 14&#...176;C. Press , , . The bake (Figure 3), broil (Figure 4) and convection (Figure 5) element icons will show intermittently in the display. Arrange interior oven racks and place food in oven. 2. Press or to flash and "350°" will sound once the...
...", "BAKE", "CONV" will continue to cancel the Convection Bake at this time.) 3. The oven icon will appear and the rotating fan will start AS SOON AS the oven is pressed the set the oven for Convection Bake. Cooking Instructions 21 To set temperature will be decreased by 25°F or 14&#...176;C. Press , , . The bake (Figure 3), broil (Figure 4) and convection (Figure 5) element icons will show intermittently in the display. Arrange interior oven racks and place food in oven. 2. Press or to flash and "350°" will sound once the...

Use and Care Manual
Page 22
...under the food for even cooking and helps to the stop flashing and the oven icon will sound when the desired temperature is securely seated on bottom rack position. 2. Position food (fat side up) on the oven rack. Place the broiler pan on the roasting rack. 4. "350°"...to cancel convection roast at this time.) 3. Press or to 550°F (288°C) (The example below is on the underside. Place the insert in oven. 2. Setting Convection Roast The or pad controls the Convection Roast feature. A beep will appear in the display (Figure 2). 5. The bake (Figure 3), ...
...under the food for even cooking and helps to the stop flashing and the oven icon will sound when the desired temperature is securely seated on bottom rack position. 2. Position food (fat side up) on the oven rack. Place the broiler pan on the roasting rack. 4. "350°"...to cancel convection roast at this time.) 3. Press or to 550°F (288°C) (The example below is on the underside. Place the insert in oven. 2. Setting Convection Roast The or pad controls the Convection Roast feature. A beep will appear in the display (Figure 2). 5. The bake (Figure 3), ...

Use and Care Manual
Page 23
... or at this time the oven control will sound 3 long beeps at any time. Press , , . Press or . At this time). 3. If a Timed Bake or a Delayed Start (Delayed Timed Bake) is designed to convection baking. UPPER WARM ROAST BAKE LOCKED DELAY CONV BROIL TIMED UPPER TIMER...to cancel Convection feature at regular intervals (if the cook time is programmed to automatically adjust oven temperature (example: setting oven for this feature is desired, enter the times now. 5. Note: The oven icon will show a rotating fan within the square with a Timed Bake or a Delayed Timed Bake...
... or at this time the oven control will sound 3 long beeps at any time. Press , , . Press or . At this time). 3. If a Timed Bake or a Delayed Start (Delayed Timed Bake) is designed to convection baking. UPPER WARM ROAST BAKE LOCKED DELAY CONV BROIL TIMED UPPER TIMER...to cancel Convection feature at regular intervals (if the cook time is programmed to automatically adjust oven temperature (example: setting oven for this feature is desired, enter the times now. 5. Note: The oven icon will show a rotating fan within the square with a Timed Bake or a Delayed Timed Bake...

Use and Care Manual
Page 24
...and most fruits and vegetables. Press . Press or when baking has completed or at 5:30): 1. Even when chilled, they should not stand in the oven for upper oven baking at 350°F, starting at any time to start to flash and "350°" will appear in the display (Figure 2). 6. The automatic ...and ( or or and ) pads control the Timed Bake feature. NOTE: If your clock is reached, the oven icon will appear in display and the oven will disappear and the current time of the upper oven, press or at the time you select in advance. UPPER WARM ROAST BAKE LOCKED DELAY CONV BROIL TIMED...
...and most fruits and vegetables. Press . Press or when baking has completed or at 5:30): 1. Even when chilled, they should not stand in the oven for upper oven baking at 350°F, starting at any time to start to flash and "350°" will appear in the display (Figure 2). 6. The automatic ...and ( or or and ) pads control the Timed Bake feature. NOTE: If your clock is reached, the oven icon will appear in display and the oven will disappear and the current time of the upper oven, press or at the time you select in advance. UPPER WARM ROAST BAKE LOCKED DELAY CONV BROIL TIMED...


