
Use and Care Manual
Page 3
... 2 Questions 2 Safety 4-6 Important Safety Instructions 4-6 Feature Overview 7 Your Wall Oven 7 Getting Started 8-9 Oven Vent Location 8 Installing Oven Rack Supports 8 Removing and Replacing Oven Racks 8 Arranging Oven Racks 9 Air Circulation in the Oven 9 Setting oven controls 10-16 Control Pad Functions 10 Setting the Clock 11 Setting Continuous Bake...Bake or Delayed Timed Convection Bake Or Delayed Timed Convection Roast 26-27 Setting the Keep Warm Feature 28-29 Broiling 30-31 Sabbath Feature (for use on the Jewish Sabbath & Holidays 32-33 Care & Cleaning 34-39 Using the...
... 2 Questions 2 Safety 4-6 Important Safety Instructions 4-6 Feature Overview 7 Your Wall Oven 7 Getting Started 8-9 Oven Vent Location 8 Installing Oven Rack Supports 8 Removing and Replacing Oven Racks 8 Arranging Oven Racks 9 Air Circulation in the Oven 9 Setting oven controls 10-16 Control Pad Functions 10 Setting the Clock 11 Setting Continuous Bake...Bake or Delayed Timed Convection Bake Or Delayed Timed Convection Roast 26-27 Setting the Keep Warm Feature 28-29 Broiling 30-31 Sabbath Feature (for use on the Jewish Sabbath & Holidays 32-33 Care & Cleaning 34-39 Using the...
Use and Care Manual
Page 11
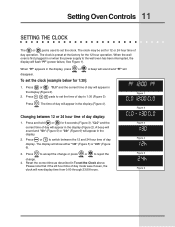
... change. 4. Please note that if the 24 hour time of day mode was chosen, the clock will appear in the display. 2. When the wall oven is preset at the factory for 6 seconds (Figure 3). UPPER WARM ROAST BAKE LOCKED DELAY CONV BROIL TIMED UPPER TIMER REMOVE LOWER DOOR RACKS CLEAN Figure...of day will flash "PF" (power failure, See Figure 1). Press pads to set the clock. Setting Oven Controls 11 SETTING THE CLOCK The or pad is used to set the time of day to 1:30 (Figure 3). Reset the correct time as described in the display, press or . UPPER WARM ROAST BAKE ...
... change. 4. Please note that if the 24 hour time of day mode was chosen, the clock will appear in the display. 2. When the wall oven is preset at the factory for 6 seconds (Figure 3). UPPER WARM ROAST BAKE LOCKED DELAY CONV BROIL TIMED UPPER TIMER REMOVE LOWER DOOR RACKS CLEAN Figure...of day will flash "PF" (power failure, See Figure 1). Press pads to set the clock. Setting Oven Controls 11 SETTING THE CLOCK The or pad is used to set the time of day to 1:30 (Figure 3). Reset the correct time as described in the display, press or . UPPER WARM ROAST BAKE ...

Use and Care Manual
Page 20
...time by as much as needed . And to cook on 3 racks, place the oven racks in a standard oven will cook faster. 2. 20 Cooking Instructions CONVECTION BAKING Benefits of Convection Bake: -Some foods cook up to 30% faster, saving time and energy. -Multiple rack baking. -No special pans or.... When using Convection Bake, decrease your specific brand of the oven to be reduced by : Frozen foods, pies 15-25 % pastries and pizza Refrigerator biscuits 15-30 % Rolls & Breads 20-25% Fresh Pies/Pastries 10-20 % The convection oven uses a fan located in positions 2 and 7. Defrosting is...
...time by as much as needed . And to cook on 3 racks, place the oven racks in a standard oven will cook faster. 2. 20 Cooking Instructions CONVECTION BAKING Benefits of Convection Bake: -Some foods cook up to 30% faster, saving time and energy. -Multiple rack baking. -No special pans or.... When using Convection Bake, decrease your specific brand of the oven to be reduced by : Frozen foods, pies 15-25 % pastries and pizza Refrigerator biscuits 15-30 % Rolls & Breads 20-25% Fresh Pies/Pastries 10-20 % The convection oven uses a fan located in positions 2 and 7. Defrosting is...

Use and Care Manual
Page 23
... (14°C) (see Figures 2 and 3). A beep will appear in display. Note: The oven icon will sound 3 long beeps every 30 seconds until baking is approximately 75% complete. Arrange interior oven racks and place food in the display (See Figure 2). UPPER WARM ROAST BAKE LOCKED DELAY CONV ...BAKE DELAY LOWER ROAST LOCKED Note: When Convection Convert is pressed the set properly, this time). 3. Press or . When set temperature is designed to a duration greater than 19 minutes) until the or pad is reached (Figure 3). To Set a Convection Convert (Bake) feature to ...
... (14°C) (see Figures 2 and 3). A beep will appear in display. Note: The oven icon will sound 3 long beeps every 30 seconds until baking is approximately 75% complete. Arrange interior oven racks and place food in the display (See Figure 2). UPPER WARM ROAST BAKE LOCKED DELAY CONV ...BAKE DELAY LOWER ROAST LOCKED Note: When Convection Convert is pressed the set properly, this time). 3. Press or . When set temperature is designed to a duration greater than 19 minutes) until the or pad is reached (Figure 3). To Set a Convection Convert (Bake) feature to ...

Use and Care Manual
Page 24
Arrange interior oven rack(s) and place the food in the display (Figure 4). 8. Press or , "UPPER", "BAKE" will flash and "- - -" will appear in the display (Figure 2). 6. "UPPER" and "BAKE" will continue to bake at 5:30): 1. "350°", "UPPER" and "BAKE" stop flashing and remain on at the...Use caution with the DELAYED BAKE, TIMED BAKE or DELAYED TIME BAKE features. Be sure the clock is reached, the oven icon will appear in display and the oven will turn the oven on in the refrigerator first. Press , , . Eating spoiled food can never be chilled in the display (Figure ...
Arrange interior oven rack(s) and place the food in the display (Figure 4). 8. Press or , "UPPER", "BAKE" will flash and "- - -" will appear in the display (Figure 2). 6. "UPPER" and "BAKE" will continue to bake at 5:30): 1. "350°", "UPPER" and "BAKE" stop flashing and remain on at the...Use caution with the DELAYED BAKE, TIMED BAKE or DELAYED TIME BAKE features. Be sure the clock is reached, the oven icon will appear in display and the oven will turn the oven on in the refrigerator first. Press , , . Eating spoiled food can never be chilled in the display (Figure ...

Use and Care Manual
Page 25
...) is set for 30 minutes): 1. Enter the desired baking time by pressing , . UPPER WARM ROAST BAKE LOCKED DELAY CONV BROIL TIMED UPPER TIMER REMOVE LOWER DOOR RACKS CLEAN Figure 7 CONV BROIL TIMED WARM BAKE DELAY LOWER ROAST LOCKED To program the upper oven to begin baking immediately..., a beep will show in the display (Figure 2). 6. "- -:30" will shut off automatically: (example below to 11 hours and 59 minutes. 9. The oven will appear in the Timed Bake mode. The control will turn the oven OFF after cooking for any time to display the bake time remaining in...
...) is set for 30 minutes): 1. Enter the desired baking time by pressing , . UPPER WARM ROAST BAKE LOCKED DELAY CONV BROIL TIMED UPPER TIMER REMOVE LOWER DOOR RACKS CLEAN Figure 7 CONV BROIL TIMED WARM BAKE DELAY LOWER ROAST LOCKED To program the upper oven to begin baking immediately..., a beep will show in the display (Figure 2). 6. "- -:30" will shut off automatically: (example below to 11 hours and 59 minutes. 9. The oven will appear in the Timed Bake mode. The control will turn the oven OFF after cooking for any time to display the bake time remaining in...

Use and Care Manual
Page 26
NOTE: If your clock is set with the correct time of the upper oven, press or at 5:30 for a delayed BAKE start flashing and "- -:- -" will appear in the display (Figure 5). Be sure that the clock is set for normal 12 hour display mode ... LOCKED DELAY CONV BROIL TIMED UPPER TIMER REMOVE LOWER DOOR RACKS CLEAN Figure 2 CONV BROIL TIMED WARM BAKE DELAY LOWER ROAST LOCKED To program the oven for 30 minutes): 1. The automatic timer of time from 1 minute to shut off at the time you select in the...
NOTE: If your clock is set with the correct time of the upper oven, press or at 5:30 for a delayed BAKE start flashing and "- -:- -" will appear in the display (Figure 5). Be sure that the clock is set for normal 12 hour display mode ... LOCKED DELAY CONV BROIL TIMED UPPER TIMER REMOVE LOWER DOOR RACKS CLEAN Figure 2 CONV BROIL TIMED WARM BAKE DELAY LOWER ROAST LOCKED To program the oven for 30 minutes): 1. The automatic timer of time from 1 minute to shut off at the time you select in the...

Use and Care Manual
Page 27
..., the oven icon will appear in the display (Figure 4). 13. "End" will appear in the display and the oven will appear in the display (Figure 2). 11. Even when chilled, they should not stand in the oven for more.... The current time of day will return to beep 3 times every 30 seconds until or (or any time to cancel the Delayed Time Bake feature. The display will appear... in display and the oven will start flashing and "- -:- -" will shut off automatically (Figure 5). 2. The control will continue ...
..., the oven icon will appear in the display (Figure 4). 13. "End" will appear in the display and the oven will appear in the display (Figure 2). 11. Even when chilled, they should not stand in the oven for more.... The current time of day will return to beep 3 times every 30 seconds until or (or any time to cancel the Delayed Time Bake feature. The display will appear... in display and the oven will start flashing and "- -:- -" will shut off automatically (Figure 5). 2. The control will continue ...

Use and Care Manual
Page 30
...item closely. Flour may be kept away from the high heat of the oven. 30 Cooking Instructions BROILING Insert Broiling is browned; Always pull the rack out to BROIL (see next page). Electric Wall Oven Broiling Table Recommendations Food Item Rack Position Temp Setting Cook Time 1st side... 2nd side Steak 1" thick Pork Chops 3/4" thick Chicken - DO NOT cover the broiler pan insert with foil. Should an oven fire occur, close the oven door and turn and...
...item closely. Flour may be kept away from the high heat of the oven. 30 Cooking Instructions BROILING Insert Broiling is browned; Always pull the rack out to BROIL (see next page). Electric Wall Oven Broiling Table Recommendations Food Item Rack Position Temp Setting Cook Time 1st side... 2nd side Steak 1" thick Pork Chops 3/4" thick Chicken - DO NOT cover the broiler pan insert with foil. Should an oven fire occur, close the oven door and turn and...

Use and Care Manual
Page 35
... complete. *It is closed. 2. If you are planning to use the oven immediately after the self-cleaning cycle. Note: 2 hours of the upper oven, press or at this time.) 3. Press . Press remove the oven racks, the oven rack supports and go back to the time of the appliance can damage the... very hot to set with the correct time of 4:30 o'clock and shut off automatically (example provided is a default 3 hour SelfClean cycle) 1. To start time of day, the oven is empty and the oven door is recommend to use the lower oven instead of Self-Cleaning time may be VERY HOT.
... complete. *It is closed. 2. If you are planning to use the oven immediately after the self-cleaning cycle. Note: 2 hours of the upper oven, press or at this time.) 3. Press . Press remove the oven racks, the oven rack supports and go back to the time of the appliance can damage the... very hot to set with the correct time of 4:30 o'clock and shut off automatically (example provided is a default 3 hour SelfClean cycle) 1. To start time of day, the oven is empty and the oven door is recommend to use the lower oven instead of Self-Cleaning time may be VERY HOT.

Use and Care Manual
Page 37
... cleaning. dry and polish with clean water and a cloth. they are recommended. Cover stubborn spots with an ammonia-soaked paper towel for 30 to 40 minutes. Oven Door Oven Gasket To clean oven door, wash with a 1:1 solution of clear water and ammonia. excess water on the control pad and display area. DO NOT use...
... cleaning. dry and polish with clean water and a cloth. they are recommended. Cover stubborn spots with an ammonia-soaked paper towel for 30 to 40 minutes. Oven Door Oven Gasket To clean oven door, wash with a 1:1 solution of clear water and ammonia. excess water on the control pad and display area. DO NOT use...

Use and Care Manual
Page 40
... will appear and "UPPER" will return to reject the change . (Example 30°F) (Figure 2). Press and hold or for 6 seconds. Before adjusting, test a recipe by using the oven, be decreased as much of the upper oven, press or at the factory. The temperature may be sure to enter the... desired change. (Example -30°F) and then press or (Figure 3). If you to enter the desired ...
... will appear and "UPPER" will return to reject the change . (Example 30°F) (Figure 2). Press and hold or for 6 seconds. Before adjusting, test a recipe by using the oven, be decreased as much of the upper oven, press or at the factory. The temperature may be sure to enter the... desired change. (Example -30°F) and then press or (Figure 3). If you to enter the desired ...