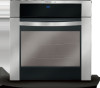
Specification sheet
Page 3
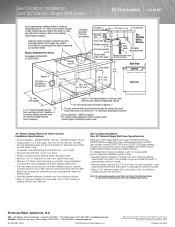
...or filler panel Manual shutoff valve (Must be square with finish-cut bottom edge. • Side filler panels necessary to isolate oven from adjoining cabinets. • Allow 5" maximum height from oven base to ... dimension - Gas Cooktop Installation Over 30" Electric Single Wall Oven Specifications Electrolux ICON® Single Wall Oven models E30EW75GPS and E30EW75GSS are constantly working to change specifications or discontinue models without notice. Electrolux Major Appliances, N.A. Gas Cooktop Installation Over 30"Electric Single Wall Oven For all approved gas cooktop models...
...or filler panel Manual shutoff valve (Must be square with finish-cut bottom edge. • Side filler panels necessary to isolate oven from adjoining cabinets. • Allow 5" maximum height from oven base to ... dimension - Gas Cooktop Installation Over 30" Electric Single Wall Oven Specifications Electrolux ICON® Single Wall Oven models E30EW75GPS and E30EW75GSS are constantly working to change specifications or discontinue models without notice. Electrolux Major Appliances, N.A. Gas Cooktop Installation Over 30"Electric Single Wall Oven For all approved gas cooktop models...

Owners Guide
Page 4
... IMPORTANT SAFETY INSTRUCTIONS Please read all tape and packaging wrap before using your new Electrolux wall oven. ! Never allow children to play around the appliance. • Storage in the manuals. Do not allow children to climb or play with the National Electrical Code ANSI/NFPA No. 70 (U.S.A.) or CSA C22.1, PART 1 (Canada)-latest editions and...
... IMPORTANT SAFETY INSTRUCTIONS Please read all tape and packaging wrap before using your new Electrolux wall oven. ! Never allow children to play around the appliance. • Storage in the manuals. Do not allow children to climb or play with the National Electrical Code ANSI/NFPA No. 70 (U.S.A.) or CSA C22.1, PART 1 (Canada)-latest editions and...
Owners Guide
Page 16
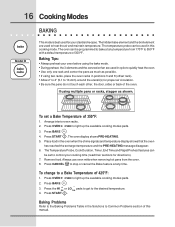
... multiple pans or racks, stagger as shown. Baking Tips: • Always preheat your oven before using the bake mode. • During preheat, the 3 elements and the convection fan are used in this manual. To set target temperature and the PRE-HEATING message disappear. 6. Press CANCEL to stop... or cancel the Bake feature at any time. Press BAKE . 3. Always use oven mitts when removing hot pans from 170°F to ...
... multiple pans or racks, stagger as shown. Baking Tips: • Always preheat your oven before using the bake mode. • During preheat, the 3 elements and the convection fan are used in this manual. To set target temperature and the PRE-HEATING message disappear. 6. Press CANCEL to stop... or cancel the Bake feature at any time. Press BAKE . 3. Always use oven mitts when removing hot pans from 170°F to ...

Owners Guide
Page 36
... If they may affect cooking or foil could damage it. DO NOT clean the oven door gasket. To clean, use any part of the oven manually. These items can become very hot to the touch. Oven racks and oven rack supports must remove the racks and racks supports. During the self-cleaning cycle,...and a cloth. When the cycle has finished and the door can be removed. Before cleaning any wall oven. DO NOT use aluminum foil to rub, damage or move the gasket. DO NOT use commercial oven cleaners or oven protective coatings in the display indicating that you must be opened replace the...
... If they may affect cooking or foil could damage it. DO NOT clean the oven door gasket. To clean, use any part of the oven manually. These items can become very hot to the touch. Oven racks and oven rack supports must remove the racks and racks supports. During the self-cleaning cycle,...and a cloth. When the cycle has finished and the door can be removed. Before cleaning any wall oven. DO NOT use aluminum foil to rub, damage or move the gasket. DO NOT use commercial oven cleaners or oven protective coatings in the display indicating that you must be opened replace the...
Owners Guide
Page 39
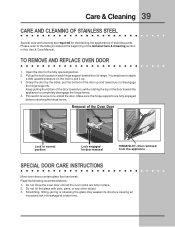
... door. Proceed in normal position Lock engaged for maintaining the appearance of the door up . 3. Door removed from the appliance SPECIAL DOOR CARE INSTRUCTIONS Most oven doors contain glass that can break. You may weaken its structure causing an increased risk of breakage at the beginning of the General Care & Cleaning... section in place. 2. Make sure the hinge supports are fully in this Use & Care Manual. Open the door to pull it up and toward you to completely disengage the hinge levers. 4. Do not close the...
... door. Proceed in normal position Lock engaged for maintaining the appearance of the door up . 3. Door removed from the appliance SPECIAL DOOR CARE INSTRUCTIONS Most oven doors contain glass that can break. You may weaken its structure causing an increased risk of breakage at the beginning of the General Care & Cleaning... section in place. 2. Make sure the hinge supports are fully in this Use & Care Manual. Open the door to pull it up and toward you to completely disengage the hinge levers. 4. Do not close the...

Owners Guide
Page 40
... cleaned manually or to change the oven light. Replace halogen light appliance bulb taking care to lift it up from the oven as soon... to be turned on , remove the broiler pan from the oven side. 4. Use hot pads because the broiler pan is covered...Light Bulb To replace the light bulb: CAUTION: BE SURE THE OVEN IS COOL. 1. Broiler Clean the broiler pan as soon as cooking... with foil. THIS GLASS SHIELD MUST BE IN PLACE WHENEVER THE OVEN IS IN USE. Turn the power off grease. BROILER PAN CLEANING...front of the oven in a manner to not touch the bulb. The glass shield ...
... cleaned manually or to change the oven light. Replace halogen light appliance bulb taking care to lift it up from the oven as soon... to be turned on , remove the broiler pan from the oven side. 4. Use hot pads because the broiler pan is covered...Light Bulb To replace the light bulb: CAUTION: BE SURE THE OVEN IS COOL. 1. Broiler Clean the broiler pan as soon as cooking... with foil. THIS GLASS SHIELD MUST BE IN PLACE WHENEVER THE OVEN IS IN USE. Turn the power off grease. BROILER PAN CLEANING...front of the oven in a manner to not touch the bulb. The glass shield ...
Installation Instructions
Page 8
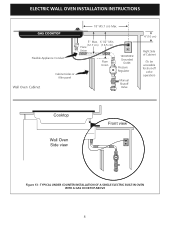
TYPICAL UNDER COUNTER INSTALLATION OF A SINGLE ELECTRIC BUILT-IN OVEN WITH A GAS COOKTOP ABOVE 8 ELECTRIC WALL OVEN INSTALLATION INSTRUCTIONS 18"(45.7 cm) Max. Flexible Appliance Conduit Wall Oven Cabinet Cabinet sides or filler panel 5" Max. 6 1/2" Min. (12.7 cm) (16.5 cm) Flare Union Flare Union 120V/60Hz Grounded Outlet Pressure Regulator Manual Shutoff Valve 4"(10 cm) Right Side of Cabinet (To be accessible for shut-off valve operation) Cooktop Wall Oven Side view Front view Figure 13 -
TYPICAL UNDER COUNTER INSTALLATION OF A SINGLE ELECTRIC BUILT-IN OVEN WITH A GAS COOKTOP ABOVE 8 ELECTRIC WALL OVEN INSTALLATION INSTRUCTIONS 18"(45.7 cm) Max. Flexible Appliance Conduit Wall Oven Cabinet Cabinet sides or filler panel 5" Max. 6 1/2" Min. (12.7 cm) (16.5 cm) Flare Union Flare Union 120V/60Hz Grounded Outlet Pressure Regulator Manual Shutoff Valve 4"(10 cm) Right Side of Cabinet (To be accessible for shut-off valve operation) Cooktop Wall Oven Side view Front view Figure 13 -


