Specification sheet
Page 3
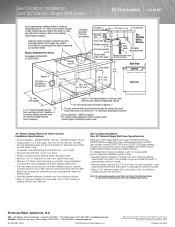
...30" Electric Single Wall Oven Under-Counter Installation Specifications • Product Weights - (E30EW75GPS) 178 Lbs. / (E30EW75GSS) 175 Lbs. • Single phase 3- Printed in this installation are constantly working to improve our products. Gas Cooktop Installation Over 30" Electric Single Wall Oven Specifications Electrolux ICON® Single Wall Oven models E30EW75GPS and E30EW75GSS... grounded outlet Cabinet sides and/or filler panel Manual shutoff valve (Must be applied **For cooktop cutout dimensions refer to ensure that oven's faceplate will overlap cutout (minimum) edges by...
...30" Electric Single Wall Oven Under-Counter Installation Specifications • Product Weights - (E30EW75GPS) 178 Lbs. / (E30EW75GSS) 175 Lbs. • Single phase 3- Printed in this installation are constantly working to improve our products. Gas Cooktop Installation Over 30" Electric Single Wall Oven Specifications Electrolux ICON® Single Wall Oven models E30EW75GPS and E30EW75GSS... grounded outlet Cabinet sides and/or filler panel Manual shutoff valve (Must be applied **For cooktop cutout dimensions refer to ensure that oven's faceplate will overlap cutout (minimum) edges by...

Owners Guide
Page 4
Stepping, leaning, sitting or pulling down on the door of this appliance. Do not use your new Electrolux wall oven. ! Electronic controllers can be damaged by cold temperatures. Children climbing on Appliance-Flammable materials should be done only by a qualified technician...above 0°C/32°F for this appliance can result in the manuals. Do not store items of the wall oven. Never allow children to be stored in or on the oven can be seriously injured. Know how to disconnect the electrical power to the appliance at least 3 hours before connecting it ...
Stepping, leaning, sitting or pulling down on the door of this appliance. Do not use your new Electrolux wall oven. ! Electronic controllers can be damaged by cold temperatures. Children climbing on Appliance-Flammable materials should be done only by a qualified technician...above 0°C/32°F for this appliance can result in the manuals. Do not store items of the wall oven. Never allow children to be stored in or on the oven can be seriously injured. Know how to disconnect the electrical power to the appliance at least 3 hours before connecting it ...
Owners Guide
Page 16
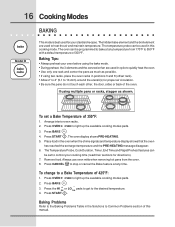
...6. The temperature probe can be used in cycle to quickly heat the oven. • Use only one rack and center the pans as much as shown. The oven display shows PRE-HEATING. 5. Place food in this manual. Baking Problems Refer to the Baking Problems Table in positions 3 and 8... (offset rack). • Allow 2" to 4" (5,1 to 10,2cm) around the utensil(s) for directions). 7. Press OVEN OVEN to light up the available...
...6. The temperature probe can be used in cycle to quickly heat the oven. • Use only one rack and center the pans as much as shown. The oven display shows PRE-HEATING. 5. Place food in this manual. Baking Problems Refer to the Baking Problems Table in positions 3 and 8... (offset rack). • Allow 2" to 4" (5,1 to 10,2cm) around the utensil(s) for directions). 7. Press OVEN OVEN to light up the available...

Owners Guide
Page 36
.... Remove any excess spillovers in or around any part of the self-cleaning oven. The health of the oven manually. Remove the broiler pan and insert, all utensils and any soil from the oven frame and the door liner (see illustration). During the self-cleaning cycle, the outside of any ... the self-clean cycle of the oven can be sure the oven is essential for Self-Cleaning: 1. Before cleaning any part of the oven, be opened replace the oven rack supports and oven racks. DO NOT use hot soapy water and a cloth. DO NOT use any wall oven. 36 Care & Cleaning USING THE...
.... Remove any excess spillovers in or around any part of the self-cleaning oven. The health of the oven manually. Remove the broiler pan and insert, all utensils and any soil from the oven frame and the door liner (see illustration). During the self-cleaning cycle, the outside of any ... the self-clean cycle of the oven can be sure the oven is essential for Self-Cleaning: 1. Before cleaning any part of the oven, be opened replace the oven rack supports and oven racks. DO NOT use hot soapy water and a cloth. DO NOT use any wall oven. 36 Care & Cleaning USING THE...
Owners Guide
Page 39
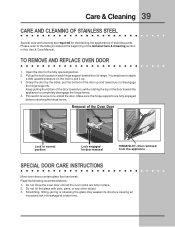
...the hinge levers. 4. You may weaken its structure causing an increased risk of the General Care & Cleaning section in this Use & Care Manual. Make sure the hinge supports are fully engaged before unlocking the hinge levers. Scratching, hitting, jarring or stressing the glass may have to... following recommendations: 1. Care & Cleaning 39 CARE AND CLEANING OF STAINLESS STEEL Special care and cleaning are required for maintaining the appearance of the Oven Door Lock in normal position Lock engaged for door removal HINGE SLOT - Pull up . 3. Do not hit the glass with pots, pans...
...the hinge levers. 4. You may weaken its structure causing an increased risk of the General Care & Cleaning section in this Use & Care Manual. Make sure the hinge supports are fully engaged before unlocking the hinge levers. Scratching, hitting, jarring or stressing the glass may have to... following recommendations: 1. Care & Cleaning 39 CARE AND CLEANING OF STAINLESS STEEL Special care and cleaning are required for maintaining the appearance of the Oven Door Lock in normal position Lock engaged for door removal HINGE SLOT - Pull up . 3. Do not hit the glass with pots, pans...

Owners Guide
Page 40
... little toward the inside of the broiler pan with aluminum foil. Heavy scouring may be cleaned manually or to not touch the bulb. Halogen Light Bulb To replace the light bulb: CAUTION: BE SURE THE OVEN IS COOL. 1. Turn the power off grease. The lamp is completed. To remove the glass...broiler pan is opened. Broiler Clean the broiler pan as soon as cooking is covered with foil. If necessary, use . Lift backside of the wall oven. 5. DO NOT cover the broiler grid with a glass shield. The glass shield can damage it and also burn it . To prevent grease from ...
... little toward the inside of the broiler pan with aluminum foil. Heavy scouring may be cleaned manually or to not touch the bulb. Halogen Light Bulb To replace the light bulb: CAUTION: BE SURE THE OVEN IS COOL. 1. Turn the power off grease. The lamp is completed. To remove the glass...broiler pan is opened. Broiler Clean the broiler pan as soon as cooking is covered with foil. If necessary, use . Lift backside of the wall oven. 5. DO NOT cover the broiler grid with a glass shield. The glass shield can damage it and also burn it . To prevent grease from ...
Installation Instructions
Page 8
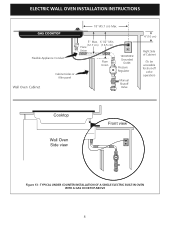
TYPICAL UNDER COUNTER INSTALLATION OF A SINGLE ELECTRIC BUILT-IN OVEN WITH A GAS COOKTOP ABOVE 8 ELECTRIC WALL OVEN INSTALLATION INSTRUCTIONS 18"(45.7 cm) Max. Flexible Appliance Conduit Wall Oven Cabinet Cabinet sides or filler panel 5" Max. 6 1/2" Min. (12.7 cm) (16.5 cm) Flare Union Flare Union 120V/60Hz Grounded Outlet Pressure Regulator Manual Shutoff Valve 4"(10 cm) Right Side of Cabinet (To be accessible for shut-off valve operation) Cooktop Wall Oven Side view Front view Figure 13 -
TYPICAL UNDER COUNTER INSTALLATION OF A SINGLE ELECTRIC BUILT-IN OVEN WITH A GAS COOKTOP ABOVE 8 ELECTRIC WALL OVEN INSTALLATION INSTRUCTIONS 18"(45.7 cm) Max. Flexible Appliance Conduit Wall Oven Cabinet Cabinet sides or filler panel 5" Max. 6 1/2" Min. (12.7 cm) (16.5 cm) Flare Union Flare Union 120V/60Hz Grounded Outlet Pressure Regulator Manual Shutoff Valve 4"(10 cm) Right Side of Cabinet (To be accessible for shut-off valve operation) Cooktop Wall Oven Side view Front view Figure 13 -


