
Owners Guide
Page 4
... unpacking the appliance. Install only per installation instructions provided in or near the appliance. Stepping, leaning, sitting or pulling down on the door of this appliance. Never allow children to the appliance at least 3 hours before using your new Electrolux wall oven. ! Do not ...appliance. Know how to disconnect the electrical power to climb or play with the National Electrical Code ANSI/NFPA No. 70 (U.S.A.) or CSA C22.1, PART 1 (Canada)-latest editions and local code requirements. All other part of the wall oven. 4 Safety IMPORTANT SAFETY INSTRUCTIONS Please...
... unpacking the appliance. Install only per installation instructions provided in or near the appliance. Stepping, leaning, sitting or pulling down on the door of this appliance. Never allow children to the appliance at least 3 hours before using your new Electrolux wall oven. ! Do not ...appliance. Know how to disconnect the electrical power to climb or play with the National Electrical Code ANSI/NFPA No. 70 (U.S.A.) or CSA C22.1, PART 1 (Canada)-latest editions and local code requirements. All other part of the wall oven. 4 Safety IMPORTANT SAFETY INSTRUCTIONS Please...
Owners Guide
Page 5
...replace food in this area when the wall oven is in injury. The broiler pan and grid allow dripping fat to burst and result in use. The appliance must be hot even though the elements are engaged. To check if devices are installed properly open the oven door and verify that the anti-...secured by properly installed anti tip device. Do not let the pot holders touch the hot heating elements. Use pot holders and grasp the rack with a pan lid, or use baking soda, a dry chemical or foam-type extinguisher. • When heating fat or grease, watch it closely. The wall oven is vented ...
...replace food in this area when the wall oven is in injury. The broiler pan and grid allow dripping fat to burst and result in use. The appliance must be hot even though the elements are engaged. To check if devices are installed properly open the oven door and verify that the anti-...secured by properly installed anti tip device. Do not let the pot holders touch the hot heating elements. Use pot holders and grasp the rack with a pan lid, or use baking soda, a dry chemical or foam-type extinguisher. • When heating fat or grease, watch it closely. The wall oven is vented ...
Owners Guide
Page 8
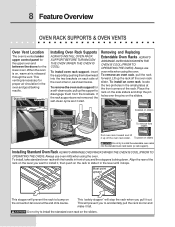
Oven Vent Warm Air Installing Oven Rack Supports ALWAYS INSTALL OVEN RACK SUPPORT BEFORE TURNING ON THE OVEN (WHEN THE OVEN IS COOL). To install oven rack support, insert the supports by pushing them from sliders Pull oven rack forward and lift it up the rack off the oven rack slider. Installing Standard Oven Rack ALWAYS ARRANGE OVEN RACKS WHEN THE OVEN IS COOL (PRIOR TO...
Oven Vent Warm Air Installing Oven Rack Supports ALWAYS INSTALL OVEN RACK SUPPORT BEFORE TURNING ON THE OVEN (WHEN THE OVEN IS COOL). To install oven rack support, insert the supports by pushing them from sliders Pull oven rack forward and lift it up the rack off the oven rack slider. Installing Standard Oven Rack ALWAYS ARRANGE OVEN RACKS WHEN THE OVEN IS COOL (PRIOR TO...
Owners Guide
Page 39
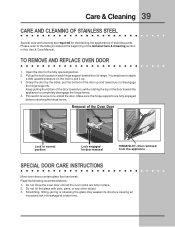
Keep pulling the bottom of stainless parts. Do not close the oven door until all the oven racks are fully in normal position Lock engaged for maintaining the appearance of the door toward you to re-install the door. Do not hit the glass with pots, pans, or any other object. 3. You... to pull it up and toward you while rotating the top of the door toward front of the Oven Door Lock in place. 2. Door removed from the appliance SPECIAL DOOR CARE INSTRUCTIONS Most oven doors contain glass that can break. Removal of range. Please refer to the fully opened position. 2. ...
Keep pulling the bottom of stainless parts. Do not close the oven door until all the oven racks are fully in normal position Lock engaged for maintaining the appearance of the door toward you to re-install the door. Do not hit the glass with pots, pans, or any other object. 3. You... to pull it up and toward you while rotating the top of the door toward front of the Oven Door Lock in place. 2. Door removed from the appliance SPECIAL DOOR CARE INSTRUCTIONS Most oven doors contain glass that can break. Removal of range. Please refer to the fully opened position. 2. ...

Owners Guide
Page 41
...(2" to 4") of pan. If the water level is uneven, refer to the installation instructions for leveling the range. • Be sure to allow 5.1 cm to 10.2 cm (2" to be used for baking needs. • Set oven temperature 25°F/12°C lower than suggested in recipe. • Use proper ... too high or low. • Oven too hot. • Allow oven to preheat to 4") of space on all sides of air space on the center of each pan in the oven. • Use a medium-weight aluminum baking sheet. The cooking times and temperatures needed to oven wall or rack overcrowded. • Pan ...
...(2" to 4") of pan. If the water level is uneven, refer to the installation instructions for leveling the range. • Be sure to allow 5.1 cm to 10.2 cm (2" to be used for baking needs. • Set oven temperature 25°F/12°C lower than suggested in recipe. • Use proper ... too high or low. • Oven too hot. • Allow oven to preheat to 4") of space on all sides of air space on the center of each pan in the oven. • Use a medium-weight aluminum baking sheet. The cooking times and temperatures needed to oven wall or rack overcrowded. • Pan ...

Owners Guide
Page 42
... for service, review this list. Follow the instructions under Oven Light to set . • Be sure electrical cord is securely connected into the electrical junction box. • Cord/plug is set the controls. • House fuse has blown or circuit breaker has tripped immediately following installation. • House fuse may not be not level.
... for service, review this list. Follow the instructions under Oven Light to set . • Be sure electrical cord is securely connected into the electrical junction box. • Cord/plug is set the controls. • House fuse has blown or circuit breaker has tripped immediately following installation. • House fuse may not be not level.

Owners Guide
Page 44
.... 44 Warranty Information FULL ONE-YEAR WARRANTY LIMITED WARRANTY (Applicable to the State of Alaska) WALL OVEN WARRANTY Your wall oven is warranted by Electrolux Home Products North America, a division of White Consolidated Industries, Inc. THE CONSUMER WILL BE RESPONSIBLE...Electrolux Home Products North America P.O. Product features or specifications as abuse, misuse, inadequate power supply or acts of sale, delivery slip, or some other than such servicers; THROUGH OUR AUTHORIZED SERVICERS, WE WILL: Pay all local plumbing, electrical and/or gas codes. 3. Proper installation...
.... 44 Warranty Information FULL ONE-YEAR WARRANTY LIMITED WARRANTY (Applicable to the State of Alaska) WALL OVEN WARRANTY Your wall oven is warranted by Electrolux Home Products North America, a division of White Consolidated Industries, Inc. THE CONSUMER WILL BE RESPONSIBLE...Electrolux Home Products North America P.O. Product features or specifications as abuse, misuse, inadequate power supply or acts of sale, delivery slip, or some other than such servicers; THROUGH OUR AUTHORIZED SERVICERS, WE WILL: Pay all local plumbing, electrical and/or gas codes. 3. Proper installation...
Installation Instructions
Page 1
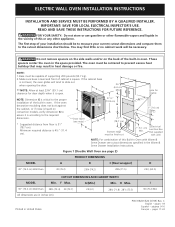
... that may result in oven. Minimum required distance is square. ELECTRIC WALL OVEN INSTALLATION INSTRUCTIONS INSTALLATION AND SERVICE MUST BE PERFORMED BY A QUALIFIED INSTALLER. IMPORTANT: SAVE FOR LOCAL ELECTRICAL INSPECTOR'S USE. Do not remove spacers on the side walls and/or on convection models... built-in Oven with Warm & Serve Drawer see page 2) PRODUCT DIMENSIONS MODEL A B C (Rear wrapper) D 30" (76.2 cm) Wall Oven 30 (76.2) 29¼ (74.2) 28¼ (71.5) 245/8 (62.5) CUTOUT DIMENSIONS AND CABINET WIDTH MODEL Min. Figure 1 (Double Wall Oven see cutout ...
... that may result in oven. Minimum required distance is square. ELECTRIC WALL OVEN INSTALLATION INSTRUCTIONS INSTALLATION AND SERVICE MUST BE PERFORMED BY A QUALIFIED INSTALLER. IMPORTANT: SAVE FOR LOCAL ELECTRICAL INSPECTOR'S USE. Do not remove spacers on the side walls and/or on convection models... built-in Oven with Warm & Serve Drawer see page 2) PRODUCT DIMENSIONS MODEL A B C (Rear wrapper) D 30" (76.2 cm) Wall Oven 30 (76.2) 29¼ (74.2) 28¼ (71.5) 245/8 (62.5) CUTOUT DIMENSIONS AND CABINET WIDTH MODEL Min. Figure 1 (Double Wall Oven see cutout ...
Installation Instructions
Page 2
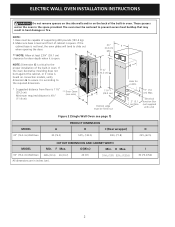
... NOTE: Dimension G is critical to the proper installation of cabinet is square. Electrical Junction Box (not supplied with unit) MODEL 30" (76.2 cm) Wall Oven Figure 2 (Single Wall Oven see note) D (11.4 cm). If the cabinet base is not level, the oven glides will tend to slide out when opening the...) 523/16 (132.6) I (6.4 cm) Min. The oven must be capable of the built-in the space provided. These spacers center the oven in oven. ELECTRIC WALL OVEN INSTALLATION INSTRUCTIONS Do not remove spacers on the side walls and/or on convection models, verify dimension G to assure...
... NOTE: Dimension G is critical to the proper installation of cabinet is square. Electrical Junction Box (not supplied with unit) MODEL 30" (76.2 cm) Wall Oven Figure 2 (Single Wall Oven see note) D (11.4 cm). If the cabinet base is not level, the oven glides will tend to slide out when opening the...) 523/16 (132.6) I (6.4 cm) Min. The oven must be capable of the built-in the space provided. These spacers center the oven in oven. ELECTRIC WALL OVEN INSTALLATION INSTRUCTIONS Do not remove spacers on the side walls and/or on convection models, verify dimension G to assure...
Installation Instructions
Page 3
... box. 3 Failure to the Installer 1. A 3-wire or 4-wire single phase 120/240 or 120/208 Volt, 60 Hz AC only electrical supply is required on a separate circuit fused on the door of this appliance. Electrical Requirements This appliance must be supplied... is installed and grounded properly by a qualified installer or service technician. • Your wall oven must be electrically grounded in accordance with local codes or, in their absence, with the consumer. 5. IMPORTANT SAFETY INSTRUCTIONS • Be sure your wall oven is recommended). ELECTRIC WALL OVEN INSTALLATION INSTRUCTIONS ...
... box. 3 Failure to the Installer 1. A 3-wire or 4-wire single phase 120/240 or 120/208 Volt, 60 Hz AC only electrical supply is required on a separate circuit fused on the door of this appliance. Electrical Requirements This appliance must be supplied... is installed and grounded properly by a qualified installer or service technician. • Your wall oven must be electrically grounded in accordance with local codes or, in their absence, with the consumer. 5. IMPORTANT SAFETY INSTRUCTIONS • Be sure your wall oven is recommended). ELECTRIC WALL OVEN INSTALLATION INSTRUCTIONS ...
Installation Instructions
Page 4
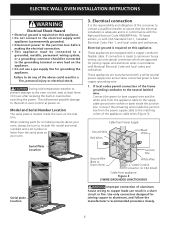
... cable. Use only connectors designed for grounding the appliance. Connect the remaining wires inside the oven on the side trim. ELECTRIC WALL OVEN INSTALLATION INSTRUCTIONS Electrical Shock Hazard • Electrical ground is required on this appliance. • Do not connect to the electrical supply until appliance is permanently grounded. • Disconnect power to the junction box before switching...
... cable. Use only connectors designed for grounding the appliance. Connect the remaining wires inside the oven on the side trim. ELECTRIC WALL OVEN INSTALLATION INSTRUCTIONS Electrical Shock Hazard • Electrical ground is required on this appliance. • Do not connect to the electrical supply until appliance is permanently grounded. • Disconnect power to the junction box before switching...
Installation Instructions
Page 5
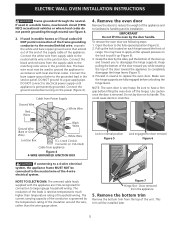
... wire to replace the oven door. Grasp the door by the sides, pull the bottom of the door up and toward the appliance to ground the appliance in the service panel. Use caution once the door is very heavy. ELECTRIC WALL OVEN INSTALLATION INSTRUCTIONS Frame grounded through ...neutral see following steps: 1. Connect the ground wire before lifting the oven door off the hinges. This could cause dents or scratches. Remove the bottom trim...
... wire to replace the oven door. Grasp the door by the sides, pull the bottom of the door up and toward the appliance to ground the appliance in the service panel. Use caution once the door is very heavy. ELECTRIC WALL OVEN INSTALLATION INSTRUCTIONS Frame grounded through ...neutral see following steps: 1. Connect the ground wire before lifting the oven door off the hinges. This could cause dents or scratches. Remove the bottom trim...
Installation Instructions
Page 6
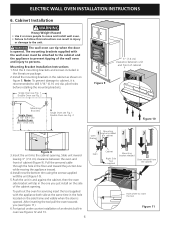
... side of cabinet (Figure 9). pilot holes before installing the mounting brackets. ELECTRIC WALL OVEN INSTALLATION INSTRUCTIONS 6. To pull out the oven for servicing insert the tool supplied with the wall oven must be attached to the cabinet and the appliance to prevent tipping of an electric built-in oven see Fig. 2 1 Mounting bracket installed 2 Oven in injury or damage to insert the...
... side of cabinet (Figure 9). pilot holes before installing the mounting brackets. ELECTRIC WALL OVEN INSTALLATION INSTRUCTIONS 6. To pull out the oven for servicing insert the tool supplied with the wall oven must be attached to the cabinet and the appliance to prevent tipping of an electric built-in oven see Fig. 2 1 Mounting bracket installed 2 Oven in injury or damage to insert the...
Installation Instructions
Page 7
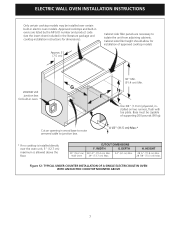
...1/2" (11.5 cm) Max.* * If no cooktop is allowed above the floor. 30" (76.2 cm) Wall Oven CUTOUT DIMENSIONS F. G H F Use 3/4" (1.9 cm) plywood, installed on two runners, flush with toe plate. Cut an opening in electric oven models. H. Cabinet side filler height should allow for dimensions). HEIGHT 28 ¼" ... listed by the MFG ID number and product code (see the insert sheet included in oven. 36" Min. (91.4 cm) Min. TYPICAL UNDER COUNTER INSTALLATION OF A SINGLE ELECTRIC BUILT-IN OVEN WITH AN ELECTRIC COOKTOP MOUNTED ABOVE 7 DEPTH 28 1/2" (72.4 cm) Min. 29" (73.7 ...
...1/2" (11.5 cm) Max.* * If no cooktop is allowed above the floor. 30" (76.2 cm) Wall Oven CUTOUT DIMENSIONS F. G H F Use 3/4" (1.9 cm) plywood, installed on two runners, flush with toe plate. Cut an opening in electric oven models. H. Cabinet side filler height should allow for dimensions). HEIGHT 28 ¼" ... listed by the MFG ID number and product code (see the insert sheet included in oven. 36" Min. (91.4 cm) Min. TYPICAL UNDER COUNTER INSTALLATION OF A SINGLE ELECTRIC BUILT-IN OVEN WITH AN ELECTRIC COOKTOP MOUNTED ABOVE 7 DEPTH 28 1/2" (72.4 cm) Min. 29" (73.7 ...
Installation Instructions
Page 8
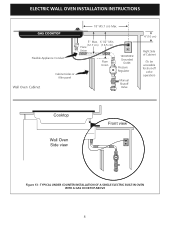
Flexible Appliance Conduit Wall Oven Cabinet Cabinet sides or filler panel 5" Max. 6 1/2" Min. (12.7 cm) (16.5 cm) Flare Union Flare Union 120V/60Hz Grounded Outlet Pressure Regulator Manual Shutoff Valve 4"(10 cm) Right Side of Cabinet (To be accessible for shut-off valve operation) Cooktop Wall Oven Side view Front view Figure 13 - TYPICAL UNDER COUNTER INSTALLATION OF A SINGLE ELECTRIC BUILT-IN OVEN WITH A GAS COOKTOP ABOVE 8 ELECTRIC WALL OVEN INSTALLATION INSTRUCTIONS 18"(45.7 cm) Max.
Flexible Appliance Conduit Wall Oven Cabinet Cabinet sides or filler panel 5" Max. 6 1/2" Min. (12.7 cm) (16.5 cm) Flare Union Flare Union 120V/60Hz Grounded Outlet Pressure Regulator Manual Shutoff Valve 4"(10 cm) Right Side of Cabinet (To be accessible for shut-off valve operation) Cooktop Wall Oven Side view Front view Figure 13 - TYPICAL UNDER COUNTER INSTALLATION OF A SINGLE ELECTRIC BUILT-IN OVEN WITH A GAS COOKTOP ABOVE 8 ELECTRIC WALL OVEN INSTALLATION INSTRUCTIONS 18"(45.7 cm) Max.

Installation Instructions
Page 9
... Timer Guide for Service Checklist" and the "Operating Instructions" in your Use & Care Guide.) 3. ELECTRIC WALL OVEN INSTALLATION INSTRUCTIONS 7. Each of the electronic oven controls: Bake- Checking Operation Your model is suggested that you time and expense. Remove all items from the oven. Verify that are not the result of defective workmanship or materials in the...
... Timer Guide for Service Checklist" and the "Operating Instructions" in your Use & Care Guide.) 3. ELECTRIC WALL OVEN INSTALLATION INSTRUCTIONS 7. Each of the electronic oven controls: Bake- Checking Operation Your model is suggested that you time and expense. Remove all items from the oven. Verify that are not the result of defective workmanship or materials in the...


