Owners Guide
Page 2
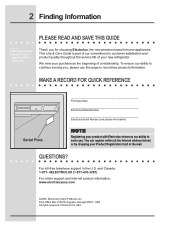
...home appliances. and Canada: 1-877- 4ELECTROLUX (1-877-435-3287) For online support and Internet product information: www.electroluxusa.com ©2006 Electrolux Home Products, Inc. For toll-free telephone support in the USA This Use & Care Guide is part of our commitment to customer satisfaction...with Electrolux enhances our ability to serve you , please use this page for choosing Electrolux, the new premium brand in the mail. 2 Finding Information PLEASE READ AND SAVE THIS GUIDE Attach your sales receipt to this page to record key product information. We view your new refrigerator....
...home appliances. and Canada: 1-877- 4ELECTROLUX (1-877-435-3287) For online support and Internet product information: www.electroluxusa.com ©2006 Electrolux Home Products, Inc. For toll-free telephone support in the USA This Use & Care Guide is part of our commitment to customer satisfaction...with Electrolux enhances our ability to serve you , please use this page for choosing Electrolux, the new premium brand in the mail. 2 Finding Information PLEASE READ AND SAVE THIS GUIDE Attach your sales receipt to this page to record key product information. We view your new refrigerator....
Owners Guide
Page 3
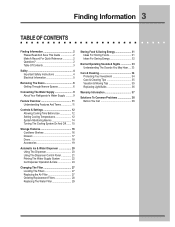
... Safety 4 Important Safety Instructions 4 Electrical Information 5 Removing The Doors 6 Getting Through Narrow Spaces 6 Connecting The Water Supply 9 About Your Refrigerator's Water Supply .......... 9 Feature Overview 11 Understanding Features And Terms 11 Controls & Settings 12 Allowing Cooling Time Before Use 12 Setting Cooling Temperatures...Ice & Water Dispenser 20 Using The Dispenser 20 Using The Dispenser Control Panel 21 Priming The Water Supply System 22 Ice Dispenser Operation & Care 24 Changing The Filter 27 Locating The Filters 27 Replacing the Air Filter 27 Ordering...
... Safety 4 Important Safety Instructions 4 Electrical Information 5 Removing The Doors 6 Getting Through Narrow Spaces 6 Connecting The Water Supply 9 About Your Refrigerator's Water Supply .......... 9 Feature Overview 11 Understanding Features And Terms 11 Controls & Settings 12 Allowing Cooling Time Before Use 12 Setting Cooling Temperatures...Ice & Water Dispenser 20 Using The Dispenser 20 Using The Dispenser Control Panel 21 Priming The Water Supply System 22 Ice Dispenser Operation & Care 24 Changing The Filter 27 Locating The Filters 27 Replacing the Air Filter 27 Ordering...
Owners Guide
Page 4
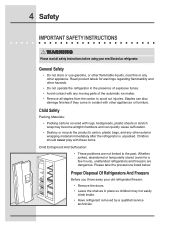
4 Safety IMPORTANT SAFETY INSTRUCTIONS ! Proper Disposal Of Refrigerators And Freezers Before you throw away your new Electrolux refrigerator. Whether junked, abandoned or temporarily stored (even for warnings regarding flammability and other appliance. Please take the precautions listed ...product's carton, plastic bags, and any moving parts of the automatic ice maker. • Remove all safety instructions before using your old refrigerator/freezer: • Remove the doors. • Leave the shelves in place so children may become airtight chambers and can also damage finishes...
4 Safety IMPORTANT SAFETY INSTRUCTIONS ! Proper Disposal Of Refrigerators And Freezers Before you throw away your new Electrolux refrigerator. Whether junked, abandoned or temporarily stored (even for warnings regarding flammability and other appliance. Please take the precautions listed ...product's carton, plastic bags, and any moving parts of the automatic ice maker. • Remove all safety instructions before using your old refrigerator/freezer: • Remove the doors. • Leave the shelves in place so children may become airtight chambers and can also damage finishes...

Owners Guide
Page 5
...shock. • Performance may be affected if the voltage varies by pulling on the power cord. Consult a qualified electrician. Operating the refrigerator with local codes and ordinances. Do not use an extension cord or adapter plug. • If the power cord is not covered under...properly grounded three-prong receptacle. Safety 5 ELECTRICAL INFORMATION ! WARNING You must follow these guidelines to prevent any risk. • Never unplug the refrigerator by 10% or more. Always grip the plug firmly, and pull straight out from the wall outlet. The receptacle must be plugged directly into...
...shock. • Performance may be affected if the voltage varies by pulling on the power cord. Consult a qualified electrician. Operating the refrigerator with local codes and ordinances. Do not use an extension cord or adapter plug. • If the power cord is not covered under...properly grounded three-prong receptacle. Safety 5 ELECTRICAL INFORMATION ! WARNING You must follow these guidelines to prevent any risk. • Never unplug the refrigerator by 10% or more. Always grip the plug firmly, and pull straight out from the wall outlet. The receptacle must be plugged directly into...

Owners Guide
Page 6
6 Removing The Doors GETTING THROUGH NARROW SPACES If your refrigerator will need the following tools: Tools Necessary: AND Phillips™ Head OR Socket Wrench Set OR Adjustable Wrench 3/8" Fixed Wrench To prepare for removing the ...
6 Removing The Doors GETTING THROUGH NARROW SPACES If your refrigerator will need the following tools: Tools Necessary: AND Phillips™ Head OR Socket Wrench Set OR Adjustable Wrench 3/8" Fixed Wrench To prepare for removing the ...

Owners Guide
Page 7
... injury. Removing The Doors 7 To remove the top hinge cover: 1 Remove the three screws from the top hinge. To reinstall the refrigerator door, reverse the above steps. To remove the refrigerator door: 1 Trace lightly around the door's top hinge with a pencil. This makes reinstallation easier. 2 Remove the two screws from the cover...
... injury. Removing The Doors 7 To remove the top hinge cover: 1 Remove the three screws from the top hinge. To reinstall the refrigerator door, reverse the above steps. To remove the refrigerator door: 1 Trace lightly around the door's top hinge with a pencil. This makes reinstallation easier. 2 Remove the two screws from the cover...
Owners Guide
Page 9
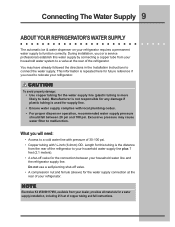
...(6.4mm) OD. Excessive pressure may have already followed the directions in the Installation Instructions to malfunction. NOTE Electrolux Kit #53039117950, available from the rear of the refrigerator to a cold water line with pressure of copper tubing and full instructions. Do not use a self-...piercing shut-off valve for the water supply connection at the rear of your refrigerator. During installation, you need : • Access to your household water supply line plus 7 feet (2.1 meters). • A shut-off ...
...(6.4mm) OD. Excessive pressure may have already followed the directions in the Installation Instructions to malfunction. NOTE Electrolux Kit #53039117950, available from the rear of the refrigerator to a cold water line with pressure of copper tubing and full instructions. Do not use a self-...piercing shut-off valve for the water supply connection at the rear of your refrigerator. During installation, you need : • Access to your household water supply line plus 7 feet (2.1 meters). • A shut-off ...
Owners Guide
Page 10
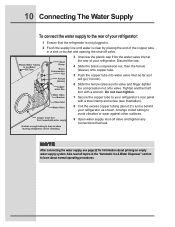
... half turn with a steel clamp and screw (see page 22 for information about priming an empty water supply system. NOTE After connecting the water supply, see illustration). 8 Coil the excess copper tubing (about 2½ turns) behind your refrigerator as it will go (1/4 inch). 6 Slide the ferrule ...(sleeve) into valve and finger-tighten the compression nut onto valve. Do not over-tighten. 7 Secure the copper tube to your refrigerator. Arrange coiled tubing to avoid vibration or wear against other surfaces. 9 Open water supply shut-off valve. 3 Unscrew the plastic cap from the...
... half turn with a steel clamp and screw (see page 22 for information about priming an empty water supply system. NOTE After connecting the water supply, see illustration). 8 Coil the excess copper tubing (about 2½ turns) behind your refrigerator as it will go (1/4 inch). 6 Slide the ferrule ...(sleeve) into valve and finger-tighten the compression nut onto valve. Do not over-tighten. 7 Secure the copper tube to your refrigerator. Arrange coiled tubing to avoid vibration or wear against other surfaces. 9 Open water supply shut-off valve. 3 Unscrew the plastic cap from the...
Owners Guide
Page 11
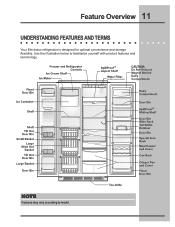
Feature Overview 11 UNDERSTANDING FEATURES AND TERMS Your Electrolux refrigerator is designed for optimal convenience and storage flexibility. Use the illustration below to model. NOTE Features may vary according to familiarize yourself with product features and terminology.
Feature Overview 11 UNDERSTANDING FEATURES AND TERMS Your Electrolux refrigerator is designed for optimal convenience and storage flexibility. Use the illustration below to model. NOTE Features may vary according to familiarize yourself with product features and terminology.
Owners Guide
Page 12
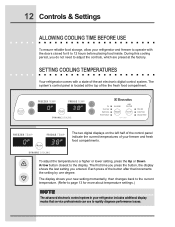
.... During this cooling period, you entered. SETTING COOLING TEMPERATURES Your refrigerator comes with the doors closed for more about temperature settings.) NOTE The advanced electronic control system in your refrigerator includes additional display modes that increments the setting by one degree. 12... Controls & Settings ALLOWING COOLING TIME BEFORE USE To ensure reliable food storage, allow your refrigerator and freezer to operate with a state-...
.... During this cooling period, you entered. SETTING COOLING TEMPERATURES Your refrigerator comes with the doors closed for more about temperature settings.) NOTE The advanced electronic control system in your refrigerator includes additional display modes that increments the setting by one degree. 12... Controls & Settings ALLOWING COOLING TIME BEFORE USE To ensure reliable food storage, allow your refrigerator and freezer to operate with a state-...
Owners Guide
Page 13
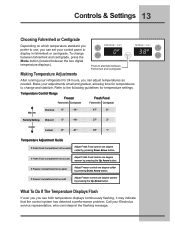
... for temperatures to change between fahrenheit and centigrade, press the Mode button (located between Fahrenheit and Centigrade After running your refrigerator for 24 hours, you see both temperature displays continuously flashing, it may indicate that the control system has detected a ...If Fresh Food compartment is too warm Adjust Fresh Food control one degree warmer by pressing Down Arrow button. Call your Electrolux service representative, who can interpret the flashing message. To change and stabilize. Temperature Control Range Freezer Fresh Food Fahrenheit ...
... for temperatures to change between fahrenheit and centigrade, press the Mode button (located between Fahrenheit and Centigrade After running your refrigerator for 24 hours, you see both temperature displays continuously flashing, it may indicate that the control system has detected a ...If Fresh Food compartment is too warm Adjust Fresh Food control one degree warmer by pressing Down Arrow button. Call your Electrolux service representative, who can interpret the flashing message. To change and stabilize. Temperature Control Range Freezer Fresh Food Fahrenheit ...

Owners Guide
Page 14
... to reset. Power Flashing Failure Amber A power outage was detected. Check if the power failure lasted long enough to Alarms (Audible Tones & Indicator Lights) Your refrigerator's control system can convey the following information through audible tones and the alarm indicator lights. 14 Controls & Settings SYSTEM-MONITORING ALARMS Indicator Lights Alarm Reset... button to disable and reset alarm. Variances from normal operating conditions are cooling toward your input. over five minutes. If temperatures do not match your refrigerator/freezer for assistance.
... to reset. Power Flashing Failure Amber A power outage was detected. Check if the power failure lasted long enough to Alarms (Audible Tones & Indicator Lights) Your refrigerator's control system can convey the following information through audible tones and the alarm indicator lights. 14 Controls & Settings SYSTEM-MONITORING ALARMS Indicator Lights Alarm Reset... button to disable and reset alarm. Variances from normal operating conditions are cooling toward your input. over five minutes. If temperatures do not match your refrigerator/freezer for assistance.

Owners Guide
Page 15
... 1 Press the Air Filter On/Off button. Change Filter Air filter is about 80 percent used . Checking the Air Filter Status Your refrigerator's fresh food air filter needs to reset (activate) the alarm system. CAUTION The alarm system does not automatically reset if you must again...button for three seconds. The On indicator light remains off the status light. Once you disable the alarm system, you disconnect and reconnect your refrigerator's power cord. This activates a test cycle, and one of the three filter status lights displays, indicating one . Please order new one ...
... 1 Press the Air Filter On/Off button. Change Filter Air filter is about 80 percent used . Checking the Air Filter Status Your refrigerator's fresh food air filter needs to reset (activate) the alarm system. CAUTION The alarm system does not automatically reset if you must again...button for three seconds. The On indicator light remains off the status light. Once you disable the alarm system, you disconnect and reconnect your refrigerator's power cord. This activates a test cycle, and one of the three filter status lights displays, indicating one . Please order new one ...
Owners Guide
Page 16
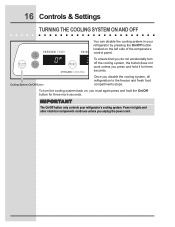
...the cooling system, all refrigeration to lights and other electrical components continues unless you must again press and hold it for three more seconds. 16 Controls & Settings TURNING THE COOLING SYSTEM ON AND OFF You can disable the cooling system in your refrigerator's cooling system. IMPORTANT ...The On/Off button only controls your refrigerator by pressing the On/Off button located on , you unplug the power cord. Power to the freezer ...
...the cooling system, all refrigeration to lights and other electrical components continues unless you must again press and hold it for three more seconds. 16 Controls & Settings TURNING THE COOLING SYSTEM ON AND OFF You can disable the cooling system in your refrigerator's cooling system. IMPORTANT ...The On/Off button only controls your refrigerator by pressing the On/Off button located on , you unplug the power cord. Power to the freezer ...

Owners Guide
Page 17
Cantilever Aspect Glass Shelf Tighten spacers to remove shelf. 1 2 3 1 Shelf Features Your refrigerator includes SpillSafeTM glass shelves, which attach to securely hold accidental spills. Sliding shelves cannot be separated from breakage, handle tempered glass shelves carefully. Loosen spacers ...
Cantilever Aspect Glass Shelf Tighten spacers to remove shelf. 1 2 3 1 Shelf Features Your refrigerator includes SpillSafeTM glass shelves, which attach to securely hold accidental spills. Sliding shelves cannot be separated from breakage, handle tempered glass shelves carefully. Loosen spacers ...
Owners Guide
Page 18
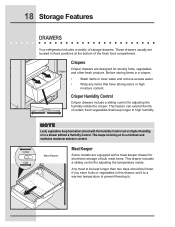
... located in high humidity. Meat Keeper Meat Keeper Some models are designed for storing fruits, vegetables, and other fresh produce. 18 Storage Features DRAWERS Your refrigerator includes a variety of the fresh food compartment. This feature can extend the life of certain fresh vegetables that keep best when stored with a meat keeper...
... located in high humidity. Meat Keeper Meat Keeper Some models are designed for storing fruits, vegetables, and other fresh produce. 18 Storage Features DRAWERS Your refrigerator includes a variety of the fresh food compartment. This feature can extend the life of certain fresh vegetables that keep best when stored with a meat keeper...

Owners Guide
Page 20
... side of the retainer wall as shown in the illustration. CAUTION To avoid errors in the bin from falling forward when opening or closing the refrigerator door. Can Rack The can rack allows you to the top of food. ! Ice Cream Shelf The ice cream shelf attaches to store a ...the ice dispenser container. Dairy Compartment Use the dairy compartment, at the top of the fresh food compartment door, for short term storage of your refrigerator's control system, do not remove the magnet that is designed to be warmer than the open storage area to six twelveounce cans of eggs. ...
... side of the retainer wall as shown in the illustration. CAUTION To avoid errors in the bin from falling forward when opening or closing the refrigerator door. Can Rack The can rack allows you to the top of food. ! Ice Cream Shelf The ice cream shelf attaches to store a ...the ice dispenser container. Dairy Compartment Use the dairy compartment, at the top of the fresh food compartment door, for short term storage of your refrigerator's control system, do not remove the magnet that is designed to be warmer than the open storage area to six twelveounce cans of eggs. ...

Owners Guide
Page 23
.... This system needs to be completely filled with water when first connected to malfunction. Automatic Ice & Water Dispenser 23 PRIMING THE WATER SUPPLY SYSTEM Your refrigerator's water supply system includes several tubing lines, an advanced water filter, a distribution valve bank, and a reserve tank to ensure ample supply to flush the system...
.... This system needs to be completely filled with water when first connected to malfunction. Automatic Ice & Water Dispenser 23 PRIMING THE WATER SUPPLY SYSTEM Your refrigerator's water supply system includes several tubing lines, an advanced water filter, a distribution valve bank, and a reserve tank to ensure ample supply to flush the system...

Owners Guide
Page 24
After the refrigerator is installed properly and has cooled for the first time, be discolored or have an odd flavor. Furthermore, if the system is controlled by the ... 23. Press the switch to the "O" position to turn the ice maker's On/Off switch to prime the water supply system as you install your refrigerator. This signal arm should not be noisy when it can result in about two days.
After the refrigerator is installed properly and has cooled for the first time, be discolored or have an odd flavor. Furthermore, if the system is controlled by the ... 23. Press the switch to the "O" position to turn the ice maker's On/Off switch to prime the water supply system as you install your refrigerator. This signal arm should not be noisy when it can result in about two days.

Owners Guide
Page 25
... the ice container as explained on the next page. • Occasionally shake the ice container to keep ice separated. • If your refrigerator is softened, be sure the softener is maintained to get cubes directly from the ice container. • The following sounds are normal when...a large quantity of ice at regular intervals, particularly before you should also turn off the water supply valve. ! If the water supply to your refrigerator is not connected to a water supply or the water supply is best to work properly. CAUTION Chemicals from tray • Running water • Turn...
... the ice container as explained on the next page. • Occasionally shake the ice container to keep ice separated. • If your refrigerator is softened, be sure the softener is maintained to get cubes directly from the ice container. • The following sounds are normal when...a large quantity of ice at regular intervals, particularly before you should also turn off the water supply valve. ! If the water supply to your refrigerator is not connected to a water supply or the water supply is best to work properly. CAUTION Chemicals from tray • Running water • Turn...


