Specification sheet
Page 1
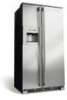
... # 4480* Optional Optional ADDITIONAL FEATURES ENERGY STAR® Yes SPECIFICATIONS Overall Dimensions - Ft. 8.5 Cu. Counter-Depth Refrigerator E23CS78HPS professional series Shown with Silver Trim Smooth-Glide™ Full-Extension Freezer Basket Full-Width / Full-Extension Basket Full-Width Lower... Basket Fixed Door Bin Silver Tilt-Out Wire Door Rack Ice Cream Shelf Dual-Level Lighting Factory Installed Yes 2 1 2 1 1 3 Yes Yes INSTALLATION Adjustable Rollers Yes Door Stops Yes ACCESSORIES Collar Kit - PureAdvantage® Filtration Systems The most advanced filtration...
... # 4480* Optional Optional ADDITIONAL FEATURES ENERGY STAR® Yes SPECIFICATIONS Overall Dimensions - Ft. 8.5 Cu. Counter-Depth Refrigerator E23CS78HPS professional series Shown with Silver Trim Smooth-Glide™ Full-Extension Freezer Basket Full-Width / Full-Extension Basket Full-Width Lower... Basket Fixed Door Bin Silver Tilt-Out Wire Door Rack Ice Cream Shelf Dual-Level Lighting Factory Installed Yes 2 1 2 1 1 3 Yes Yes INSTALLATION Adjustable Rollers Yes Door Stops Yes ACCESSORIES Collar Kit - PureAdvantage® Filtration Systems The most advanced filtration...

Specification sheet
Page 2
... • 5855 Terry Fox Way • Mississauga, ON L5V 3E4 • 1-800-265-8352 • electroluxicon.ca E23CS78HPS 09/09 © 2009 Electrolux Home Products, Inc. mean we are required. (Refer to Louvered Trim Kit 4480 Installation Specifications page on web.) "Built-In Look" Specifications • Minimum opening of 70-1/4" H x 36" W x 25" D required...
... • 5855 Terry Fox Way • Mississauga, ON L5V 3E4 • 1-800-265-8352 • electroluxicon.ca E23CS78HPS 09/09 © 2009 Electrolux Home Products, Inc. mean we are required. (Refer to Louvered Trim Kit 4480 Installation Specifications page on web.) "Built-In Look" Specifications • Minimum opening of 70-1/4" H x 36" W x 25" D required...
Specification sheet
Page 3
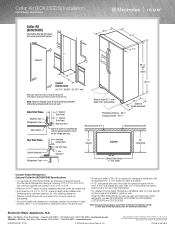
... depth from underside of cabinet to bottom of cabinet door. • A minimum width of side panel will be even. Collar Kit (ECK23CDS) Installation E23CS78HPS, E23CS78HSS Collar Kit (ECK23CDS) Kit includes: Side/top trim pieces and corner gussets with screws. 26 7/8" 35 5/8" 7 5/8" A Collar Kit...open position 69 5/16" 23 5/8" Depth to model-specific product page and installation guide on web. • Collar Kit (PN # ECK23CDS) can also be installed flush with Electrolux ICON® refrigerator models E23CS75DSS, E23CS78EPS, E23CS78ESS, E23CS78GPS and E23CS78GSS. High standards of...
... depth from underside of cabinet to bottom of cabinet door. • A minimum width of side panel will be even. Collar Kit (ECK23CDS) Installation E23CS78HPS, E23CS78HSS Collar Kit (ECK23CDS) Kit includes: Side/top trim pieces and corner gussets with screws. 26 7/8" 35 5/8" 7 5/8" A Collar Kit...open position 69 5/16" 23 5/8" Depth to model-specific product page and installation guide on web. • Collar Kit (PN # ECK23CDS) can also be installed flush with Electrolux ICON® refrigerator models E23CS75DSS, E23CS78EPS, E23CS78ESS, E23CS78GPS and E23CS78GSS. High standards of...

Specification sheet
Page 4
...2009 Electrolux Home Products, Inc. Electrolux Major Appliances, N.A. Refer to Product Installation Guide on the web at electroluxicon.com for Trim Kit assembly. • For detailed Counter-Depth Refrigerator installation, refer to detailed Louvered Trim Kit (4480) Installation ... 4480) can also be used with 3/8" rollers 69 5/16" Louvered Trim Kit A C B Allow at Electrolux Home Products, Inc. Louvered Trim Kit (4480) Installation E23CS78HPS, E23CS78HSS 26 7/8" Recessed water line Recessed electrical outlet 24" Cabinet Top View 25" Countertop Cabinet Side Panels ...
...2009 Electrolux Home Products, Inc. Electrolux Major Appliances, N.A. Refer to Product Installation Guide on the web at electroluxicon.com for Trim Kit assembly. • For detailed Counter-Depth Refrigerator installation, refer to detailed Louvered Trim Kit (4480) Installation ... 4480) can also be used with 3/8" rollers 69 5/16" Louvered Trim Kit A C B Allow at Electrolux Home Products, Inc. Louvered Trim Kit (4480) Installation E23CS78HPS, E23CS78HSS 26 7/8" Recessed water line Recessed electrical outlet 24" Cabinet Top View 25" Countertop Cabinet Side Panels ...

Owners Guide
Page 5
... grounding plug for your refrigerator's safety mechanisms are operating correctly. • The refrigerator must follow these guidelines to avoid electrical shock. • Performance may be installed in accordance with insufficient power can damage the compressor. The receptacle must be plugged into a properly grounded three-prong receptacle. Consult a qualified electrician. Safety 5 ELECTRICAL...
... grounding plug for your refrigerator's safety mechanisms are operating correctly. • The refrigerator must follow these guidelines to avoid electrical shock. • Performance may be installed in accordance with insufficient power can damage the compressor. The receptacle must be plugged into a properly grounded three-prong receptacle. Consult a qualified electrician. Safety 5 ELECTRICAL...

Owners Guide
Page 6
... doors: 1 Make sure the electrical power cord is unplugged from the wall outlet. 2 Open both doors and remove the toe grille (as explained in the Installation Instructions that came with your refrigerator will not fit through an entrance area, you can reduce its size by measuring the entrance. 6 Removing The Doors... the door shelves. 4 Close the doors. Check first by removing the doors. NOTE For more information on removing the toe grille, please refer to the Installation Instructions.
... doors: 1 Make sure the electrical power cord is unplugged from the wall outlet. 2 Open both doors and remove the toe grille (as explained in the Installation Instructions that came with your refrigerator will not fit through an entrance area, you can reduce its size by measuring the entrance. 6 Removing The Doors... the door shelves. 4 Close the doors. Check first by removing the doors. NOTE For more information on removing the toe grille, please refer to the Installation Instructions.
Owners Guide
Page 9
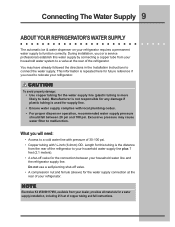
... supply connection at the rear of the refrigerator. Excessive pressure may have already followed the directions in the Installation Instructions to malfunction. NOTE Electrolux Kit #53039117950, available from the rear of the refrigerator to relocate your refrigerator. This information is more ...responsible for any damage if plastic tubing is the distance from your refrigerator requires a permanent water supply to leak). During installation, you will need to your household water line and the refrigerator supply line. Connecting The Water Supply 9 ABOUT YOUR ...
... supply connection at the rear of the refrigerator. Excessive pressure may have already followed the directions in the Installation Instructions to malfunction. NOTE Electrolux Kit #53039117950, available from the rear of the refrigerator to relocate your refrigerator. This information is more ...responsible for any damage if plastic tubing is the distance from your refrigerator requires a permanent water supply to leak). During installation, you will need to your household water line and the refrigerator supply line. Connecting The Water Supply 9 ABOUT YOUR ...

Owners Guide
Page 20
... cream shelf attaches to accommodate these types of food. ! It allows storage of both round and rectangular cartons of cheese, spreads, or butter. To install, slide the special item rack onto the left side of eggs. The dairy compartment, which includes a lift-up to store a sixpack of 12 ounce... keeps tall containers in your favorite ice cream. Special Items Rack The innovative design of the retainer wall as shown in the illustration. To install, snap the ends of the retainer over the edge of the special items rack allows you to efficiently and securely store up cover, is...
... cream shelf attaches to accommodate these types of food. ! It allows storage of both round and rectangular cartons of cheese, spreads, or butter. To install, slide the special item rack onto the left side of eggs. The dairy compartment, which includes a lift-up to store a sixpack of 12 ounce... keeps tall containers in your favorite ice cream. Special Items Rack The innovative design of the retainer wall as shown in the illustration. To install, snap the ends of the retainer over the edge of the special items rack allows you to efficiently and securely store up cover, is...

Owners Guide
Page 24
... to prime the water supply system as you cannot connect a water supply, turn it can produce ice within 24 hours. Using The Ice Dispenser After Installation Before making ice for several hours, the ice maker can work as soon as described on page 23. Furthermore, if the system is full. The... odd flavor. After the refrigerator is turned on at a rate of 8 cubes every 75 to manually stop the ice maker. IMPORTANT The ice maker is installed properly and has cooled for the first time, be used to 90 minutes. Turning The Ice Dispenser On And Off Ice production is produced at...
... to prime the water supply system as you cannot connect a water supply, turn it can produce ice within 24 hours. Using The Ice Dispenser After Installation Before making ice for several hours, the ice maker can work as soon as described on page 23. Furthermore, if the system is full. The... odd flavor. After the refrigerator is turned on at a rate of 8 cubes every 75 to manually stop the ice maker. IMPORTANT The ice maker is installed properly and has cooled for the first time, be used to 90 minutes. Turning The Ice Dispenser On And Off Ice production is produced at...

Owners Guide
Page 28
You may want to consider ordering extra filters when you bought your refrigerator. Here is the product number to request when ordering: Water Filter Water Filter FC-100 MB-100 pure advantageTM replacement cartridge pure advantageplus replacement cartridge 28 Changing The Filter ORDERING REPLACEMENT FILTERS Order new filters through the dealer where you first install your refrigerator, or contact the Electrolux Customer Care Center at 1-877-435-3287, or go to our web site at www.electroluxusa.com.
You may want to consider ordering extra filters when you bought your refrigerator. Here is the product number to request when ordering: Water Filter Water Filter FC-100 MB-100 pure advantageTM replacement cartridge pure advantageplus replacement cartridge 28 Changing The Filter ORDERING REPLACEMENT FILTERS Order new filters through the dealer where you first install your refrigerator, or contact the Electrolux Customer Care Center at 1-877-435-3287, or go to our web site at www.electroluxusa.com.
Owners Guide
Page 32
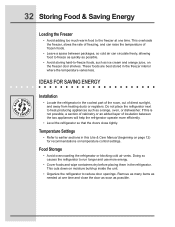
...-producing appliances such as ice cream and orange juice, on the freezer door shelves. This cuts down on temperature control settings. IDEAS FOR SAVING ENERGY Installation • Locate the refrigerator in this is not possible, a section of cabinetry or an added layer of direct sunlight, and away from heating ducts or...
...-producing appliances such as ice cream and orange juice, on the freezer door shelves. This cuts down on temperature control settings. IDEAS FOR SAVING ENERGY Installation • Locate the refrigerator in this is not possible, a section of cabinetry or an added layer of direct sunlight, and away from heating ducts or...

Owners Guide
Page 35
... and empty ice bucket, even if you will only be gone for location of On/Off button) and disconnect power cord. • Turn off (see Installation Instructions.). • Vacuum backside and wipe with non-abrasive soapy water and a dishcloth. Toe Grille • Soap and water • Mild liquid sprays • Vacuum...
... and empty ice bucket, even if you will only be gone for location of On/Off button) and disconnect power cord. • Turn off (see Installation Instructions.). • Vacuum backside and wipe with non-abrasive soapy water and a dishcloth. Toe Grille • Soap and water • Mild liquid sprays • Vacuum...
Owners Guide
Page 37
... in house wiring. 4. USA 800-944-9044 Electrolux Home Products, Inc. exclusions listed below : 1. Costs of service. Our obligations for pick up and delivery of the appliance required because of the technician's travel to finish after installation. 6. Damages to the home and any of ...sale, delivery slip, or some other than genuine Electrolux Home Products parts; Costs for pickup and delivery of the appliance required because of...
... in house wiring. 4. USA 800-944-9044 Electrolux Home Products, Inc. exclusions listed below : 1. Costs of service. Our obligations for pick up and delivery of the appliance required because of the technician's travel to finish after installation. 6. Damages to the home and any of ...sale, delivery slip, or some other than genuine Electrolux Home Products parts; Costs for pickup and delivery of the appliance required because of...

Owners Guide
Page 40
...; See Problem section Temperatures Are Too Warm. • Turn off household water line valve. Ice maker will produce fresh supply. • Add filter to see Installation Instructions). • Turn on household water line valve. • If it may be replaced. • Push firmly until the water filter snaps into place. •...
...; See Problem section Temperatures Are Too Warm. • Turn off household water line valve. Ice maker will produce fresh supply. • Add filter to see Installation Instructions). • Turn on household water line valve. • If it may be replaced. • Push firmly until the water filter snaps into place. •...

Owners Guide
Page 41
... is extremely low. • Cut-off and cut -on the water pump system (well systems only). • It is in the household water supply and installation may affect water taste and odor. • Water has a high mineral content. Filter should operate. • Ensure freezer door is closed. • Motor ...together. • Ice cubes are jamming the dispenser. • Use the dispenser often so that freezer door is clogged. • Front filter not fully installed, if equipped Water has an odd taste and/or odor. • Water has been in the tank for help. • Have someone turn up ...
... is extremely low. • Cut-off and cut -on the water pump system (well systems only). • It is in the household water supply and installation may affect water taste and odor. • Water has a high mineral content. Filter should operate. • Ensure freezer door is closed. • Motor ...together. • Ice cubes are jamming the dispenser. • Use the dispenser often so that freezer door is clogged. • Front filter not fully installed, if equipped Water has an odd taste and/or odor. • Water has been in the tank for help. • Have someone turn up ...
Installation Instructions
Page 1
... copper tubing (about 2½ turns) behind your refrigerator. Electrolux uses packing foam and tape to secure the internal parts of the cabinet must be part of the installation tasks are installing your refrigerator? IMPORTANT If you are not completed. Sufficient air...Necessary: AND Phillips™ Head OR Socket Wrench Set OR Adjustable Wrench 3/8" Fixed Wrench NOTE Instructions These installation instructions are ready to begin enjoying your refrigerator. Electrolux recommends that doors close automatically at the front and rear. • The sides should tilt ¼-inch ...
... copper tubing (about 2½ turns) behind your refrigerator. Electrolux uses packing foam and tape to secure the internal parts of the cabinet must be part of the installation tasks are installing your refrigerator? IMPORTANT If you are not completed. Sufficient air...Necessary: AND Phillips™ Head OR Socket Wrench Set OR Adjustable Wrench 3/8" Fixed Wrench NOTE Instructions These installation instructions are ready to begin enjoying your refrigerator. Electrolux recommends that doors close automatically at the front and rear. • The sides should tilt ¼-inch ...

