Installation Instructions (All Languages)
Page 1
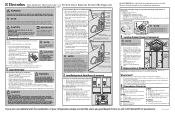
Installation Instructions* for French Door Bottom Freezer/Refrigerator *Please refer to your Use & Care Guide for recommendations on water lines and associated materials prior to installing your new refrigerator. Electrolux recommends that you use refrigerator handles to soft water, ensure that cabinet is stable.... 3 After unit is in position, you can raise or lower each side) to allow moving refrigerator out for ease of installation,...
Installation Instructions* for French Door Bottom Freezer/Refrigerator *Please refer to your Use & Care Guide for recommendations on water lines and associated materials prior to installing your new refrigerator. Electrolux recommends that you use refrigerator handles to soft water, ensure that cabinet is stable.... 3 After unit is in position, you can raise or lower each side) to allow moving refrigerator out for ease of installation,...
Owners Guide
Page 2
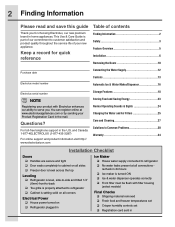
... 1/4" (6mm) front-to-back Toe grille is properly attached to refrigerator Cabinet is setting solid on all corners Electrical Power House power turned on Refrigerator plugged in Ice Maker House water supply connected to customer satisfaction and ... Ice & water dispenser operates correctly Front filter must be flush with Electrolux enhances our ability to serve you for quick reference Table of our commitment to refrigerator No water leaks present at www.electroluxappliances.com or by sending your Product Registration...
... 1/4" (6mm) front-to-back Toe grille is properly attached to refrigerator Cabinet is setting solid on all corners Electrical Power House power turned on Refrigerator plugged in Ice Maker House water supply connected to customer satisfaction and ... Ice & water dispenser operates correctly Front filter must be flush with Electrolux enhances our ability to serve you for quick reference Table of our commitment to refrigerator No water leaks present at www.electroluxappliances.com or by sending your Product Registration...
Owners Guide
Page 3
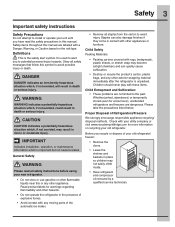
... this manual are labeled with rugs, bedspreads, plastic sheets, or stretch wrap may not easily climb inside. • Have refrigerant and compressor oil removed by a qualified service technician. Check with these items. Child Entrapment and Suffocation: • These problems...potential personal injury hazards. CAUTION CAUTION indicates a potentially hazardous situation which is used to alert you recycle or dispose of Refrigerators/Freezers We strongly encourage responsible appliance recycling/ disposal methods. Whether junked, abandoned, or temporarily stored (even for warnings ...
... this manual are labeled with rugs, bedspreads, plastic sheets, or stretch wrap may not easily climb inside. • Have refrigerant and compressor oil removed by a qualified service technician. Check with these items. Child Entrapment and Suffocation: • These problems...potential personal injury hazards. CAUTION CAUTION indicates a potentially hazardous situation which is used to alert you recycle or dispose of Refrigerators/Freezers We strongly encourage responsible appliance recycling/ disposal methods. Whether junked, abandoned, or temporarily stored (even for warnings ...

Owners Guide
Page 4
...a light bulb or LED light. • Performance may be replaced by the manufacturer, service technician, or a qualified person. • Never unplug the refrigerator by 10% or more. Do not use an extension cord or adapter plug. • If the power cord is not covered under your warranty. &#...8226; Do not plug the unit into an outlet controlled by a wall switch or pull cord to prevent the refrigerator from being turned off power to your refrigerator, unplug the power cord from the receptacle to ensure that your protection against electrical shock hazards. The receptacle must be ...
...a light bulb or LED light. • Performance may be replaced by the manufacturer, service technician, or a qualified person. • Never unplug the refrigerator by 10% or more. Do not use an extension cord or adapter plug. • If the power cord is not covered under your warranty. &#...8226; Do not plug the unit into an outlet controlled by a wall switch or pull cord to prevent the refrigerator from being turned off power to your refrigerator, unplug the power cord from the receptacle to ensure that your protection against electrical shock hazards. The receptacle must be ...

Owners Guide
Page 5
... models only) Toe Grille Wire Tilt-Out Shelf (inside freezer drawer) The illustration below is provided to model. Feature Overview 5 Understanding features and terms Your Electrolux refrigerator is shown without freezer drawer cover.
... models only) Toe Grille Wire Tilt-Out Shelf (inside freezer drawer) The illustration below is provided to model. Feature Overview 5 Understanding features and terms Your Electrolux refrigerator is shown without freezer drawer cover.
Owners Guide
Page 6
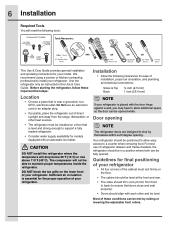
...of direct sunlight and away from front to back (to allow easy access to install your model. CAUTION DO NOT install the refrigerator where the temperature will need the following clearances for models equipped with each other and be level. The compressor will not be ... • Allow the following tools: This Use & Care Guide provides general installation and operating instructions for final positioning of your refrigerator. Use the refrigerator only as instructed in a position where both can be positioned to allow additional space so the door can be fully opened wider.
...of direct sunlight and away from front to back (to allow easy access to install your model. CAUTION DO NOT install the refrigerator where the temperature will need the following clearances for models equipped with each other and be level. The compressor will not be ... • Allow the following tools: This Use & Care Guide provides general installation and operating instructions for final positioning of your refrigerator. Use the refrigerator only as instructed in a position where both can be positioned to allow additional space so the door can be fully opened wider.
Owners Guide
Page 7
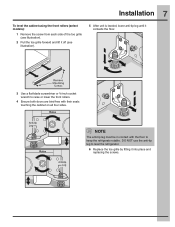
.... NOTE The anti-tip leg must be in contact with the floor to level the refrigerator. 6 Replace the toe grille by fitting it contacts the floor. 3 Use a flat-blade screwdriver or ³⁄₈-inch socket wrench to raise or lower ...
.... NOTE The anti-tip leg must be in contact with the floor to level the refrigerator. 6 Replace the toe grille by fitting it contacts the floor. 3 Use a flat-blade screwdriver or ³⁄₈-inch socket wrench to raise or lower ...
Owners Guide
Page 8
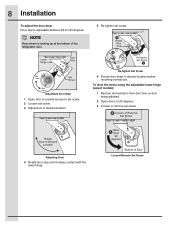
... from door bins on door being adjusted. 2 Open doors to desired location. Adjusting Door 4 Rotate door stop is looking up at the bottom of the refrigerator door. 5 Re-tighten set screw. 3 Adjust door to 90 degrees. 3 Loosen or remove set screw.
... from door bins on door being adjusted. 2 Open doors to desired location. Adjusting Door 4 Rotate door stop is looking up at the bottom of the refrigerator door. 5 Re-tighten set screw. 3 Adjust door to 90 degrees. 3 Loosen or remove set screw.

Owners Guide
Page 10
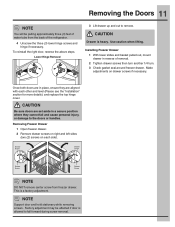
...the wall outlet. 2 Open the freezer drawer and remove the toe grille (see "Installation" section). 3 Remove any food from hinge. To remove the refrigerator doors: 1 Trace lightly around the door's top hinges with a pencil. NOTE DO NOT remove the ground screw from the door shelves and close the doors.... This makes reinstallation easier. To remove the top hinge covers: 1 Remove the two (2) screws from the connector located behind the refrigerator and pull the tube back out to hold in the sleeve, pull the tube away. The connector releases when you can remove the doors. ...
...the wall outlet. 2 Open the freezer drawer and remove the toe grille (see "Installation" section). 3 Remove any food from hinge. To remove the refrigerator doors: 1 Trace lightly around the door's top hinges with a pencil. NOTE DO NOT remove the ground screw from the door shelves and close the doors.... This makes reinstallation easier. To remove the top hinge covers: 1 Remove the two (2) screws from the connector located behind the refrigerator and pull the tube back out to hold in the sleeve, pull the tube away. The connector releases when you can remove the doors. ...
Owners Guide
Page 11
... Support door and hold stationary while removing screws. CAUTION Be sure doors are set aside in a secure position where they are in reverse of the refrigerator. 4 Unscrew the three (3) lower hinge screws and hinge if necessary. NOTE DO NOT remove center screw from the back of removal. 2 Tighten drawer screws then...
... Support door and hold stationary while removing screws. CAUTION Be sure doors are set aside in a secure position where they are in reverse of the refrigerator. 4 Unscrew the three (3) lower hinge screws and hinge if necessary. NOTE DO NOT remove center screw from the back of removal. 2 Tighten drawer screws then...

Owners Guide
Page 12
...Chemicals from a malfunctioning softener can cause death or severe personal injury, disconnect the refrigerator from electrical power before connecting a water supply line to your local/state building codes, Electrolux recommends for the water supply line. To turn with your local building authority ... you use a self-piercing type shutoff valve. • A compression nut and ferrule (sleeve) for important information about 2½ turns, behind refrigerator as shown. 6. Stainless Steel Water Line) and for water leaks, and the manufacturer will go (¼ inch / 6.4 mm). CAUTION To...
...Chemicals from a malfunctioning softener can cause death or severe personal injury, disconnect the refrigerator from electrical power before connecting a water supply line to your local/state building codes, Electrolux recommends for the water supply line. To turn with your local building authority ... you use a self-piercing type shutoff valve. • A compression nut and ferrule (sleeve) for important information about 2½ turns, behind refrigerator as shown. 6. Stainless Steel Water Line) and for water leaks, and the manufacturer will go (¼ inch / 6.4 mm). CAUTION To...

Owners Guide
Page 13
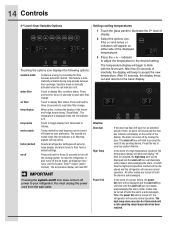
Wave-TouchTM Controls 13 Your refrigerator is more brightly illuminated. Touch an icon to gently touch the glass. Black space will return to the Sleep mode. The active dispenser mode is ... deactivate. The control panel is awakened by touching anywhere on the glass where there is turned off Press and hold for three (3) seconds to the refrigerator's settings and prevents use of the ice and water dispenser. IMPORTANT When the ice maker is an indicator. It is only necessary to activate the...
Wave-TouchTM Controls 13 Your refrigerator is more brightly illuminated. Touch an icon to gently touch the glass. Black space will return to the Sleep mode. The active dispenser mode is ... deactivate. The control panel is awakened by touching anywhere on the glass where there is turned off Press and hold for three (3) seconds to the refrigerator's settings and prevents use of the ice and water dispenser. IMPORTANT When the ice maker is an indicator. It is only necessary to activate the...
Owners Guide
Page 14
...the red indicator is acknowledged. Press and hold for an extended period of a power failure, the power fail alert will be displayed and the refrigerator will resume normal operation. air filter Touch to the basic display. mute sounds Tones emitted by each keypress can be turned off until the ...alarm off the ice maker, all refrigerator settings such as temp, temp display, and alarm tones to blink with the first touch. It also turns off icon is acknowledged. You ...
...the red indicator is acknowledged. Press and hold for an extended period of a power failure, the power fail alert will be displayed and the refrigerator will resume normal operation. air filter Touch to the basic display. mute sounds Tones emitted by each keypress can be turned off until the ...alarm off the ice maker, all refrigerator settings such as temp, temp display, and alarm tones to blink with the first touch. It also turns off icon is acknowledged. You ...

Owners Guide
Page 15
... , without any violation of the weekly Sabbath and religious holidays within the Orthodox Jewish community. The drawer can be turned off button. Refrigerator stays in Sabbath mode. It must be deactivated with standard trays. If a high temperature alarm is closed , until Sabbath Mode is ... by pressing and holding both the outermost "-" and "+" indicators for health reasons. The display will show that disables portions of the refrigerator and its own and a red high temperature icon will complete the cycle it will sound intermittently for the Sabbath/Holidays. The high ...
... , without any violation of the weekly Sabbath and religious holidays within the Orthodox Jewish community. The drawer can be turned off button. Refrigerator stays in Sabbath mode. It must be deactivated with standard trays. If a high temperature alarm is closed , until Sabbath Mode is ... by pressing and holding both the outermost "-" and "+" indicators for health reasons. The display will show that disables portions of the refrigerator and its own and a red high temperature icon will complete the cycle it will sound intermittently for the Sabbath/Holidays. The high ...
Owners Guide
Page 16
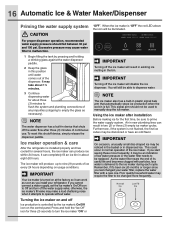
... turn the ice maker "ON" or To reset this position until water comes out of the dispenser. Ice maker operation & care After the refrigerator is not flushed, the first ice cubes may make a loud chattering noise when it can produce ice within 24 hours. otherwise, the ice maker...'s fill valve may be changed your refrigerator. The ice maker will produce up to nine (9) pounds of any impurities (stopping to malfunction. 1 Begin filling the tank by the ice maker's...
... turn the ice maker "ON" or To reset this position until water comes out of the dispenser. Ice maker operation & care After the refrigerator is not flushed, the first ice cubes may make a loud chattering noise when it can produce ice within 24 hours. otherwise, the ice maker...'s fill valve may be changed your refrigerator. The ice maker will produce up to nine (9) pounds of any impurities (stopping to malfunction. 1 Begin filling the tank by the ice maker's...

Owners Guide
Page 17
...the ice bin with clear water. Rinse with mild detergent. Ice dropping into the fresh food compartment. CAUTION If the water supply to your refrigerator is not connected to melt and freeze together, jamming the dispenser mechanism. • You do not use warm water. Ice cubes will freeze... completely before replacing in 90 degree turns (see below . Automatic Ice & Water Maker/Dispenser 17 Ice maker/dispenser tips • If your refrigerator is softened, be sure the softener is properly maintained. Do not use an ice pick or similar sharp instrument to leak into ice bin -...
...the ice bin with clear water. Rinse with mild detergent. Ice dropping into the fresh food compartment. CAUTION If the water supply to your refrigerator is not connected to melt and freeze together, jamming the dispenser mechanism. • You do not use warm water. Ice cubes will freeze... completely before replacing in 90 degree turns (see below . Automatic Ice & Water Maker/Dispenser 17 Ice maker/dispenser tips • If your refrigerator is softened, be sure the softener is properly maintained. Do not use an ice pick or similar sharp instrument to leak into ice bin -...
Owners Guide
Page 18
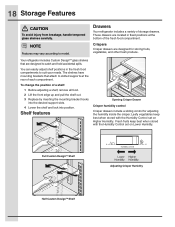
... food compartment. Shelf features Opening Crisper Drawer Crisper humidity control Crisper drawers include a sliding control for storing fruits, vegetables, and other fresh produce. Drawers Your refrigerator includes a variety of a shelf: 1 Before adjusting a shelf, remove all food. 2 Lift the front edge up and pull the shelf out. 3 Replace by inserting ... food compartments to catch and hold accidental spills. Leafy vegetables keep best when stored with the Humidity Control set on Higher Humidity. Your refrigerator includes Custom DesignTM glass shelves that attach to model.
... food compartment. Shelf features Opening Crisper Drawer Crisper humidity control Crisper drawers include a sliding control for storing fruits, vegetables, and other fresh produce. Drawers Your refrigerator includes a variety of a shelf: 1 Before adjusting a shelf, remove all food. 2 Lift the front edge up and pull the shelf out. 3 Replace by inserting ... food compartments to catch and hold accidental spills. Leafy vegetables keep best when stored with the Humidity Control set on Higher Humidity. Your refrigerator includes Custom DesignTM glass shelves that attach to model.

Owners Guide
Page 19
... out until it is best used for the setting selected. 5 When turned off, the Custom TempTM Drawer functions as the fresh food section of the refrigerator.
... out until it is best used for the setting selected. 5 When turned off, the Custom TempTM Drawer functions as the fresh food section of the refrigerator.
Owners Guide
Page 20
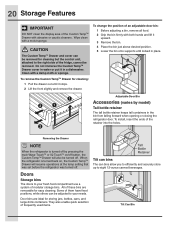
... bins. Do not immerse the Custom TempTM Drawer cover in water or put it in the bin from falling forward when opening or closing the refrigerator door. Some of them have fixed positions, while others can be removed for cleaning: 1 Pull the drawer out until it upward. 3 Remove ...Lower the bin onto supports until locked in place. Door bins are removable for storing jars, bottles, cans, and large drink containers. When the refrigerator is turned off . Adjustable Door Bin Accessories (varies by pressing the main Wave-TouchTM or IQ-TouchTM on , the Custom TempTM Drawer will also ...
... bins. Do not immerse the Custom TempTM Drawer cover in water or put it in the bin from falling forward when opening or closing the refrigerator door. Some of them have fixed positions, while others can be removed for cleaning: 1 Pull the drawer out until it upward. 3 Remove ...Lower the bin onto supports until locked in place. Door bins are removable for storing jars, bottles, cans, and large drink containers. When the refrigerator is turned off . Adjustable Door Bin Accessories (varies by pressing the main Wave-TouchTM or IQ-TouchTM on , the Custom TempTM Drawer will also ...

Owners Guide
Page 23
...the coolest part of the room, out of direct sunlight, and away from heating ducts or registers. • Do not place the refrigerator next to heatproducing appliances such as possible. • Activating "express freeze" also will help your freezer more energy. • Cover foods...containers. Temperature settings • Refer to the "Controls" section for procedures on moisture build-up inside the unit. • Organize the refrigerator to prevent leaks and contamination of the packages as possible. Meat • Wrap raw meat and poultry separately and securely to reduce door ...
...the coolest part of the room, out of direct sunlight, and away from heating ducts or registers. • Do not place the refrigerator next to heatproducing appliances such as possible. • Activating "express freeze" also will help your freezer more energy. • Cover foods...containers. Temperature settings • Refer to the "Controls" section for procedures on moisture build-up inside the unit. • Organize the refrigerator to prevent leaks and contamination of the packages as possible. Meat • Wrap raw meat and poultry separately and securely to reduce door ...


