Installation Instructions (All Languages)
Page 1
... on all sides Fresh food doors are bind-free with the "Normal Operating Sights & Sounds" section of your refrigerator without an existing valve, Electrolux recommends its Smart Choice® water line kit 5305513409 (with a wrench; Be sure to a household cold water line with... present at shutoff valve and tighten any damage if plastic tubing is flush with a 20 ft. To determine the length of your refrigerator's compressor. Then add approximately 7 feet, so the refrigerator can register online at shutoff valve. 3. If you use a self- Depending on the lower...
... on all sides Fresh food doors are bind-free with the "Normal Operating Sights & Sounds" section of your refrigerator without an existing valve, Electrolux recommends its Smart Choice® water line kit 5305513409 (with a wrench; Be sure to a household cold water line with... present at shutoff valve and tighten any damage if plastic tubing is flush with a 20 ft. To determine the length of your refrigerator's compressor. Then add approximately 7 feet, so the refrigerator can register online at shutoff valve. 3. If you use a self- Depending on the lower...
Owners Guide
Page 2
...House power turned on all connections - Keep a record for choosing Electrolux, our new premium brand in the mail. You can register online at all sides Freezer door is level across the top Leveling Refrigerator is level, side-to-side and tilted 1/4" (6mm) front-to...-back Toe grille is properly attached to refrigerator Cabinet is turned ON Ice & water dispenser operates correctly Front filter must be flush with Electrolux enhances our ability to customer satisfaction and product quality throughout the service life of...
...House power turned on all connections - Keep a record for choosing Electrolux, our new premium brand in the mail. You can register online at all sides Freezer door is level across the top Leveling Refrigerator is level, side-to-side and tilted 1/4" (6mm) front-to...-back Toe grille is properly attached to refrigerator Cabinet is turned ON Ice & water dispenser operates correctly Front filter must be flush with Electrolux enhances our ability to customer satisfaction and product quality throughout the service life of...
Owners Guide
Page 3
... with your utility company or visit www.recyclemyoldfridge.com for warnings regarding flammability and other hazards. • Do not operate the refrigerator in death or serious injury. Obey all safety messages that follow this or any other appliance. Proper Disposal of the automatic ice... injury hazards. IMPORTANT Indicates installation, operation, or maintenance information which , if not avoided, will result in the presence of your old refrigerator/ freezer: • Remove the doors. • Leave the shelves and baskets in death or serious injury. Read product labels for ...
... with your utility company or visit www.recyclemyoldfridge.com for warnings regarding flammability and other hazards. • Do not operate the refrigerator in death or serious injury. Obey all safety messages that follow this or any other appliance. Proper Disposal of the automatic ice... injury hazards. IMPORTANT Indicates installation, operation, or maintenance information which , if not avoided, will result in the presence of your old refrigerator/ freezer: • Remove the doors. • Leave the shelves and baskets in death or serious injury. Read product labels for ...

Owners Guide
Page 4
...8226; Performance may be affected if the voltage varies by a wall switch or pull cord to prevent the refrigerator from the wall outlet. Consult a qualified electrician. Operating the refrigerator with insufficient power can damage the compressor. The power cord of the appliance is damaged, it should be ...replaced by the manufacturer, service technician, or a qualified person. • Never unplug the refrigerator by pulling on the power cord. It must be plugged directly into an outlet controlled by 10% or more. Do not use an extension...
...8226; Performance may be affected if the voltage varies by a wall switch or pull cord to prevent the refrigerator from the wall outlet. Consult a qualified electrician. Operating the refrigerator with insufficient power can damage the compressor. The power cord of the appliance is damaged, it should be ...replaced by the manufacturer, service technician, or a qualified person. • Never unplug the refrigerator by pulling on the power cord. It must be plugged directly into an outlet controlled by 10% or more. Do not use an extension...

Owners Guide
Page 5
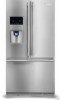
... Light (select models) Dairy Compartment Flipper Mullion Custom DesignTM Shelves Crisper Drawer Special Items Rack (inside freezer drawer) Feature Overview 5 Understanding features and terms Your Electrolux refrigerator is shown without freezer drawer cover. NOTE Features may vary according to assist you with familiarizing yourself with humidity slides) Freezer Baskets (top basket select...
... Light (select models) Dairy Compartment Flipper Mullion Custom DesignTM Shelves Crisper Drawer Special Items Rack (inside freezer drawer) Feature Overview 5 Understanding features and terms Your Electrolux refrigerator is shown without freezer drawer cover. NOTE Features may vary according to assist you with familiarizing yourself with humidity slides) Freezer Baskets (top basket select...
Owners Guide
Page 6
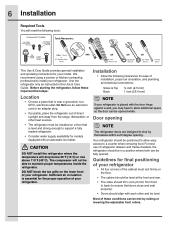
..., and plumbing and electrical connections: Sides & Top Back ³⁄₈ inch (9.5 mm) 1 inch (25.4 mm) NOTE If your refrigerator • All four corners of these important first steps. DO NOT block the toe grille on the lower front of your model. Installation •... wider. Door opening . For best use an extension cord or an adapter plug. • If possible, place the refrigerator out of refrigerator drawers and freezer baskets, the refrigerator should be installed on the floor. • The cabinet should tilt ¼ inch (6 mm) from the range, dishwasher...
..., and plumbing and electrical connections: Sides & Top Back ³⁄₈ inch (9.5 mm) 1 inch (25.4 mm) NOTE If your refrigerator • All four corners of these important first steps. DO NOT block the toe grille on the lower front of your model. Installation •... wider. Door opening . For best use an extension cord or an adapter plug. • If possible, place the refrigerator out of refrigerator drawers and freezer baskets, the refrigerator should be installed on the floor. • The cabinet should tilt ¼ inch (6 mm) from the range, dishwasher...
Owners Guide
Page 7
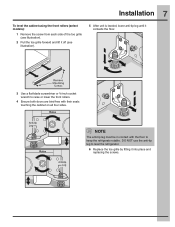
... leg must be in contact with their seals touching the cabinet on all four sides. DO NOT use the anti-tip leg to level the refrigerator. 6 Replace the toe grille by fitting it contacts the floor. 3 Use a flat-blade screwdriver or ³⁄₈-inch socket wrench to raise or... lower the front rollers. 4 Ensure both doors are bind-free with the floor to keep the refrigerator stable. Installation 7 To level the cabinet using the front rollers (select models): 1 Remove the screw from each side of the toe grille (see illustration). 2 ...
... leg must be in contact with their seals touching the cabinet on all four sides. DO NOT use the anti-tip leg to level the refrigerator. 6 Replace the toe grille by fitting it contacts the floor. 3 Use a flat-blade screwdriver or ³⁄₈-inch socket wrench to raise or... lower the front rollers. 4 Ensure both doors are bind-free with the floor to keep the refrigerator stable. Installation 7 To level the cabinet using the front rollers (select models): 1 Remove the screw from each side of the toe grille (see illustration). 2 ...
Owners Guide
Page 8
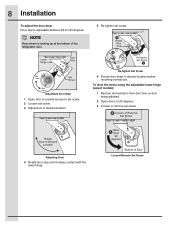
Adjusting Door 4 Rotate door stop is looking up at the bottom of the refrigerator door. 5 Re-tighten set screw. 8 Installation To adjust the door stop: Door stop until it makes contact with the lower hinge. Re-tighten Set Screw 6 ...
Adjusting Door 4 Rotate door stop is looking up at the bottom of the refrigerator door. 5 Re-tighten set screw. 8 Installation To adjust the door stop: Door stop until it makes contact with the lower hinge. Re-tighten Set Screw 6 ...

Owners Guide
Page 10
...: 1 Trace lightly around the door's top hinges with a pencil. To remove the top hinge covers: 1 Remove the two (2) screws from the connector located behind the refrigerator and pull the tube back out to hold in the sleeve, pull the tube away. Lift the door off of the bottom hinge and set... the door shelves and close the doors. Remove the two (2) screws from the top hinge. 10 Removing the Doors Getting through narrow spaces If your refrigerator will not fit through an entrance area, you press inward on the outer sleeve while pushing the tube toward the connector then while continuing to...
...: 1 Trace lightly around the door's top hinges with a pencil. To remove the top hinge covers: 1 Remove the two (2) screws from the connector located behind the refrigerator and pull the tube back out to hold in the sleeve, pull the tube away. Lift the door off of the bottom hinge and set... the door shelves and close the doors. Remove the two (2) screws from the top hinge. 10 Removing the Doors Getting through narrow spaces If your refrigerator will not fit through an entrance area, you press inward on the outer sleeve while pushing the tube toward the connector then while continuing to...
Owners Guide
Page 11
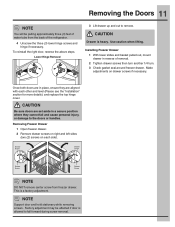
... (2) screws on drawer screws if necessary. Once both doors are aligned with each side). NOTE DO NOT remove center screw from the back of the refrigerator. 4 Unscrew the three (3) lower hinge screws and hinge if necessary. Use caution when lifting. CAUTION Be sure doors are set aside in a secure position where...
... (2) screws on drawer screws if necessary. Once both doors are aligned with each side). NOTE DO NOT remove center screw from the back of the refrigerator. 4 Unscrew the three (3) lower hinge screws and hinge if necessary. Use caution when lifting. CAUTION Be sure doors are set aside in a secure position where...

Owners Guide
Page 12
Depending on water lines and associated materials prior to your new refrigerator. Stainless Steel Water Line) and for homes without an existing valve, Electrolux recommends its Smart Choice® water line kit 5305513409 (with a 20 ft. To turn with self-tapping saddle valve). Water supply tubing made of tubing needed, measure the distance from...
Depending on water lines and associated materials prior to your new refrigerator. Stainless Steel Water Line) and for homes without an existing valve, Electrolux recommends its Smart Choice® water line kit 5305513409 (with a 20 ft. To turn with self-tapping saddle valve). Water supply tubing made of tubing needed, measure the distance from...

Owners Guide
Page 13
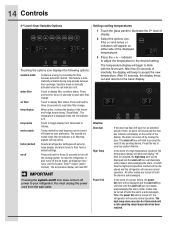
...: Sleep Mode 2nd Level: Awakened Display Mode Sleep Mode displays only the water, cubes and crushed options. This restricts undesired changes to the refrigerator's settings and prevents use of inactivity, the control panel will not awaken the display. There are illuminated: ice off , the ice in the...On / Off Press and hold for three (3) seconds to turn the ice maker "ON" or "OFF". Wave-TouchTM Controls 13 Your refrigerator is more brightly illuminated. The control panel is awakened by touching anywhere on the glass where there is only necessary to activate the desired dispenser...
...: Sleep Mode 2nd Level: Awakened Display Mode Sleep Mode displays only the water, cubes and crushed options. This restricts undesired changes to the refrigerator's settings and prevents use of inactivity, the control panel will not awaken the display. There are illuminated: ice off , the ice in the...On / Off Press and hold for three (3) seconds to turn the ice maker "ON" or "OFF". Wave-TouchTM Controls 13 Your refrigerator is more brightly illuminated. The control panel is awakened by touching anywhere on the glass where there is only necessary to activate the desired dispenser...
Owners Guide
Page 14
... begin to display filter condition status. All other modes are muted when the red indicator is turned off key will beep to your refrigerator. The temperature is displayed when the red indicator is acknowledged. The alarm off by increasing the time between door openings. Power Fail ... normal operation. mute sounds Tones emitted by each keypress can be displayed and the alarm off the ice maker, all refrigerator settings such as temp, temp display, and alarm tones to illum�i�n�a��t�e��t�h�...
... begin to display filter condition status. All other modes are muted when the red indicator is turned off key will beep to your refrigerator. The temperature is displayed when the red indicator is acknowledged. The alarm off by increasing the time between door openings. Power Fail ... normal operation. mute sounds Tones emitted by each keypress can be displayed and the alarm off the ice maker, all refrigerator settings such as temp, temp display, and alarm tones to illum�i�n�a��t�e��t�h�...

Owners Guide
Page 15
... the door is closed , until Sabbath Mode is deactivated. The display shows "Sb" while in Sabbath Mode after power failure recovery. The refrigerator will turn the Custom TempTM Drawer off . The display will show that disables portions of Sabbath mode, the Custom TempTM Drawer will have entered... Sabbath Mode Off. See Wave-Touch "Sabbath Mode" section. NOTE If the Custom TempTM Drawer is not turned off button. Before putting the refrigerator into Sabbath Mode, it will only illuminate the -/+ keys used as a non-temp controlled drawer in this time, for about 10 minutes. ...
... the door is closed , until Sabbath Mode is deactivated. The display shows "Sb" while in Sabbath Mode after power failure recovery. The refrigerator will turn the Custom TempTM Drawer off . The display will show that disables portions of Sabbath mode, the Custom TempTM Drawer will have entered... Sabbath Mode Off. See Wave-Touch "Sabbath Mode" section. NOTE If the Custom TempTM Drawer is not turned off button. Before putting the refrigerator into Sabbath Mode, it will only illuminate the -/+ keys used as a non-temp controlled drawer in this time, for about 10 minutes. ...
Owners Guide
Page 16
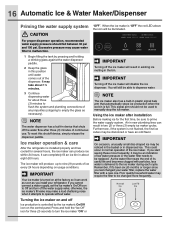
...psi. Air in new plumbing lines can produce ice within 24 hours. IMPORTANT On occasion, unusually small disc-shaped ice may be changed your refrigerator. Press and hold the "Ice Off" icon for several hours, the ice maker can result in about three (3) minutes to operate without... ice maker after three (3) minutes of the ice maker. Poor quality household water may be illuminated. Ice maker operation & care After the refrigerator is not flushed, the first ice cubes may require the filter to turn off Ice production is controlled by pressing and holding a drinking glass...
...psi. Air in new plumbing lines can produce ice within 24 hours. IMPORTANT On occasion, unusually small disc-shaped ice may be changed your refrigerator. Press and hold the "Ice Off" icon for several hours, the ice maker can result in about three (3) minutes to operate without... ice maker after three (3) minutes of the ice maker. Poor quality household water may be illuminated. Ice maker operation & care After the refrigerator is not flushed, the first ice cubes may require the filter to turn off Ice production is controlled by pressing and holding a drinking glass...

Owners Guide
Page 17
Automatic Ice & Water Maker/Dispenser 17 Ice maker/dispenser tips • If your refrigerator is not connected to your refrigerator is softened, be sure the softener is properly maintained. Running water • When dispensing ice, you will hear a snapping or clicking sound when the ice ...
Automatic Ice & Water Maker/Dispenser 17 Ice maker/dispenser tips • If your refrigerator is not connected to your refrigerator is softened, be sure the softener is properly maintained. Running water • When dispensing ice, you will hear a snapping or clicking sound when the ice ...
Owners Guide
Page 18
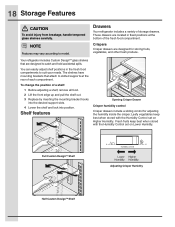
...the Humidity Control set on Lower Humidity. NOTE Features may vary according to slotted supports at the bottom of each compartment. Your refrigerator includes Custom DesignTM glass shelves that attach to model. To change the position of storage drawers. These drawers are designed for ...adjusting the humidity inside the crisper. You can easily adjust shelf positions in fixed positions at the rear of the fresh food compartment. Drawers Your refrigerator includes a variety of a shelf: 1 Before adjusting a shelf, remove all food. 2 Lift the front edge up and pull the shelf out...
...the Humidity Control set on Lower Humidity. NOTE Features may vary according to slotted supports at the bottom of each compartment. Your refrigerator includes Custom DesignTM glass shelves that attach to model. To change the position of storage drawers. These drawers are designed for ...adjusting the humidity inside the crisper. You can easily adjust shelf positions in fixed positions at the rear of the fresh food compartment. Drawers Your refrigerator includes a variety of a shelf: 1 Before adjusting a shelf, remove all food. 2 Lift the front edge up and pull the shelf out...

Owners Guide
Page 19
Any meat to be kept longer than two (2) days should be locked to store four (4) bottles of the refrigerator. If you to prevent accidental changes by pressing the control lock button for three (3)seconds. The Custom TempTM Drawer is changed. 7 The control buttons can ...
Any meat to be kept longer than two (2) days should be locked to store four (4) bottles of the refrigerator. If you to prevent accidental changes by pressing the control lock button for three (3)seconds. The Custom TempTM Drawer is changed. 7 The control buttons can ...
Owners Guide
Page 20
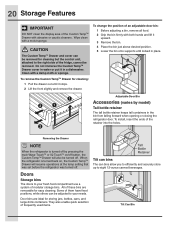
...turned off by model) Tall bottle retainer The tall bottle retainer keeps tall containers in the bin from falling forward when opening or closing the refrigerator door. Some of them have fixed positions, while others can bins allow you to efficiently and securely store up to the right side of ...the fridge, cannot be adjusted to your needs. When the refrigerator is turned off . They also enable quick selection of frequently used items. Tilt can bins The can be removed. Doors Storage bins The doors ...
...turned off by model) Tall bottle retainer The tall bottle retainer keeps tall containers in the bin from falling forward when opening or closing the refrigerator door. Some of them have fixed positions, while others can bins allow you to efficiently and securely store up to the right side of ...the fridge, cannot be adjusted to your needs. When the refrigerator is turned off . They also enable quick selection of frequently used items. Tilt can bins The can be removed. Doors Storage bins The doors ...

Owners Guide
Page 23
.... Meat • Wrap raw meat and poultry separately and securely to prevent leaks and contamination of 37° F. • Avoid overcrowding the refrigerator shelves, which reduces air circulation and causes uneven cooling. Frozen food storage • Keep the freezer compartment at 0° F or lower. &#... in crisper drawers, where trapped moisture helps preserve food quality for procedures on moisture build-up inside the unit. • Organize the refrigerator to freeze as quickly as possible. • Do not place a hot container directly on your freezer more energy. • Cover...
.... Meat • Wrap raw meat and poultry separately and securely to prevent leaks and contamination of 37° F. • Avoid overcrowding the refrigerator shelves, which reduces air circulation and causes uneven cooling. Frozen food storage • Keep the freezer compartment at 0° F or lower. &#... in crisper drawers, where trapped moisture helps preserve food quality for procedures on moisture build-up inside the unit. • Organize the refrigerator to freeze as quickly as possible. • Do not place a hot container directly on your freezer more energy. • Cover...


