
Owner's Manual
Page 1
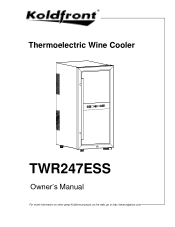
Thermoelectric Wine Cooler TWR247ESS Owner's Manual For more information on other great Koldfront products on the web, go to http://www.edgestar.com
Thermoelectric Wine Cooler TWR247ESS Owner's Manual For more information on other great Koldfront products on the web, go to http://www.edgestar.com
Owner's Manual
Page 2
... level. Do not move and install the wine cooler. This unit is not intended for domestic indoor use . Please read and follow the safety information listed below to repair the unit yourself. Contact customer service for electrical and other use extension cords or unprotected power strips with other appliances. Do not start or stop the unit by children. Children should...
... level. Do not move and install the wine cooler. This unit is not intended for domestic indoor use . Please read and follow the safety information listed below to repair the unit yourself. Contact customer service for electrical and other use extension cords or unprotected power strips with other appliances. Do not start or stop the unit by children. Children should...
Owner's Manual
Page 3
... THE WINE COOLER 3 UNPACKING THE WINE COOLER 3 TYPE OF INSTALLATION 3 FREE-STANDING INSTALLATION 3 INSTALLATION CLEARANCE REQUIREMENTS 3 ELECTRICAL REQUIREMENTS 4 RECOMMENDED GROUNDING METHOD 4 LEVELING THE WINE COOLER 4 OPERATION ...5 INSTALLATION CHECKLIST BEFORE OPERATION 5 ADJUSTING THE TEMPERATURE 5 NORMAL SOUNDS 6 DEFROSTING ...6 PREPARING THE WINE COOLER FOR STORAGE 6 CLEANING AND MAINTENANCE 7 CLEANING THE AIR FILTER 7 EXTERIOR CLEANING 7 INTERIOR CLEANING 7 TROUBLESHOOTING ...8 SPECIFICATIONS...9 LIMITED WARRANTY 10 First Time Operating Instructions Before use, make...
... THE WINE COOLER 3 UNPACKING THE WINE COOLER 3 TYPE OF INSTALLATION 3 FREE-STANDING INSTALLATION 3 INSTALLATION CLEARANCE REQUIREMENTS 3 ELECTRICAL REQUIREMENTS 4 RECOMMENDED GROUNDING METHOD 4 LEVELING THE WINE COOLER 4 OPERATION ...5 INSTALLATION CHECKLIST BEFORE OPERATION 5 ADJUSTING THE TEMPERATURE 5 NORMAL SOUNDS 6 DEFROSTING ...6 PREPARING THE WINE COOLER FOR STORAGE 6 CLEANING AND MAINTENANCE 7 CLEANING THE AIR FILTER 7 EXTERIOR CLEANING 7 INTERIOR CLEANING 7 TROUBLESHOOTING ...8 SPECIFICATIONS...9 LIMITED WARRANTY 10 First Time Operating Instructions Before use, make...
Owner's Manual
Page 4
... regarding the proper installation, use and maintain your wine cooler. Read the troubleshooting section of this manual as it will work at 1 (866) 319-5473. 1 Please save the original product packaging in case you need warranty service, our friendly customer service representatives are located on the ratings label on the web at http://www.edgestar.com to register your product, download product guides, additional troubleshooting resources and...
... regarding the proper installation, use and maintain your wine cooler. Read the troubleshooting section of this manual as it will work at 1 (866) 319-5473. 1 Please save the original product packaging in case you need warranty service, our friendly customer service representatives are located on the ratings label on the web at http://www.edgestar.com to register your product, download product guides, additional troubleshooting resources and...
Owner's Manual
Page 5
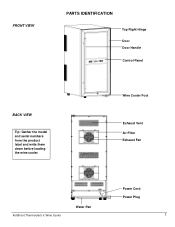
FRONT VIEW PARTS IDENTIFICATION Top Right Hinge Door Door Handle Control Panel BACK VIEW Tip: Gather the model and serial numbers from the product label and write them down before loading the wine cooler. Wine Cooler Foot Exhaust Vent Air Filter Exhaust Fan Koldfront Thermoelectric Wine Cooler Water Pan Power Cord Power Plug 2
FRONT VIEW PARTS IDENTIFICATION Top Right Hinge Door Door Handle Control Panel BACK VIEW Tip: Gather the model and serial numbers from the product label and write them down before loading the wine cooler. Wine Cooler Foot Exhaust Vent Air Filter Exhaust Fan Koldfront Thermoelectric Wine Cooler Water Pan Power Cord Power Plug 2
Owner's Manual
Page 6
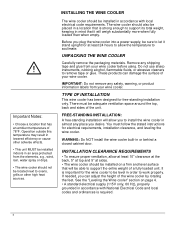
... to work properly. TYPE OF INSTALLATION This wine cooler has been designed for electrical requirements, installation clearance, and leveling the wine cooler. You must be adequate ventilation space around the top, back and sides of a fully loaded unit. INSTALLING THE WINE COOLER The wine cooler should not be located next to support the entire weight of the unit. WARNING: Do NOT install the wine cooler built-in accordance with local electrical code requirements. INSTALLATION...
... to work properly. TYPE OF INSTALLATION This wine cooler has been designed for electrical requirements, installation clearance, and leveling the wine cooler. You must be adequate ventilation space around the top, back and sides of a fully loaded unit. INSTALLING THE WINE COOLER The wine cooler should not be located next to support the entire weight of the unit. WARNING: Do NOT install the wine cooler built-in accordance with local electrical code requirements. INSTALLATION...
Owner's Manual
Page 7
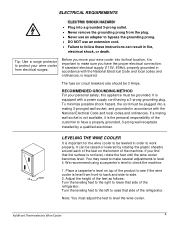
... the product to check the machine. 1. The fuse (or circuit breaker) size should be raised or lowered by a qualified electrician. Adjust the height of the feet as follows: Turn the leveling feet to the right to lower that the surface is equipped with a power supply cord having a 3-prong grounding plug. It can result in accordance with the National Electrical Code and local codes and...
... the product to check the machine. 1. The fuse (or circuit breaker) size should be raised or lowered by a qualified electrician. Adjust the height of the feet as follows: Turn the leveling feet to the right to lower that the surface is equipped with a power supply cord having a 3-prong grounding plug. It can result in accordance with the National Electrical Code and local codes and...
Owner's Manual
Page 8
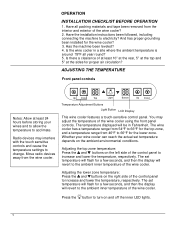
... wine cooler. The temperature displayed will revert to increase and lower the temperature, respectively. Adjusting the top zone temperature: Press the and buttons on and off the inner LED lights. 5 The set temperature will flash for the wine cooler? 3. Have the installation instructions been followed, including connecting the machine to turn on the left side of the control panel to the ambient inner temperature of the wine cooler using the front panel controls. Press the button to electricity? OPERATION INSTALLATION CHECKLIST BEFORE OPERATION...
... wine cooler. The temperature displayed will revert to increase and lower the temperature, respectively. Adjusting the top zone temperature: Press the and buttons on and off the inner LED lights. 5 The set temperature will flash for the wine cooler? 3. Have the installation instructions been followed, including connecting the machine to turn on the left side of the control panel to the ambient inner temperature of the wine cooler using the front panel controls. Press the button to electricity? OPERATION INSTALLATION CHECKLIST BEFORE OPERATION...
Owner's Manual
Page 9
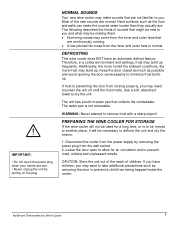
... the door open to minimize frost buildup. DEFROSTING This wine cooler does NOT have children, you may build up . The water pan is to be moved to another place, it will not be necessary to prevent mold, mildew and unpleasant smells. PREPARING THE WINE COOLER FOR STORAGE If the wine cooler will be used for air circulation and to defrost the unit...
... the door open to minimize frost buildup. DEFROSTING This wine cooler does NOT have children, you may build up . The water pan is to be moved to another place, it will not be necessary to prevent mold, mildew and unpleasant smells. PREPARING THE WINE COOLER FOR STORAGE If the wine cooler will be used for air circulation and to defrost the unit...
Owner's Manual
Page 10
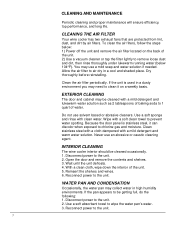
... AIR FILTER Your wine cooler has two exhaust fans that are protected from lint, dust, and dirt by air filters. Dry thoroughly before reinstalling. If the unit is stainless steel, it on the back of the unit. 2) Use a vacuum cleaner or tap the filter lightly to remove loose dust and dirt, then rinse thoroughly under lukewarm running water (below : 1) Power off the unit and remove the air filter located...
... AIR FILTER Your wine cooler has two exhaust fans that are protected from lint, dust, and dirt by air filters. Dry thoroughly before reinstalling. If the unit is stainless steel, it on the back of the unit. 2) Use a vacuum cleaner or tap the filter lightly to remove loose dust and dirt, then rinse thoroughly under lukewarm running water (below : 1) Power off the unit and remove the air filter located...
Owner's Manual
Page 11
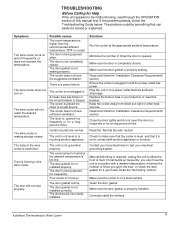
... opened . A house fuse has blown or the circuit breaker is not installed correctly. Plug the unit in and the power outlet has power. Close the door tightly and do not open the door, or check the door gasket for a good seal. The body of time. The door gasket is tripped. If the problem persists, check the Troubleshooting Guide below. Symptoms The wine cooler turns on . The wine cooler will not...
... opened . A house fuse has blown or the circuit breaker is not installed correctly. Plug the unit in and the power outlet has power. Close the door tightly and do not open the door, or check the door gasket for a good seal. The body of time. The door gasket is tripped. If the problem persists, check the Troubleshooting Guide below. Symptoms The wine cooler turns on . The wine cooler will not...
Owner's Manual
Page 12
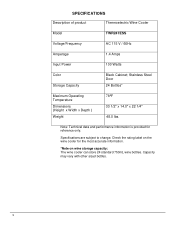
... sized bottles. 9 Note: Technical data and performance information is provided for the most accurate information. *Note on the wine cooler for reference only. Stainless Steel Door 24 Bottles* Maximum Operating Temperature Dimensions (Height x Width x Depth ) Weight 78ºF 33 1/2" x 14.0" x 22 1/4" 48.0 lbs. SPECIFICATIONS Description of product Thermoelectric Wine Cooler Model TWR247ESS Voltage/Frequency AC 115 V / 60Hz Amperage 1.4 Amps Input Power 100 Watts Color Storage Capacity Black Cabinet; Specifications...
... sized bottles. 9 Note: Technical data and performance information is provided for the most accurate information. *Note on the wine cooler for reference only. Stainless Steel Door 24 Bottles* Maximum Operating Temperature Dimensions (Height x Width x Depth ) Weight 78ºF 33 1/2" x 14.0" x 22 1/4" 48.0 lbs. SPECIFICATIONS Description of product Thermoelectric Wine Cooler Model TWR247ESS Voltage/Frequency AC 115 V / 60Hz Amperage 1.4 Amps Input Power 100 Watts Color Storage Capacity Black Cabinet; Specifications...
Owner's Manual
Page 13
... WARRANTY GIVES YOU SPECIFIC LEGAL RIGHTS. YOU MAY HAVE OTHER RIGHTS THAT VARY FROM STATE TO STATE. After the ninety (90) day period, EdgeStar will supply new, rebuilt, or refurbished parts free of EdgeStar. This warranty applies to the purchase and use of EdgeStar products in proper usage of the product. Damages or operating problems resulting from an unauthorized reseller. Products that your serial number and...
... WARRANTY GIVES YOU SPECIFIC LEGAL RIGHTS. YOU MAY HAVE OTHER RIGHTS THAT VARY FROM STATE TO STATE. After the ninety (90) day period, EdgeStar will supply new, rebuilt, or refurbished parts free of EdgeStar. This warranty applies to the purchase and use of EdgeStar products in proper usage of the product. Damages or operating problems resulting from an unauthorized reseller. Products that your serial number and...
Owner's Manual
Page 14
Capital of TX Hwy, Bldg 5 Austin, TX 78746-3448 Toll Free: 1-866-319-5473 Web: http://www.edgestar.com E-mail: service@edgestar.com Register your product, download owner's manuals, access additional troubleshooting resources, and obtain more information on other great EdgeStar & Koldfront products on the web at: http://www.edgestar.com Product contents and specifications may change without notice. By EdgeStar Products 500 N. Copyright © 2012 Living Direct, Inc.
Capital of TX Hwy, Bldg 5 Austin, TX 78746-3448 Toll Free: 1-866-319-5473 Web: http://www.edgestar.com E-mail: service@edgestar.com Register your product, download owner's manuals, access additional troubleshooting resources, and obtain more information on other great EdgeStar & Koldfront products on the web at: http://www.edgestar.com Product contents and specifications may change without notice. By EdgeStar Products 500 N. Copyright © 2012 Living Direct, Inc.


