Owner's Manual
Page 1
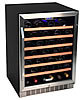
Wine Refrigerator CWR531SZ Owner's Manual For more information on other great EdgeStar products on the web, go to http://www.edgestar.com
Wine Refrigerator CWR531SZ Owner's Manual For more information on other great EdgeStar products on the web, go to http://www.edgestar.com
Owner's Manual
Page 2
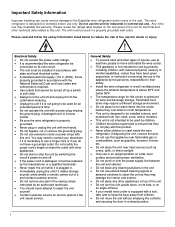
... temperature is above 50°F and below to reduce the risk of the unit for use by switching the circuit's power on its side, or at an angle off . If the power cord is damaged, it is designed for wine and beverage storage. Any other types of injuries, use at least two people to the user. This wine refrigerator is necessary to use a longer cord...
... temperature is above 50°F and below to reduce the risk of the unit for use by switching the circuit's power on its side, or at an angle off . If the power cord is damaged, it is designed for wine and beverage storage. Any other types of injuries, use at least two people to the user. This wine refrigerator is necessary to use a longer cord...
Owner's Manual
Page 3
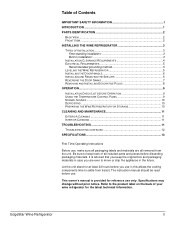
... 5 LEVELING THE WINE REFRIGERATOR 5 INSTALLING THE DOOR HANDLE 6 INSTALLING AND REMOVING THE SHELVES 6 REVERSING THE DOOR SWING 7 REMOVING AND INSTALLING DECORATIVE PLUGS 8 OPERATION...9 INSTALLATION CHECK LIST BEFORE OPERATION 9 USING THE TEMPERATURE CONTROL PANEL 9 NORMAL SOUNDS 10 DEFROSTING ...10 PREPARING THE WINE REFRIGERATOR FOR STORAGE 10 CLEANING AND MAINTENANCE 11 EXTERIOR CLEANING 11 INTERIOR CLEANING 11 TROUBLESHOOTING 11 TROUBLESHOOTING CONTINUED 12 SPECIFICATIONS 13 First Time Operating Instructions Before use it; Specifications may change without prior notice...
... 5 LEVELING THE WINE REFRIGERATOR 5 INSTALLING THE DOOR HANDLE 6 INSTALLING AND REMOVING THE SHELVES 6 REVERSING THE DOOR SWING 7 REMOVING AND INSTALLING DECORATIVE PLUGS 8 OPERATION...9 INSTALLATION CHECK LIST BEFORE OPERATION 9 USING THE TEMPERATURE CONTROL PANEL 9 NORMAL SOUNDS 10 DEFROSTING ...10 PREPARING THE WINE REFRIGERATOR FOR STORAGE 10 CLEANING AND MAINTENANCE 11 EXTERIOR CLEANING 11 INTERIOR CLEANING 11 TROUBLESHOOTING 11 TROUBLESHOOTING CONTINUED 12 SPECIFICATIONS 13 First Time Operating Instructions Before use it; Specifications may change without prior notice...
Owner's Manual
Page 4
... proper installation, use and maintain your wine refrigerator. Read the troubleshooting section of this EdgeStar wine refrigerator. Following this manual will ensure that sold you the product. Read and follow this instruction manual carefully to help you diagnose and solve common issues. Visit us . You may also want to staple your receipt to -date information. If you need to obtain warranty service...
... proper installation, use and maintain your wine refrigerator. Read the troubleshooting section of this EdgeStar wine refrigerator. Following this manual will ensure that sold you the product. Read and follow this instruction manual carefully to help you diagnose and solve common issues. Visit us . You may also want to staple your receipt to -date information. If you need to obtain warranty service...
Owner's Manual
Page 5
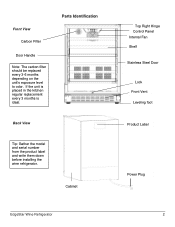
Front View Carbon Filter Door Handle Note: The carbon filter should be replaced every 3-6 months depending on the unit's exposure level to odor. If the unit is placed in the kitchen regular replacement every 3 months is ideal. Cabinet EdgeStar Wine Refrigerator Top Right Hinge Control Panel Internal Fan Shelf Stainless Steel Door Lock Front Vent Leveling foot Product Label Power Plug 2 Parts Identification Back View Tip: Gather the model and serial number from the product label and write them down before installing the wine refrigerator.
Front View Carbon Filter Door Handle Note: The carbon filter should be replaced every 3-6 months depending on the unit's exposure level to odor. If the unit is placed in the kitchen regular replacement every 3 months is ideal. Cabinet EdgeStar Wine Refrigerator Top Right Hinge Control Panel Internal Fan Shelf Stainless Steel Door Lock Front Vent Leveling foot Product Label Power Plug 2 Parts Identification Back View Tip: Gather the model and serial number from the product label and write them down before installing the wine refrigerator.
Owner's Manual
Page 6
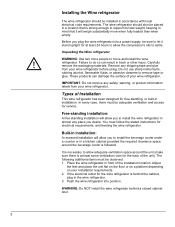
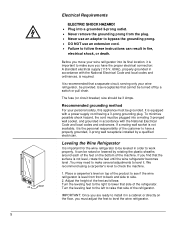
... from your wine refrigerator. Types of the installation location. Before you to support its total weight, keeping in mind that is strong enough to install the beverage cooler under a counter or in accordance with local electrical code requirements. Free-standing installation: A free-standing installation will allow you desire. The following additional items must be installed in a kitchen cabinet provided the required clearance space around the unit (make...
... from your wine refrigerator. Types of the installation location. Before you to support its total weight, keeping in mind that is strong enough to install the beverage cooler under a counter or in accordance with local electrical code requirements. Free-standing installation: A free-standing installation will allow you desire. The following additional items must be installed in a kitchen cabinet provided the required clearance space around the unit (make...
Owner's Manual
Page 7
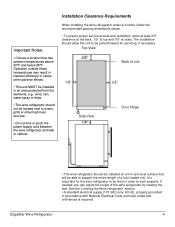
... be located next to ovens, grills or other adverse effects. • This unit MUST be installed in order to work properly. Operation outside these temperatures may result in lowered efficiency or cause other high heat sources. • Do not kink or pinch the power supply cord between the wine refrigerator and wall or cabinet. Top View Back of unit Side View Door Hinge • The wine refrigerator...
... be located next to ovens, grills or other adverse effects. • This unit MUST be installed in order to work properly. Operation outside these temperatures may result in lowered efficiency or cause other high heat sources. • Do not kink or pinch the power supply cord between the wine refrigerator and wall or cabinet. Top View Back of unit Side View Door Hinge • The wine refrigerator...
Owner's Manual
Page 8
... with the National Electrical Code and local codes and ordinances. The fuse (or circuit breaker) size should be provided. If a mating wall socket is not available, it is level from the plug. Never use an adapter to bypass the grounding prong. DO NOT use an extension cord. Failure to follow these instructions can be turned off by a qualified...
... with the National Electrical Code and local codes and ordinances. The fuse (or circuit breaker) size should be provided. If a mating wall socket is not available, it is level from the plug. Never use an adapter to bypass the grounding prong. DO NOT use an extension cord. Failure to follow these instructions can be turned off by a qualified...
Owner's Manual
Page 9
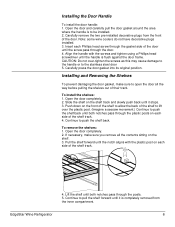
... shelf to lift over -tighten the screws as this may cause damage to the handle or to be installed. 2. Lift the shelf until it stops. 3. Continue to push the shelf back. Installing the Door Handle To install the door handle: 1. Carefully press the door gasket into its original position. Note: some wine coolers do not have decorative plugs installed. 3. Open the door completely. 2. Open the door...
... shelf to lift over -tighten the screws as this may cause damage to the handle or to be installed. 2. Lift the shelf until it stops. 3. Continue to push the shelf back. Installing the Door Handle To install the door handle: 1. Carefully press the door gasket into its original position. Note: some wine coolers do not have decorative plugs installed. 3. Open the door completely. 2. Open the door...
Owner's Manual
Page 10
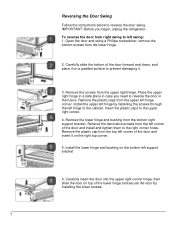
... upper right corner hinge, then slide the door on top of the lower hinge and secure the door by fastening the screws through the left corner of the door and install and tighten them to reverse the door in case you begin, unplug the refrigerator. Reversing the Door Swing Follow the instructions below to the upper right corner. 4. Remove the plastic caps from the upper left support...
... upper right corner hinge, then slide the door on top of the lower hinge and secure the door by fastening the screws through the left corner of the door and install and tighten them to reverse the door in case you begin, unplug the refrigerator. Reversing the Door Swing Follow the instructions below to the upper right corner. 4. Remove the plastic caps from the upper left support...

Owner's Manual
Page 11
... door gasket from the door. Note: A small Flathead screwdriver is inserted carefully press the door gasket into the decorative plug slot. Reinsert the decorative plugs to the right side of the door into its original position. EdgeStar Wine Refrigerator 8 Insert the Flathead screwdriver through this same procedure. 4. IMPORTANT: Before you begin, unplug the refrigerator. 1. Removing and Installing Decorative Plugs Follow the instructions...
... door gasket from the door. Note: A small Flathead screwdriver is inserted carefully press the door gasket into the decorative plug slot. Reinsert the decorative plugs to the right side of the door into its original position. EdgeStar Wine Refrigerator 8 Insert the Flathead screwdriver through this same procedure. 4. IMPORTANT: Before you begin, unplug the refrigerator. 1. Removing and Installing Decorative Plugs Follow the instructions...
Owner's Manual
Page 12
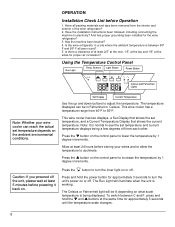
... 3 seconds to adjust the temperature. The temperature displayed can reach the actual set temperature, and a Current Temperature Display that shows the current temperature. Caution: If you powered off from each other. Using the Temperature Control Panel Run Light Temp. Set Display Current Temperature Use the up and down buttons to turn the inner light on what scale temperature is between C and F, press and hold the power button for approximately 5 seconds until the temperature scale changes. 9 OPERATION Installation Check List before powering it back...
... 3 seconds to adjust the temperature. The temperature displayed can reach the actual set temperature, and a Current Temperature Display that shows the current temperature. Caution: If you powered off from each other. Using the Temperature Control Panel Run Light Temp. Set Display Current Temperature Use the up and down buttons to turn the inner light on what scale temperature is between C and F, press and hold the power button for approximately 5 seconds until the temperature scale changes. 9 OPERATION Installation Check List before powering it back...
Owner's Manual
Page 13
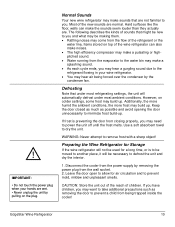
... build up . Hard surfaces like the floor, walls can also make noises. The high efficiency compressor may make a pulsating or highpitched sound. Water running from the wall socket. 2. Disconnect the cooler from the power supply by the condenser fan. IMPORTANT: • Do not touch the power plug when your wine refrigerator. You may hear air being trapped inside the...
... build up . Hard surfaces like the floor, walls can also make noises. The high efficiency compressor may make a pulsating or highpitched sound. Water running from the wall socket. 2. Disconnect the cooler from the power supply by the condenser fan. IMPORTANT: • Do not touch the power plug when your wine refrigerator. You may hear air being trapped inside the...
Owner's Manual
Page 14
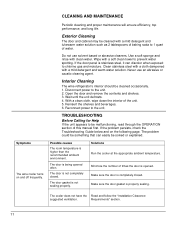
... The wine cooler turns on the following page. Exterior Cleaning The door and cabinet may be malfunctioning, read through the OPERATION section of the unit. 5. Wait until the unit defrosts. 4. Do not use an abrasive or caustic cleaning agent. Reconnect power to the unit. 2. If the door panel is properly sealing. Solutions Run the cooler at the appropriate ambient temperature. If the problem persists, check the Troubleshooting Guide...
... The wine cooler turns on the following page. Exterior Cleaning The door and cabinet may be malfunctioning, read through the OPERATION section of the unit. 5. Wait until the unit defrosts. 4. Do not use an abrasive or caustic cleaning agent. Reconnect power to the unit. 2. If the door panel is properly sealing. Solutions Run the cooler at the appropriate ambient temperature. If the problem persists, check the Troubleshooting Guide...
Owner's Manual
Page 15
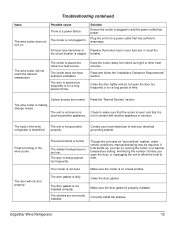
... the desired temperature The cooler is tripped. Make sure the cooler is opened too frequently. A house fuse has blown or the circuit breaker is placed too close to test your fuse box or reset the breaker. Correctly install the shelves. Plug the unit in . The door is on . The wine cooler will not shut properly. EdgeStar Wine Refrigerator 12 Troubleshooting continued Issue The wine cooler does not turn on a level...
... the desired temperature The cooler is tripped. Make sure the cooler is opened too frequently. A house fuse has blown or the circuit breaker is placed too close to test your fuse box or reset the breaker. Correctly install the shelves. Plug the unit in . The door is on . The wine cooler will not shut properly. EdgeStar Wine Refrigerator 12 Troubleshooting continued Issue The wine cooler does not turn on a level...

Owner's Manual
Page 16
Specifications are subject to change. Temperature Range 40 - 65ºF Dimensions (Height x Width x Depth ) Weight 33 1/2" x 23 1/2" x 22 1/2" 100 pounds Note: Technical data and performance information is provided for the most accurate information. *Note on wine storage capacity: The wine refrigerator will store 53 standard 750 ml. Check the rating label on the wine refrigerator for reference only. Stainless Steel Door 53 Bottles* Refrigerant R134a...
Specifications are subject to change. Temperature Range 40 - 65ºF Dimensions (Height x Width x Depth ) Weight 33 1/2" x 23 1/2" x 22 1/2" 100 pounds Note: Technical data and performance information is provided for the most accurate information. *Note on wine storage capacity: The wine refrigerator will store 53 standard 750 ml. Check the rating label on the wine refrigerator for reference only. Stainless Steel Door 53 Bottles* Refrigerant R134a...
Owner's Manual
Page 17
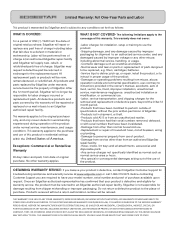
... a defective part be repaired or replaced on parts or replacement of charge. This warranty does not cover: -Labor charges for installation, setup or training to a defect in exchange for troubleshooting assistance and warranty service at an authorized EdgeStar repair facility and EdgeStar will supply new, rebuilt, or refurbished parts free of parts designed to the place of America. Once an EdgeStar authorized representative has confirmed that have your product is...
... a defective part be repaired or replaced on parts or replacement of charge. This warranty does not cover: -Labor charges for installation, setup or training to a defect in exchange for troubleshooting assistance and warranty service at an authorized EdgeStar repair facility and EdgeStar will supply new, rebuilt, or refurbished parts free of parts designed to the place of America. Once an EdgeStar authorized representative has confirmed that have your product is...

Owner's Manual
Page 18
All rights reserved. Copyright © 2013 Living Direct, Inc. Capital of TX Hwy, Bldg 5 Austin, TX 78746 Toll Free: 1-866-319-5473 Web: http://www.edgestar.com E-mail: service@edgestar.com Register your product, download owner's manuals, access additional troubleshooting resources, and obtain more information on other great EdgeStar products on the web at: http://www.edgestar.com Product contents and specifications may change without notice. EdgeStar Products 500 N.
All rights reserved. Copyright © 2013 Living Direct, Inc. Capital of TX Hwy, Bldg 5 Austin, TX 78746 Toll Free: 1-866-319-5473 Web: http://www.edgestar.com E-mail: service@edgestar.com Register your product, download owner's manuals, access additional troubleshooting resources, and obtain more information on other great EdgeStar products on the web at: http://www.edgestar.com Product contents and specifications may change without notice. EdgeStar Products 500 N.


