Owner's Manual
Page 1
Beverage Cooler BWC120SSLT Owner's Manual For more information on other great EdgeStar products on the web, go to http://www.edgestar.com
Beverage Cooler BWC120SSLT Owner's Manual For more information on other great EdgeStar products on the web, go to http://www.edgestar.com
Owner's Manual
Page 2
... or stop the unit by switching the circuit's power on a flat, level surface and provide proper ventilation. • Do not pinch or kink the power supply line between the unit and cabinet. • Do not leave any other use may damage the interior and exterior. • Do not place any cleaning solutions in accordance with the National Electrical Code and local codes and...
... or stop the unit by switching the circuit's power on a flat, level surface and provide proper ventilation. • Do not pinch or kink the power supply line between the unit and cabinet. • Do not leave any other use may damage the interior and exterior. • Do not place any cleaning solutions in accordance with the National Electrical Code and local codes and...

Owner's Manual
Page 3
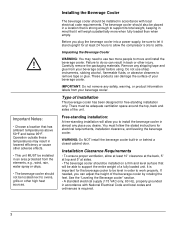
...3 TYPE OF INSTALLATION 3 Free-standing installation 3 INSTALLATION CLEARANCE REQUIREMENTS 3 ELECTRICAL REQUIREMENTS 4 Recommended grounding method 4 LEVELING THE BEVERAGE COOLER 4 REVERSING THE DOOR SWING 5 OPERATION...5 INSTALLATION CHECK LIST BEFORE OPERATION 5 ADJUSTING THE TEMPERATURE 5 NORMAL SOUNDS 6 DEFROSTING ...6 PREPARING THE BEVERAGE COOLER FOR STORAGE 6 CLEANING AND MAINTENANCE 7 EXTERIOR CLEANING 7 INTERIOR CLEANING 7 TROUBLESHOOTING 7 TROUBLESHOOTING CONTINUED 8 SPECIFICATIONS 9 EDGESTAR LIMITED WARRANTY 10 First Time Operating Instructions Before use, make sure...
...3 TYPE OF INSTALLATION 3 Free-standing installation 3 INSTALLATION CLEARANCE REQUIREMENTS 3 ELECTRICAL REQUIREMENTS 4 Recommended grounding method 4 LEVELING THE BEVERAGE COOLER 4 REVERSING THE DOOR SWING 5 OPERATION...5 INSTALLATION CHECK LIST BEFORE OPERATION 5 ADJUSTING THE TEMPERATURE 5 NORMAL SOUNDS 6 DEFROSTING ...6 PREPARING THE BEVERAGE COOLER FOR STORAGE 6 CLEANING AND MAINTENANCE 7 EXTERIOR CLEANING 7 INTERIOR CLEANING 7 TROUBLESHOOTING 7 TROUBLESHOOTING CONTINUED 8 SPECIFICATIONS 9 EDGESTAR LIMITED WARRANTY 10 First Time Operating Instructions Before use, make sure...

Owner's Manual
Page 4
.... • Read and follow this instruction manual carefully to safely transport your beverage cooler. Following this product opens a relationship between you and EdgeStar. You may also want to staple your receipt to obtain warranty service. We believe that your purchase of this manual will ensure that your product will provide the customer support needed for future reference. Model Number: Serial Number: Date of Purchase: To...
.... • Read and follow this instruction manual carefully to safely transport your beverage cooler. Following this product opens a relationship between you and EdgeStar. You may also want to staple your receipt to obtain warranty service. We believe that your purchase of this manual will ensure that your product will provide the customer support needed for future reference. Model Number: Serial Number: Date of Purchase: To...
Owner's Manual
Page 5
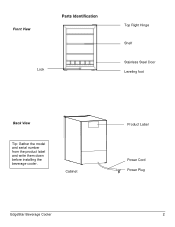
Cabinet EdgeStar Beverage Cooler Product Label Power Cord Power Plug 2 Front View Parts Identification Lock Top Right Hinge Shelf Stainless Steel Door Leveling foot Back View Tip: Gather the model and serial number from the product label and write them down before installing the beverage cooler.
Cabinet EdgeStar Beverage Cooler Product Label Power Cord Power Plug 2 Front View Parts Identification Lock Top Right Hinge Shelf Stainless Steel Door Leveling foot Back View Tip: Gather the model and serial number from the product label and write them down before installing the beverage cooler.
Owner's Manual
Page 6
... be installed in accordance with National Electrical Code and local codes and ordinances is strong enough to support its total weight, keeping in a location that is required. 3 Failure to do so can adjust the height of the beverage cooler by rotating the feet. These products can damage the surface of your beverage cooler before using. There must follow the stated instructions...
... be installed in accordance with National Electrical Code and local codes and ordinances is strong enough to support its total weight, keeping in a location that is required. 3 Failure to do so can adjust the height of the beverage cooler by rotating the feet. These products can damage the surface of your beverage cooler before using. There must follow the stated instructions...
Owner's Manual
Page 7
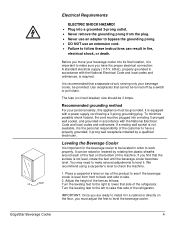
... 3-pronged wall socket, and grounded in fire, electrical shock, or death. We recommend using a carpenter's level to follow these instructions can be 3 Amps. Turn the leveling feet to the left to side. 2. Before you find that the surface is level from the plug. • Never use an adapter to bypass the grounding prong. • DO NOT use an extension cord. • Failure to check...
... 3-pronged wall socket, and grounded in fire, electrical shock, or death. We recommend using a carpenter's level to follow these instructions can be 3 Amps. Turn the leveling feet to the left to side. 2. Before you find that the surface is level from the plug. • Never use an adapter to bypass the grounding prong. • DO NOT use an extension cord. • Failure to check...
Owner's Manual
Page 8
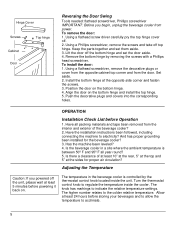
.... Turn the thermostat control knob to indicate the relative temperature settings. Using a flathead screw driver carefully pry the top hinge cover off the bottom hinge and set them aside. 3. Is there a clearance of the beverage cooler? 2. Lift the door off . 2. Hinge Cover Screws Cabinet Door Top hinge Reversing the Door Swing Tools needed: flathead screwdriver, Phillips screwdriver IMPORTANT: Before you powered off top hinge. To remove the door: 1. Keep the parts together and set the door aside. 4. Install the...
.... Turn the thermostat control knob to indicate the relative temperature settings. Using a flathead screw driver carefully pry the top hinge cover off the bottom hinge and set them aside. 3. Is there a clearance of the beverage cooler? 2. Lift the door off . 2. Hinge Cover Screws Cabinet Door Top hinge Reversing the Door Swing Tools needed: flathead screwdriver, Phillips screwdriver IMPORTANT: Before you powered off top hinge. To remove the door: 1. Keep the parts together and set the door aside. 4. Install the...

Owner's Manual
Page 9
...; You may hear air being trapped inside the cooler! Hard surfaces like the floor, walls can also make noises. • The high efficiency compressor may make a pulsating or highpitched sound. • Water running from the wall socket. 2. Therefore, in your hands are wet. • Never unplug the unit by removing the power plug from the evaporator to the water bin may make a splashing sound. •...
...; You may hear air being trapped inside the cooler! Hard surfaces like the floor, walls can also make noises. • The high efficiency compressor may make a pulsating or highpitched sound. • Water running from the wall socket. 2. Therefore, in your hands are wet. • Never unplug the unit by removing the power plug from the evaporator to the water bin may make a splashing sound. •...

Owner's Manual
Page 10
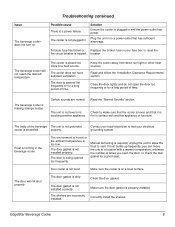
... door gasket is properly sealing. Solutions Run the cooler at the appropriate ambient temperature. The cooler does not have the Read and follow the "Installation Clearance suggested ventilation. Interior Cleaning The beverage cooler's interior should be something that can discolor when exposed to be cleaned with a mild detergent and warm water solution. Reinsert the shelves and beverages. 6. If the door panel is opened often. TROUBLESHOOTING Before...
... door gasket is properly sealing. Solutions Run the cooler at the appropriate ambient temperature. The cooler does not have the Read and follow the "Installation Clearance suggested ventilation. Interior Cleaning The beverage cooler's interior should be something that can discolor when exposed to be cleaned with a mild detergent and warm water solution. Reinsert the shelves and beverages. 6. If the door panel is opened often. TROUBLESHOOTING Before...
Owner's Manual
Page 11
... frost to make sure that the cooler is Check to melt. Clean the door gasket. breaker. Close the door tightly and do not open the door, or check the door gasket for a good seal. The environment is humid or the ambient temperature is not installed properly. The door gasket is too low. Manual defrosting is a power failure. Keep the cooler away from direct sun light or other...
... frost to make sure that the cooler is Check to melt. Clean the door gasket. breaker. Close the door tightly and do not open the door, or check the door gasket for a good seal. The environment is humid or the ambient temperature is not installed properly. The door gasket is too low. Manual defrosting is a power failure. Keep the cooler away from direct sun light or other...

Owner's Manual
Page 12
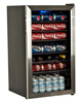
... change. Stainless Steel Door 118 Cans* Temperature Range Low 30s - cans. 9 Mid 50sºF Dimensions (Height x Width x Depth ) Weight 33" x 19" x 18 1/4" 64 pounds Note: Technical data and performance information is provided for the most accurate information. *Note on the beverage cooler for reference only. Specifications Description of product Freestanding Beverage Cooler Model BWC120SSLT Voltage/Frequency AC 115V~60Hz Amperage 1.3 Amps...
... change. Stainless Steel Door 118 Cans* Temperature Range Low 30s - cans. 9 Mid 50sºF Dimensions (Height x Width x Depth ) Weight 33" x 19" x 18 1/4" 64 pounds Note: Technical data and performance information is provided for the most accurate information. *Note on the beverage cooler for reference only. Specifications Description of product Freestanding Beverage Cooler Model BWC120SSLT Voltage/Frequency AC 115V~60Hz Amperage 1.3 Amps...
Owner's Manual
Page 13
...; The use of this warranty will be performed free of charge at 1-866-319-5473. filters, cartridges, batteries. • Service trips to deliver, pick-up, or repair, install the product, or to instruct in proper usage of the product. • Damages or operating problems resulting from misuse, abuse, operation outside of specifications without a return authorization number will repair the product with new or remanufactured parts, or exchange...
...; The use of this warranty will be performed free of charge at 1-866-319-5473. filters, cartridges, batteries. • Service trips to deliver, pick-up, or repair, install the product, or to instruct in proper usage of the product. • Damages or operating problems resulting from misuse, abuse, operation outside of specifications without a return authorization number will repair the product with new or remanufactured parts, or exchange...

Owner's Manual
Page 14
Capital of TX Hwy, Bldg 5 Austin, TX 78746 Toll Free: 1-866-319-5473 Web: http://www.edgestar.com E-mail: service@edgestar.com Register your product, download owner's manuals, access additional troubleshooting resources, and obtain more information on other great EdgeStar products on the web at: http://www.edgestar.com Product contents and specifications may change without notice. EdgeStar Products 500 N. Copyright © 2011 Living Direct, Inc. All rights reserved.
Capital of TX Hwy, Bldg 5 Austin, TX 78746 Toll Free: 1-866-319-5473 Web: http://www.edgestar.com E-mail: service@edgestar.com Register your product, download owner's manuals, access additional troubleshooting resources, and obtain more information on other great EdgeStar products on the web at: http://www.edgestar.com Product contents and specifications may change without notice. EdgeStar Products 500 N. Copyright © 2011 Living Direct, Inc. All rights reserved.


