
Owner's Manual
Page 1
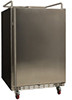
Built-In Kegerator BR7000SS Fridge for the KC7000SS Kegerator Owner's Manual For more information on other great EdgeStar products on the web, go to http://www.edgestar.com
Built-In Kegerator BR7000SS Fridge for the KC7000SS Kegerator Owner's Manual For more information on other great EdgeStar products on the web, go to http://www.edgestar.com
Owner's Manual
Page 2
... or stop the unit by switching the circuit's power on its own circuit. • The unit must be replaced by the person(s) responsible for use by an authorized technician. • You should be supervised to ensure that cannot be turned off by a switch or pull chain. • Always turn the unit upside down to room temperature. • This unit is designed to be installed...
... or stop the unit by switching the circuit's power on its own circuit. • The unit must be replaced by the person(s) responsible for use by an authorized technician. • You should be supervised to ensure that cannot be turned off by a switch or pull chain. • Always turn the unit upside down to room temperature. • This unit is designed to be installed...
Owner's Manual
Page 3
... 6 FREE-STANDING INSTALLATION 7 Top Cover Installation 7 Guard Rail ...7 Drip Tray...7 BUILT-IN INSTALLATION 8 Installation Requirements 8 KEG LOADING...9 OPERATION...10 INSTALLATION CHECK LIST BEFORE OPERATION 10 USING THE TEMPERATURE CONTROL PANEL 10 NORMAL SOUNDS 11 DEFROSTING ...11 PREPARING THE KEGERATOR FOR STORAGE 11 CLEANING AND MAINTENANCE 12 EXTERIOR CLEANING 12 INTERIOR CLEANING 12 TROUBLESHOOTING 12 TROUBLESHOOTING CONTINUED 13 SPECIFICATIONS 14 First Time Operating Instructions Before use it; Specifications may change without prior notice. The instruction manual...
... 6 FREE-STANDING INSTALLATION 7 Top Cover Installation 7 Guard Rail ...7 Drip Tray...7 BUILT-IN INSTALLATION 8 Installation Requirements 8 KEG LOADING...9 OPERATION...10 INSTALLATION CHECK LIST BEFORE OPERATION 10 USING THE TEMPERATURE CONTROL PANEL 10 NORMAL SOUNDS 11 DEFROSTING ...11 PREPARING THE KEGERATOR FOR STORAGE 11 CLEANING AND MAINTENANCE 12 EXTERIOR CLEANING 12 INTERIOR CLEANING 12 TROUBLESHOOTING 12 TROUBLESHOOTING CONTINUED 13 SPECIFICATIONS 14 First Time Operating Instructions Before use it; Specifications may change without prior notice. The instruction manual...
Owner's Manual
Page 4
... glad you chose us on the web at http://www.edgestar.com to register your warranty. For Your Records: Please write down the model number and serial number below for service under your product, download product guides, additional troubleshooting resources and up-to-date information. • If you install, use and maintenance of this EdgeStar kegerator. We are needed to obtain warranty service. We believe that relationship.
... glad you chose us on the web at http://www.edgestar.com to register your warranty. For Your Records: Please write down the model number and serial number below for service under your product, download product guides, additional troubleshooting resources and up-to-date information. • If you install, use and maintenance of this EdgeStar kegerator. We are needed to obtain warranty service. We believe that relationship.
Owner's Manual
Page 5
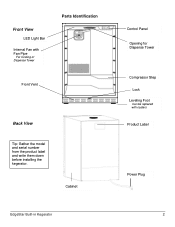
Front View LED Light Bar Internal Fan with casters Product Label Power Plug 2 Cabinet EdgeStar Built-in Kegerator Control Panel Opening for Dispense Tower Compressor Step Lock Leveling Foot Can be replaced with Fan Pipe For Cooling of Dispense Tower Parts Identification Front Vent Back View Tip: Gather the model and serial number from the product label and write them down before installing the kegerator.
Front View LED Light Bar Internal Fan with casters Product Label Power Plug 2 Cabinet EdgeStar Built-in Kegerator Control Panel Opening for Dispense Tower Compressor Step Lock Leveling Foot Can be replaced with Fan Pipe For Cooling of Dispense Tower Parts Identification Front Vent Back View Tip: Gather the model and serial number from the product label and write them down before installing the kegerator.

Owner's Manual
Page 6
... NOTE: The type of kegerator you purchase will determine the type of accessories you will be based upon the type of standard accessories. The most common options include single, dual, and triple taps. 1 - Guard Rail Includes 4 small screws for installation 3 The other accessories you receive for the dispense kit and Co2 tank will receive for...
... NOTE: The type of kegerator you purchase will determine the type of accessories you will be based upon the type of standard accessories. The most common options include single, dual, and triple taps. 1 - Guard Rail Includes 4 small screws for installation 3 The other accessories you receive for the dispense kit and Co2 tank will receive for...
Owner's Manual
Page 7
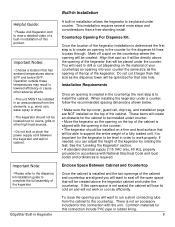
... to support its final location, it is required. Do not use an extension cord. • Failure to remove tape or glue. EdgeStar Built-in Kegerator Installing the Kegerator The kegerator should be 3 Amps. The kegerator should be installed in accordance with the National Electrical Code and local codes and ordinances, is the personal responsibility of your kegerator. The fuse (or circuit breaker) size should...
... to support its final location, it is required. Do not use an extension cord. • Failure to remove tape or glue. EdgeStar Built-in Kegerator Installing the Kegerator The kegerator should be 3 Amps. The kegerator should be installed in accordance with the National Electrical Code and local codes and ordinances, is the personal responsibility of your kegerator. The fuse (or circuit breaker) size should...
Owner's Manual
Page 8
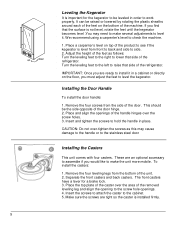
We recommend using a carpenter's level to hold the handle in place. Insert and tighten the screws to check the machine. 1. The front casters have a lever for the kegerator to be leveled in order to side. 2. Turn the leveling feet to the left to make several adjustments to lower that ...cabinet or directly on the floor, you would like to raise that side of the refrigerator. Insert the screws to attach the caster to the stainless steel door Installing the Casters This unit comes with four casters. Remove the four screws from front to back and side to work properly. ...
We recommend using a carpenter's level to hold the handle in place. Insert and tighten the screws to check the machine. 1. The front casters have a lever for the kegerator to be leveled in order to side. 2. Turn the leveling feet to the left to make several adjustments to lower that ...cabinet or directly on the floor, you would like to raise that side of the refrigerator. Insert the screws to attach the caster to the stainless steel door Installing the Casters This unit comes with four casters. Remove the four screws from front to back and side to work properly. ...
Owner's Manual
Page 9
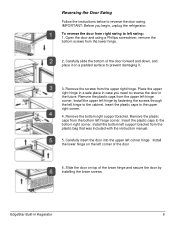
... was included with the instruction manual. 5. EdgeStar Built-in the future. Place the upper right hinge in a safe place in case you begin, unplug the refrigerator. Install the lower hinge on a padded surface to the cabinet. IMPORTANT: Before you need to the upper right corner. 4. Install the upper left corner of the door 6. Remove the bottom right support bracket. Install the bottom left corner hinge. Insert the plastic caps...
... was included with the instruction manual. 5. EdgeStar Built-in the future. Place the upper right hinge in a safe place in case you begin, unplug the refrigerator. Install the lower hinge on a padded surface to the cabinet. IMPORTANT: Before you need to the upper right corner. 4. Install the upper left corner of the door 6. Remove the bottom right support bracket. Install the bottom left corner hinge. Insert the plastic caps...

Owner's Manual
Page 10
Free-Standing Installation A free-standing installation will allow you to install the kegerator in order to avoid spills or broken glass. 1. Top Cover Installation The included stainless steel top cover is an optional accessory for this manual. The top cover will lock the rail into the guard rail. Place it...you desire. This will use with your kegerator. Place the cover on the outer edges of the cabinet in almost any runoff liquid from scratches to the main cabinet. Important Note: • Please refer to the dispense kit installation guide to complete the full ...
Free-Standing Installation A free-standing installation will allow you to install the kegerator in order to avoid spills or broken glass. 1. Top Cover Installation The included stainless steel top cover is an optional accessory for this manual. The top cover will lock the rail into the guard rail. Place it...you desire. This will use with your kegerator. Place the cover on the outer edges of the cabinet in almost any runoff liquid from scratches to the main cabinet. Important Note: • Please refer to the dispense kit installation guide to complete the full ...
Owner's Manual
Page 11
... installed under counter. EdgeStar Built-in Kegerator A built-in order to ovens, grills or other adverse effects. • This unit MUST be installed in the counter. • The kegerator should not be located next to work or cool as the dispense tower will be level in installation allows the kegerator to complete the full assembly of the kegerator. Align that size...
... installed under counter. EdgeStar Built-in Kegerator A built-in order to ovens, grills or other adverse effects. • This unit MUST be installed in the counter. • The kegerator should not be located next to work or cool as the dispense tower will be level in installation allows the kegerator to complete the full assembly of the kegerator. Align that size...
Owner's Manual
Page 13
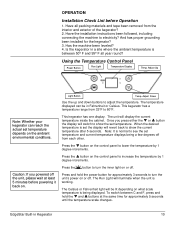
... hold the power button for the kegerator? 3. Note: It is working. Adjust Up Note: Whether your kegerator can be lit depending on the ambient environmental conditions. The unit will illuminate when the unit is normal to turn the unit's power on or off . Have the installation instructions been followed, including connecting the machine to adjust the temperature. Using the Temperature Control Panel Power Button Run Light Temperature Display Temp. The Run Light will display the current temperature inside...
... hold the power button for the kegerator? 3. Note: It is working. Adjust Up Note: Whether your kegerator can be lit depending on the ambient environmental conditions. The unit will illuminate when the unit is normal to turn the unit's power on or off . Have the installation instructions been followed, including connecting the machine to adjust the temperature. Using the Temperature Control Panel Power Button Run Light Temperature Display Temp. The Run Light will display the current temperature inside...
Owner's Manual
Page 14
... refrigerating settings, the unit will automatically defrost under most ambient conditions. Preparing the Kegerator for Storage If the kegerator will be making them. • Rattling noises may come from the evaporator to the water bin may make sounds that are wet. • Never unplug the unit by removing the power ...over the condenser by the condenser fan. However, on top of the new sounds are . If frost is to be moved to another place, it will not be used for air circulation and to remove frost with a sharp object! Items stored on colder settings, some frost may build up...
... refrigerating settings, the unit will automatically defrost under most ambient conditions. Preparing the Kegerator for Storage If the kegerator will be making them. • Rattling noises may come from the evaporator to the water bin may make sounds that are wet. • Never unplug the unit by removing the power ...over the condenser by the condenser fan. However, on top of the new sounds are . If frost is to be moved to another place, it will not be used for air circulation and to remove frost with a sharp object! Items stored on colder settings, some frost may build up...
Owner's Manual
Page 15
... a cloth dampened with a soft clean towel to chlorine gas and moisture. Solutions Run the unit at the appropriate ambient temperature. If the door panel is properly sealing. Reconnect power to the unit. 2. Make sure the door gasket is stainless steel, it can easily be something that can discolor when exposed to prevent water spotting. The problem could be solved or explained.
... a cloth dampened with a soft clean towel to chlorine gas and moisture. Solutions Run the unit at the appropriate ambient temperature. If the door panel is properly sealing. Reconnect power to the unit. 2. Make sure the door gasket is stainless steel, it can easily be something that can discolor when exposed to prevent water spotting. The problem could be solved or explained.
Owner's Manual
Page 16
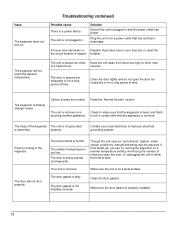
... "Normal Sounds" section. The door will not reach the desired temperature The unit is properly installed. 13 Make sure the door gasket is placed too close Keep the unit away from direct sun light or other heat to a heat source. Solution Ensure the unit is not in and the power outlet has power. A house fuse has blown or Replace the broken fuse in to make sure...
... "Normal Sounds" section. The door will not reach the desired temperature The unit is properly installed. 13 Make sure the door gasket is placed too close Keep the unit away from direct sun light or other heat to a heat source. Solution Ensure the unit is not in and the power outlet has power. A house fuse has blown or Replace the broken fuse in to make sure...
Owner's Manual
Page 17
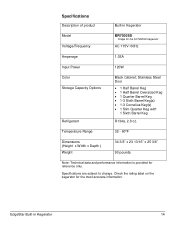
Specifications Description of product Built-in Kegerator 14 Check the rating label on the kegerator for the KC7000SS Kegerator AC 115V~60Hz Amperage 1.03A Input Power 120W Color Storage Capacity Options Refrigerant Black Cabinet; EdgeStar Built-in Kegerator Model Voltage/Frequency BR7000SS Fridge for the most accurate information. Specifications are subject to change. Temperature Range 32 - 60ºF Dimensions (Height x Width x Depth ) Weight 34 3/8" x 23 13/16...
Specifications Description of product Built-in Kegerator 14 Check the rating label on the kegerator for the KC7000SS Kegerator AC 115V~60Hz Amperage 1.03A Input Power 120W Color Storage Capacity Options Refrigerant Black Cabinet; EdgeStar Built-in Kegerator Model Voltage/Frequency BR7000SS Fridge for the most accurate information. Specifications are subject to change. Temperature Range 32 - 60ºF Dimensions (Height x Width x Depth ) Weight 34 3/8" x 23 13/16...
Owner's Manual
Page 18
... that have your product is not responsible for damage resulting from date of EdgeStar. OBTAINING WARRANTY SERVICE: If you are required to a defect in the owner's manual, accidents, acts of God, vermin, fire, flood, improper installation, unauthorized service, maintenance negligence, unauthorized installation or modification, or commercial use . -Replacement or repair of household fuses, circuit breakers, wiring or plumbing. -Damage to any part free of this warranty will be...
... that have your product is not responsible for damage resulting from date of EdgeStar. OBTAINING WARRANTY SERVICE: If you are required to a defect in the owner's manual, accidents, acts of God, vermin, fire, flood, improper installation, unauthorized service, maintenance negligence, unauthorized installation or modification, or commercial use . -Replacement or repair of household fuses, circuit breakers, wiring or plumbing. -Damage to any part free of this warranty will be...

Owner's Manual
Page 19
EdgeStar Products 500 N. Capital of TX Hwy, Bldg 5 Austin, TX 78746 Toll Free: 1-866-319-5473 Web: http://www.edgestar.com E-mail: service@edgestar.com Register your product, download owner's manuals, access additional troubleshooting resources, and obtain more information on other great EdgeStar products on the web at: http://www.edgestar.com Product contents and specifications may change without notice. Copyright © 2014 Living Direct, Inc. All rights reserved.
EdgeStar Products 500 N. Capital of TX Hwy, Bldg 5 Austin, TX 78746 Toll Free: 1-866-319-5473 Web: http://www.edgestar.com E-mail: service@edgestar.com Register your product, download owner's manuals, access additional troubleshooting resources, and obtain more information on other great EdgeStar products on the web at: http://www.edgestar.com Product contents and specifications may change without notice. Copyright © 2014 Living Direct, Inc. All rights reserved.


