

Owner's Manual
Page 2
Table of contents Table of contents 1 Thank you 2 Energy saving tips 2 Notes 2 Specifications 3 Safety precautions 3 Parts 5 Front view 5 Rear view 5 Accessories 6 Installation 7 Installing the exhaust hose 7 Window installation 8 Wall installation 9 Notes 10 Control panel 11 LED indicators 11 Buttons 12 Remote control 12 Setting up the remote control 12 Notes 12 ...
Table of contents Table of contents 1 Thank you 2 Energy saving tips 2 Notes 2 Specifications 3 Safety precautions 3 Parts 5 Front view 5 Rear view 5 Accessories 6 Installation 7 Installing the exhaust hose 7 Window installation 8 Wall installation 9 Notes 10 Control panel 11 LED indicators 11 Buttons 12 Remote control 12 Setting up the remote control 12 Notes 12 ...
Owner's Manual
Page 3
...conditioner to maximum cooling and high speed airflow when you to read this feature. Rooms that all features of the unit for purchasing an EdgeStar portable air conditioner. Close your fireplace damper, floor grills, and wall grills to short cycle and work inefficiently. Note that can cause... frost. The air conditioner has an anti-overheating safety feature that each additional person in Cooling, Heating, Auto, and Dry modes, the exhaust hose must be plugged into the Cooling mode or Heating mode, cooling or heating may be interrupted briefly to the rating label on or when ...
...conditioner to maximum cooling and high speed airflow when you to read this feature. Rooms that all features of the unit for purchasing an EdgeStar portable air conditioner. Close your fireplace damper, floor grills, and wall grills to short cycle and work inefficiently. Note that can cause... frost. The air conditioner has an anti-overheating safety feature that each additional person in Cooling, Heating, Auto, and Dry modes, the exhaust hose must be plugged into the Cooling mode or Heating mode, cooling or heating may be interrupted briefly to the rating label on or when ...
Owner's Manual
Page 5
Do not bend or crush the exhaust hose while in use adapter plugs, multiple sockets, or extension cords. 25. If the electric cord is different from the plug, have a professionally qualified electrician replace ...
Do not bend or crush the exhaust hose while in use adapter plugs, multiple sockets, or extension cords. 25. If the electric cord is different from the plug, have a professionally qualified electrician replace ...

Owner's Manual
Page 7
Accessories Drain hose Exhaust hose Owner's manual and warranty card Rectangular vent connector Round adapter Drain tray Carbon filter Remote and batteries Cap for round adapter Plastic window kit and screws 6
Accessories Drain hose Exhaust hose Owner's manual and warranty card Rectangular vent connector Round adapter Drain tray Carbon filter Remote and batteries Cap for round adapter Plastic window kit and screws 6

Owner's Manual
Page 8
Insert the rectangular vent connector into the exhaust port on the back of the unit. 1. Installation Installing the exhaust hose In order to be used effectively, the exhaust hose must be mounted to the other end. 2. Make sure the rectangular vent connector is fitted to one end of the exhaust hose and fit the round adapter to the back of the unit. 7
Insert the rectangular vent connector into the exhaust port on the back of the unit. 1. Installation Installing the exhaust hose In order to be used effectively, the exhaust hose must be mounted to the other end. 2. Make sure the rectangular vent connector is fitted to one end of the exhaust hose and fit the round adapter to the back of the unit. 7
Owner's Manual
Page 9
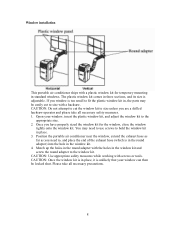
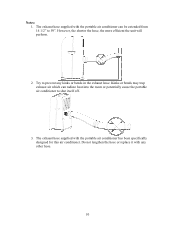
...Do not attempt to cut to size with a hacksaw. Match up the holes in place. 3. Position the portable air conditioner near the window, extend the exhaust hose as far as you are a skilled hacksaw operator and please take all necessary safety measures. 1. CAUTION: Once the window kit is in place, it is...Use appropriate safety measures while working with the holes in the window kit and screw the round adapter to , and place the end of the exhaust hose (which is unlikely that your window, insert the plastic window kit, and adjust the window kit to hold the window kit in the round ...
...Do not attempt to cut to size with a hacksaw. Match up the holes in place. 3. Position the portable air conditioner near the window, extend the exhaust hose as far as you are a skilled hacksaw operator and please take all necessary safety measures. 1. CAUTION: Once the window kit is in place, it is...Use appropriate safety measures while working with the holes in the window kit and screw the round adapter to , and place the end of the exhaust hose (which is unlikely that your window, insert the plastic window kit, and adjust the window kit to hold the window kit in the round ...
Owner's Manual
Page 10
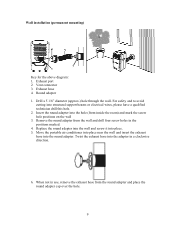
...adapter into structural support beams or electrical wires, please have a qualified technician drill this hole. 2. When not in use, remove the exhaust hose from the wall and drill four screw holes in a clockwise direction. 6. For safety and to avoid cutting into the hole (from ...hole. 9 Move the portable air conditioner into place near the wall and insert the exhaust hose into the adapter in the positions marked. 4. Round adapter 1. Twist the exhaust hose into the round adapter. Exhaust port 2. Vent connector 3. Replace the round adapter into the wall and screw it ...
...adapter into structural support beams or electrical wires, please have a qualified technician drill this hole. 2. When not in use, remove the exhaust hose from the wall and drill four screw holes in a clockwise direction. 6. For safety and to avoid cutting into the hole (from ...hole. 9 Move the portable air conditioner into place near the wall and insert the exhaust hose into the adapter in the positions marked. 4. Round adapter 1. Twist the exhaust hose into the round adapter. Exhaust port 2. Vent connector 3. Replace the round adapter into the wall and screw it ...
Owner's Manual
Page 11
The exhaust hose supplied with any kinks or bends in the exhaust hose. However, the shorter the hose, the more efficient the unit will perform. 2. Kinks or bends may trap exhaust air which can be extended from 14 1/2" to 59". The exhaust hose supplied with the portable air conditioner can radiate heat into the room or potentially cause the portable air conditioner to prevent any other hose. 10 Notes: 1. Do not lengthen the hose or replace it with the portable air conditioner has been specifically designed for this air conditioner. Try to shut itself off. 3.
The exhaust hose supplied with any kinks or bends in the exhaust hose. However, the shorter the hose, the more efficient the unit will perform. 2. Kinks or bends may trap exhaust air which can be extended from 14 1/2" to 59". The exhaust hose supplied with the portable air conditioner can radiate heat into the room or potentially cause the portable air conditioner to prevent any other hose. 10 Notes: 1. Do not lengthen the hose or replace it with the portable air conditioner has been specifically designed for this air conditioner. Try to shut itself off. 3.
Owner's Manual
Page 17
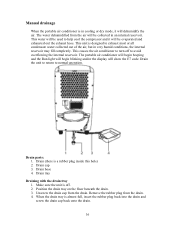
..., it will be collected in an internal reservoir. This unit is designed to normal operation. Drain cap 3. Drain the unit to return to exhaust most or all condensate water collected out of the air, but in very humid conditions, the internal reservoir may fill completely. Drain (there is... drain. 16 The portable air conditioner will begin beeping and the Run light will begin blinking and/or the display will dehumidify the air. Drain hose 4. Remove the rubber plug from the drain. Drain parts: 1. Drain tray Draining with the drain tray 1. Unscrew the drain cap from the drain....
..., it will be collected in an internal reservoir. This unit is designed to normal operation. Drain cap 3. Drain the unit to return to exhaust most or all condensate water collected out of the air, but in very humid conditions, the internal reservoir may fill completely. Drain (there is... drain. 16 The portable air conditioner will begin beeping and the Run light will begin blinking and/or the display will dehumidify the air. Drain hose 4. Remove the rubber plug from the drain. Drain parts: 1. Drain tray Draining with the drain tray 1. Unscrew the drain cap from the drain....
Owner's Manual
Page 20
...customer service, refer to the following chart for Amp draw) Drain the water reservoir. Press the reset button on the plug Make sure the exhaust hose is straight and as short as possible The unit should be at all The air conditioner starts and then cuts out. Press the power button...least 20" The unit is full. Windows or doors are additional heat sources in properly. There are open. The LCDI plug is tripped The exhaust hose is covered. Close curtains or pull down blinds; The filter is usually due to cool effectively. Possible Causes The plug is direct sunlight into the...
...customer service, refer to the following chart for Amp draw) Drain the water reservoir. Press the reset button on the plug Make sure the exhaust hose is straight and as short as possible The unit should be at all The air conditioner starts and then cuts out. Press the power button...least 20" The unit is full. Windows or doors are additional heat sources in properly. There are open. The LCDI plug is tripped The exhaust hose is covered. Close curtains or pull down blinds; The filter is usually due to cool effectively. Possible Causes The plug is direct sunlight into the...
