
Owner's Manual
Page 1
Portable Air Conditioner AP12005ECO Owner's Manual For more information on other great EdgeStar products on the web, go to http://www.edgestar.com
Portable Air Conditioner AP12005ECO Owner's Manual For more information on other great EdgeStar products on the web, go to http://www.edgestar.com

Owner's Manual
Page 2
...; This portable air conditioner is not intended to ensure that they do not play with this product. Plug the power cord to the user. Do not use may invalidate the warranty. Important Safety Information Improper handling can cause serious damage to the appliance and/or to a grounded outlet. 2. Press the TEST button on the unit, please contact EdgeStar support. Press the RESET button to start using your air conditioner. Electrical Safety...
...; This portable air conditioner is not intended to ensure that they do not play with this product. Plug the power cord to the user. Do not use may invalidate the warranty. Important Safety Information Improper handling can cause serious damage to the appliance and/or to a grounded outlet. 2. Press the TEST button on the unit, please contact EdgeStar support. Press the RESET button to start using your air conditioner. Electrical Safety...
Owner's Manual
Page 3
... ADAPTER 8 REMOTE CONTROL OVERVIEW 10 INSTALLING THE BATTERIES 10 REMOTE CONTROL LCD INDICATORS 11 OPERATING THE REMOTE CONTROL 12 POWER ...12 AUTO-RESTART 12 COOLING MODE 12 DEHUMIDIFYING MODE 12 FAN ONLY MODE 13 AUTOMATIC MODE 13 FAN SPEED...13 CLOCK ...13 TIMER ...14 How to set the unit to automatically turn on 14 How to set the unit to automatically turn off 14 FRONT PANEL LIGHTS AND CONTROLS 14 FRONT PANEL LIGHTS 14 FRONT PANEL CONTROLS 14 ENERGY SAVING GUIDE 15 MAINTENANCE 16 CLEANING THE UNIT...
... ADAPTER 8 REMOTE CONTROL OVERVIEW 10 INSTALLING THE BATTERIES 10 REMOTE CONTROL LCD INDICATORS 11 OPERATING THE REMOTE CONTROL 12 POWER ...12 AUTO-RESTART 12 COOLING MODE 12 DEHUMIDIFYING MODE 12 FAN ONLY MODE 13 AUTOMATIC MODE 13 FAN SPEED...13 CLOCK ...13 TIMER ...14 How to set the unit to automatically turn on 14 How to set the unit to automatically turn off 14 FRONT PANEL LIGHTS AND CONTROLS 14 FRONT PANEL LIGHTS 14 FRONT PANEL CONTROLS 14 ENERGY SAVING GUIDE 15 MAINTENANCE 16 CLEANING THE UNIT...
Owner's Manual
Page 4
... this manual as it will provide the customer support needed to safely transport your portable air conditioner. Please save the original product packaging in case you need service, our friendly customer service representatives are located on the ratings label on the web at http://www.edgestar.com for future reference. Model Number: Serial Number: Date of your portable air conditioner. For Your Records: Please write down the model number and serial number below for product guides, additional troubleshooting resources...
... this manual as it will provide the customer support needed to safely transport your portable air conditioner. Please save the original product packaging in case you need service, our friendly customer service representatives are located on the ratings label on the web at http://www.edgestar.com for future reference. Model Number: Serial Number: Date of your portable air conditioner. For Your Records: Please write down the model number and serial number below for product guides, additional troubleshooting resources...

Owner's Manual
Page 6
..., or as needed. Insert the assembled pre-filter into the back of the unit. 3 It is necessary to the pegs on the filter frame. 4. Place the activated carbon filter on the pre-filter straight up. Installing the Carbon Filter Your portable air conditioner ships with a pre-filter and an activated carbon filter. The carbon filter will help remove contaminates and odors from the air. Carbon filter Pre-filter Pegs 2. Pull...
..., or as needed. Insert the assembled pre-filter into the back of the unit. 3 It is necessary to the pegs on the filter frame. 4. Place the activated carbon filter on the pre-filter straight up. Installing the Carbon Filter Your portable air conditioner ships with a pre-filter and an activated carbon filter. The carbon filter will help remove contaminates and odors from the air. Carbon filter Pre-filter Pegs 2. Pull...

Owner's Manual
Page 7
... separate them. 4 Screws 1 Exhaust Hose 1 Grated Adapter 1 Exhaust Cover 1 Window Kit Plate with Hole 2 Duct Connectors 1 Window Kit Plate NOTE: You may be used to your room's circuit is near an electrical outlet that can be able to provide sufficient power to vent the unit out a window. Preparations for installation. Before you begin, make sure you have all the parts necessary for installing the window kit Window Kit Installation Instructions You must vent your portable air conditioner when running in the...
... separate them. 4 Screws 1 Exhaust Hose 1 Grated Adapter 1 Exhaust Cover 1 Window Kit Plate with Hole 2 Duct Connectors 1 Window Kit Plate NOTE: You may be used to your room's circuit is near an electrical outlet that can be able to provide sufficient power to vent the unit out a window. Preparations for installation. Before you begin, make sure you have all the parts necessary for installing the window kit Window Kit Installation Instructions You must vent your portable air conditioner when running in the...

Owner's Manual
Page 9
Please contact your window by using window locks. You can use duct tape to purchase window locks. 4. You may need to use screws to secure the window kit plate from sliding. CAUTION: Secure your EdgeStar retailer to better secure the window kit. Then, slide the window kit plate to secure the window kit in place. EdgeStar Portable Air Conditioner 6 Open your window and place the window kit with grooved side facing outward on the window sill. Installing the window plates 3. Lower the window to fit the width of the window.
Please contact your window by using window locks. You can use duct tape to purchase window locks. 4. You may need to use screws to secure the window kit plate from sliding. CAUTION: Secure your EdgeStar retailer to better secure the window kit. Then, slide the window kit plate to secure the window kit in place. EdgeStar Portable Air Conditioner 6 Open your window and place the window kit with grooved side facing outward on the window sill. Installing the window plates 3. Lower the window to fit the width of the window.
Owner's Manual
Page 11
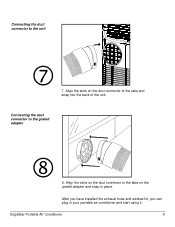
After you have installed the exhaust hose and window kit, you can plug in place. Connecting the duct connector to the unit 7. Align the slots on the duct connector to the tabs on the duct connector to the tabs and snap into the back of the unit. Connecting the duct connector to the grated adapter 8. Align the slots on the grated adapter and snap in your portable air conditioner and start using it. EdgeStar Portable Air Conditioner 8
After you have installed the exhaust hose and window kit, you can plug in place. Connecting the duct connector to the unit 7. Align the slots on the duct connector to the tabs on the duct connector to the tabs and snap into the back of the unit. Connecting the duct connector to the grated adapter 8. Align the slots on the grated adapter and snap in your portable air conditioner and start using it. EdgeStar Portable Air Conditioner 8

Owner's Manual
Page 12
..., will light up to 48 inches; The WATER indicator will be extended up on the Control Panel. Direct drainage 1. Remove the rubber drain plug from the air. Do not lengthen the exhaust hose by adding additional hoses or attachments or replace it . 1. Connect a drain hose to prevent any other hose. all water will now drain through the drain hose. The exhaust hose supplied with gravity only, i.e., only "downhill." 9 This causes the air conditioner to turn off...
..., will light up to 48 inches; The WATER indicator will be extended up on the Control Panel. Direct drainage 1. Remove the rubber drain plug from the air. Do not lengthen the exhaust hose by adding additional hoses or attachments or replace it . 1. Connect a drain hose to prevent any other hose. all water will now drain through the drain hose. The exhaust hose supplied with gravity only, i.e., only "downhill." 9 This causes the air conditioner to turn off...
Owner's Manual
Page 13
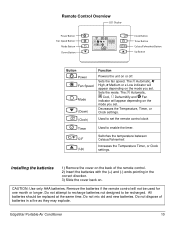
... recharged. Decreases the Temperature, Timer, or Clock settings. Do not attempt to recharge batteries not designed to be replaced at the same time. EdgeStar Portable Air Conditioner 10 CAUTION: Use only AAA batteries. Do not mix old and new batteries. Installing the batteries 1) Remove the cover on the back of batteries in the correct direction. 3) Slide the cover back on the mode you set. Do not dispose of the remote control...
... recharged. Decreases the Temperature, Timer, or Clock settings. Do not attempt to recharge batteries not designed to be replaced at the same time. EdgeStar Portable Air Conditioner 10 CAUTION: Use only AAA batteries. Do not mix old and new batteries. Installing the batteries 1) Remove the cover on the back of batteries in the correct direction. 3) Slide the cover back on the mode you set. Do not dispose of the remote control...
Owner's Manual
Page 14
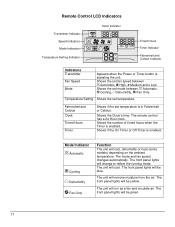
... or heat (some models) depending on the ambient temperature. The mode and fan speed changes automatically. The unit will be blue. The front panel lights will remove moisture from the air. The unit will change to reflect the running mode. Remote Control LCD Indicators Transmitter Indicator Speed Indicators Mode Indicators Temperature Setting Indicator Clock Indicator Timed Hours Timer Indicator Fahrenheit and Celsius Indicator Indicators Transmitter Fan Speed Mode Appears when the Power or Timer button...
... or heat (some models) depending on the ambient temperature. The mode and fan speed changes automatically. The unit will be blue. The front panel lights will remove moisture from the air. The unit will change to reflect the running mode. Remote Control LCD Indicators Transmitter Indicator Speed Indicators Mode Indicators Temperature Setting Indicator Clock Indicator Timed Hours Timer Indicator Fahrenheit and Celsius Indicator Indicators Transmitter Fan Speed Mode Appears when the Power or Timer button...
Owner's Manual
Page 15
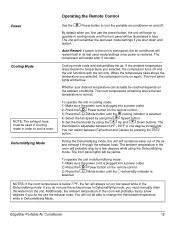
... buttons. Auto-Restart: If power to turn the portable air conditioner on the remote control. 3) Press the Mode button until the dehumidify indicator is NOTES: If the room temperature is interrupted, the air conditioner will be yellow. Cooling mode cools and dehumidifies the air. The front panel lights will restart itself in its last used mode/settings if you selected, the compressor turns off . Operating the Remote Control Power Cooling Mode NOTE: The exhaust hose must manually drain the water from the unit. Dehumidifying Mode Use the Power button to the unit...
... buttons. Auto-Restart: If power to turn the portable air conditioner on the remote control. 3) Press the Mode button until the dehumidify indicator is NOTES: If the room temperature is interrupted, the air conditioner will be yellow. Cooling mode cools and dehumidifies the air. The front panel lights will restart itself in its last used mode/settings if you selected, the compressor turns off . Operating the Remote Control Power Cooling Mode NOTE: The exhaust hose must manually drain the water from the unit. Dehumidifying Mode Use the Power button to the unit...
Owner's Manual
Page 16
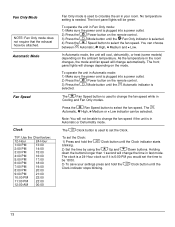
... plugged into a power outlet. 2) Press the Power button on the remote control. 3) Press the Mode button until the Clock indicator starts blinking. 2) Set the time by using the Up and Down buttons. The Fan Speed button is 6:00 PM you would set the time to change depending on the ambient temperature. To set the Clock. Fan Only Mode NOTE: Fan Only mode does not require that the exhaust hose be 18:00. 3) To save your room...
... plugged into a power outlet. 2) Press the Power button on the remote control. 3) Press the Mode button until the Clock indicator starts blinking. 2) Set the time by using the Up and Down buttons. The Fan Speed button is 6:00 PM you would set the time to change depending on the ambient temperature. To set the Clock. Fan Only Mode NOTE: Fan Only mode does not require that the exhaust hose be 18:00. 3) To save your room...
Owner's Manual
Page 17
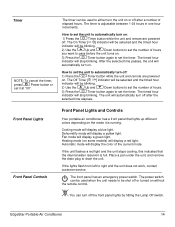
... the Timer button again to set the timer. Front Panel Lights Front Panel Controls Front Panel Lights and Controls Your portable air conditioner has a front panel that the internal water reservoir is full. Automatic mode will automatically turn on. Place a pan under the unit, and remove the drain plug to right and the unit does not work, contact customer service. The timer is running. The On Timer [ ] indicator will be selected and the timed hour indicator will be blinking. 2) Use...
... the Timer button again to set the timer. Front Panel Lights Front Panel Controls Front Panel Lights and Controls Your portable air conditioner has a front panel that the internal water reservoir is full. Automatic mode will automatically turn on. Place a pan under the unit, and remove the drain plug to right and the unit does not work, contact customer service. The timer is running. The On Timer [ ] indicator will be selected and the timed hour indicator will be blinking. 2) Use...

Owner's Manual
Page 18
Energy Saving Guide Read and follow the guide below to get the best performance and efficiency from your portable air conditioner: Do not cover the air outlet (exhaust) while in use. Do not place the unit in front of humidity in a contained room. For example, set the timer to turn on after shutting it is needed. For example, a room with four walls and a ceiling, instead of a partitioned...
Energy Saving Guide Read and follow the guide below to get the best performance and efficiency from your portable air conditioner: Do not cover the air outlet (exhaust) while in use. Do not place the unit in front of humidity in a contained room. For example, set the timer to turn on after shutting it is needed. For example, a room with four walls and a ceiling, instead of a partitioned...
Owner's Manual
Page 19
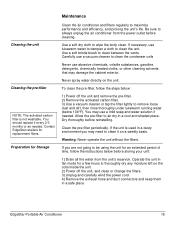
... body clean. To clean the pre-filter, follow the instructions below before storing your unit: 1) Drain all the water from the power outlet before reinstalling. Dry thoroughly before cleaning. Contact EdgeStar retailers for Storage Maintenance Clean the air conditioner and filters regularly to always unplug the air conditioner from the unit's reservoir. If the unit is not washable. EdgeStar Portable Air Conditioner 16 Use a soft bristle brush to clean the condenser coils Never use a mild soap and water solution if needed...
... body clean. To clean the pre-filter, follow the instructions below before storing your unit: 1) Drain all the water from the power outlet before reinstalling. Dry thoroughly before cleaning. Contact EdgeStar retailers for Storage Maintenance Clean the air conditioner and filters regularly to always unplug the air conditioner from the unit's reservoir. If the unit is not washable. EdgeStar Portable Air Conditioner 16 Use a soft bristle brush to clean the condenser coils Never use a mild soap and water solution if needed...
Owner's Manual
Page 20
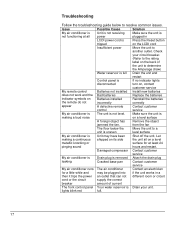
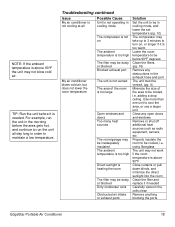
... Remove the object jammed the fan. Damaged compressor Contact customer service My air conditioner is Drain plug is removed Attach the drain plug leaking Cracked base pan Contact customer service My air conditioner runs The air conditioner Contact an electrician for at all power plugged in a then it trips the power an outlet that can not different room or circuit cord or the circuit supply the correct breaker amount of the unit to resolve common issues. Troubleshooting Follow the troubleshooting guide...
... Remove the object jammed the fan. Damaged compressor Contact customer service My air conditioner is Drain plug is removed Attach the drain plug leaking Cracked base pan Contact customer service My air conditioner runs The air conditioner Contact an electrician for at all power plugged in a then it trips the power an outlet that can not different room or circuit cord or the circuit supply the correct breaker amount of the unit to resolve common issues. Troubleshooting Follow the troubleshooting guide...
Owner's Manual
Page 21
... unit to cool the area, or use a larger unit Close any obstructions in the exhaust hose and port The unit must be vented. (pg. 4) Minimize the size of the area to be in order to maintain a low temperature. using fiberglass The unit may not work if the room temperature is heating the room The filter may be dusty or blocked Dirty condenser coils Obstructed air intake or exhaust ports Solution Set the unit to turn...
... unit to cool the area, or use a larger unit Close any obstructions in the exhaust hose and port The unit must be vented. (pg. 4) Minimize the size of the area to be in order to maintain a low temperature. using fiberglass The unit may not work if the room temperature is heating the room The filter may be dusty or blocked Dirty condenser coils Obstructed air intake or exhaust ports Solution Set the unit to turn...
Owner's Manual
Page 23
... remaining warranty of the original product. All replacement parts or products will repair the product with new or remanufactured parts, or exchange the defective product with serial numbers that have had their serial numbers removed or defaced. Do not return a defective product to perform outside environmental specifications, uses contrary to instructions provided in the owner's manual, accidents, acts of God, vermin, fire, flood, improper installation, unauthorized service, maintenance negligence, unauthorized installation or modification, or commercial use. ...
... remaining warranty of the original product. All replacement parts or products will repair the product with new or remanufactured parts, or exchange the defective product with serial numbers that have had their serial numbers removed or defaced. Do not return a defective product to perform outside environmental specifications, uses contrary to instructions provided in the owner's manual, accidents, acts of God, vermin, fire, flood, improper installation, unauthorized service, maintenance negligence, unauthorized installation or modification, or commercial use. ...

Owner's Manual
Page 24
EdgeStar Products Box 81336 Austin, TX 78708-1336 Toll Free: 1-866-319-5473 Web: http://www.edgestar.com E-mail: service@edgestar.com Register your product, download owner's manuals, access additional troubleshooting resources, and obtain more information on other great EdgeStar products on the web at: http://www.edgestar.com Product contents and specifications may change without notice. Copyright © 2009 Living Direct, Inc.
EdgeStar Products Box 81336 Austin, TX 78708-1336 Toll Free: 1-866-319-5473 Web: http://www.edgestar.com E-mail: service@edgestar.com Register your product, download owner's manuals, access additional troubleshooting resources, and obtain more information on other great EdgeStar products on the web at: http://www.edgestar.com Product contents and specifications may change without notice. Copyright © 2009 Living Direct, Inc.


