
User Guide
Page 1
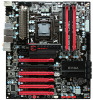
User's Guide EVGA P55 Classified 200 Motherboard 1
User's Guide EVGA P55 Classified 200 Motherboard 1

User Guide
Page 3
... You Begin...7 Parts NOT in the Kit 7 EVGA P55 Classified 200 Motherboard 8 Motherboard Specifications 8 Hardware Installation 10 Safety Instructions 10 Preparing the Motherboard 11 Installing the CPU 11 Installing the CPU Fan 12 Installing System Memory (DIMMs 13 Installing the Motherboard 13 Installing the I/O Shield 14 Securing the Motherboard into a System Case 15 Connecting Cables 15...
... You Begin...7 Parts NOT in the Kit 7 EVGA P55 Classified 200 Motherboard 8 Motherboard Specifications 8 Hardware Installation 10 Safety Instructions 10 Preparing the Motherboard 11 Installing the CPU 11 Installing the CPU Fan 12 Installing System Memory (DIMMs 13 Installing the Motherboard 13 Installing the I/O Shield 14 Securing the Motherboard into a System Case 15 Connecting Cables 15...

User Guide
Page 5
POST Codes for the EVGA P55 Classified 200 Motherboard 50 5 Assertion Width 46 Restore on AC Power Loss 46 Hardware Health Configure 46 H/W Health Function 47 CPU Fan Mode Setting 47 Frequency/Voltage Control ...Menu 47 Memory Configure 48 CPU Configuration 48 Installing Drivers and Software 49 Windows XP/Vista/7 Driver Installation 49 Appendix A. EVGA P55 Classified 200 Motherboard Clear NVRAM...42 Plug & Play O/S 42 PCI Latency Timer 42 Allocate IRQ to PCI VGA 43 Palette Snooping 43 PCI IDE BusMaster 43...
POST Codes for the EVGA P55 Classified 200 Motherboard 50 5 Assertion Width 46 Restore on AC Power Loss 46 Hardware Health Configure 46 H/W Health Function 47 CPU Fan Mode Setting 47 Frequency/Voltage Control ...Menu 47 Memory Configure 48 CPU Configuration 48 Installing Drivers and Software 49 Windows XP/Vista/7 Driver Installation 49 Appendix A. EVGA P55 Classified 200 Motherboard Clear NVRAM...42 Plug & Play O/S 42 PCI Latency Timer 42 Allocate IRQ to PCI VGA 43 Palette Snooping 43 PCI IDE BusMaster 43...

User Guide
Page 6
Boot Configuration Features 44 Figure 8. Frequency/Voltage Control 47 6 CMOS Setup Utility Main Menu 34 Figure 3. Power Management Features 45 Figure 9. Hardware Health Configure 46 Figure 10. Advanced BIOS Features 38 Figure 5. Advanced Chipset Features 39 Figure 6. PCI/PNP Resource Management 42 Figure 7. Standard BIOS Features Menu 36 Figure 4. List of Figures Figure 1. PW1 Motherboard Connector 16 Figure 2.
Boot Configuration Features 44 Figure 8. Frequency/Voltage Control 47 6 CMOS Setup Utility Main Menu 34 Figure 3. Power Management Features 45 Figure 9. Hardware Health Configure 46 Figure 10. Advanced BIOS Features 38 Figure 5. Advanced Chipset Features 39 Figure 6. PCI/PNP Resource Management 42 Figure 7. Standard BIOS Features Menu 36 Figure 4. List of Figures Figure 1. PW1 Motherboard Connector 16 Figure 2.

User Guide
Page 7
..., you have an operating system. 7 However, it does not contain the following items that must be purchased separately to make the motherboard functional. Intel Socket 1156 Processor DDR3 System Memory Socket 1156 or Socket 775 Cooling fan PCI ...allow for proper system functionality. For a full list of supported CPU's on this motherboard, please visit http://www.evga.com/support/motherboard/. EVGA P55 Classified 200 Motherboard Before You Begin... When replacing a motherboard in the Kit This kit contains all the necessary parts needed to install and ...
..., you have an operating system. 7 However, it does not contain the following items that must be purchased separately to make the motherboard functional. Intel Socket 1156 Processor DDR3 System Memory Socket 1156 or Socket 775 Cooling fan PCI ...allow for proper system functionality. For a full list of supported CPU's on this motherboard, please visit http://www.evga.com/support/motherboard/. EVGA P55 Classified 200 Motherboard Before You Begin... When replacing a motherboard in the Kit This kit contains all the necessary parts needed to install and ...

User Guide
Page 8
... 32bit/64bit, Windows Vista 32bit/64bit, and Windows 7 32bit/64bit Intel P55 Express Chipset System Memory support Supports dual channel DDR3-2600+. EVGA P55 Classified 200 Motherboard Motherboard Specifications Size ATX form factor of DDR3 memory. USB 2.0 Ports Supports hot plug Thirteen USB 2.0 ports (Seven rear panel ports, six...
... 32bit/64bit, Windows Vista 32bit/64bit, and Windows 7 32bit/64bit Intel P55 Express Chipset System Memory support Supports dual channel DDR3-2600+. EVGA P55 Classified 200 Motherboard Motherboard Specifications Size ATX form factor of DDR3 memory. USB 2.0 Ports Supports hot plug Thirteen USB 2.0 ports (Seven rear panel ports, six...

User Guide
Page 10
...; Installing the CPU Installing the CPU fan Installing the memory Installing the motherboard Connecting cables Safety Instructions To reduce the risk of the motherboard. Remember to remove power off your computer by disconnecting the AC main source before removing or installing any equipment from/to the computer chassis...
...; Installing the CPU Installing the CPU fan Installing the memory Installing the motherboard Connecting cables Safety Instructions To reduce the risk of the motherboard. Remember to remove power off your computer by disconnecting the AC main source before removing or installing any equipment from/to the computer chassis...

User Guide
Page 11
... the socket lever by the edges and do not touch the contacts on the motherboard or CPU. Remove the protective socket cover from the socket. Note: It is no CPU installed. Hold the processor only by pushing down and away ... a straight up motion. Any physical damage to store it. 11 Pull the socket lever back and the load plate will void the warranty. Preparing the Motherboard Installing the CPU Be very careful when handling the CPU. There is a protective socket cover within the CPU socket to protect the socket when there...
... the socket lever by the edges and do not touch the contacts on the motherboard or CPU. Remove the protective socket cover from the socket. Note: It is no CPU installed. Hold the processor only by pushing down and away ... a straight up motion. Any physical damage to store it. 11 Pull the socket lever back and the load plate will void the warranty. Preparing the Motherboard Installing the CPU Be very careful when handling the CPU. There is a protective socket cover within the CPU socket to protect the socket when there...

User Guide
Page 12
Align notches with this motherboard. The other holes are to be used . 12 Lower the load plate so it into the socket Note: Make sure the CPU is fully seated ...
Align notches with this motherboard. The other holes are to be used . 12 Lower the load plate so it into the socket Note: Make sure the CPU is fully seated ...

User Guide
Page 13
...installing memory. (See Figure 1 on page 10 for DDR3 memory. The plastic clips at least one gap near the center of installing the motherboard into a system case depends on the memory DIMM to ensure the component is only one memory bank populated to install memory DIMMs. Note that... a DIMM slot by pressing the module clips outward. 2. Use the following procedure to ensure normal operation. Installing System Memory (DIMMs) Your new motherboard has four 240-pin slots for the location of the DIMM slot automatically lock the DIMM into the connector. Align the memory module to make...
...installing memory. (See Figure 1 on page 10 for DDR3 memory. The plastic clips at least one gap near the center of installing the motherboard into a system case depends on the memory DIMM to ensure the component is only one memory bank populated to install memory DIMMs. Note that... a DIMM slot by pressing the module clips outward. 2. Use the following procedure to ensure normal operation. Installing System Memory (DIMMs) Your new motherboard has four 240-pin slots for the location of the DIMM slot automatically lock the DIMM into the connector. Align the memory module to make...

User Guide
Page 14
... radio frequency transmissions, protects internal components from the inside of the chassis. Installing the I/O Shield The motherboard kit comes with an I /O shield into the chassis. the connections prior to this step or to secure the motherboard and then make sure it fits securely. 14 Use the following procedure to install the I /O shield...
... radio frequency transmissions, protects internal components from the inside of the chassis. Installing the I/O Shield The motherboard kit comes with an I /O shield into the chassis. the connections prior to this step or to secure the motherboard and then make sure it fits securely. 14 Use the following procedure to install the I /O shield...

User Guide
Page 15
...(9) screws. Align the mounting holes with mounting studs or spacers to allow the motherboard to be secured to the chassis and help to prevent short circuits. Carefully place the motherboard onto the stand offs located inside the chassis. 2. Connecting Cables This section takes...possibility of nine (9) spacers and screws. 1. Ensure that the fan assembly is recommended that stud to secure the motherboard using a minimum of a short circuit. Secure the motherboard with the chassis vents according to the I/O shield. 4. Align the connectors to the fan assembly instruction. 5. ...
...(9) screws. Align the mounting holes with mounting studs or spacers to allow the motherboard to be secured to the chassis and help to prevent short circuits. Carefully place the motherboard onto the stand offs located inside the chassis. 2. Connecting Cables This section takes...possibility of nine (9) spacers and screws. 1. Ensure that the fan assembly is recommended that stud to secure the motherboard using a minimum of a short circuit. Secure the motherboard with the chassis vents according to the I/O shield. 4. Align the connectors to the fan assembly instruction. 5. ...

User Guide
Page 16
... the pins to PW1 Figure 1. PW1 connector Plug power cable from system power supply to the connector and press firmly until seated. 16 PW1 Motherboard Connector Table 1. Firmly plug the power supply cable into the connector and make sure it is the main power supply connector located along the edge... of the board next to the CPU. Make sure that the power supply cable and pins are properly aligned with the connector on the motherboard. 24-pin ATX Power (PW1) PW1 is secure. PW1 Pin Assignments Connector 1 13 Pin Signal 1 +3.3V 12 2 +3.3V 3 GND 4 +5V 5 GND 6 +5V 24 7 GND ...
... the pins to PW1 Figure 1. PW1 connector Plug power cable from system power supply to the connector and press firmly until seated. 16 PW1 Motherboard Connector Table 1. Firmly plug the power supply cable into the connector and make sure it is the main power supply connector located along the edge... of the board next to the CPU. Make sure that the power supply cable and pins are properly aligned with the connector on the motherboard. 24-pin ATX Power (PW1) PW1 is secure. PW1 Pin Assignments Connector 1 13 Pin Signal 1 +3.3V 12 2 +3.3V 3 GND 4 +5V 5 GND 6 +5V 24 7 GND ...

User Guide
Page 17
... ATA II cables for primary storage devices. These connection points support RAID 0, RAID 1, and RAID 10 configurations. There are designed to be angled to the motherboard. SATA 4 (bottom) SATA 2 (bottom) SATA 0 (bottom) SATA 5 (top) SATA 3 (top) SATA 1 (top) 17 Connecting Serial ATA Cables The Serial ATA II connector is used to... connect the Serial ATA II device to not interfere with any expansions cards. These connections are six (6) internal serial ATA connectors on this motherboard. The current Serial ATA II interface allows up to 300MB/s data transfer rate.
... ATA II cables for primary storage devices. These connection points support RAID 0, RAID 1, and RAID 10 configurations. There are designed to be angled to the motherboard. SATA 4 (bottom) SATA 2 (bottom) SATA 0 (bottom) SATA 5 (top) SATA 3 (top) SATA 1 (top) 17 Connecting Serial ATA Cables The Serial ATA II connector is used to... connect the Serial ATA II device to not interfere with any expansions cards. These connections are six (6) internal serial ATA connectors on this motherboard. The current Serial ATA II interface allows up to 300MB/s data transfer rate.

User Guide
Page 18
...; HD_LED Attach the hard disk drive indicator LED cable to these two pins. Connecting Internal Headers Front Panel Header The front panel header on this motherboard is one connector used to connect the following four cables. (see Table 2 for pin definitions): PWRLED Attach the front panel power LED cable to...
...; HD_LED Attach the hard disk drive indicator LED cable to these two pins. Connecting Internal Headers Front Panel Header The front panel header on this motherboard is one connector used to connect the following four cables. (see Table 2 for pin definitions): PWRLED Attach the front panel power LED cable to...

User Guide
Page 19
Alternatively, you can also connect this to the IEEE1394a header on the motherboard. IEEE 1394a Connector Pins Connector IEEE 1394a Connector 10 9 8 7 6 5 4 3 2 1 Pin Signal 1 TPA+ 2 TPA- 3 GND 4 GND 5 TPB+ 6 TPB- 7 +12V 8 +12V 9 Empty 10 GND 19 Table 3. Secure the bracket to either the front or rear panel of the cable to your system case (if applicable). 1. Connect the end of the system case (not all system cases are equipped with the front panel option). IEEE1394a (Firewire) This motherboard has one IEEE 1394a onboard header.
Alternatively, you can also connect this to the IEEE1394a header on the motherboard. IEEE 1394a Connector Pins Connector IEEE 1394a Connector 10 9 8 7 6 5 4 3 2 1 Pin Signal 1 TPA+ 2 TPA- 3 GND 4 GND 5 TPB+ 6 TPB- 7 +12V 8 +12V 9 Empty 10 GND 19 Table 3. Secure the bracket to either the front or rear panel of the cable to your system case (if applicable). 1. Connect the end of the system case (not all system cases are equipped with the front panel option). IEEE1394a (Firewire) This motherboard has one IEEE 1394a onboard header.

User Guide
Page 20
... 2.0 header on the rear panel of the chassis (Figure 2). Table 4. Connect the end of your chassis (not all chassis are exposed on the motherboard. USB 2.0 Header Pins Connector Pin USB 2.0 Header Connector 1 3 5 7 9 Pin 2 4 6 8 10 Signal 5V_DUAL DD+ GND Empty Signal 5V_DUAL DD...+ GND No Connect 20 The motherboard also contains three (3) 10pin internal header connectors onboard that are equipped with the front panel option). 2. Secure the bracket to either the front or rear...
... 2.0 header on the rear panel of the chassis (Figure 2). Table 4. Connect the end of your chassis (not all chassis are exposed on the motherboard. USB 2.0 Header Pins Connector Pin USB 2.0 Header Connector 1 3 5 7 9 Pin 2 4 6 8 10 Signal 5V_DUAL DD+ GND Empty Signal 5V_DUAL DD...+ GND No Connect 20 The motherboard also contains three (3) 10pin internal header connectors onboard that are equipped with the front panel option). 2. Secure the bracket to either the front or rear...

User Guide
Page 22
Expansion Slots PCI Express x16/x8/x4 Slots These PCI Express slots are reserved for Graphic Cards and PCI Express x1 and x4 devices. When installing a PCI Express Graphic Card, be sure the retention clip snaps and locks the card into place. If the card is not seated properly, it could cause a short across the pins. The design of this motherboard supports multiple Graphic Card technology. Secure the card's metal bracket to the chassis back panel with the screw used to hold the blank cover. 22
Expansion Slots PCI Express x16/x8/x4 Slots These PCI Express slots are reserved for Graphic Cards and PCI Express x1 and x4 devices. When installing a PCI Express Graphic Card, be sure the retention clip snaps and locks the card into place. If the card is not seated properly, it could cause a short across the pins. The design of this motherboard supports multiple Graphic Card technology. Secure the card's metal bracket to the chassis back panel with the screw used to hold the blank cover. 22

User Guide
Page 23
... allow you to easily reset the system, turn on /off the system. When the system is powered on the external I/O Panel. Clear CMOS Button The motherboard uses the CMOS RAM to easily turn on /off the system, or clear the CMOS. These buttons allow you to store all the set parameters...
... allow you to easily reset the system, turn on /off the system. When the system is powered on the external I/O Panel. Clear CMOS Button The motherboard uses the CMOS RAM to easily turn on /off the system, or clear the CMOS. These buttons allow you to store all the set parameters...

User Guide
Page 24
... Provides two-digit POST codes to show why the system may be failing to boot. This Debug LED will remain on as long as the motherboard is on . STANDBY LED (Blue): When the System is in Standby Mode: This LED is receiving constant power. 24 It is useful during troubleshooting...
... Provides two-digit POST codes to show why the system may be failing to boot. This Debug LED will remain on as long as the motherboard is on . STANDBY LED (Blue): When the System is in Standby Mode: This LED is receiving constant power. 24 It is useful during troubleshooting...