User Manual
Page 2
User Guide EVGA nForce 680i SLI Motherboard With Intel Processor Installation and Configuration 122-CK-NF68-XX November 2006
User Guide EVGA nForce 680i SLI Motherboard With Intel Processor Installation and Configuration 122-CK-NF68-XX November 2006

User Manual
Page 3
Installing and Configuring the EVGA nForce 680i SLI Motherboard ii
Installing and Configuring the EVGA nForce 680i SLI Motherboard ii

User Manual
Page 4
Table of Contents Before You Begin 10 Parts NOT in the Kit 10 Intentions of the Kit xlix Introduction to the EVGA nForce 680i SLI Motherboard 1 Features ...1 Engineered for Enthusiasts 1 Extreme Overclocking 2 Extreme FSB speeds 2 Extreme DDR2 Speeds 2 Comprehensive Overclocking Tools 2 Designed for NVIDIA SLI Technology 3 True 2 x16 PCI Express SLI ...
Table of Contents Before You Begin 10 Parts NOT in the Kit 10 Intentions of the Kit xlix Introduction to the EVGA nForce 680i SLI Motherboard 1 Features ...1 Engineered for Enthusiasts 1 Extreme Overclocking 2 Extreme FSB speeds 2 Extreme DDR2 Speeds 2 Comprehensive Overclocking Tools 2 Designed for NVIDIA SLI Technology 3 True 2 x16 PCI Express SLI ...

User Manual
Page 5
...EVGA nForce 680i SLI Motherboard Networking with NVIDIA nForce 5 NVIDIA Native Gigabit Ethernet 5 NVIDIA FirstPacket™ technology 5 NVIDIA DualNet® technology 5 High Definition Audio (HDA 6 USB 2.0 ...6 Motherboard Specifications 7 Unpacking and Parts Descriptions 9 Unpacking ...9 Equipment ...9 NVIDIA nForce 680i SLI Motherboard 10 Hardware Installation 13 Safety Instructions 13 Preparing the Motherboard...Fan 15 Installing Memory DIMMs 15 Installing the Motherboard 16 Installing the I/O Shield 16 Securing the Motherboard into the Chassis 16 Connecting Cables and Setting...
...EVGA nForce 680i SLI Motherboard Networking with NVIDIA nForce 5 NVIDIA Native Gigabit Ethernet 5 NVIDIA FirstPacket™ technology 5 NVIDIA DualNet® technology 5 High Definition Audio (HDA 6 USB 2.0 ...6 Motherboard Specifications 7 Unpacking and Parts Descriptions 9 Unpacking ...9 Equipment ...9 NVIDIA nForce 680i SLI Motherboard 10 Hardware Installation 13 Safety Instructions 13 Preparing the Motherboard...Fan 15 Installing Memory DIMMs 15 Installing the Motherboard 16 Installing the I/O Shield 16 Securing the Motherboard into the Chassis 16 Connecting Cables and Setting...

User Manual
Page 7
Installing and Configuring the EVGA nForce 680i SLI Motherboard Network Boot Priority 39 CPU Internal Cache 39 Quick Power On Self Test 40 First/Second/Third Boot Device 40 Boot Other Device 40 Boot ...
Installing and Configuring the EVGA nForce 680i SLI Motherboard Network Boot Priority 39 CPU Internal Cache 39 Quick Power On Self Test 40 First/Second/Third Boot Device 40 Boot Other Device 40 Boot ...

User Manual
Page 9
Installing and Configuring the EVGA nForce 680i SLI Motherboard NVIDIA Monitor 70 NVIDIA nTune 5.0 71 Manual Tuning 72 Adjust Motherboard Settings 72 System Voltages 74 System Fans 74 Memory Timing 75 Adjust GPU Settings 77 Dynamic BIOS Access 78 Available BIOS Pages 79 General Settings ...
Installing and Configuring the EVGA nForce 680i SLI Motherboard NVIDIA Monitor 70 NVIDIA nTune 5.0 71 Manual Tuning 72 Adjust Motherboard Settings 72 System Voltages 74 System Fans 74 Memory Timing 75 Adjust GPU Settings 77 Dynamic BIOS Access 78 Available BIOS Pages 79 General Settings ...

User Manual
Page 11
... the Kit This kit contains all the hardware necessary to connect the two graphics cards. When ordering a graphics card, be purchased separately to make the motherboard functional. ‰ Intel microprocessor: Intel Core 2 Extreme, Intel Core 2 Quad, Intel Core 2 Duo, Pentium EE, and Pentium. ‰ Cooling fan ...-aNt bFef6ore8i-nXstaXlling the driver CD that is capable of using the NVIDIA SLI technology. The kit comes with your new EVGA nForce 680i SLI motherboard. The motherboard supports Windows XP 32bit and 64bit and is a PCI Express card. The CD that has been shipped with a CD ...
... the Kit This kit contains all the hardware necessary to connect the two graphics cards. When ordering a graphics card, be purchased separately to make the motherboard functional. ‰ Intel microprocessor: Intel Core 2 Extreme, Intel Core 2 Quad, Intel Core 2 Duo, Pentium EE, and Pentium. ‰ Cooling fan ...-aNt bFef6ore8i-nXstaXlling the driver CD that is capable of using the NVIDIA SLI technology. The kit comes with your new EVGA nForce 680i SLI motherboard. The motherboard supports Windows XP 32bit and 64bit and is a PCI Express card. The CD that has been shipped with a CD ...
User Manual
Page 13
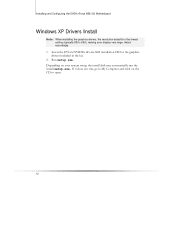
Adjust accordingly. 1. Depending on the CD to open. 12 If it does not run the install setup.exe. Insert the EVGA NVIDIA nForce 680i installation CD for the graphics drivers included in the kit. 2. Run setup.exe. Installing and Configuring the EVGA nForce 680i SLI Motherboard Windows XP Drivers Install Note: When installing the graphics drivers, the resolution defaults to the lowest setting (typically 800 x 600), making your system setup, the install disk may automatically run , go to My Computer and click on your display very large.
Adjust accordingly. 1. Depending on the CD to open. 12 If it does not run the install setup.exe. Insert the EVGA NVIDIA nForce 680i installation CD for the graphics drivers included in the kit. 2. Run setup.exe. Installing and Configuring the EVGA nForce 680i SLI Motherboard Windows XP Drivers Install Note: When installing the graphics drivers, the resolution defaults to the lowest setting (typically 800 x 600), making your system setup, the install disk may automatically run , go to My Computer and click on your display very large.

User Manual
Page 15
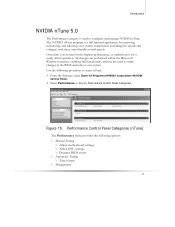
xiv This display shows the performance (usage) of various system components. To view temperatures and fans, click the button. To display the NVIDIA Monitor, select Start¾All Programs¾NVIDIA Corporation¾NVIDIA Monitor. Installing and Configuring the EVGA nForce 680i SLI Motherboard NVIDIA Monitor The NVIDIA Monitor application can be used at any time with any applications to view the real-time status of the CPU, disk, memory, and network. It also monitors the Bus speeds and voltages.
xiv This display shows the performance (usage) of various system components. To view temperatures and fans, click the button. To display the NVIDIA Monitor, select Start¾All Programs¾NVIDIA Corporation¾NVIDIA Monitor. Installing and Configuring the EVGA nForce 680i SLI Motherboard NVIDIA Monitor The NVIDIA Monitor application can be used at any time with any applications to view the real-time status of the CPU, disk, memory, and network. It also monitors the Bus speeds and voltages.
User Manual
Page 16
Figure 18. Overclock your system. Use the following options: ¾ Manual Tuning ª Adjust motherboard settings ª Adjust GPU settings ª Dynamic BIOS access ¾ Automatic Tuning ª Tune system ¾ Management xv Introduction NVIDIA nTune 5.0 The Performance category is a ...
Figure 18. Overclock your system. Use the following options: ¾ Manual Tuning ª Adjust motherboard settings ª Adjust GPU settings ª Dynamic BIOS access ¾ Automatic Tuning ª Tune system ¾ Management xv Introduction NVIDIA nTune 5.0 The Performance category is a ...

User Manual
Page 17
...setting does not allow a change, it probably requires a reboot and should be applied. Note that will be changed in the Adjust Motherboard Settings screen let you pass the cursor over the various adjustments, notes display at the bottom of the system clocks, system voltages, memory... controller timings, and system fans. xvi All changes take effect immediately after selecting Apply; Installing and Configuring the EVGA nForce 680i SLI Motherboard ª View system information ª Adjust custom rules Manual Tuning The Manual Tuning option provides the ability to adjust...
...setting does not allow a change, it probably requires a reboot and should be applied. Note that will be changed in the Adjust Motherboard Settings screen let you pass the cursor over the various adjustments, notes display at the bottom of the system clocks, system voltages, memory... controller timings, and system fans. xvi All changes take effect immediately after selecting Apply; Installing and Configuring the EVGA nForce 680i SLI Motherboard ª View system information ª Adjust custom rules Manual Tuning The Manual Tuning option provides the ability to adjust...

User Manual
Page 18
... FSB reference clock, the CPU core frequency, the FSB Frequency and the memory bus frequency are exceeded. Adjust Motherboard Settings (nTune) CAUTION: Increasing the voltage or the clock speed of the Adjust Motherboard Settings allows you change the slider for the FSB, the SPP PCI Express, and the MCP PCI Express. xvii...
... FSB reference clock, the CPU core frequency, the FSB Frequency and the memory bus frequency are exceeded. Adjust Motherboard Settings (nTune) CAUTION: Increasing the voltage or the clock speed of the Adjust Motherboard Settings allows you change the slider for the FSB, the SPP PCI Express, and the MCP PCI Express. xvii...

User Manual
Page 19
... of the components can manually control each slider. Installing and Configuring the EVGA nForce 680i SLI Motherboard In this menu, you can specify to the components. From this section of the Adjust Motherboard Settings menu allows you are possible overvoltaging the component and could be causing...control or you are no longer in Celsius or Fahrenheit. xviii Overvoltaging any components. System Fans This section of the Adjust Motherboard Settings you must understand what you can result in damage to show the temperatures in the safe range. Green indicates the voltage...
... of the components can manually control each slider. Installing and Configuring the EVGA nForce 680i SLI Motherboard In this menu, you can specify to the components. From this section of the Adjust Motherboard Settings menu allows you are possible overvoltaging the component and could be causing...control or you are no longer in Celsius or Fahrenheit. xviii Overvoltaging any components. System Fans This section of the Adjust Motherboard Settings you must understand what you can result in damage to show the temperatures in the safe range. Green indicates the voltage...

User Manual
Page 20
... Precharge and deactivated. xix Adjustable from 1 to 15. ‰ RAS to CAS access The RAS-to soon. Introduction Memory Timing This section of the Adjust Motherboard Settings allows you to the same physical block. A row cannot be deactivated until tRAS has completed. Adjustable from 1 to 63. ‰ Write Recovery Time Memory...
... Precharge and deactivated. xix Adjustable from 1 to 15. ‰ RAS to CAS access The RAS-to soon. Introduction Memory Timing This section of the Adjust Motherboard Settings allows you to the same physical block. A row cannot be deactivated until tRAS has completed. Adjustable from 1 to 63. ‰ Write Recovery Time Memory...

User Manual
Page 21
... the user. ‰ Memory bank switch The row Precharge time (tRP) is the minimum time between the last read command. Installing and Configuring the EVGA nForce 680i SLI Motherboard ‰ RAS to RAS Delay The RAS-to-RAS delay (tRRD) is the is the amount of cycles it take a row to complete...
... the user. ‰ Memory bank switch The row Precharge time (tRP) is the minimum time between the last read command. Installing and Configuring the EVGA nForce 680i SLI Motherboard ‰ RAS to RAS Delay The RAS-to-RAS delay (tRRD) is the is the amount of cycles it take a row to complete...

User Manual
Page 23
Figure 21. Installing and Configuring the EVGA nForce 680i SLI Motherboard Dynamic BIOS Access Dynamic BIOS Access allows you to the default settings. Dynamic BIOS Access (nTune) xxii The changes do not go into effect until you reboot your system BIOS settings. Since these changes are made to actual BIOS settings in the CMOS, the settings remain active until you change them again or restore the CMOS to change some of your system.
Figure 21. Installing and Configuring the EVGA nForce 680i SLI Motherboard Dynamic BIOS Access Dynamic BIOS Access allows you to the default settings. Dynamic BIOS Access (nTune) xxii The changes do not go into effect until you reboot your system BIOS settings. Since these changes are made to actual BIOS settings in the CMOS, the settings remain active until you change them again or restore the CMOS to change some of your system.
User Manual
Page 24
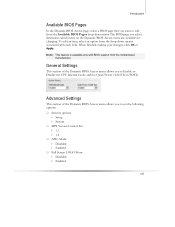
...; APIC Mode ¾ Disabled ¾ Enabled ‰ Full Screen LOGO Show ¾ Disabled ¾ Enabled xxiii To edit an item, select an option from the motherboard manufacturer. Note: This feature is available only with each item. Introduction Available BIOS Pages In the Dynamic BIOS Access page, select a BIOS page that you...
...; APIC Mode ¾ Disabled ¾ Enabled ‰ Full Screen LOGO Show ¾ Disabled ¾ Enabled xxiii To edit an item, select an option from the motherboard manufacturer. Note: This feature is available only with each item. Introduction Available BIOS Pages In the Dynamic BIOS Access page, select a BIOS page that you...

User Manual
Page 25
Installing and Configuring the EVGA nForce 680i SLI Motherboard Boot up Setting This section of the Dynamic BIOS Access menu allows you to set the following options: ‰ First/Second/Third Boot Device ¾ Removable ¾ Hard Disk ¾ CDROM ¾ Legacy LAN ¾ Disable ‰ Swap Floppy Drive ¾ Enable ¾ Disable ‰ Boot Up Floppy Seek ¾ Enable ¾ Disable ‰ Boot UP NumLock Status ¾ On ¾ Off ‰ Gate A20 Option ¾ Normal ¾ Fast xxiv
Installing and Configuring the EVGA nForce 680i SLI Motherboard Boot up Setting This section of the Dynamic BIOS Access menu allows you to set the following options: ‰ First/Second/Third Boot Device ¾ Removable ¾ Hard Disk ¾ CDROM ¾ Legacy LAN ¾ Disable ‰ Swap Floppy Drive ¾ Enable ¾ Disable ‰ Boot Up Floppy Seek ¾ Enable ¾ Disable ‰ Boot UP NumLock Status ¾ On ¾ Off ‰ Gate A20 Option ¾ Normal ¾ Fast xxiv

User Manual
Page 27
Installing and Configuring the EVGA nForce 680i SLI Motherboard Figure 22. Tune System Menu (nTune) xxvi
Installing and Configuring the EVGA nForce 680i SLI Motherboard Figure 22. Tune System Menu (nTune) xxvi

User Manual
Page 29
xxviii Detailed CPU and memory information is displayed when you double-click on a processor or DIMM listed under Software information. Installing and Configuring the EVGA nForce 680i SLI Motherboard Hardware and driver version information can be viewed and saved using this interface. The status of NVIDIA software and other system software are listed under Hardware information. Versions of the system, including current system clock speeds, system temperatures, memory timings, and system voltages can be logged.
xxviii Detailed CPU and memory information is displayed when you double-click on a processor or DIMM listed under Software information. Installing and Configuring the EVGA nForce 680i SLI Motherboard Hardware and driver version information can be viewed and saved using this interface. The status of NVIDIA software and other system software are listed under Hardware information. Versions of the system, including current system clock speeds, system temperatures, memory timings, and system voltages can be logged.