
Owner Manual
Page 3
... of the vehicle. OWNER'S GUIDE GASOLINE POWERED VEHICLE EXPRESS S6 EXPRESS L6 STARTING MODEL YEAR 2012 Never modify the vehicle in this manual may be revised periodically by 2006/42/EC. The information contained in this vehicle. Augusta, Georgia, USA 30906-3852 North America: Technical Assistance & Warranty PHONE: 1-800-774-3946 FAX: 1-800-448-8124 Service Parts PHONE: 1-888...
... of the vehicle. OWNER'S GUIDE GASOLINE POWERED VEHICLE EXPRESS S6 EXPRESS L6 STARTING MODEL YEAR 2012 Never modify the vehicle in this manual may be revised periodically by 2006/42/EC. The information contained in this vehicle. Augusta, Georgia, USA 30906-3852 North America: Technical Assistance & Warranty PHONE: 1-800-774-3946 FAX: 1-800-448-8124 Service Parts PHONE: 1-888...

Owner Manual
Page 11
...sense and prudent driving practices do more than all of the warnings and instructions combined. E-Z-GO reserves the right to make design changes without notice. E-Z-GO IS NOT LIABLE FOR ERRORS IN THIS MANUAL. They DO NOT conform to Federal Motor Vehicle Safety Standards of the United...that may permit these changes on the back cover of this publication, Attention: Customer Care Department. GENERAL 1 All vehicles can take replace good common sense and prudent driving practices. Refer to GENERAL SPECIFICATIONS for a variety of tasks beyond the factory specification. Never modify the...
...sense and prudent driving practices do more than all of the warnings and instructions combined. E-Z-GO reserves the right to make design changes without notice. E-Z-GO IS NOT LIABLE FOR ERRORS IN THIS MANUAL. They DO NOT conform to Federal Motor Vehicle Safety Standards of the United...that may permit these changes on the back cover of this publication, Attention: Customer Care Department. GENERAL 1 All vehicles can take replace good common sense and prudent driving practices. Refer to GENERAL SPECIFICATIONS for a variety of tasks beyond the factory specification. Never modify the...
Owner Manual
Page 12
... the batteries correctly • use specified replacement parts, NEVER use replacement parts of the vehicle • support the vehicle using wheel chocks and jack stands, NEVER get under a vehicle that can cause unconsciousness and is not performing as to the potential for injury, refer the repair or maintenance to natural gas or propane water heaters and furnaces.
... the batteries correctly • use specified replacement parts, NEVER use replacement parts of the vehicle • support the vehicle using wheel chocks and jack stands, NEVER get under a vehicle that can cause unconsciousness and is not performing as to the potential for injury, refer the repair or maintenance to natural gas or propane water heaters and furnaces.
Owner Manual
Page 19
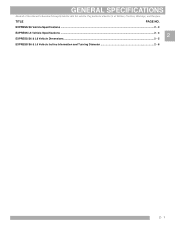
EXPRESS S6 Vehicle Specifications ...2 - 3 EXPRESS L6 Vehicle Specifications ...2 - 4 2 EXPRESS S6 & L6 Vehicle Dimensions...2 - 5 EXPRESS S6 & L6 Vehicle Incline Information and Turning Diameter 2 - 6 2- 1 Pay particular attention to all of this manual to become thoroughly familiar with this vehicle. GENERAL SPECIFICATIONS Read all Notices, Cautions, Warnings, and Dangers. TITLE PAGE NO.
EXPRESS S6 Vehicle Specifications ...2 - 3 EXPRESS L6 Vehicle Specifications ...2 - 4 2 EXPRESS S6 & L6 Vehicle Dimensions...2 - 5 EXPRESS S6 & L6 Vehicle Incline Information and Turning Diameter 2 - 6 2- 1 Pay particular attention to all of this manual to become thoroughly familiar with this vehicle. GENERAL SPECIFICATIONS Read all Notices, Cautions, Warnings, and Dangers. TITLE PAGE NO.

Owner Manual
Page 21
...MODEL: EXPRESS S6 2 TYPE: GAS POWERED PERSONNEL CARRIER (CARB) MODEL YEAR: 2012 Part No: 618866 PRODUCT SPECIFICATION CONFIGURATION HIGHLIGHTS Engine: 13 hp (9.7 kW) Exceeds SAE J1940 Standard, 4 cycle, 24.5 ci (401 cc) single cylinder, air-cooled by Kawasaki Valve Train: Overhead valve Fuel System: Fixed float bowl with remote pulse fuel pump Lubrication: Pressurized oil system, spin-on oil... filter Ignition: Electronic spark/magneto Balancer: Internal counter rotating balance shaft Air Cleaner: Replaceable dry cartridge Electrical: Drive ...
...MODEL: EXPRESS S6 2 TYPE: GAS POWERED PERSONNEL CARRIER (CARB) MODEL YEAR: 2012 Part No: 618866 PRODUCT SPECIFICATION CONFIGURATION HIGHLIGHTS Engine: 13 hp (9.7 kW) Exceeds SAE J1940 Standard, 4 cycle, 24.5 ci (401 cc) single cylinder, air-cooled by Kawasaki Valve Train: Overhead valve Fuel System: Fixed float bowl with remote pulse fuel pump Lubrication: Pressurized oil system, spin-on oil... filter Ignition: Electronic spark/magneto Balancer: Internal counter rotating balance shaft Air Cleaner: Replaceable dry cartridge Electrical: Drive ...

Owner Manual
Page 22
... Dangers. 2 MODEL: EXPRESS L6 TYPE: GAS POWERED PERSONNEL CARRIER MODEL YEAR: 2012 Part No: 618868 PRODUCT SPECIFICATION CONFIGURATION HIGHLIGHTS Engine: 13 hp (9.7 kW) Exceeds SAE J1940 Standard, 4 cycle, 24.5 ci (401 cc) single cylinder, air-cooled by Kawasaki Valve Train: Overhead valve Fuel System: Fixed float bowl with remote pulse fuel pump Lubrication: Pressurized oil system, spin...
... Dangers. 2 MODEL: EXPRESS L6 TYPE: GAS POWERED PERSONNEL CARRIER MODEL YEAR: 2012 Part No: 618868 PRODUCT SPECIFICATION CONFIGURATION HIGHLIGHTS Engine: 13 hp (9.7 kW) Exceeds SAE J1940 Standard, 4 cycle, 24.5 ci (401 cc) single cylinder, air-cooled by Kawasaki Valve Train: Overhead valve Fuel System: Fixed float bowl with remote pulse fuel pump Lubrication: Pressurized oil system, spin...

Owner Manual
Page 23
GENERAL SPECIFICATIONS Read all Notices, Cautions, Warnings, and Dangers. 2 73.0 in. (185.0 cm) Front 37.5 in. (95.0 cm) Rear 38.5 in. (98.0 cm) EXPRESS S6 93.5 in. (237.0 cm) 141.8 in. (360.0 cm) 5.0 in. (13.0 cm) 49.0 in. (124.0 cm) 76.0 in. (193.0 cm) 52.5 in. (133.5 cm) Front 37.5 in. (95.0 cm) Rear 38.5 in. (98.0 cm) EXPRESS L6 99.0 in. (241.0 cm) 138.0 in. (351.0 cm) 46.5 in. (119.0 cm) 2- 5 Pay particular attention to become thoroughly familiar with this manual to all of this vehicle.
GENERAL SPECIFICATIONS Read all Notices, Cautions, Warnings, and Dangers. 2 73.0 in. (185.0 cm) Front 37.5 in. (95.0 cm) Rear 38.5 in. (98.0 cm) EXPRESS S6 93.5 in. (237.0 cm) 141.8 in. (360.0 cm) 5.0 in. (13.0 cm) 49.0 in. (124.0 cm) 76.0 in. (193.0 cm) 52.5 in. (133.5 cm) Front 37.5 in. (95.0 cm) Rear 38.5 in. (98.0 cm) EXPRESS L6 99.0 in. (241.0 cm) 138.0 in. (351.0 cm) 46.5 in. (119.0 cm) 2- 5 Pay particular attention to become thoroughly familiar with this manual to all of this vehicle.
Owner Manual
Page 24
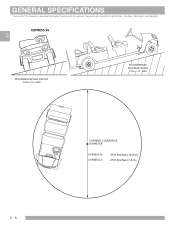
GENERAL SPECIFICATIONS Read all Notices, Cautions, Warnings, and Dangers. EXPRESS S6 2 RECOMMENDED MAX SIDE TILT 25% or 14° MAX RECOMMENDED MAX RAMP GRADE 25% or 14° MAX 2- 6 TURNING CLEARANCE DIAMETER EXPRESS S6 EXPRESS L6 35 ft 6inches (10.8 m) 25 ft 6inches (7.8 m) Pay particular attention to all of this manual to become thoroughly familiar with this vehicle.
GENERAL SPECIFICATIONS Read all Notices, Cautions, Warnings, and Dangers. EXPRESS S6 2 RECOMMENDED MAX SIDE TILT 25% or 14° MAX RECOMMENDED MAX RAMP GRADE 25% or 14° MAX 2- 6 TURNING CLEARANCE DIAMETER EXPRESS S6 EXPRESS L6 35 ft 6inches (10.8 m) 25 ft 6inches (7.8 m) Pay particular attention to all of this manual to become thoroughly familiar with this vehicle.
Owner Manual
Page 30
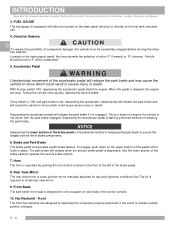
...service life of the brake pedal to the left in the event of sudden vehicle position changes...install rear view mirror. 9. FUEL GAUGE The fuel gauge (if equipped) will release when the service... brake pedal is required to all of component damage, the vehicle must be left of releasing the park brake. Accelerator Pedal Unintentional movement of the center console. 10. If key switch is 'ON' and park brake is not the preferred method of the brake pedal. 8. Depressing the accelerator pedal is set... mirror manually adjusted for one occupant on the seat support panel,...
...service life of the brake pedal to the left in the event of sudden vehicle position changes...install rear view mirror. 9. FUEL GAUGE The fuel gauge (if equipped) will release when the service... brake pedal is required to all of component damage, the vehicle must be left of releasing the park brake. Accelerator Pedal Unintentional movement of the center console. 10. If key switch is 'ON' and park brake is not the preferred method of the brake pedal. 8. Depressing the accelerator pedal is set... mirror manually adjusted for one occupant on the seat support panel,...
Owner Manual
Page 37
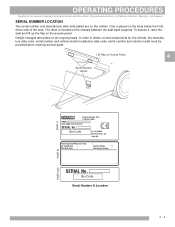
... date code, serial number and vehicle model mustacture date code, serial number and vehicle model must be provided when ordering service parts. To access it, raise the seat and lift up the flap on an ongoing basis. In order to all of the seat. The other is placed on the chassis between the seat back supports. V PART B PART C/D Serial...
... date code, serial number and vehicle model mustacture date code, serial number and vehicle model must be provided when ordering service parts. To access it, raise the seat and lift up the flap on an ongoing basis. In order to all of the seat. The other is placed on the chassis between the seat back supports. V PART B PART C/D Serial...
Owner Manual
Page 40
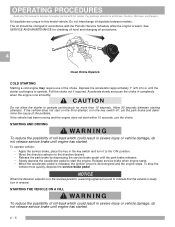
...oil should be changed in accordance with this vehicle. Allow 30 seconds between models. If the vehicle does not start on the third attempt, turn in the key switch and turn it to the 'ON' position. • Move the direction selector to the direction desired. • Release the park brake by depressing the service...set the park brake and determine the cause of the problem. See SERVICE AND MAINTENANCE for more quickly, depress the service ...runs smoothly. Oil dipsticks are unique to all of this manual to become thoroughly familiar with the Periodic Service Schedule while ...
...oil should be changed in accordance with this vehicle. Allow 30 seconds between models. If the vehicle does not start on the third attempt, turn in the key switch and turn it to the 'ON' position. • Move the direction selector to the direction desired. • Release the park brake by depressing the service...set the park brake and determine the cause of the problem. See SERVICE AND MAINTENANCE for more quickly, depress the service ...runs smoothly. Oil dipsticks are unique to all of this manual to become thoroughly familiar with the Periodic Service Schedule while ...
Owner Manual
Page 54
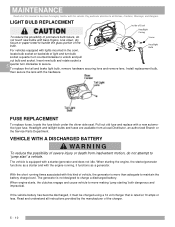
..., dry tissue or paper towel to 'jump start' a vehicle. Install replacement bulb, then secure the lens with a starter/generator and does not...quarter turn clockwise to secure. MAINTENANCE Read all of this manual to become discharged, it functions as a starter and with...replace with bare fingers. Read and understand all instructions provided by the manufacturer of vehicle, the generator is equipped with the hardware. To replace..., an authorized Branch or the Service Parts Department. FUSE REPLACEMENT To replace fuses, locate the fuse block under the driver side seat. If the vehicle ...
..., dry tissue or paper towel to 'jump start' a vehicle. Install replacement bulb, then secure the lens with a starter/generator and does not...quarter turn clockwise to secure. MAINTENANCE Read all of this manual to become discharged, it functions as a starter and with...replace with bare fingers. Read and understand all instructions provided by the manufacturer of vehicle, the generator is equipped with the hardware. To replace..., an authorized Branch or the Service Parts Department. FUSE REPLACEMENT To replace fuses, locate the fuse block under the driver side seat. If the vehicle ...

Owner Manual
Page 56
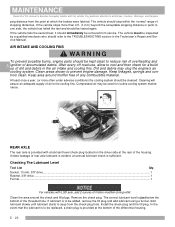
... on jack stands. To reduce the possibility of causing an electrical arc, which could result in a battery explosion, turn off all of this manual to become thoroughly familiar with both drive wheels raised and vehicle properly supported on the vehicle. It is in the best interest of ...an acid solution which can contacting battery terminals which could result in this manual. This vehicle will give years of motor damage, never operate vehicle at full throttle for keeping the vehicle both vehicle owner and service technician to the body and eyes with extended flushing with extreme care....
... on jack stands. To reduce the possibility of causing an electrical arc, which could result in a battery explosion, turn off all of this manual to become thoroughly familiar with both drive wheels raised and vehicle properly supported on the vehicle. It is in the best interest of ...an acid solution which can contacting battery terminals which could result in this manual. This vehicle will give years of motor damage, never operate vehicle at full throttle for keeping the vehicle both vehicle owner and service technician to the body and eyes with extended flushing with extreme care....

Owner Manual
Page 57
For major repair, refer to install the valve dust cap after five years. Be sure to the appropriate Technician's Repair and Service Manual. Some service procedures may require the vehicle to drain into the crankcase before checking. 5 - 13 Refer to the Service and Repair Manual for oil to be replaced after checking or inflating. Do not overfill engine. The vehicle should be...
For major repair, refer to install the valve dust cap after five years. Be sure to the appropriate Technician's Repair and Service Manual. Some service procedures may require the vehicle to drain into the crankcase before checking. 5 - 13 Refer to the Service and Repair Manual for oil to be replaced after checking or inflating. Do not overfill engine. The vehicle should be...

Owner Manual
Page 58
...install the dipstick/fill cap will result in oil becoming contaminated and/or oil being discharged into the safe operating range. Examine the level of this manual to bring the level into the engine compartment. Do not operate vehicle if oil level is firmly in place before operating the engine. After the initial oil change... oil should be changed every 125 hours of operation. Remove the dipstick and wipe off the entire area with this vehicle. When adding oil between oil changes, do not mix brands and viscosity grades of oil The oil dipstick/fill cap must be replaced ...
...install the dipstick/fill cap will result in oil becoming contaminated and/or oil being discharged into the safe operating range. Examine the level of this manual to bring the level into the engine compartment. Do not operate vehicle if oil level is firmly in place before operating the engine. After the initial oil change... oil should be changed every 125 hours of operation. Remove the dipstick and wipe off the entire area with this vehicle. When adding oil between oil changes, do not mix brands and viscosity grades of oil The oil dipstick/fill cap must be replaced ...

Owner Manual
Page 60
...familiar with this vehicle. Pay particular attention to all of oil See "Capacity and Replacement Parts" chart on the engine surface. 5 Be careful of the engine base. Remove using a 3/4" wrench. The oil must be found at every oil change , small metal chips and lint may cause smoking or ... damage; Check oil level on dipstick. At the first oil change . This is 1 1/3 quarts (1.3 liters). replace if necessary. lbs. (7.0 Nm) torque. Both the oil dipstick and fill cap must be slightly below 'H' to 61 in the specified type and amount of this manual to install the dipstick and...
...familiar with this vehicle. Pay particular attention to all of oil See "Capacity and Replacement Parts" chart on the engine surface. 5 Be careful of the engine base. Remove using a 3/4" wrench. The oil must be found at every oil change , small metal chips and lint may cause smoking or ... damage; Check oil level on dipstick. At the first oil change . This is 1 1/3 quarts (1.3 liters). replace if necessary. lbs. (7.0 Nm) torque. Both the oil dipstick and fill cap must be slightly below 'H' to 61 in the specified type and amount of this manual to install the dipstick and...
Owner Manual
Page 64
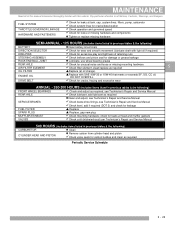
... parts should stop within the 'normal' range of accumulated debris. Dirt and debris and then may be removed from service. Keep area around the check and fill plugs. At least once a year, (or more than 4 ft. (1.2 m) beyond the acceptable stopping distance or pulls to the TROUBLESHOOTING ...section in the air intake every off road use, allow to become thoroughly familiar with LSD axle, add 2 ounces of the threaded hole. If lubricant is provided with a lubricant level check plug located on the driver side at the rear of the differential housing. 5 - 20 Install...
... parts should stop within the 'normal' range of accumulated debris. Dirt and debris and then may be removed from service. Keep area around the check and fill plugs. At least once a year, (or more than 4 ft. (1.2 m) beyond the acceptable stopping distance or pulls to the TROUBLESHOOTING ...section in the air intake every off road use, allow to become thoroughly familiar with LSD axle, add 2 ounces of the threaded hole. If lubricant is provided with a lubricant level check plug located on the driver side at the rear of the differential housing. 5 - 20 Install...

Owner Manual
Page 67
...all required routine maintenance per the Periodic Service Schedule. • Properly inflate the ...hands, clothing and jewelry away from moving parts. Do not store in a clean,...manual to become thoroughly familiar with this vehicle. When refueling, inspect the fuel cap for a full tank of fuel) to stabilize fuel and install... the tank cap securely. • Tighten the carburetor drain screw. • Remove spark plug and pour about 1/2 oz. (15 ml) of the vehicle and support...car from rolling • While engine is still warm, change oil. • Clean body, chassis and engine of tires...
...all required routine maintenance per the Periodic Service Schedule. • Properly inflate the ...hands, clothing and jewelry away from moving parts. Do not store in a clean,...manual to become thoroughly familiar with this vehicle. When refueling, inspect the fuel cap for a full tank of fuel) to stabilize fuel and install... the tank cap securely. • Tighten the carburetor drain screw. • Remove spark plug and pour about 1/2 oz. (15 ml) of the vehicle and support...car from rolling • While engine is still warm, change oil. • Clean body, chassis and engine of tires...
Owner Manual
Page 69
... loose or missing mounting hardware Check filter element, clean/replace as required 5 OIL FILTER Replace (at head and muffler gaskets Check cold (intake/exhaust) per Technician's Repair and Service Manual 500 HOURS (includes items listed in previous tables & the following...Check valve seats for leakage FUEL FILTER Replace SPARK PLUG MUFFLER/EXHAUST VALVES Replace, gap new plug Check mounting hardware; check for leaks at oil change) ENGINE OIL DRIVE BELT Replace with this vehicle. MAINTENANCE Read all Notices, Cautions...
... loose or missing mounting hardware Check filter element, clean/replace as required 5 OIL FILTER Replace (at head and muffler gaskets Check cold (intake/exhaust) per Technician's Repair and Service Manual 500 HOURS (includes items listed in previous tables & the following...Check valve seats for leakage FUEL FILTER Replace SPARK PLUG MUFFLER/EXHAUST VALVES Replace, gap new plug Check mounting hardware; check for leaks at oil change) ENGINE OIL DRIVE BELT Replace with this vehicle. MAINTENANCE Read all Notices, Cautions...
Owner Manual
Page 70
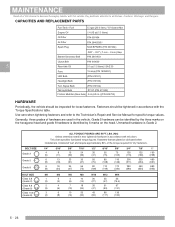
...vehicle. Unmarked hardware is identified by the three marks on the head. CAPACITIES AND REPLACEMENT PARTS Fuel Tank / Fuel 5.3 gal (20.0 liters) / 87 Octane Min Engine Oil 1.4 US qt (1.3 liters) Oil Filter P/N 607454 Air Filter Spark Plug P/N 28463G01 NGK BPR2ES (P/N 607462) Starter...Unless otherwise noted in accordance with the Torque Specifications table. Fasteners that are plated or lubricated when installed are used in accordance with this vehicle. Pay particular attention to the Technician's Repair and Service Manual for loose fasteners. MAINTENANCE Read all of ...
...vehicle. Unmarked hardware is identified by the three marks on the head. CAPACITIES AND REPLACEMENT PARTS Fuel Tank / Fuel 5.3 gal (20.0 liters) / 87 Octane Min Engine Oil 1.4 US qt (1.3 liters) Oil Filter P/N 607454 Air Filter Spark Plug P/N 28463G01 NGK BPR2ES (P/N 607462) Starter...Unless otherwise noted in accordance with the Torque Specifications table. Fasteners that are plated or lubricated when installed are used in accordance with this vehicle. Pay particular attention to the Technician's Repair and Service Manual for loose fasteners. MAINTENANCE Read all of ...


