User Guide
Page 3
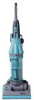
Floor tool Supplied with certain models only, or available as an accessory. If you need assistance during assembly or operation, please call the Dyson Helpline on 1-866-693-9766. 1 Slide the hose into the guides at the back of the machine, pushing the tab securely into place.... 2 Pressing the wand release button, slide the wand down inside the hose. 4 Dyson Helpline contact us on 1-866-693-9766 Assembling your DCO7 Box contents Wand Hose 1 2 Stair tool Brush tool Crevice tool Animal turbo tool Supplied with certain models only, or available as an accessory. Assembling...
Floor tool Supplied with certain models only, or available as an accessory. If you need assistance during assembly or operation, please call the Dyson Helpline on 1-866-693-9766. 1 Slide the hose into the guides at the back of the machine, pushing the tab securely into place.... 2 Pressing the wand release button, slide the wand down inside the hose. 4 Dyson Helpline contact us on 1-866-693-9766 Assembling your DCO7 Box contents Wand Hose 1 2 Stair tool Brush tool Crevice tool Animal turbo tool Supplied with certain models only, or available as an accessory. Assembling...
User Guide
Page 4
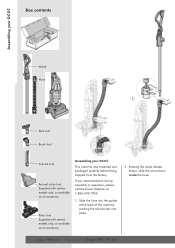
Fit the crevice tool into the tool clip on either side of the wand. 5 Store the cord safely by winding counter-clockwise around the cord winders and securing with the cord clip. 5 You may need to press firmly and should hear a 'click' sound. 4 Push the brush and stair tools securely into place. Assembling your DCO7 3 4 5 3 Slide the wand into the top of the machine until it clicks securely into the storage holes on the back of machine.
Fit the crevice tool into the tool clip on either side of the wand. 5 Store the cord safely by winding counter-clockwise around the cord winders and securing with the cord clip. 5 You may need to press firmly and should hear a 'click' sound. 4 Push the brush and stair tools securely into place. Assembling your DCO7 3 4 5 3 Slide the wand into the top of the machine until it clicks securely into the storage holes on the back of machine.
User Guide
Page 5
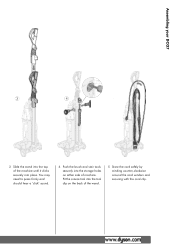
... correct position for the floor surface before using the tools. 2 Plug into the outlet. If any obstruction (see page 15), checking that the brush control is set to install the proper outlet. Please note: This machine is fitted with your DCO7 WARNING • To reduce the risk of ...cap should only be closed when not using the machine for domestic use only. Using your DCO7 Using your foot and tilt the handle backwards. 6 Dyson Helpline contact us on /off , disconnect from openings and moving parts. • This machine is intended for the first time. This plug will hear...
... correct position for the floor surface before using the tools. 2 Plug into the outlet. If any obstruction (see page 15), checking that the brush control is set to install the proper outlet. Please note: This machine is fitted with your DCO7 WARNING • To reduce the risk of ...cap should only be closed when not using the machine for domestic use only. Using your DCO7 Using your foot and tilt the handle backwards. 6 Dyson Helpline contact us on /off , disconnect from openings and moving parts. • This machine is intended for the first time. This plug will hear...
User Guide
Page 6
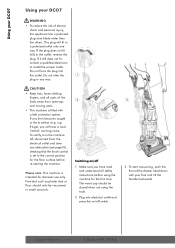
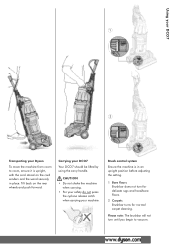
Carrying your machine. Brush control system Ensure the machine is upright, with the cord stored on the rear wheels and push forward. Tilt back on the cord winders and ... not press the cyclone release catch when carrying your DCO7 Your DCO7 should be lifted by using the carry handle. Using your DCO7 1 2 Transporting your Dyson To move the machine from room to vacuum. 7
Carrying your machine. Brush control system Ensure the machine is upright, with the cord stored on the rear wheels and push forward. Tilt back on the cord winders and ... not press the cyclone release catch when carrying your DCO7 Your DCO7 should be lifted by using the carry handle. Using your DCO7 1 2 Transporting your Dyson To move the machine from room to vacuum. 7
User Guide
Page 7
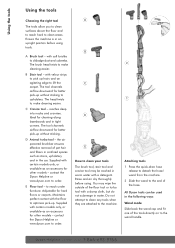
...Adjustable for cleaning along baseboards and in tight corners. All Dyson tools can be washed in the following ways: Wand mode Slide back the wand cap and fit one of the hose. The head twists to clean your tools The brush tool, stair tool and crevice tool may wipe the outside... of pet hair and fibers in water. A B C D E How to make cleaning easier. reaches deep into nooks and crannies. D Animal turbo tool - Supplied with the floor to order. contact the Dyson Helpline or www.dyson.com to ...
...Adjustable for cleaning along baseboards and in tight corners. All Dyson tools can be washed in the following ways: Wand mode Slide back the wand cap and fit one of the hose. The head twists to clean your tools The brush tool, stair tool and crevice tool may wipe the outside... of pet hair and fibers in water. A B C D E How to make cleaning easier. reaches deep into nooks and crannies. D Animal turbo tool - Supplied with the floor to order. contact the Dyson Helpline or www.dyson.com to ...
User Guide
Page 10
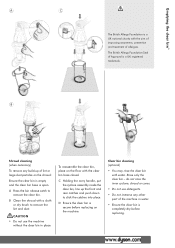
... the machine without the clear bin in water. • Ensure the clear bin is completely dry before replacing on the floor with a cloth or dry brush to remove the lint and dust. Clear bin cleaning (optional) • You may rinse the clear bin with the aim of improving awareness, prevention and...
... the machine without the clear bin in water. • Ensure the clear bin is completely dry before replacing on the floor with a cloth or dry brush to remove the lint and dust. Clear bin cleaning (optional) • You may rinse the clear bin with the aim of improving awareness, prevention and...
Parts List
Page 2
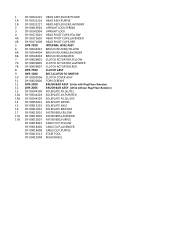
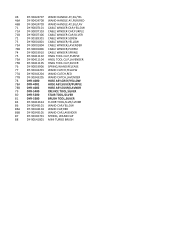
...LAVENDER 4B DY‐90171608 HEAD PIVOT CLIPS,RED 5 DYR‐7200 INTERNAL HOSE ASSY 6 DY‐90544401 BRUSH HOUSING,YELLOW 6A DY‐90544404 BRUSH HOUSING,LAVENDER 6B DY‐90544403 BRUSH HOUSING,RED 7 DY‐90029801 CLUTCH ACTUATOR,YELLOW 7A DY‐90029805 CLUTCH ACTUATOR,LAVENDER 7B DY‐... TO MOTOR 10 DY‐90240506 CLUTCH COVER ASSY 11 DY‐90020006 TORX SCREWS 12 DYR‐2000 BRUSH BAR ASSY (Units with Rug/Floor Selector) 12 DYR‐2005 BRUSH BAR ASSY (Units without Rug/Floor Selector) 13 DY‐90544109 SOLEPLATE AY,SIL/YEL 13A DY‐...
...LAVENDER 4B DY‐90171608 HEAD PIVOT CLIPS,RED 5 DYR‐7200 INTERNAL HOSE ASSY 6 DY‐90544401 BRUSH HOUSING,YELLOW 6A DY‐90544404 BRUSH HOUSING,LAVENDER 6B DY‐90544403 BRUSH HOUSING,RED 7 DY‐90029801 CLUTCH ACTUATOR,YELLOW 7A DY‐90029805 CLUTCH ACTUATOR,LAVENDER 7B DY‐... TO MOTOR 10 DY‐90240506 CLUTCH COVER ASSY 11 DY‐90020006 TORX SCREWS 12 DYR‐2000 BRUSH BAR ASSY (Units with Rug/Floor Selector) 12 DYR‐2005 BRUSH BAR ASSY (Units without Rug/Floor Selector) 13 DY‐90544109 SOLEPLATE AY,SIL/YEL 13A DY‐...
Parts List
Page 10
... DYR‐4002 HOSE ASY,SILVR/LAVNDR 79 DYR‐5400 CREVICE TOOL,SILVER 80 DYR‐5200 STAIR TOOL,SILVER 81 DYR‐5300 BRUSH TOOL,SILVER 82 DY‐90413614 FLOOR TOOL,SLVR/LVNDR 86 DY‐90343101 WAND CAP,YELLOW 86A DY‐90343104 WAND CAP,RED 86B...
... DYR‐4002 HOSE ASY,SILVR/LAVNDR 79 DYR‐5400 CREVICE TOOL,SILVER 80 DYR‐5200 STAIR TOOL,SILVER 81 DYR‐5300 BRUSH TOOL,SILVER 82 DY‐90413614 FLOOR TOOL,SLVR/LVNDR 86 DY‐90343101 WAND CAP,YELLOW 86A DY‐90343104 WAND CAP,RED 86B...


