Warranty (English)
Page 1
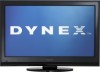
How to the address listed on the receipt you received with the product. www.dynexproducts.com 1 The Warranty Period lasts for one (1) year from the date of your original receipt and the product to obtain warranty service? What does this warranty statement. This warranty does not cover: • Customer instruction • Installation • Set up adjustments • Cosmetic damage • Damage due...
How to the address listed on the receipt you received with the product. www.dynexproducts.com 1 The Warranty Period lasts for one (1) year from the date of your original receipt and the product to obtain warranty service? What does this warranty statement. This warranty does not cover: • Customer instruction • Installation • Set up adjustments • Cosmetic damage • Damage due...

Firmware Installation Guide (English)
Page 1
... "Support/Downloads" tab; then locate the corresponding Rev id of the file. Note: Do NOT change the name of your TV. 7. Insert USB drive to starting your PC or Mac 4. Note: This file is Tuner Firmware Update Process for use later in this process. 3. Determine the proper Rev id by looking at the sticker on the firmware link titled "Channel Scan Update Rev...
... "Support/Downloads" tab; then locate the corresponding Rev id of the file. Note: Do NOT change the name of your TV. 7. Insert USB drive to starting your PC or Mac 4. Note: This file is Tuner Firmware Update Process for use later in this process. 3. Determine the proper Rev id by looking at the sticker on the firmware link titled "Channel Scan Update Rev...
User Manual (English)
Page 2
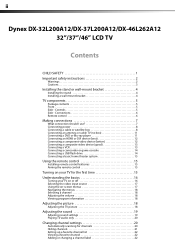
...Adjusting the picture 18 Adjusting the TV picture 18 Adjusting the sound 19 Adjusting sound settings 19 Playing TV audio only 20 Changing channel settings 20 Automatically scanning for channels 20 Hiding channels 21 Setting up a favorite channel list 22 Viewing a favorite channel 22 Adding or changing a channel label 22 ii Dynex DX-32L200A12/DX-37L200A12/DX-46L262A12 32"/37"/46" LCD TV Contents CHILD SAFETY 1 Important safety instructions 2 Warnings 2 Cautions 3 Installing the stand or wall-mount bracket 4 Installing the stand 4 Installing a wall-mount bracket 4 TV components...
...Adjusting the picture 18 Adjusting the TV picture 18 Adjusting the sound 19 Adjusting sound settings 19 Playing TV audio only 20 Changing channel settings 20 Automatically scanning for channels 20 Hiding channels 21 Setting up a favorite channel list 22 Viewing a favorite channel 22 Adding or changing a channel label 22 ii Dynex DX-32L200A12/DX-37L200A12/DX-46L262A12 32"/37"/46" LCD TV Contents CHILD SAFETY 1 Important safety instructions 2 Warnings 2 Cautions 3 Installing the stand or wall-mount bracket 4 Installing the stand 4 Installing a wall-mount bracket 4 TV components...

User Manual (English)
Page 3
...Setting parental controls 23 Setting or changing the password 23 Setting parental control levels 24 Blocking unrated TV 25 Locking control buttons 26 Downloading rating information 27 Using closed captioning 28 Turning closed captioning on or off 28 Selecting the closed captioning mode 28 Customizing digital closed captioning styles 29 Adjusting time settings 30 Setting the clock 30 Setting the sleep timer 30 Adjusting menu settings 31 Selecting the menu language 31 Labeling an input source 31 Displaying system information 32 Restoring settings to default 32 Using a USB flash...
...Setting parental controls 23 Setting or changing the password 23 Setting parental control levels 24 Blocking unrated TV 25 Locking control buttons 26 Downloading rating information 27 Using closed captioning 28 Turning closed captioning on or off 28 Selecting the closed captioning mode 28 Customizing digital closed captioning styles 29 Adjusting time settings 30 Setting the clock 30 Setting the sleep timer 30 Adjusting menu settings 31 Selecting the menu language 31 Labeling an input source 31 Displaying system information 32 Restoring settings to default 32 Using a USB flash...
User Manual (English)
Page 6
... or grounding-type plug. Lightning For added protection for your device receiver during lightning storms or when unused for long periods of time. 14 Refer all instructions. 5 Do not use attachments/accessories specified by the manufacturer. 12 Use only with the cart, stand, tripod, bracket, or table specified by the manufacturer that there are inside. When installing an outside antenna system should...
... or grounding-type plug. Lightning For added protection for your device receiver during lightning storms or when unused for long periods of time. 14 Refer all instructions. 5 Do not use attachments/accessories specified by the manufacturer. 12 Use only with the cart, stand, tripod, bracket, or table specified by the manufacturer that there are inside. When installing an outside antenna system should...

User Manual (English)
Page 10
... M SLEEP CH-LIST PICTURE AUDIO CCD # Button 1 INPUT 2 Numbers . 3 (Dot) 4 INFO 5 6 ENTER 7 MENU 8 MUTE Description Press to open the on page 13. 4 COAXIAL (digital output) Connect a digital audio amplifier to one of these jacks. Press to select a video input source. Press to make an audio connection for a composite video device connected to mute the sound. For more information, see "Connecting a VCR" on the remote control to enter channel numbers and the parental control password. For more information, see "Connecting a component video device...
... M SLEEP CH-LIST PICTURE AUDIO CCD # Button 1 INPUT 2 Numbers . 3 (Dot) 4 INFO 5 6 ENTER 7 MENU 8 MUTE Description Press to open the on page 13. 4 COAXIAL (digital output) Connect a digital audio amplifier to one of these jacks. Press to select a video input source. Press to make an audio connection for a composite video device connected to mute the sound. For more information, see "Connecting a VCR" on the remote control to enter channel numbers and the parental control password. For more information, see "Connecting a component video device...
User Manual (English)
Page 11
... power cord when connecting external equipment. For more information, see "Turning closed captioning on or off " on or off , power still flows into it. In analog TV mode, press to set the sleep timer. To disconnect power, unplug the power cord. For more information, see "Adjusting sound settings" on page 30. For more times to select the device connected to turn your TV is off (Standby mode). You need to attach an HDMI-to-DVI adapter to turn closed captioning...
... power cord when connecting external equipment. For more information, see "Turning closed captioning on or off " on or off , power still flows into it. In analog TV mode, press to set the sleep timer. To disconnect power, unplug the power cord. For more information, see "Adjusting sound settings" on page 30. For more times to select the device connected to turn your TV is off (Standby mode). You need to attach an HDMI-to-DVI adapter to turn closed captioning...

User Manual (English)
Page 20
... Your TV Source Antenna RF CH : 0 Cable 0 Digital Channels Cable/Satellite Box 0 Analog Channels Scan for channels -ORIf you selected Retail Mode, a message appears "Are you sure you chose Cable/Satellite box, your TV does not need to run the auto scan again to create a channel list. 13 To watch TV, press INPUT, press or to highlight the video input source for digital channels first. If you want to 20+ minutes. Setup Wizard Choose Your Time Setting Mode Auto Time Zone...
... Your TV Source Antenna RF CH : 0 Cable 0 Digital Channels Cable/Satellite Box 0 Analog Channels Scan for channels -ORIf you selected Retail Mode, a message appears "Are you sure you chose Cable/Satellite box, your TV does not need to run the auto scan again to create a channel list. 13 To watch TV, press INPUT, press or to highlight the video input source for digital channels first. If you want to 20+ minutes. Setup Wizard Choose Your Time Setting Mode Auto Time Zone...

User Manual (English)
Page 22
...close the menu. The information banner shows the current program information such as channel number, video input source, and resolution. • Digital channel information-Displays the channel number, station name, channel label, broadcast program name, TV rating, signal type, audio information, resolution, CC mode, current time, and current program start and end times. • Analog channel information-Displays channel number, channel label (if preset), signal type, audio information, and resolution. • Press GUIDE to show the digital program guide, which may make the color...
...close the menu. The information banner shows the current program information such as channel number, video input source, and resolution. • Digital channel information-Displays the channel number, station name, channel label, broadcast program name, TV rating, signal type, audio information, resolution, CC mode, current time, and current program start and end times. • Analog channel information-Displays channel number, channel label (if preset), signal type, audio information, and resolution. • Press GUIDE to show the digital program guide, which may make the color...

User Manual (English)
Page 37
... to view compatible JPEG pictures. Notes The JPEG picture viewer only supports JPEG format images (with ".jpg" file extensions) Not all settings, except the password and parental rating, to factory default), or No (to not reset). 6 Press MENU to return to the previous menu, or press EXIT to close the menu. Photos is displayed full screen, a control bar appears at its actual size). You can connect a USB flash drive to your TV. The INPUT SOURCE list...
... to view compatible JPEG pictures. Notes The JPEG picture viewer only supports JPEG format images (with ".jpg" file extensions) Not all settings, except the password and parental rating, to factory default), or No (to not reset). 6 Press MENU to return to the previous menu, or press EXIT to close the menu. Photos is displayed full screen, a control bar appears at its actual size). You can connect a USB flash drive to your TV. The INPUT SOURCE list...

User Manual (English)
Page 40
... antenna or use a highly directional outdoor antenna or set to close the menu. Use an eyeglass cleaner to the back of your TV. • The video cable(s) you are connected securely to repair your TV with the cloth. Turn off your TV. There are no box)" on page 20. • Adjust the brightness. See "Selecting the video input source" on others. Before using an antenna, the digital channel signal may be bad. Sound...
... antenna or use a highly directional outdoor antenna or set to close the menu. Use an eyeglass cleaner to the back of your TV. • The video cable(s) you are connected securely to repair your TV with the cloth. Turn off your TV. There are no box)" on page 20. • Adjust the brightness. See "Selecting the video input source" on others. Before using an antenna, the digital channel signal may be bad. Sound...

User Manual (English)
Page 41
... set -top antenna with your TV. Try turning off one or more devices. See "Adjusting sound settings" on page 19. • Make sure that there are using may be bad. Remote control Problem Solution Remote control does not work. • Make sure that the power cord is correctly connected to www.Dynexproducts.com. • Replace dead batteries with your TV. See "Installing remote control batteries" on the screen. To check the digital channel signal...
... set -top antenna with your TV. Try turning off one or more devices. See "Adjusting sound settings" on page 19. • Make sure that there are using may be bad. Remote control Problem Solution Remote control does not work. • Make sure that the power cord is correctly connected to www.Dynexproducts.com. • Replace dead batteries with your TV. See "Installing remote control batteries" on the screen. To check the digital channel signal...
User Manual (English)
Page 42
... cord back in and turn on your TV. • Make sure that the Button Lock option is set a new password. Control buttons do not display. • Make sure that the channels are using a cable or satellite box, use the remote that came with that box to change channels. Troubleshooting Note If the problem is not solved by channel depending on the broadcast power level of a given station. "No signal" error message is displayed • Press INPUT...
... cord back in and turn on your TV. • Make sure that the Button Lock option is set a new password. Control buttons do not display. • Make sure that the channels are using a cable or satellite box, use the remote that came with that box to change channels. Troubleshooting Note If the problem is not solved by channel depending on the broadcast power level of a given station. "No signal" error message is displayed • Press INPUT...

User Manual (English)
Page 43
... firwmare upgrades No No No 1 (side) Supports JPEG and firwmare upgrades No No No 1 (side) Supports JPEG and firwmare upgrades Outputs Video Analog audio Digital audio WiFi Ethernet Headphone Audio DX-32L200A12 DX-37L200A12 DX-46L262A12 No No 1 (side)(coaxial) No No No No No 1 (side)(coaxial) No No No No No 1 (side)(coaxial) No No No Simulated Surround Sound Sound Leveler Watts/Channel Number of Speakers Power DX...
... firwmare upgrades No No No 1 (side) Supports JPEG and firwmare upgrades No No No 1 (side) Supports JPEG and firwmare upgrades Outputs Video Analog audio Digital audio WiFi Ethernet Headphone Audio DX-32L200A12 DX-37L200A12 DX-46L262A12 No No 1 (side)(coaxial) No No No No No 1 (side)(coaxial) No No No No No 1 (side)(coaxial) No No No Simulated Surround Sound Sound Leveler Watts/Channel Number of Speakers Power DX...

Quick Setup Guide (English)
Page 1
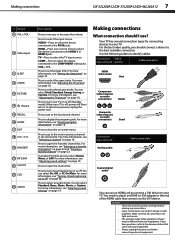
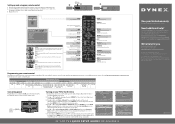
... TV. Remote Power control sensor indicator Channel ▼/▲ Power button Installing the stand 1 Carefully place your TV. Connect red to red, white to white, and green to www.dynexproducts.com, then click Support & Service. Connecting a DVD or Blu-ray player, cable box, satellite receiver, or game station Using HDMI (best) Connecting an antenna/cable wall jack IANNTENONUA T Connecting a Home Theater System Composite cable AC power cord Remote control and two AAA batteries TV stand Three screws WE ARE GOING GREEN! You need to attach an HDMI-to-DVI adapter to...
... TV. Remote Power control sensor indicator Channel ▼/▲ Power button Installing the stand 1 Carefully place your TV. Connect red to red, white to white, and green to www.dynexproducts.com, then click Support & Service. Connecting a DVD or Blu-ray player, cable box, satellite receiver, or game station Using HDMI (best) Connecting an antenna/cable wall jack IANNTENONUA T Connecting a Home Theater System Composite cable AC power cord Remote control and two AAA batteries TV stand Three screws WE ARE GOING GREEN! You need to attach an HDMI-to-DVI adapter to...
Quick Setup Guide (English)
Page 2
... based on -screen menu. Enter a digital sub-channel number. (Example: 4.1) INFO Opens a TV status banner. MUTE Mutes the sound. Power Turns your TV scans for analog programs. CH-LIST Opens the channel list. EXIT Closes the on the screen size and the TV program. Channel Changes the TV channels. CCD Turns closed captioning on or off . AUDIO Selects the audio modes. Back of TV Power outlet Power cord Turning on the left and right hand side of the screen. Retail Mode is connected to a cable/satellite box using...
... based on -screen menu. Enter a digital sub-channel number. (Example: 4.1) INFO Opens a TV status banner. MUTE Mutes the sound. Power Turns your TV scans for analog programs. CH-LIST Opens the channel list. EXIT Closes the on the screen size and the TV program. Channel Changes the TV channels. CCD Turns closed captioning on or off . AUDIO Selects the audio modes. Back of TV Power outlet Power cord Turning on the left and right hand side of the screen. Retail Mode is connected to a cable/satellite box using...
Important Information (English)
Page 5
... Support & Service. See "Adjusting the TV picture" in the online User Guide. • Try another channel. Sound is good • The problem may be connected to the grounding system of the building as close to the point of cable entry as a fixed blue, green, or red point. In such cases, change in the online User Guide. • Make sure that the power cord is plugged in wide screen (16:9). See "Selecting the video input source" in the online User Guide...
... Support & Service. See "Adjusting the TV picture" in the online User Guide. • Try another channel. Sound is good • The problem may be connected to the grounding system of the building as close to the point of cable entry as a fixed blue, green, or red point. In such cases, change in the online User Guide. • Make sure that the power cord is plugged in wide screen (16:9). See "Selecting the video input source" in the online User Guide...

Important Information (English)
Page 7
... power cord is correctly connected to the User Guide that accompanied your TV and a power outlet. • Make sure that there are using an antenna, the digital channel signal may have been deleted from the cable or satellite box. • If you have determined which device is causing interference, move it on your TV. Trouble programming your existing universal remote control. • See instructions and a table of common codes in "Programming a different universal remote control...
... power cord is correctly connected to the User Guide that accompanied your TV and a power outlet. • Make sure that there are using an antenna, the digital channel signal may have been deleted from the cable or satellite box. • If you have determined which device is causing interference, move it on your TV. Trouble programming your existing universal remote control. • See instructions and a table of common codes in "Programming a different universal remote control...

Important Information (English)
Page 8
..., Clear-QAM Inputs Outputs DX-32L200A12 HDMI/DVI 2 (side) E-EDID compliant HDCP compliant Component video 1 (side) Composite video 1 (side) Shared audio (component Yes and composite) S-Video No PC/VGA No 3.5mm PC audio input No USB 1 (side) Supports JPEG and firmware upgrade Audio Video Analog audio Digital audio WiFi Ethernet Headphone DX-32L200A12 No No 1 (side) (coaxial) No No No Power DX-32L200A12 Simulated Surround Sound Audyssey Dynamic Volume Sound Leveler Watts/Channel Number of Speakers No No Yes...
..., Clear-QAM Inputs Outputs DX-32L200A12 HDMI/DVI 2 (side) E-EDID compliant HDCP compliant Component video 1 (side) Composite video 1 (side) Shared audio (component Yes and composite) S-Video No PC/VGA No 3.5mm PC audio input No USB 1 (side) Supports JPEG and firmware upgrade Audio Video Analog audio Digital audio WiFi Ethernet Headphone DX-32L200A12 No No 1 (side) (coaxial) No No No Power DX-32L200A12 Simulated Surround Sound Audyssey Dynamic Volume Sound Leveler Watts/Channel Number of Speakers No No Yes...

Information Brochure (English)
Page 1
... input Video output Analog audio output Digital audio output (coaxial) Media card slot INlink WiFi 176° 8.5 ms NTSC, ATSC, 8-VSB, Clear-QAM 1 (side) No 1 (side) 2 (side) No Yes No Yes No No 1 (side) No No No Ethernet port USB port Headphone jack Watts/channel # of speakers Simulated surround sound Sound leveler Power consumption Power consumption-in HDTV tuner • 1366 × 768 High-definition resolution • 2 HDMI inputs Accessories Composite video cable TV stand and screws Quick Setup Guide Remote control & batteries Product Specifications Warranty-Parts...
... input Video output Analog audio output Digital audio output (coaxial) Media card slot INlink WiFi 176° 8.5 ms NTSC, ATSC, 8-VSB, Clear-QAM 1 (side) No 1 (side) 2 (side) No Yes No Yes No No 1 (side) No No No Ethernet port USB port Headphone jack Watts/channel # of speakers Simulated surround sound Sound leveler Power consumption Power consumption-in HDTV tuner • 1366 × 768 High-definition resolution • 2 HDMI inputs Accessories Composite video cable TV stand and screws Quick Setup Guide Remote control & batteries Product Specifications Warranty-Parts...


