

User Manual
Page 2
ii Dynex DX-32E250A12 32" LED-LCD TV Contents CHILD SAFETY 1 Important safety instructions 2 Warnings 2 Cautions 2... for the first time 17 Understanding the basics 18 Turning your TV on or off 18 Selecting the video input source 18 On-screen menu overview 18 Navigating the menus 19 Selecting a channel 19 Adjusting the ...Adjusting the computer image 20 Adjusting the sound 21 Adjusting sound settings 21 Playing TV audio only 21 Changing channel settings 22 Automatically scanning for channels 22 Hiding channels 22 Setting up a favorite channel list 23 Viewing a favorite channel 23...
ii Dynex DX-32E250A12 32" LED-LCD TV Contents CHILD SAFETY 1 Important safety instructions 2 Warnings 2 Cautions 2... for the first time 17 Understanding the basics 18 Turning your TV on or off 18 Selecting the video input source 18 On-screen menu overview 18 Navigating the menus 19 Selecting a channel 19 Adjusting the ...Adjusting the computer image 20 Adjusting the sound 21 Adjusting sound settings 21 Playing TV audio only 21 Changing channel settings 22 Automatically scanning for channels 22 Hiding channels 22 Setting up a favorite channel list 23 Viewing a favorite channel 23...
User Manual
Page 3
Dynex Televisions 39 US and Canada Market 39 iii Checking the digital signal strength 24 Setting parental controls 24 Setting or changing the password 24 Locking control buttons 25 Blocking unrated TV programs 25 Setting parental control levels 26 Downloading rating information 27 Using closed ... Selecting the menu language 31 Labeling an input source 31 Restoring settings to the defaults 32 Maintaining 32 Cleaning the TV cabinet 32 Cleaning the TV screen 32 Troubleshooting 33 Video and audio 33 Remote control 34 General 34 Specifications 35 Programming universal remote...
Dynex Televisions 39 US and Canada Market 39 iii Checking the digital signal strength 24 Setting parental controls 24 Setting or changing the password 24 Locking control buttons 25 Blocking unrated TV programs 25 Setting parental control levels 26 Downloading rating information 27 Using closed ... Selecting the menu language 31 Labeling an input source 31 Restoring settings to the defaults 32 Maintaining 32 Cleaning the TV cabinet 32 Cleaning the TV screen 32 Troubleshooting 33 Video and audio 33 Remote control 34 General 34 Specifications 35 Programming universal remote...
User Manual
Page 10
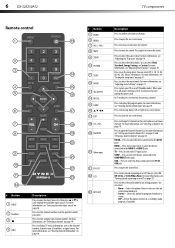
... Press to close the on weak stereo broadcasts. • Stereo-Select this option for an analog program. For more information, see "Adjusting sound settings" on page 19. Press again to enter a digital sub-channel number. For more information, see "Selecting a channel" on page 21. Press..."Selecting a channel" on page 18. Press to change TV channels to cycle through the available input sources. For more information, see "Selecting the video input source" on page 19. Press to move up a favorite channel list" on page 23 and "Viewing a favorite channel" on page 19. ...
... Press to close the on weak stereo broadcasts. • Stereo-Select this option for an analog program. For more information, see "Adjusting sound settings" on page 19. Press again to enter a digital sub-channel number. For more information, see "Selecting a channel" on page 21. Press..."Selecting a channel" on page 18. Press to change TV channels to cycle through the available input sources. For more information, see "Selecting the video input source" on page 19. Press to move up a favorite channel list" on page 23 and "Viewing a favorite channel" on page 19. ...
User Manual
Page 12
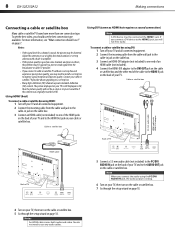
... a sound connection) Note A DVI device must be if the content was originally recorded in HD. Adjust the antenna or use a highly directional outdoor or set -top box to the AUDIO OUT jack on the cable or satellite box. The picture displayed on your TV. Cable or satellite box 3.5 mm audio... setup wizard on page 18. 4 Turn on your TV and to improve signal reception and picture quality. Notes An HDMI cable carries both audio and video. on others, the problem may be distorted. Using HDMI (best) To connect a cable or satellite box using HDMI: 1 Turn off your TV and all...
... a sound connection) Note A DVI device must be if the content was originally recorded in HD. Adjust the antenna or use a highly directional outdoor or set -top box to the AUDIO OUT jack on the cable or satellite box. The picture displayed on your TV. Cable or satellite box 3.5 mm audio... setup wizard on page 18. 4 Turn on your TV and to improve signal reception and picture quality. Notes An HDMI cable carries both audio and video. on others, the problem may be distorted. Using HDMI (best) To connect a cable or satellite box using HDMI: 1 Turn off your TV and all...
User Manual
Page 15
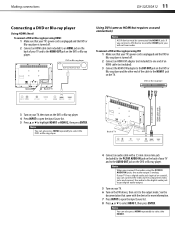
... or to highlight HDMI 1 or HDMI 2, then press ENTER. If your TV has a digital audio jack (optical or coaxial), you can connect the video to the component video jacks and connect the audio to the digital audio jack to get digital audio output. 5 Turn on your TV and to another HDMI jack... mini-jack (included) to the PC/DVI AUDIO IN jack on the back of the cable to the HDMI 1 jack on the DVI device, then set it to select the HDMI 1.
... or to highlight HDMI 1 or HDMI 2, then press ENTER. If your TV has a digital audio jack (optical or coaxial), you can connect the video to the component video jacks and connect the audio to the digital audio jack to get digital audio output. 5 Turn on your TV and to another HDMI jack... mini-jack (included) to the PC/DVI AUDIO IN jack on the back of the cable to the HDMI 1 jack on the DVI device, then set it to select the HDMI 1.
User Manual
Page 22
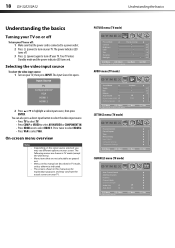
...for explanation purposes and may see different options on your screen. The following menus are grayed out. Selecting the video input source To select the video input source: 1 Turn on your TV, then press INPUT. You can also press a direct input button to ...HDMI 2. • Press VGA to affect sound quality Menu Back Exit Exit SETTINGS menu (TV mode) Parental Controls Closed Caption Time Menu Settings Input Labels Computer Settings Component Settings PICTURE AUDIO SETTINGS CHANNELS Move Select Set various TV options Menu Back Exit Exit CHANNELS menu (TV mode) Auto Channel ...
...for explanation purposes and may see different options on your screen. The following menus are grayed out. Selecting the video input source To select the video input source: 1 Turn on your TV, then press INPUT. You can also press a direct input button to ...HDMI 2. • Press VGA to affect sound quality Menu Back Exit Exit SETTINGS menu (TV mode) Parental Controls Closed Caption Time Menu Settings Input Labels Computer Settings Component Settings PICTURE AUDIO SETTINGS CHANNELS Move Select Set various TV options Menu Back Exit Exit CHANNELS menu (TV mode) Auto Channel ...
User Manual
Page 23
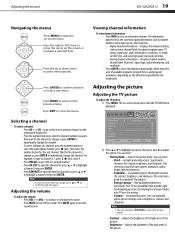
...back on the memorized channel list. • Press the number buttons to enter the channel number you manually adjust picture settings such as channel number, video input source, and resolution. • Digital channel information-Displays the channel number, station name, channel label, broadcast program... volume: • Press VOL + or VOL - Significantly increases the contrast, brightness, and sharpness. Lets you want, then wait for video games, animation, and in bright light environments. • Standard-(a standard picture). Press the right or left arrow to move the cursor ...
...back on the memorized channel list. • Press the number buttons to enter the channel number you manually adjust picture settings such as channel number, video input source, and resolution. • Digital channel information-Displays the channel number, station name, channel label, broadcast program... volume: • Press VOL + or VOL - Significantly increases the contrast, brightness, and sharpness. Lets you want, then wait for video games, animation, and in bright light environments. • Standard-(a standard picture). Press the right or left arrow to move the cursor ...
User Manual
Page 24
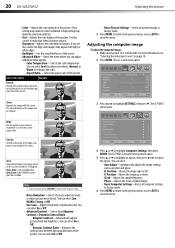
...to highlight an option, then press or to highlight Computer Settings, then press ENTER. You can select On or Off. Wide: Use this control too high, dark images may make skin tones look more information, see "Selecting the video input source" on the screen size and the TV program... ratio option Example Normal: Displays the original aspect ratio with light or white edges. • Backlight-Sets the overall brilliance of the screen. • Advanced Video-Opens the menu where you set to view content recorded in VGA mode. The top and bottom of the picture. Adjusting the computer ...
...to highlight an option, then press or to highlight Computer Settings, then press ENTER. You can select On or Off. Wide: Use this control too high, dark images may make skin tones look more information, see "Selecting the video input source" on the screen size and the TV program... ratio option Example Normal: Displays the original aspect ratio with light or white edges. • Backlight-Sets the overall brilliance of the screen. • Advanced Video-Opens the menu where you set to view content recorded in VGA mode. The top and bottom of the picture. Adjusting the computer ...
User Manual
Page 37
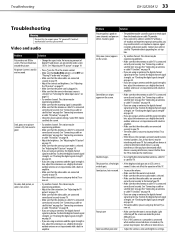
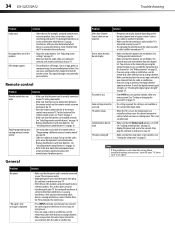
... device is low, adjust the antenna or use a highly directional outdoor antenna or set-top antenna with your TV. • Adjust the contrast and brightness. See "Selecting the video input source" on page 19. • Make sure that the video cables are using an antenna and the signal strength is turned on, the...
... device is low, adjust the antenna or use a highly directional outdoor antenna or set-top antenna with your TV. • Adjust the contrast and brightness. See "Selecting the video input source" on page 19. • Make sure that the video cables are using an antenna and the signal strength is turned on, the...
User Manual
Page 38
...buttons or you have determined which device is causing interference, move it on your TV. the current video input mode. See "Setting the sleep timer" on page 16. See "Adjusting sound settings" on page 21. • Make sure that accompanied your existing universal remote control. • ... batteries" on page 22. • If you have determined which can cause a permanent after-image to be • If a setting is grayed, the setting is connected securely to the channel list. See "Hiding channels" on page 16. • Replace dead batteries with new batteries. For...
...buttons or you have determined which device is causing interference, move it on your TV. the current video input mode. See "Setting the sleep timer" on page 16. See "Adjusting sound settings" on page 21. • Make sure that accompanied your existing universal remote control. • ... batteries" on page 22. • If you have determined which can cause a permanent after-image to be • If a setting is grayed, the setting is connected securely to the channel list. See "Hiding channels" on page 16. • Replace dead batteries with new batteries. For...


