Warranty (English)
Page 1
... warranty does not cover: • Customer instruction • Installation • Set up adjustments • Cosmetic damage • Damage due to the address listed on the receipt you must be purchased from the date you purchased the product. If you notify Dynex during the Warranty Period. or (2) replace the product at its sole option): (1) repair the product with new or rebuilt parts; Warranty...
... warranty does not cover: • Customer instruction • Installation • Set up adjustments • Cosmetic damage • Damage due to the address listed on the receipt you must be purchased from the date you purchased the product. If you notify Dynex during the Warranty Period. or (2) replace the product at its sole option): (1) repair the product with new or rebuilt parts; Warranty...
Warranty (English)
Page 2
... DURATION TO THE WARRANTY PERIOD SET FORTH ABOVE AND NO WARRANTIES, WHETHER EXPRESS OR IMPLIED, WILL APPLY AFTER THE WARRANTY PERIOD. Contact Dynex: For customer service please call 1-800-305-2204 www.dynexproducts.com Distributed by Dynex to service the product • Products sold as fuses or batteries • Products where the factory applied serial number has been altered or removed REPAIR REPLACEMENT AS PROVIDED...
... DURATION TO THE WARRANTY PERIOD SET FORTH ABOVE AND NO WARRANTIES, WHETHER EXPRESS OR IMPLIED, WILL APPLY AFTER THE WARRANTY PERIOD. Contact Dynex: For customer service please call 1-800-305-2204 www.dynexproducts.com Distributed by Dynex to service the product • Products sold as fuses or batteries • Products where the factory applied serial number has been altered or removed REPAIR REPLACEMENT AS PROVIDED...
User Manual (English)
Page 3
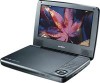
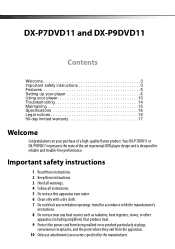
...DX-P7DVD11 or DX-P9DVD11 represents the state of a high-quality Dynex product. DX-P7DVD11 and DX-P9DVD11 Contents Welcome 3 Important safety instructions 3 Features 5 Setting up your player 6 Using your player 10 Troubleshooting 14 Maintaining 15 Specifications 16 Legal notices 16 90-day limited warranty...the power cord from being walked on your purchase of the art in accordance with the manufacturer's instructions. 8 Do not use attachments/accessories specified by the manufacturer. Install in personal DVD player design and is designed for reliable and trouble-free ...
...DX-P7DVD11 or DX-P9DVD11 represents the state of a high-quality Dynex product. DX-P7DVD11 and DX-P9DVD11 Contents Welcome 3 Important safety instructions 3 Features 5 Setting up your player 6 Using your player 10 Troubleshooting 14 Maintaining 15 Specifications 16 Legal notices 16 90-day limited warranty...the power cord from being walked on your purchase of the art in accordance with the manufacturer's instructions. 8 Do not use attachments/accessories specified by the manufacturer. Install in personal DVD player design and is designed for reliable and trouble-free ...

User Manual (English)
Page 4
... the region number of this unit, it in any way, such as sunshine, fire, or the like. This unit contains a low-power laser device. Handle a disc by its edge. • Clean a disc by wiping the disc from the center out with a cleaning cloth. • Remove a disc from your player plays discs according to qualified service personnel. Because your player and store it cannot play DVDs and Audio...
... the region number of this unit, it in any way, such as sunshine, fire, or the like. This unit contains a low-power laser device. Handle a disc by its edge. • Clean a disc by wiping the disc from the center out with a cleaning cloth. • Remove a disc from your player plays discs according to qualified service personnel. Because your player and store it cannot play DVDs and Audio...

User Manual (English)
Page 5
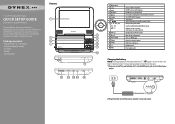
... DVD or CD. Press to stop playback. Press to the previous or next title, chapter, or track. Press to go to access or exit the SETUP menu. Press to select the audio language on a DVD. The DX-P9DVD11 is shown in all examples. DX-P7DVD11 and DX-P9DVD11 5 Features Note: For illustration purposes, the DX-P7DVD11 is very similar in all features. # Component 1 LCD screen 2 SETUP button 3 AUDIO button 4 DISC MENU button 5 OPTIONS button 6 SUBTITLE button 7 STOP button 8 / buttons Description Displays the picture...
... DVD or CD. Press to stop playback. Press to the previous or next title, chapter, or track. Press to go to access or exit the SETUP menu. Press to select the audio language on a DVD. The DX-P9DVD11 is shown in all examples. DX-P7DVD11 and DX-P9DVD11 5 Features Note: For illustration purposes, the DX-P7DVD11 is very similar in all features. # Component 1 LCD screen 2 SETUP button 3 AUDIO button 4 DISC MENU button 5 OPTIONS button 6 SUBTITLE button 7 STOP button 8 / buttons Description Displays the picture...

User Manual (English)
Page 6
... 7" (DX-P7DVD11) or 9" (DX-P9DVD11) LCD monitor • Wall power adapter (AC adapter) • Car adapter • A/V cable • Quick Setup Guide Connecting to play or pause playback. When using the setup menus, press the arrow keys to navigate and the /OK button to fast /OK forward or fast reverse the disc. 6 # Component Description 9 , , , or During playback, press the right and left double-arrow keys to confirm an entry or selection. 10 CHR/ Charging...
... 7" (DX-P7DVD11) or 9" (DX-P9DVD11) LCD monitor • Wall power adapter (AC adapter) • Car adapter • A/V cable • Quick Setup Guide Connecting to play or pause playback. When using the setup menus, press the arrow keys to navigate and the /OK button to fast /OK forward or fast reverse the disc. 6 # Component Description 9 , , , or During playback, press the right and left double-arrow keys to confirm an entry or selection. 10 CHR/ Charging...
User Manual (English)
Page 7
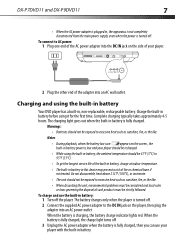
... player should be recharged. • While using it for the first time. DX-P7DVD11 and DX-P9DVD11 7 • When the AC power adapter is plugged in, the apparatus is not completely disconnected from the main power supply, even when the power is turned off . 3 Unplug the AC power adapter when the battery is fully charged, then you can use the built-in battery: 1 Turn off . 2 Connect the supplied AC power adapter...
... player should be recharged. • While using it for the first time. DX-P7DVD11 and DX-P9DVD11 7 • When the AC power adapter is plugged in, the apparatus is not completely disconnected from the main power supply, even when the power is turned off . 3 Unplug the AC power adapter when the battery is fully charged, then you can use the built-in battery: 1 Turn off . 2 Connect the supplied AC power adapter...

User Manual (English)
Page 8
...cigarette lighter socket before use your DVD player in 24V vehicles or you could damage the unit. • The 12V car power adapter included with this unit or view videos while driving a vehicle. • Make sure the unit ...operate this DVD player is off your player. Do not use it from both the DVD player and the cigarette lighter socket. Use with a dry cloth. • After use in vehicles that have a 12V, negative ground electrical system. Be sure to poor contact. To connect to a 12V car power outlet The 12V car power adapter lets you use . The red charge indicator turns...
...cigarette lighter socket before use your DVD player in 24V vehicles or you could damage the unit. • The 12V car power adapter included with this unit or view videos while driving a vehicle. • Make sure the unit ...operate this DVD player is off your player. Do not use it from both the DVD player and the cigarette lighter socket. Use with a dry cloth. • After use in vehicles that have a 12V, negative ground electrical system. Be sure to poor contact. To connect to a 12V car power outlet The 12V car power adapter lets you use . The red charge indicator turns...

User Manual (English)
Page 9
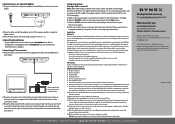
... monitor If your TV has audio/video inputs, you can connect your DVD player to your TV using standard Audio/Video cables so you can watch DVDs or view photos on your player. To connect a TV or monitor: 1 Plug the end of an A/V cable (included) into the AV OUT jack on the TV or monitor. Make sure that the colors on the connectors match. 3 Plug the other...
... monitor If your TV has audio/video inputs, you can connect your DVD player to your TV using standard Audio/Video cables so you can watch DVDs or view photos on your player. To connect a TV or monitor: 1 Plug the end of an A/V cable (included) into the AV OUT jack on the TV or monitor. Make sure that the colors on the connectors match. 3 Plug the other...
User Manual (English)
Page 10
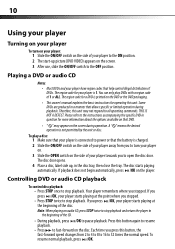
... fast-forward on the player. Playing a DVD or audio CD Notes: • Most DVDs and your player have region codes that allows specific or limited operation during operation. If you press /OK, your player starts playing at the point where you stopped. To play DVDs with a region code of your player to the ON position. 2 The start-up , in the disc tray, then close the tray. 10 Using your player Turning on your player To turn your player on. 3 Slide the OPEN switch...
... fast-forward on the player. Playing a DVD or audio CD Notes: • Most DVDs and your player have region codes that allows specific or limited operation during operation. If you press /OK, your player starts playing at the point where you stopped. To play DVDs with a region code of your player to the ON position. 2 The start-up , in the disc tray, then close the tray. 10 Using your player Turning on your player To turn your player on. 3 Slide the OPEN switch...

User Manual (English)
Page 11
... display subtitles automatically, and you cannot turn subtitles off, press the SUBTITLE button repeatedly until "Subtitle Off" is 1/3, pressing AUDIO advances it to cycle through the available audio formats. Adjusting the volume To adjust the volume: • Rotate the volume control on the DVD, the number does not change. • Some DVDs let you change the audio: • Press the AUDIO button repeatedly to select the preferred language and sound system. If only one audio format is recorded, the language does not change subtitles using the disc menu...
... display subtitles automatically, and you cannot turn subtitles off, press the SUBTITLE button repeatedly until "Subtitle Off" is 1/3, pressing AUDIO advances it to cycle through the available audio formats. Adjusting the volume To adjust the volume: • Rotate the volume control on the DVD, the number does not change. • Some DVDs let you change the audio: • Press the AUDIO button repeatedly to select the preferred language and sound system. If only one audio format is recorded, the language does not change subtitles using the disc menu...

User Manual (English)
Page 12
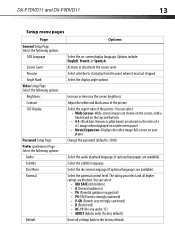
Using the Setup menu Your player has a Setup menu you can set Play options: 1 During playback, press the OPTIONS button on the top of your player. To use to adjust settings for your player. General Video Password Prefer Exit Français Español 2 Press or to select the menu page you start playback from DVD to select other menu pages. Setting Play options To set the following options: • For DVDs: • Audio • Subtitle • Repeat • Time Disp...
Using the Setup menu Your player has a Setup menu you can set Play options: 1 During playback, press the OPTIONS button on the top of your player. To use to adjust settings for your player. General Video Password Prefer Exit Français Español 2 Press or to select the menu page you start playback from DVD to select other menu pages. Setting Play options To set the following options: • For DVDs: • Audio • Subtitle • Repeat • Time Disp...
User Manual (English)
Page 13
...: Audio Subtitle Disc Menu Parental Default Select the on the top and bottom. • 4:3-Black bars (known as pillar boxes) are available). Select the audio playback language (if optional languages are blocked. The rating you select and all settings back to start play from the point where it was last stopped. Select the aspect ratio of the picture. Select the disc menu language (if optional languages are placed on the sides of a 4:3 image when displayed on a widescreen panel. •...
...: Audio Subtitle Disc Menu Parental Default Select the on the top and bottom. • 4:3-Black bars (known as pillar boxes) are available). Select the audio playback language (if optional languages are blocked. The rating you select and all settings back to start play from the point where it was last stopped. Select the aspect ratio of the picture. Select the disc menu language (if optional languages are placed on the sides of a 4:3 image when displayed on a widescreen panel. •...

User Manual (English)
Page 14
... player can play . The DVD's region code is on . • Adjust the volume. • Make sure that all cables are not plugged in fast forward or fast reverse mode. • Make sure that your player is not in . • You cannot fast-forward through a movie. Let it cool for 30 minutes, then try it . • The DVD does not support the feature (for your player dry out. 14 Troubleshooting Problem No power No sound...
... player can play . The DVD's region code is on . • Adjust the volume. • Make sure that all cables are not plugged in fast forward or fast reverse mode. • Make sure that your player is not in . • You cannot fast-forward through a movie. Let it cool for 30 minutes, then try it . • The DVD does not support the feature (for your player dry out. 14 Troubleshooting Problem No power No sound...
User Manual (English)
Page 15
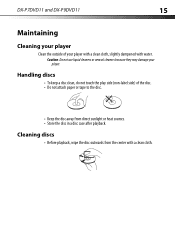
... discs • Before playback, wipe the disc outwards from direct sunlight or heat sources. • Store the disc in a disc case after playback. Handling discs • To keep a disc clean, do not touch the play side (non-label side) of your player with a clean cloth, slightly dampened with a clean cloth. DX-P7DVD11 and DX-P9DVD11 15 Maintaining Cleaning your player Clean the outside of the disc...
... discs • Before playback, wipe the disc outwards from direct sunlight or heat sources. • Store the disc in a disc case after playback. Handling discs • To keep a disc clean, do not touch the play side (non-label side) of your player with a clean cloth, slightly dampened with a clean cloth. DX-P7DVD11 and DX-P9DVD11 15 Maintaining Cleaning your player Clean the outside of the disc...
User Manual (English)
Page 16
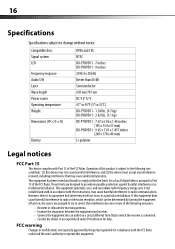
... which the receiver is no guarantee that interference will not occur in a residential installation. This equipment generates, uses, and can be determined by the party responsible for compliance with the instructions, may cause undesired operation. Compatible discs Signal system LCD Frequency response Audio S/N Laser Wave length Power source Operating temperature Weight Dimensions (W × D × H) Battery DVDs and CDs NTSC DX-P7DVD11 - 7 inches DX-P9DVD11 - 9 inches 20...
... which the receiver is no guarantee that interference will not occur in a residential installation. This equipment generates, uses, and can be determined by the party responsible for compliance with the instructions, may cause undesired operation. Compatible discs Signal system LCD Frequency response Audio S/N Laser Wave length Power source Operating temperature Weight Dimensions (W × D × H) Battery DVDs and CDs NTSC DX-P7DVD11 - 7 inches DX-P9DVD11 - 9 inches 20...
User Manual (English)
Page 17
... authorized Dynex repair center or store personnel, Dynex will have an Dynex-approved repair person dispatched to your purchase of the Product ("Warranty Period"). Make sure that you . This warranty is determined to be defective by static (non-moving) images applied for 90 days from the date of your home. This warranty does not cover: • Customer instruction • Installation • Set up adjustments...
... authorized Dynex repair center or store personnel, Dynex will have an Dynex-approved repair person dispatched to your purchase of the Product ("Warranty Period"). Make sure that you . This warranty is determined to be defective by static (non-moving) images applied for 90 days from the date of your home. This warranty does not cover: • Customer instruction • Installation • Set up adjustments...

User Manual (English)
Page 18
..., U.S.A. 55423-3645 © 2011 BBY Solutions, Inc. Contact Dynex: For customer service please call 1-800-305-2204 www.dynexproducts.com Distributed by Dynex to service the Product • Products sold as fuses or batteries • Products where the factory applied serial number has been altered or removed REPAIR REPLACEMENT AS PROVIDED UNDER THIS WARRANTY IS YOUR EXCLUSIVE REMEDY. All rights reserved. SOME...
..., U.S.A. 55423-3645 © 2011 BBY Solutions, Inc. Contact Dynex: For customer service please call 1-800-305-2204 www.dynexproducts.com Distributed by Dynex to service the Product • Products sold as fuses or batteries • Products where the factory applied serial number has been altered or removed REPAIR REPLACEMENT AS PROVIDED UNDER THIS WARRANTY IS YOUR EXCLUSIVE REMEDY. All rights reserved. SOME...
Quick Setup Guide (English)
Page 1
... the setup menu For DVD, select an audio language For DVD, access or exit disc menu Access options relating to the current activity or selection Selects DVD subtitle language Stops the disc Skips to the previous or next title, chapter, or track Navigates through the menus Searches backwards/forward at different speeds Confirms an entry or selection Starts, pauses, or resumes disc play Charging indicator/Power indicator Opens the disc compartment Turns on/off DVD player Increases or decreases volume Audio/ video output...
... the setup menu For DVD, select an audio language For DVD, access or exit disc menu Access options relating to the current activity or selection Selects DVD subtitle language Stops the disc Skips to the previous or next title, chapter, or track Navigates through the menus Searches backwards/forward at different speeds Confirms an entry or selection Starts, pauses, or resumes disc play Charging indicator/Power indicator Opens the disc compartment Turns on/off DVD player Increases or decreases volume Audio/ video output...
Quick Setup Guide (English)
Page 2
The region code for a DVD is printed on the DVD or the DVD packaging. 1 Make sure that your player is connected to power or that help . The disc starts playing automatically. Important safety instructions 1 Read these instructions. 2 Keep these instructions. 3 Heed all warnings. 4 Follow all servicing to qualified service personnel. The wide blade or the third prong are plugged into the headphone jack, no sound comes from the apparatus. 11...
The region code for a DVD is printed on the DVD or the DVD packaging. 1 Make sure that your player is connected to power or that help . The disc starts playing automatically. Important safety instructions 1 Read these instructions. 2 Keep these instructions. 3 Heed all warnings. 4 Follow all servicing to qualified service personnel. The wide blade or the third prong are plugged into the headphone jack, no sound comes from the apparatus. 11...


