Quick Setup Guide (English)
Page 1
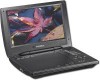
...free performance. Press to open the disc tray. Front and side features Inside features 7" and 9" Portable DVD Players QUICK SETUP GUIDE DX-P7DVD and DX-P9DVD Congratulations on your player. Package contents • DVD player with 7" or 9" LCD monitor • Remote control with the car adapter. 1 Plug one ... Plug headphones into the DC input jack on the side of your purchase of power left on the screen, indicating the amount of a high-quality Dynex product. Press to stop ) 7 (play/pause) button 8 or buttons (fast rev) button (fast fwd) buttons 9...
...free performance. Press to open the disc tray. Front and side features Inside features 7" and 9" Portable DVD Players QUICK SETUP GUIDE DX-P7DVD and DX-P9DVD Congratulations on your player. Package contents • DVD player with 7" or 9" LCD monitor • Remote control with the car adapter. 1 Plug one ... Plug headphones into the DC input jack on the side of your purchase of power left on the screen, indicating the amount of a high-quality Dynex product. Press to stop ) 7 (play/pause) button 8 or buttons (fast rev) button (fast fwd) buttons 9...
Quick Setup Guide (English)
Page 2
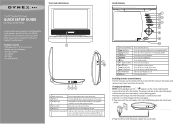
... instructions 1 Read these instructions. 2 Keep these instructions. 3 Heed all warnings. 4 Follow all servicing to qualified service personnel. DYNEX is snapped completely into the connectors on an RCA cable (not included) into place. The white connector goes into the left audio...button inside your player. However, there is incorrectly replaced. ENGLISH 10-0035 7" AND 9" PORTABLE DVD PLAYERS I QUICK SETUP GUIDE I DX-P7DVD AND DX-P9DVD Caution: Danger of DVDs. This equipment has been tested and found to comply within the limits for help control illegal distribution...
... instructions 1 Read these instructions. 2 Keep these instructions. 3 Heed all warnings. 4 Follow all servicing to qualified service personnel. DYNEX is snapped completely into the connectors on an RCA cable (not included) into place. The white connector goes into the left audio...button inside your player. However, there is incorrectly replaced. ENGLISH 10-0035 7" AND 9" PORTABLE DVD PLAYERS I QUICK SETUP GUIDE I DX-P7DVD AND DX-P9DVD Caution: Danger of DVDs. This equipment has been tested and found to comply within the limits for help control illegal distribution...
User Manual (English)
Page 2
...Heed all warnings. 4 Follow all instructions. 5 Do not use this apparatus near any ventilation openings. Install in personal DVD player design and is designed for reliable and trouble-free performance. DX-P7DVD and DX-P9DVD Contents Welcome 3 Important safety instructions 3 Features 5 Setting up your player 9 Using your purchase of the art in ...plugs, convenience receptacles, and the point where they exit from the apparatus. 10 Only use attachments/accessories specified by the manufacturer. Your DX-P7DVD or DX-P9DVD represents the state of a high-quality Dynex product.
...Heed all warnings. 4 Follow all instructions. 5 Do not use this apparatus near any ventilation openings. Install in personal DVD player design and is designed for reliable and trouble-free performance. DX-P7DVD and DX-P9DVD Contents Welcome 3 Important safety instructions 3 Features 5 Setting up your player 9 Using your purchase of the art in ...plugs, convenience receptacles, and the point where they exit from the apparatus. 10 Only use attachments/accessories specified by the manufacturer. Your DX-P7DVD or DX-P9DVD represents the state of a high-quality Dynex product.
User Manual (English)
Page 6
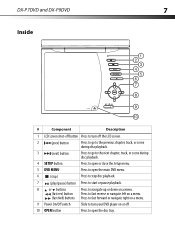
DX-P7DVD and DX-P9DVD 7 Inside SETUP DVD MENU OPEN OFF ON # Component Description 1 LCD screen shut-off button Press to turn off the LCD screen. 2 (...to the next chapter, track, or scene during disc playback. 4 SETUP button Press to open or close the Setup menu. 5 DVD MENU Press to open the main DVD menu. 6 (stop) Press to stop disc playback. 7 (play/pause) button Press to start or pause playback. 8 or... fwd) buttons Press to fast forward or navigate right on a menu. 9 Power On/Off switch Slide to turn your DVD player on or off. 10 OPEN button Press to open the disc tray.
DX-P7DVD and DX-P9DVD 7 Inside SETUP DVD MENU OPEN OFF ON # Component Description 1 LCD screen shut-off button Press to turn off the LCD screen. 2 (...to the next chapter, track, or scene during disc playback. 4 SETUP button Press to open or close the Setup menu. 5 DVD MENU Press to open the main DVD menu. 6 (stop) Press to stop disc playback. 7 (play/pause) button Press to start or pause playback. 8 or... fwd) buttons Press to fast forward or navigate right on a menu. 9 Power On/Off switch Slide to turn your DVD player on or off. 10 OPEN button Press to open the disc tray.
User Manual (English)
Page 8
... Your player remembers where you press this button, the (right) fast-forward speed increases from 16:9 to 4:3 aspect ratio. Each time you stopped. DX-P7DVD and DX-P9DVD 9 # Button Description 8 (down) Press to navigate down for 2, 3, or 4 times the normal size. 12 A-B (repeat) Press to repeat... a specific portion (from point A to point B) of a disc. 13 (next) Press to skip forward to the next chapter or scene on a DVD, or track on...
... Your player remembers where you press this button, the (right) fast-forward speed increases from 16:9 to 4:3 aspect ratio. Each time you stopped. DX-P7DVD and DX-P9DVD 9 # Button Description 8 (down) Press to navigate down for 2, 3, or 4 times the normal size. 12 A-B (repeat) Press to repeat... a specific portion (from point A to point B) of a disc. 13 (next) Press to skip forward to the next chapter or scene on a DVD, or track on...
User Manual (English)
Page 10
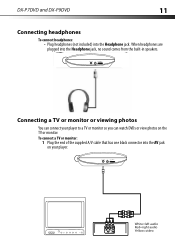
... Connecting a TV or monitor or viewing photos You can watch DVDs or view photos on the TV or monitor. To connect a TV or monitor: 1 Plug the end of the supplied A/V cable that has one black connector into the Headphone jack. DX-P7DVD and DX-P9DVD 11 Connecting headphones To connect headphones: • Plug headphones...
... Connecting a TV or monitor or viewing photos You can watch DVDs or view photos on the TV or monitor. To connect a TV or monitor: 1 Plug the end of the supplied A/V cable that has one black connector into the Headphone jack. DX-P7DVD and DX-P9DVD 11 Connecting headphones To connect headphones: • Plug headphones...
User Manual (English)
Page 11
...The white connector goes into the left side of the CD. • Press to fast-forward on the TV or monitor. The region code for a DVD is 1. Your player remembers where you press this button again to resume playback. • Press to pause playback. The region code for your player. ... the volume control on the other end of 1 or ALL. Make sure that the colors on the connectors match. 3 Plug the other end of DVDs. The disc starts playing automatically. Note: When playing an audio CD, press STOP once to power or that help control illegal distribution of the supplied...
...The white connector goes into the left side of the CD. • Press to fast-forward on the TV or monitor. The region code for a DVD is 1. Your player remembers where you press this button again to resume playback. • Press to pause playback. The region code for your player. ... the volume control on the other end of 1 or ALL. Make sure that the colors on the connectors match. 3 Plug the other end of DVDs. The disc starts playing automatically. Note: When playing an audio CD, press STOP once to power or that help control illegal distribution of the supplied...

User Manual (English)
Page 12
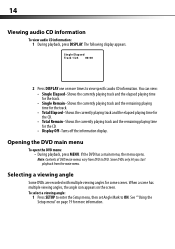
The following display appears. Note: The information display automatically turns off the information display. DX-P7DVD and DX-P9DVD 13 Viewing DVD information To view DVD information: 1 During playback, press DISPLAY. Title Elapsed Tt 01/01 Ch 02/17 0:00:00 1 2 3 4 5 1 Current title number. 2 Total number of titles. 3 Current chapter number. 4 ... time for the chapter. • Chapter Remain-Shows the remaining playing time for the current title. 2 Press DISPLAY one or more times to view specific DVD information.
The following display appears. Note: The information display automatically turns off the information display. DX-P7DVD and DX-P9DVD 13 Viewing DVD information To view DVD information: 1 During playback, press DISPLAY. Title Elapsed Tt 01/01 Ch 02/17 0:00:00 1 2 3 4 5 1 Current title number. 2 Total number of titles. 3 Current chapter number. 4 ... time for the chapter. • Chapter Remain-Shows the remaining playing time for the current title. 2 Press DISPLAY one or more times to view specific DVD information.
User Manual (English)
Page 13
...audio CD information To view audio CD information: 1 During playback, press DISPLAY. Opening the DVD main menu To open the DVD menu: • During playback, press MENU. Some DVDs only let you start playback from DVD to DVD. To select a viewing angle: 1 Press SETUP to enter the Setup menu, then set ...for the CD. • Total Remain-Shows the currently playing track and the remaining playing time for some scenes. Selecting a viewing angle Some DVDs are recorded with multiple viewing angles for the CD. • Display Off-Turns off the information display. Single Elapsed Track 1/24 00:00 2...
...audio CD information To view audio CD information: 1 During playback, press DISPLAY. Opening the DVD main menu To open the DVD menu: • During playback, press MENU. Some DVDs only let you start playback from DVD to DVD. To select a viewing angle: 1 Press SETUP to enter the Setup menu, then set ...for the CD. • Total Remain-Shows the currently playing track and the remaining playing time for some scenes. Selecting a viewing angle Some DVDs are recorded with multiple viewing angles for the CD. • Display Off-Turns off the information display. Single Elapsed Track 1/24 00:00 2...

User Manual (English)
Page 14
... image To enlarge the display image: 1 Press ZOOM one or more times to enlarge the display image from the DVD main menu. To select an audio language: 1 During playback, press AUDIO. Selecting an audio language Some DVDs are recorded with multiple audio languages. DX-P7DVD and DX-P9DVD 15 2 During playback, press the number keys.
... image To enlarge the display image: 1 Press ZOOM one or more times to enlarge the display image from the DVD main menu. To select an audio language: 1 During playback, press AUDIO. Selecting an audio language Some DVDs are recorded with multiple audio languages. DX-P7DVD and DX-P9DVD 15 2 During playback, press the number keys.
User Manual (English)
Page 16
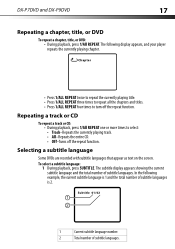
... CD. • Off-Turns off the repeat function. To select a subtitle language: 1 During playback, press SUBTITLE. DX-P7DVD and DX-P9DVD 17 Repeating a chapter, title, or DVD To repeat a chapter, title, or DVD: • During playback, press 1/All REPEAT. The subtitle display appears showing the current subtitle language and the total number... repeat function. The following example, the current subtitle language is 1 and the total number of subtitle languages is 2. Selecting a subtitle language Some DVDs are recorded with subtitle languages that appear as text on the screen.
... CD. • Off-Turns off the repeat function. To select a subtitle language: 1 During playback, press SUBTITLE. DX-P7DVD and DX-P9DVD 17 Repeating a chapter, title, or DVD To repeat a chapter, title, or DVD: • During playback, press 1/All REPEAT. The subtitle display appears showing the current subtitle language and the total number... repeat function. The following example, the current subtitle language is 1 and the total number of subtitle languages is 2. Selecting a subtitle language Some DVDs are recorded with subtitle languages that appear as text on the screen.
User Manual (English)
Page 17
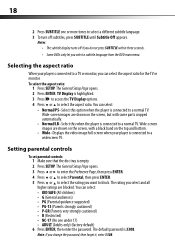
... (No one or more times to select a different subtitle language. 3 To turn off if you do not press SUBTITLE within three seconds. • Some DVDs only let you change the password, then forget it, enter 3308. Wide-screen images are blocked. The rating you select and all higher ratings are... to a TV or monitor, you want to a normal TV. To select the aspect ratio: 1 Press SETUP. Note: If you select a subtitle language from the DVD main menu. Setting parental controls To set parental controls: 1 Make sure that the disc tray is 3308. You can select the aspect ratio for the...
... (No one or more times to select a different subtitle language. 3 To turn off if you do not press SUBTITLE within three seconds. • Some DVDs only let you change the password, then forget it, enter 3308. Wide-screen images are blocked. The rating you select and all higher ratings are... to a TV or monitor, you want to a normal TV. To select the aspect ratio: 1 Press SETUP. Note: If you select a subtitle language from the DVD main menu. Setting parental controls To set parental controls: 1 Make sure that the disc tray is 3308. You can select the aspect ratio for the...
User Manual (English)
Page 18
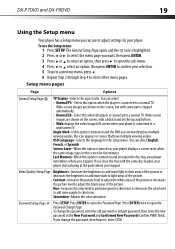
... password or default password, then enter the new password in scenes that have multiple viewing angles. Password Setup Page Press SETUP. If you stopped. DX-P7DVD and DX-P9DVD 19 Using the Setup menu Your player has a Setup menu you can use the Setup menu: 1 Press SETUP. Wide-screen images are shown on... other menu pages. You can select English, French, or Spanish. Last Memory-When this option is turned on and you are shown on and the DVD you open the sub-menu. 4 Press or select an option, then press ENTER to skin tones. To change the password, then forget it, enter ...
... password or default password, then enter the new password in scenes that have multiple viewing angles. Password Setup Page Press SETUP. If you stopped. DX-P7DVD and DX-P9DVD 19 Using the Setup menu Your player has a Setup menu you can use the Setup menu: 1 Press SETUP. Wide-screen images are shown on... other menu pages. You can select English, French, or Spanish. Last Memory-When this option is turned on and you are shown on and the DVD you open the sub-menu. 4 Press or select an option, then press ENTER to skin tones. To change the password, then forget it, enter ...
User Manual (English)
Page 19
... default. Cannot fast-forward or fast-reverse through opening credits and warning information at the beginning of a movie. • Some DVDs do not allow it. • The DVD does not support the feature (for example the Subtitle feature). • The feature is not available at the IR sensor and... Remote control does not work. The action you are inserted correctly into the appropriate jacks. • You cannot fast-forward through a movie. Try another DVD. • Make sure that the battery is fresh. • Make sure that nothing is blocking the IR sensor. • Make sure that you ...
... default. Cannot fast-forward or fast-reverse through opening credits and warning information at the beginning of a movie. • Some DVDs do not allow it. • The DVD does not support the feature (for example the Subtitle feature). • The feature is not available at the IR sensor and... Remote control does not work. The action you are inserted correctly into the appropriate jacks. • You cannot fast-forward through a movie. Try another DVD. • Make sure that the battery is fresh. • Make sure that nothing is blocking the IR sensor. • Make sure that you ...
User Manual (English)
Page 20
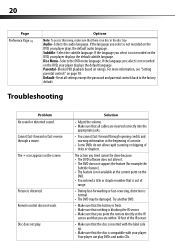
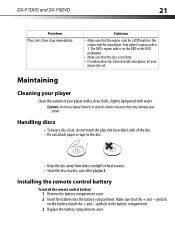
Solution • Make sure that the disc is not dirty. • If condensation has formed inside your player, let your player. The DVD's region code is 1. Caution: Do not use liquid cleaners or aerosol cleaners because they may damage your player with a clean cloth, slightly ... (non-label side) of your player. symbols on the DVD or the DVD packaging. • Make sure that the region code for a DVD matches the region code for your player dry out. symbols in a disc case after playback. DX-P7DVD and DX-P9DVD 21 Problem Play starts, then stops immediately. Maintaining Cleaning your...
Solution • Make sure that the disc is not dirty. • If condensation has formed inside your player, let your player. The DVD's region code is 1. Caution: Do not use liquid cleaners or aerosol cleaners because they may damage your player with a clean cloth, slightly ... (non-label side) of your player. symbols on the DVD or the DVD packaging. • Make sure that the region code for a DVD matches the region code for your player dry out. symbols in a disc case after playback. DX-P7DVD and DX-P9DVD 21 Problem Play starts, then stops immediately. Maintaining Cleaning your...
User Manual (English)
Page 21
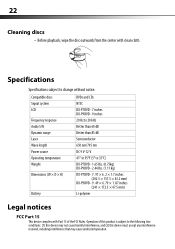
.... Compatible discs Signal system LCD Frequency response Audio S/N Dynamic range Laser Wave length Power source Operating temperature Weight Dimensions (W × D × H) Battery DVDs and CDs NTSC DX-P7DVD - 7 inches DX-P9DVD - 9 inches 20 Hz to 20 kHz Better than 60 dB Better than 85 dB Semiconductor 650 nm/795 nm DC 9 V-12 V 41°...
.... Compatible discs Signal system LCD Frequency response Audio S/N Dynamic range Laser Wave length Power source Operating temperature Weight Dimensions (W × D × H) Battery DVDs and CDs NTSC DX-P7DVD - 7 inches DX-P9DVD - 9 inches 20 Hz to 20 kHz Better than 60 dB Better than 85 dB Semiconductor 650 nm/795 nm DC 9 V-12 V 41°...


