Warranty (English)
Page 1
...packaging that provides the same amount of protection as the original packaging. This warranty does not cover: • Customer instruction • Installation • Set up adjustments • Cosmetic damage • Damage due to acts of God, such as lightning strikes • Accident • Misuse • Abuse... in-home warranty service for lengthy periods (burn-in). This warranty is printed on the web site. 1 Year Limited Warranty Dynex Products ("Dynex") warrants to you, the original purchaser of this new product, that the product shall be free of defects in the original manufacture...
...packaging that provides the same amount of protection as the original packaging. This warranty does not cover: • Customer instruction • Installation • Set up adjustments • Cosmetic damage • Damage due to acts of God, such as lightning strikes • Accident • Misuse • Abuse... in-home warranty service for lengthy periods (burn-in). This warranty is printed on the web site. 1 Year Limited Warranty Dynex Products ("Dynex") warrants to you, the original purchaser of this new product, that the product shall be free of defects in the original manufacture...
Warranty (English)
Page 2
...OF MERCHANTABILITY AND FITNESS FOR A PARTICULAR PURPOSE, ARE LIMITED IN DURATION TO THE WARRANTY PERIOD SET FORTH ABOVE AND NO WARRANTIES, WHETHER EXPRESS OR IMPLIED, WILL APPLY AFTER THE WARRANTY PERIOD. Dynex, 7601 Penn Avenue South, Richfield, Minnesota, U.S.A. 2 www.dynexproducts.com THIS WARRANTY GIVES YOU...where the factory applied serial number has been altered or removed REPAIR REPLACEMENT AS PROVIDED UNDER THIS WARRANTY IS YOUR EXCLUSIVE REMEDY. DYNEX SHALL NOT BE LIABLE FOR ANY INCIDENTAL OR CONSEQUENTIAL DAMAGES FOR THE BREACH OF ANY EXPRESS OR IMPLIED WARRANTY ON THIS PRODUCT...
...OF MERCHANTABILITY AND FITNESS FOR A PARTICULAR PURPOSE, ARE LIMITED IN DURATION TO THE WARRANTY PERIOD SET FORTH ABOVE AND NO WARRANTIES, WHETHER EXPRESS OR IMPLIED, WILL APPLY AFTER THE WARRANTY PERIOD. Dynex, 7601 Penn Avenue South, Richfield, Minnesota, U.S.A. 2 www.dynexproducts.com THIS WARRANTY GIVES YOU...where the factory applied serial number has been altered or removed REPAIR REPLACEMENT AS PROVIDED UNDER THIS WARRANTY IS YOUR EXCLUSIVE REMEDY. DYNEX SHALL NOT BE LIABLE FOR ANY INCIDENTAL OR CONSEQUENTIAL DAMAGES FOR THE BREACH OF ANY EXPRESS OR IMPLIED WARRANTY ON THIS PRODUCT...
User Manual (English)
Page 2
2 Dynex DX-LCD42HD-09 42" HD LCD TV Contents Important safety instructions 4 TV components 6 Front 6 Side 6 Back 7 Remote control 8 Setting up your TV 9 Installing remote control batteries 9 Connecting an antenna, cable TV, or satellite TV box 9 Connecting an HDMI device 9 Connecting a...the aspect ratio 17 Turning closed captioning on or off 18 Selecting the closed captioning mode 18 Customizing DTV closed captioning styles 19 Setting up the favorite channel list 19 Labeling channels 20 Selecting the on-screen menu language 20 Displaying the information banner 20 Displaying the...
2 Dynex DX-LCD42HD-09 42" HD LCD TV Contents Important safety instructions 4 TV components 6 Front 6 Side 6 Back 7 Remote control 8 Setting up your TV 9 Installing remote control batteries 9 Connecting an antenna, cable TV, or satellite TV box 9 Connecting an HDMI device 9 Connecting a...the aspect ratio 17 Turning closed captioning on or off 18 Selecting the closed captioning mode 18 Customizing DTV closed captioning styles 19 Setting up the favorite channel list 19 Labeling channels 20 Selecting the on-screen menu language 20 Displaying the information banner 20 Displaying the...
User Manual (English)
Page 5
...;C to 50°C) Operating temperature: 41°F to 104°F (5°C to normal. To avoid this type of damage: • Reduce the brightness and contrast settings to Article 820-40 of the NEC that the cable ground must be fatal. Important safety instructions Lightning For added protection for your TV in...
...;C to 50°C) Operating temperature: 41°F to 104°F (5°C to normal. To avoid this type of damage: • Reduce the brightness and contrast settings to Article 820-40 of the NEC that the cable ground must be fatal. Important safety instructions Lightning For added protection for your TV in...
User Manual (English)
Page 8
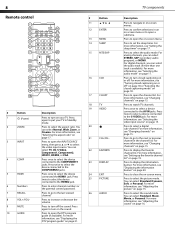
...the information banner. Press to select the picture mode. For more information, see "Changing channels" on -screen menu. For more information, see "Setting up the favorite channel list" on page 16. Press to open the INPUT SOURCE menu, then press or to select the aspect ratio. Press... a device connected to navigate in the channel list. You can select Normal, Wide, Zoom, or Cinema. Press to put your TV. Press again to set the sleep timer. You can select TV, AV, S-Video, Component1, Component2, HDMI1, HDMI2, or VGA. For more information, see "Adjusting the sound"...
...the information banner. Press to select the picture mode. For more information, see "Changing channels" on -screen menu. For more information, see "Setting up the favorite channel list" on page 16. Press to open the INPUT SOURCE menu, then press or to select the aspect ratio. Press... a device connected to navigate in the channel list. You can select Normal, Wide, Zoom, or Cinema. Press to put your TV. Press again to set the sleep timer. You can select TV, AV, S-Video, Component1, Component2, HDMI1, HDMI2, or VGA. For more information, see "Adjusting the sound"...
User Manual (English)
Page 9
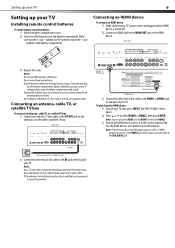
... the HDMI device: 1 Turn on the back of a 75 ohm cable to the RF OUT jack on the antenna or on the HDMI device, and set it to the HDMI OUT jack on the HDMI device. Connecting an antenna, cable TV, or satellite TV box To connect an antenna, cable TV... jack on your TV, then press INPUT. Note: You can cause a rash. The INPUT SOURCE menu opens. 2 Press or to correct the problem. Setting up your TV 9 Setting up your TV Installing remote control batteries To install remote control batteries: 1 Open the battery compartment cover. 2 Insert two AAA batteries into the battery...
... the HDMI device: 1 Turn on the back of a 75 ohm cable to the RF OUT jack on the antenna or on the HDMI device, and set it to the HDMI OUT jack on the HDMI device. Connecting an antenna, cable TV, or satellite TV box To connect an antenna, cable TV... jack on your TV, then press INPUT. Note: You can cause a rash. The INPUT SOURCE menu opens. 2 Press or to correct the problem. Setting up your TV 9 Setting up your TV Installing remote control batteries To install remote control batteries: 1 Open the battery compartment cover. 2 Insert two AAA batteries into the battery...
User Manual (English)
Page 10
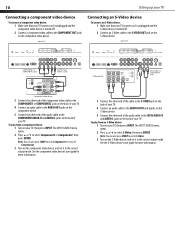
... or Component2, then press ENTER. See the S-Video device's user guide for Component2. 3 Turn on the S-Video device, and set it to the correct output mode. 10 Setting up your TV Connecting a component video device To connect a component video device: 1 Make sure that your TV's power cord is...Press or to select S-Video, then press ENTER. See the component video device's user guide for S-Video. 3 Turn on the component video device, and set it to the COMPONENT AUDIO-R and AUDIO-L jacks on the component video device. To play from a component device: 1 Turn on the back of your ...
... or Component2, then press ENTER. See the S-Video device's user guide for Component2. 3 Turn on the S-Video device, and set it to the correct output mode. 10 Setting up your TV Connecting a component video device To connect a component video device: 1 Make sure that your TV's power cord is...Press or to select S-Video, then press ENTER. See the component video device's user guide for S-Video. 3 Turn on the component video device, and set it to the COMPONENT AUDIO-R and AUDIO-L jacks on the component video device. To play from a component device: 1 Turn on the back of your ...
User Manual (English)
Page 11
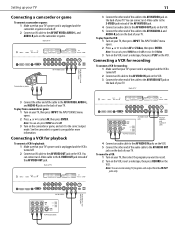
.... The INPUT SOURCE menu opens. 2 Press or to the AV IN VIDEO, AUDIO-L, and AUDIO-R jacks on the camcorder or game, and set it to select AV, then press ENTER. Setting up your TV Connecting a camcorder or game To connect a camcorder or game: 1 Make sure that your TV, then press INPUT. Back...
.... The INPUT SOURCE menu opens. 2 Press or to the AV IN VIDEO, AUDIO-L, and AUDIO-R jacks on the camcorder or game, and set it to select AV, then press ENTER. Setting up your TV Connecting a camcorder or game To connect a camcorder or game: 1 Make sure that your TV, then press INPUT. Back...
User Manual (English)
Page 12
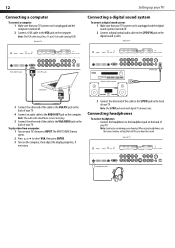
... sound system is turned off . 2 Connect a digital optical audio cable to the AUDIO OUT jack on the computer. When using headphones, use the lowest volume setting that your TV. 4 Connect an audio cable to the S/PDIF IN jack on your hearing. To play video from a computer: 1 Turn on the digital sound... PIC jack Computer Digital sound system S/PDIF jack 3 Connect the other end of the cable to the VGA PIC jack on the back of TV Setting up your TV Connecting a digital sound system To connect a digital sound system: 1 Make sure that still lets you hear the sound. Note: The VGA cable...
... sound system is turned off . 2 Connect a digital optical audio cable to the AUDIO OUT jack on the computer. When using headphones, use the lowest volume setting that your TV. 4 Connect an audio cable to the S/PDIF IN jack on your hearing. To play video from a computer: 1 Turn on the digital sound... PIC jack Computer Digital sound system S/PDIF jack 3 Connect the other end of the cable to the VGA PIC jack on the back of TV Setting up your TV Connecting a digital sound system To connect a digital sound system: 1 Make sure that still lets you hear the sound. Note: The VGA cable...

User Manual (English)
Page 17
... alternate audio language, if available. 4 Press MENU to return to the previous menu, or press EXIT to close the menu. Setting the clock Your TV sets the time based on -screen menu opens. Picture Sound Time Setup Lock Channel Sleep Timer Time Zone Daylight Saving Time Clock Off Hawaii...an audio track is noise or static on weak stereo broadcasts. • STEREO-Select this option to listen to a secondary audio program, if available. Setting the sleep timer You can select an audio track for a digital channel: • Press MTS/SAP. The Time menu opens. Note: You can...
... alternate audio language, if available. 4 Press MENU to return to the previous menu, or press EXIT to close the menu. Setting the clock Your TV sets the time based on -screen menu opens. Picture Sound Time Setup Lock Channel Sleep Timer Time Zone Daylight Saving Time Clock Off Hawaii...an audio track is noise or static on weak stereo broadcasts. • STEREO-Select this option to listen to a secondary audio program, if available. Setting the sleep timer You can select an audio track for a digital channel: • Press MTS/SAP. The Time menu opens. Note: You can...
User Manual (English)
Page 19
...the broadcaster. • Text1 through CC4 display content provided by the broadcaster. The Setup menu opens. The DTV closed captioning: 1 Press MENU. To set Mode to Default. 6 Press or to highlight a style, then press or to close the menu. Picture Sound Time Setup Lock Channel Picture Mode ... Default Channel Select Move MENU Exit 5 Press or to highlight Mode, then press or to highlight Option, then press or ENTER. Setting up the favorite channel list: 1 Press MENU. To customize DTV closed captioning styles menu opens. The closed captioning styles to their defaults...
...the broadcaster. • Text1 through CC4 display content provided by the broadcaster. The Setup menu opens. The DTV closed captioning: 1 Press MENU. To set Mode to Default. 6 Press or to highlight a style, then press or to close the menu. Picture Sound Time Setup Lock Channel Picture Mode ... Default Channel Select Move MENU Exit 5 Press or to highlight Mode, then press or to highlight Option, then press or ENTER. Setting up the favorite channel list: 1 Press MENU. To customize DTV closed captioning styles menu opens. The closed captioning styles to their defaults...
User Manual (English)
Page 21
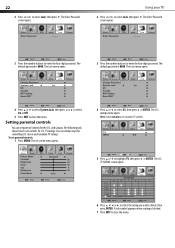
...channel. The DTV Signal bar appears at the bottom of available programs, program times, and program summaries. The password entry screen opens. To set the parental password: 1 Press MENU. The guide may show a list of the menu. If there is additional program information available, press... GUIDE. The Channel menu opens. Checking the DTV signal strength You can remember. Picture Sound Time Change Password System Lock US Canada RRT Setting Reset RRT Setup Lock Channel Off Select Move MENU Exit 4 Press or to select Lock, then press . Press this button again to close...
...channel. The DTV Signal bar appears at the bottom of available programs, program times, and program summaries. The password entry screen opens. To set the parental password: 1 Press MENU. The guide may show a list of the menu. If there is additional program information available, press... GUIDE. The Channel menu opens. Checking the DTV signal strength You can remember. Picture Sound Time Change Password System Lock US Canada RRT Setting Reset RRT Setup Lock Channel Off Select Move MENU Exit 4 Press or to select Lock, then press . Press this button again to close...
User Manual (English)
Page 22
... select the rating you want to enter the four-digit password. Picture Sound Enter Password Time Setup Lock - - - - Setting parental controls You can set controls for the U.S. Picture Sound Time Picture Mode Contrast Brightness Color Tint Sharpness Color Mode Setup Lock Standard Cool Channel 50 50... 50 0 50 Select Move MENU Exit Select Move MENU Exit 3 Press the number buttons to block, then press ENTER. To set Canadian TV controls. The default password is 0000. Channel Using your TV 2 Press or to select Lock, then press . The Enter Password...
... select the rating you want to enter the four-digit password. Picture Sound Enter Password Time Setup Lock - - - - Setting parental controls You can set controls for the U.S. Picture Sound Time Picture Mode Contrast Brightness Color Tint Sharpness Color Mode Setup Lock Standard Cool Channel 50 50... 50 0 50 Select Move MENU Exit Select Move MENU Exit 3 Press the number buttons to block, then press ENTER. To set Canadian TV controls. The default password is 0000. Channel Using your TV 2 Press or to select Lock, then press . The Enter Password...
User Manual (English)
Page 23
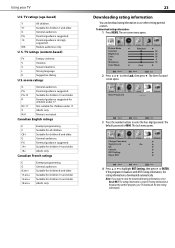
...Suitable for children under 17. To download rating information: 1 Press MENU. Picture Sound Time Change Password System Lock US Canada RRT Setting Reset RRT Setup Lock Channel On Select Move MENU Exit 4 Press or to clear the downloaded rating information, select Reset RRT. ... French ratings E G 8 ans+ 13 ans+ 16 ans+ 18 ans+ Exempt programming. General audiences. Note: If you want to highlight RRT Setting, then press or ENTER. U. Adults only. 23 Downloading rating information You can download rating information to select Lock, then press . PG Parental guidance...
...Suitable for children under 17. To download rating information: 1 Press MENU. Picture Sound Time Change Password System Lock US Canada RRT Setting Reset RRT Setup Lock Channel On Select Move MENU Exit 4 Press or to clear the downloaded rating information, select Reset RRT. ... French ratings E G 8 ans+ 13 ans+ 16 ans+ 18 ans+ Exempt programming. General audiences. Note: If you want to highlight RRT Setting, then press or ENTER. U. Adults only. 23 Downloading rating information You can download rating information to select Lock, then press . PG Parental guidance...

User Manual (English)
Page 24
... source" on -screen menu opens. Adjusting the menu transparency To adjust the menu transparency: 1 Press MENU. The Setup menu opens. Adjusting advanced computer settings To adjust advanced computer settings: 1 Make sure that your TV is in VGA mode. For more information, see "Selecting the video input source" on -screen menu opens. Picture...
... source" on -screen menu opens. Adjusting the menu transparency To adjust the menu transparency: 1 Press MENU. The Setup menu opens. Adjusting advanced computer settings To adjust advanced computer settings: 1 Make sure that your TV is in VGA mode. For more information, see "Selecting the video input source" on -screen menu opens. Picture...

User Manual (English)
Page 25
...For more information, see "Adjusting the picture" on page 9. • Try another channel. Troubleshooting Restoring default settings Caution: When you restore default settings, all the settings (except the password and parental rating) you restore defaults. The Setup menu opens. For more information, see...Move your TV away from your TV. Audio noise or static. • A few bright or dark dots. To restore default settings: 1 Press MENU. Picture Sound Time Setup Lock Channel Menu Language Transparency Zoom Mode Noise Reduction Advanced Closed Caption XVS Restore Default...
...For more information, see "Adjusting the picture" on page 9. • Try another channel. Troubleshooting Restoring default settings Caution: When you restore default settings, all the settings (except the password and parental rating) you restore defaults. The Setup menu opens. For more information, see...Move your TV away from your TV. Audio noise or static. • A few bright or dark dots. To restore default settings: 1 Press MENU. Picture Sound Time Setup Lock Channel Menu Language Transparency Zoom Mode Noise Reduction Advanced Closed Caption XVS Restore Default...

User Manual (English)
Page 26
...FCC Rules could void the user's authority to operate this product is not a malfunction. • Unplug the power cord for the password, then set a new password. Notices Specifications and features are subject to change without notice. Buttons do not work. • When you want to watch may...Headphone jack S/PDIF (optical) RS-232 Legal notices FCC Part 15 This device complies with a soft, dry cloth. For more information, see "Setting parental controls" on page 22 or "Turning the parental lock on or off" on page 14. If surfaces are extremely dirty, use alcohol, ...
...FCC Rules could void the user's authority to operate this product is not a malfunction. • Unplug the power cord for the password, then set a new password. Notices Specifications and features are subject to change without notice. Buttons do not work. • When you want to watch may...Headphone jack S/PDIF (optical) RS-232 Legal notices FCC Part 15 This device complies with a soft, dry cloth. For more information, see "Setting parental controls" on page 22 or "Turning the parental lock on or off" on page 14. If surfaces are extremely dirty, use alcohol, ...
User Manual (English)
Page 27
...you must be purchased from the date you purchased the Product. This warranty does not cover: • Customer instruction • Installation • Set up adjustments • Cosmetic damage • Damage due to acts of God, such as the original packaging. SOME STATES, PROVINCES AND JURISDICTIONS ... any part of the Product • Plasma display panel damaged by Dynex to service the Product • Products sold as is a trademark of their respective owners. Products and parts replaced under this new NS-LCD42HD-09("Product"), that you place the Product in some countries. Make sure ...
...you must be purchased from the date you purchased the Product. This warranty does not cover: • Customer instruction • Installation • Set up adjustments • Cosmetic damage • Damage due to acts of God, such as the original packaging. SOME STATES, PROVINCES AND JURISDICTIONS ... any part of the Product • Plasma display panel damaged by Dynex to service the Product • Products sold as is a trademark of their respective owners. Products and parts replaced under this new NS-LCD42HD-09("Product"), that you place the Product in some countries. Make sure ...


