User Manual (English)
Page 3
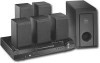
... trademarks of Dolby Laboratories. Your DX-HTIB represents the state of the art in accordance with the manufacturer's instructions. 8 Do not use this apparatus near any ventilation openings. Install in home theater system design and is designed for reliable and trouble-free performance. Welcome Congratulations on your player 12 Troubleshooting 20 Maintaining 21 Specifications 22 Legal notices 23 90-day limited warranty 24 Manufactured...
... trademarks of Dolby Laboratories. Your DX-HTIB represents the state of the art in accordance with the manufacturer's instructions. 8 Do not use this apparatus near any ventilation openings. Install in home theater system design and is designed for reliable and trouble-free performance. Welcome Congratulations on your player 12 Troubleshooting 20 Maintaining 21 Specifications 22 Legal notices 23 90-day limited warranty 24 Manufactured...
User Manual (English)
Page 5
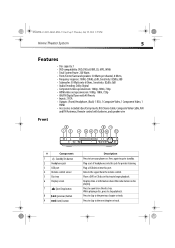
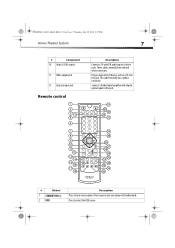
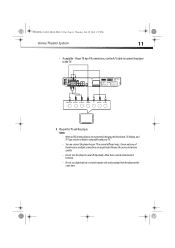
...; HDMI video out upconversion: 1080p, 1080i, 720p • AM/FM Digital Tuner with 40 Presets • Inputs: 2 RCA • Outputs: (Front) Headphone, (Back) 1 RCA, 1 Composite Video, 1 Component Video, 1 HDMI • Accessories included: Quick Setup Guide, RCA Stereo Cable, Composite Video Cable, AM and FM Antennas, Remote control with batteries, and speaker wire Front # Component 1 Standby/On button 2 Headphone jack 3 USB port 4 Remote control sensor 5 Disc tray 6 Display screen 7 Eject/Stop button 8 (previous) button 9 (next) button Description Press to turn your player on...
...; HDMI video out upconversion: 1080p, 1080i, 720p • AM/FM Digital Tuner with 40 Presets • Inputs: 2 RCA • Outputs: (Front) Headphone, (Back) 1 RCA, 1 Composite Video, 1 Component Video, 1 HDMI • Accessories included: Quick Setup Guide, RCA Stereo Cable, Composite Video Cable, AM and FM Antennas, Remote control with batteries, and speaker wire Front # Component 1 Standby/On button 2 Headphone jack 3 USB port 4 Remote control sensor 5 Disc tray 6 Display screen 7 Eject/Stop button 8 (previous) button 9 (next) button Description Press to turn your player on...
User Manual (English)
Page 6
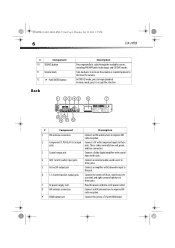
.../AM Radio, Audio input, and CD/DVD modes. These cables normally have red, green, and blue connectors. 3 Coaxial output jack Connect a Dolby Digital amplifier with coaxial input to this jack. 4 AUX 1 and 2 (audio) input jacks Connect an external audio sound source to these jacks. 5 Active SW output jack Connect an amplifier with component inputs to these jacks. 7 AC power supply cord Plug this power cord into an AC power outlet. 8 AM antenna connection 9 HDMI output jack Connect an AM...
.../AM Radio, Audio input, and CD/DVD modes. These cables normally have red, green, and blue connectors. 3 Coaxial output jack Connect a Dolby Digital amplifier with coaxial input to this jack. 4 AUX 1 and 2 (audio) input jacks Connect an external audio sound source to these jacks. 5 Active SW output jack Connect an amplifier with component inputs to these jacks. 7 AC power supply cord Plug this power cord into an AC power outlet. 8 AM antenna connection 9 HDMI output jack Connect an AM...
User Manual (English)
Page 7
... Standby mode. Connect a Dolby Digital amplifier with L/R audio inputs to put your player. This cable normally has a yellow connector. DX-HTIB_10-0823_MAN_ENG_V3.fm Page 7 Thursday, July 29, 2010 2:57 PM Home Theater System 7 # Component 10 Audio (L & R) output 11 Video output jack 12 Optical output jack Remote control Description Connect a TV with digital optical input to this jack. These cables normally have red and white connectors. Plug a composite A/V device, such as a TV, into this jack. # Button 1 STANDBY/ON 2 USB...
... Standby mode. Connect a Dolby Digital amplifier with L/R audio inputs to put your player. This cable normally has a yellow connector. DX-HTIB_10-0823_MAN_ENG_V3.fm Page 7 Thursday, July 29, 2010 2:57 PM Home Theater System 7 # Component 10 Audio (L & R) output 11 Video output jack 12 Optical output jack Remote control Description Connect a TV with digital optical input to this jack. These cables normally have red and white connectors. Plug a composite A/V device, such as a TV, into this jack. # Button 1 STANDBY/ON 2 USB...
User Manual (English)
Page 8
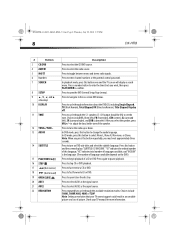
... channel numbers or the parental control password. Press to toggle between mono and stereo radio signals. Press to open /close the disc tray. Choices include FL (front left), FR (front right), CEN (center), SL (surround left), SR (surround right), and SUB (subwoofer). Press this button once and the TV screen will display a search menu. Press to select the radio source. Press to stop CD or DVD playback. In playback mode, press this button...
... channel numbers or the parental control password. Press to toggle between mono and stereo radio signals. Press to open /close the disc tray. Choices include FL (front left), FR (front right), CEN (center), SL (surround left), SR (surround right), and SUB (subwoofer). Press this button once and the TV screen will display a search menu. Press to select the radio source. Press to stop CD or DVD playback. In playback mode, press this button...
User Manual (English)
Page 9
... on a CD. Press to select the picture magnification. You can select 2 times, 3 times, 4 times, 1/2, 1/3, or 1/4. Press repeatedly to save a radio station as a preset. Press to cycle through the available preset sound modes. DX-HTIB_10-0823_MAN_ENG_V3.fm Page 9 Thursday, July 29, 2010 2:57 PM Home Theater System 9 # Button 23 ZOOM 24 MEMORY 25 DVD MENU 26 PLAY/ENTER 27 MUTE 28 SURROUND 29 VOL+/VOL- 30 DSP...
... on a CD. Press to select the picture magnification. You can select 2 times, 3 times, 4 times, 1/2, 1/3, or 1/4. Press repeatedly to save a radio station as a preset. Press to cycle through the available preset sound modes. DX-HTIB_10-0823_MAN_ENG_V3.fm Page 9 Thursday, July 29, 2010 2:57 PM Home Theater System 9 # Button 23 ZOOM 24 MEMORY 25 DVD MENU 26 PLAY/ENTER 27 MUTE 28 SURROUND 29 VOL+/VOL- 30 DSP...
User Manual (English)
Page 10
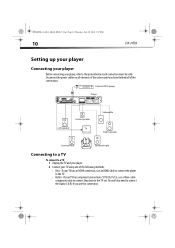
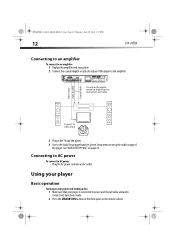
...; Best - If your player, refer to the picture below. DX-HTIB_10-0823_MAN_ENG_V3.fm Page 10 Thursday, July 29, 2010 2:57 PM 10 DX-HTIB Setting up your player Connecting your player Before connecting your TV has an HDMI connection, use an HDMI cable to connect the player to the TV. • Better - Disconnect the power cables on all elements of the connections. You will also need to connect the Audio (L & R) if you have...
...; Best - If your player, refer to the picture below. DX-HTIB_10-0823_MAN_ENG_V3.fm Page 10 Thursday, July 29, 2010 2:57 PM 10 DX-HTIB Setting up your player Connecting your player Before connecting your TV has an HDMI connection, use an HDMI cable to connect the player to the TV. • Better - Disconnect the power cables on all elements of the connections. You will also need to connect the Audio (L & R) if you have...
User Manual (English)
Page 11
... TV has A/V connections, use digital optical or coaxial outputs and analog output from the player at the same time. Notes: • When a DVD is being played, we recommend changing the Resolution, TV Display, and TV Type in order to make it compatible with your TV in several different ways. Video Input Audio L Audio R HDMI Y Pb/Cb Pr/Cr 3 Plug in between. • Do not use the A/V cable to connect the player to your TV...
... TV has A/V connections, use digital optical or coaxial outputs and analog output from the player at the same time. Notes: • When a DVD is being played, we recommend changing the Resolution, TV Display, and TV Type in order to make it compatible with your TV in several different ways. Video Input Audio L Audio R HDMI Y Pb/Cb Pr/Cr 3 Plug in between. • Do not use the A/V cable to connect the player to your TV...
User Manual (English)
Page 12
Video cable Optical cable Coaxial cable Connect to video input 3 Plug in the TV and the player. 4 Access the Audio Setup page from the System Setup menu to setup the audio output of the player to the amplifier. Connecting to AC power To connect to AC power: • Plug the AC power cord into an AC outlet. Using your player Basic operation Turning on your player and loading a disc: 1 Make sure that all video and audio connections have been made. 2 Press the STANDBY/ON button on page...
Video cable Optical cable Coaxial cable Connect to video input 3 Plug in the TV and the player. 4 Access the Audio Setup page from the System Setup menu to setup the audio output of the player to the amplifier. Connecting to AC power To connect to AC power: • Plug the AC power cord into an AC outlet. Using your player Basic operation Turning on your player and loading a disc: 1 Make sure that all video and audio connections have been made. 2 Press the STANDBY/ON button on page...
User Manual (English)
Page 13
Controlling disc playback To control disc playback: 1 Press the OPEN/CLOSE button on the remote control (or the EJECT button on your player have region codes that help control illegal distribution of the DVD or CD. • Press REPEAT A-B once to select the beginning point on a DVD to repeat. The region code for a USB flash drive Adjusting the volume To adjust the volume: • Rotate the volume control on the front of your player starts playing at the point where you press this button, the fast-forward speed changes from...
Controlling disc playback To control disc playback: 1 Press the OPEN/CLOSE button on the remote control (or the EJECT button on your player have region codes that help control illegal distribution of the DVD or CD. • Press REPEAT A-B once to select the beginning point on a DVD to repeat. The region code for a USB flash drive Adjusting the volume To adjust the volume: • Rotate the volume control on the front of your player starts playing at the point where you press this button, the fast-forward speed changes from...
User Manual (English)
Page 14
... DX-HTIB Viewing disc information To view disc information: • During playback, press DISPLAY one or more times to select the play mode or audio language you want. Selecting a subtitle language Some DVDs are recorded with subtitle languages that appear as text on the type of audio languages available. 2 Press AUDIO one or more times to view specific disc information. Notes: • The subtitle display turns off if you do not press AUDIO within three seconds. • Some DVDs only let you select a subtitle language from the DVD...
... DX-HTIB Viewing disc information To view disc information: • During playback, press DISPLAY one or more times to select the play mode or audio language you want. Selecting a subtitle language Some DVDs are recorded with subtitle languages that appear as text on the type of audio languages available. 2 Press AUDIO one or more times to view specific disc information. Notes: • The subtitle display turns off if you do not press AUDIO within three seconds. • Some DVDs only let you select a subtitle language from the DVD...
User Manual (English)
Page 15
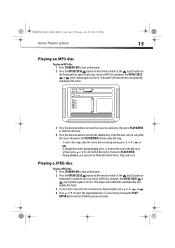
... to turn on the player. 2 Press the OPEN/CLOSE button on the remote control (or the (eject) button on front panel) to open the disc tray. Your player will read the disc automatically and display the menu. 3 To select other songs under the current directory during playing, press or , , or . • To change directories during playing, press to move the cursor to a directory, then press PLAY/ENTER to enter the directory. 4 Press the direction buttons...
... to turn on the player. 2 Press the OPEN/CLOSE button on the remote control (or the (eject) button on front panel) to open the disc tray. Your player will read the disc automatically and display the menu. 3 To select other songs under the current directory during playing, press or , , or . • To change directories during playing, press to move the cursor to a directory, then press PLAY/ENTER to enter the directory. 4 Press the direction buttons...
User Manual (English)
Page 16
... 16 DX-HTIB • To view a specific picture, input its number using the number buttons or press or . • To repeat a picture, press the REPEAT button. • While playing, press STOP or DVD MENU button to return to the main menu. • You can play digital JPEG-file photo discs and also supports photos created by the TV and not your player. • Your player can also use the radio: 1 Press STANDBY/ON to turn on the remote control to switch from stereo mode...
... 16 DX-HTIB • To view a specific picture, input its number using the number buttons or press or . • To repeat a picture, press the REPEAT button. • While playing, press STOP or DVD MENU button to return to the main menu. • You can play digital JPEG-file photo discs and also supports photos created by the TV and not your player. • Your player can also use the radio: 1 Press STANDBY/ON to turn on the remote control to switch from stereo mode...
User Manual (English)
Page 17
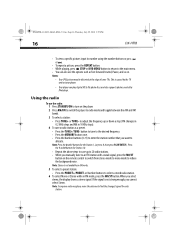
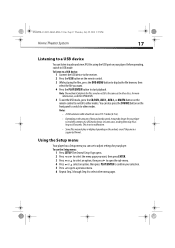
... the SOURCE button on the front panel to switch to other modes. To listen to a USB device: 1 Connect the USB device to the receiver. 2 Press the USB button on the remote control. 3 While playing the files, press the DVD MENU button to display the file browser, then select the file you can use the Setup menu: 1 Press SETUP. Before operating, switch to read the contents of data and media speed, it may take longer for your player. Using the Setup menu Your player has a Setup menu you...
... the SOURCE button on the front panel to switch to other modes. To listen to a USB device: 1 Connect the USB device to the receiver. 2 Press the USB button on the remote control. 3 While playing the files, press the DVD MENU button to display the file browser, then select the file you can use the Setup menu: 1 Press SETUP. Before operating, switch to read the contents of data and media speed, it may take longer for your player. Using the Setup menu Your player has a Setup menu you...
User Manual (English)
Page 19
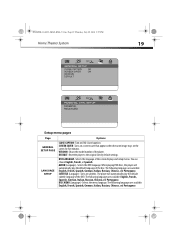
You can choose English, French, or Spanish. SUBTITLE (Language)-Turns on DVD closed captions. DEFAULT-Reset the player to the original factory default settings. When playing DVD discs, the player will automatically play the default language of the DVD. DX-HTIB_10-0823_MAN_ENG_V3.fm Page 19 Thursday, July 29, 2010 2:57 PM Home Theater System 19 Setup menu pages Page Options GENERAL SETUP PAGE LANGUAGE SETUP CLOSE CAPTION-Turn on subtitles. The following languages are available: English, French, Spanish, German, Italian, Russian, Chinese,and...
You can choose English, French, or Spanish. SUBTITLE (Language)-Turns on DVD closed captions. DEFAULT-Reset the player to the original factory default settings. When playing DVD discs, the player will automatically play the default language of the DVD. DX-HTIB_10-0823_MAN_ENG_V3.fm Page 19 Thursday, July 29, 2010 2:57 PM Home Theater System 19 Setup menu pages Page Options GENERAL SETUP PAGE LANGUAGE SETUP CLOSE CAPTION-Turn on subtitles. The following languages are available: English, French, Spanish, German, Italian, Russian, Chinese,and...

User Manual (English)
Page 20
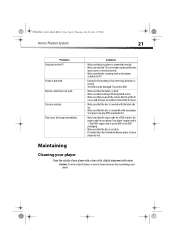
... Mode - You can change it to input the password. The player has eight different age ratings PARENTAL CONTROL PAGE that there is connected to select one of titles or chapters. Move the cursor to a normal TV. Troubleshooting Problem No sound or distorted sound. DX-HTIB_10-0823_MAN_ENG_V3.fm Page 20 Thursday, July 29, 2010 2:57 PM 20 DX-HTIB Page Options VIDEO SETUP PAGE TV TYPE-Sets the aspect ratio of your player. AUDIO SETUP PAGE SURROUND-Sets...
... Mode - You can change it to input the password. The player has eight different age ratings PARENTAL CONTROL PAGE that there is connected to select one of titles or chapters. Move the cursor to a normal TV. Troubleshooting Problem No sound or distorted sound. DX-HTIB_10-0823_MAN_ENG_V3.fm Page 20 Thursday, July 29, 2010 2:57 PM 20 DX-HTIB Page Options VIDEO SETUP PAGE TV TYPE-Sets the aspect ratio of your player. AUDIO SETUP PAGE SURROUND-Sets...
User Manual (English)
Page 21
... your player. The DVD's region code is on the TV Picture is distorted. Your player's region code is normal. • The DVD may damage your player dry out. Remote control does not work. Caution: Do not use liquid cleaners or aerosol cleaners because they may be damaged. Disc does not play DVDs and audio CDs. • Make sure that the scanning mode on the player matches the TV. • During fast-forwarding or fast-reversing...
... your player. The DVD's region code is on the TV Picture is distorted. Your player's region code is normal. • The DVD may damage your player dry out. Remote control does not work. Caution: Do not use liquid cleaners or aerosol cleaners because they may be damaged. Disc does not play DVDs and audio CDs. • Make sure that the scanning mode on the player matches the TV. • During fast-forwarding or fast-reversing...
User Manual (English)
Page 22
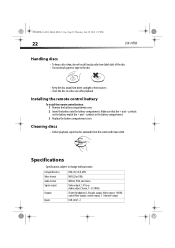
...and - symbols in a disc case after playback. Compatible discs Video format Audio format Signal output Outputs Inputs DVD, CD, CD-R, MP3 MPEG2 for DVDs MPEG2, PCM, and stereo Video output: 1.0 V p-p Audio output: Stereo, 1~2 V (RMS) (Front) Headphone, L/R audio output, Video output, 1 HDMI, optical fiber output, coaxial output, 5.1 channel output. Specifications Specifications subject to the disc. • Keep the disc away from the center with clean cloth. Installing the remote control battery To install the remote control battery: 1 Remove the battery compartment cover. 2 Insert the...
...and - symbols in a disc case after playback. Compatible discs Video format Audio format Signal output Outputs Inputs DVD, CD, CD-R, MP3 MPEG2 for DVDs MPEG2, PCM, and stereo Video output: 1.0 V p-p Audio output: Stereo, 1~2 V (RMS) (Front) Headphone, L/R audio output, Video output, 1 HDMI, optical fiber output, coaxial output, 5.1 channel output. Specifications Specifications subject to the disc. • Keep the disc away from the center with clean cloth. Installing the remote control battery To install the remote control battery: 1 Remove the battery compartment cover. 2 Insert the...

User Manual (English)
Page 23
... into an outlet on , the user is connected. • Consult the dealer or an experienced radio/TV technician for help. FCC warning Changes or modifications not expressly approved by one or more of the FCC Rules. Operation of Dolby Laboratories. These limits are trademarks of this device must accept any interference received, including interference that interference will not...
... into an outlet on , the user is connected. • Consult the dealer or an experienced radio/TV technician for help. FCC warning Changes or modifications not expressly approved by one or more of the FCC Rules. Operation of Dolby Laboratories. These limits are trademarks of this device must accept any interference received, including interference that interference will not...
User Manual (English)
Page 24
... -home warranty service for a period of 90 days from an online web site, mail your Dynex Product during the Warranty Period of a defect covered by this warranty that requires service, terms of Dynex and are required after the Warranty Period expires, you must pay all labor and parts charges. Make sure that you place the Product in its sole option): (1) repair the Product with a screen...
... -home warranty service for a period of 90 days from an online web site, mail your Dynex Product during the Warranty Period of a defect covered by this warranty that requires service, terms of Dynex and are required after the Warranty Period expires, you must pay all labor and parts charges. Make sure that you place the Product in its sole option): (1) repair the Product with a screen...


