
User Manual (English)
Page 3
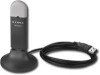
Product features 3 Package contents • Wireless G USB network adapter • Desktop adapter base • Quick Installation Guide • Installation software CD • This User Guide System requirements • PC-compatible desktop computer with one available USB port and CD/DVD drive • Windows® 2000, Windows XP, or Windows Vista® Components 2 1 # Component Description 1 USB adapter Connects to your computer's USB port or the desktop adapter base. 2 Activity LED Lights up and flashes when the network adapter is active
Product features 3 Package contents • Wireless G USB network adapter • Desktop adapter base • Quick Installation Guide • Installation software CD • This User Guide System requirements • PC-compatible desktop computer with one available USB port and CD/DVD drive • Windows® 2000, Windows XP, or Windows Vista® Components 2 1 # Component Description 1 USB adapter Connects to your computer's USB port or the desktop adapter base. 2 Activity LED Lights up and flashes when the network adapter is active

User Manual (English)
Page 4
...installation process. Our software has been fully tested and is normal and does not indicate a problem. DX-BUSB 2 Double-click Run Installer.exe. If you see a window titled, "Windows can't verify the publisher of this operating system. 4 Setting up your wireless network adapter Setting ...up your CD/DVD drive. This is compatible with Windows Vista: 1 Insert the Installation Software CD into your wireless network adapter Windows Vista™ Important note: Install the software before inserting the card. To install the software...
...installation process. Our software has been fully tested and is normal and does not indicate a problem. DX-BUSB 2 Double-click Run Installer.exe. If you see a window titled, "Windows can't verify the publisher of this operating system. 4 Setting up your wireless network adapter Setting ...up your CD/DVD drive. This is compatible with Windows Vista: 1 Insert the Installation Software CD into your wireless network adapter Windows Vista™ Important note: Install the software before inserting the card. To install the software...
User Manual (English)
Page 7
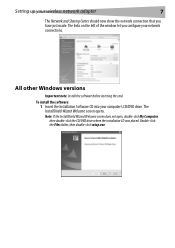
Setting up your computer's CD/DVD drive. All other Windows versions Important note: Install the software before inserting the card. Double-click the Files folder, then double-click setup.exe. To install the software: 1 Insert ... double-click the CD/DVD drive where the installation CD was placed. The InstallShield Wizard Welcome screen opens. The links on the left of the window let you have just made.
Setting up your computer's CD/DVD drive. All other Windows versions Important note: Install the software before inserting the card. Double-click the Files folder, then double-click setup.exe. To install the software: 1 Insert ... double-click the CD/DVD drive where the installation CD was placed. The InstallShield Wizard Welcome screen opens. The links on the left of the window let you have just made.

User Manual (English)
Page 8
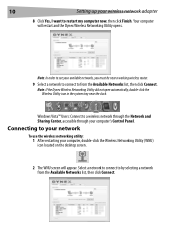
The Please plug in your Card, do so now. The Welcome to run on Windows. 4 Firmly insert the USB adapter into an available USB slot. Note: If your system did not prompt you to proceed. This software is designed to the Found New Hardware Wizard Welcome screen opens. Note: If at any time during the install a warning appears that the software has not passed Windows® logo testing, click the Continue anyway button to insert your USB Adapter now screen opens. 8 Setting up your wireless network adapter 2 Click Next. The Choose Destination Location screen opens. 3 Click Next.
The Please plug in your Card, do so now. The Welcome to run on Windows. 4 Firmly insert the USB adapter into an available USB slot. Note: If your system did not prompt you to proceed. This software is designed to the Found New Hardware Wizard Welcome screen opens. Note: If at any time during the install a warning appears that the software has not passed Windows® logo testing, click the Continue anyway button to insert your USB Adapter now screen opens. 8 Setting up your wireless network adapter 2 Click Next. The Choose Destination Location screen opens. 3 Click Next.
User Manual (English)
Page 10
Note: If the Dynex Wireless Networking Utility did not open automatically, double-click the Wireless Utility icon in the system tray near a ...the Available Networks list, then click Connect. Select a network to connect to see your computer's Control Panel. Your computer will appear. Windows Vista™ Users: Connect to a wireless network through the Network and Sharing Center, accessible through your available networks, you must be ...Wireless Networking Utility (WNU) icon located on the desktop screen. 2 The WNU screen will restart and the Dynex Wireless Networking Utility opens.
Note: If the Dynex Wireless Networking Utility did not open automatically, double-click the Wireless Utility icon in the system tray near a ...the Available Networks list, then click Connect. Select a network to connect to see your computer's Control Panel. Your computer will appear. Windows Vista™ Users: Connect to a wireless network through the Network and Sharing Center, accessible through your available networks, you must be ...Wireless Networking Utility (WNU) icon located on the desktop screen. 2 The WNU screen will restart and the Dynex Wireless Networking Utility opens.

User Manual (English)
Page 11
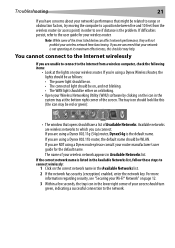
... Status tab, which displays the current network status and available networks. Lost Wireless Connection If the current wireless connection is lost, a window opens and the WNU attempts to determine the source (for example, computer, router, or Internet/modem). Setting up the Utility screen.... The WNU's default screen is not present, click on Start, Programs, Dynex, Wireless Networking Utility. Available Networks This area displays the available networks at the current location as well as the SSID, Signal Strength, ...
... Status tab, which displays the current network status and available networks. Lost Wireless Connection If the current wireless connection is lost, a window opens and the WNU attempts to determine the source (for example, computer, router, or Internet/modem). Setting up the Utility screen.... The WNU's default screen is not present, click on Start, Programs, Dynex, Wireless Networking Utility. Available Networks This area displays the available networks at the current location as well as the SSID, Signal Strength, ...
User Manual (English)
Page 21
...your wireless router. The name of Available Networks. The tray icon should look like this checklist may be red or green): • The window that opens should be related to range or obstruction factors, try moving the computer to a position between five and 10 feet from the ...router (or access point) in order to which you are wireless networks to see "Securing your wireless router. If you are NOT using a Dynex 802.11b router, the default name should have concerns about your network's performance that your Wireless Networking Utility (WNU) software by clicking on ...
...your wireless router. The name of Available Networks. The tray icon should look like this checklist may be red or green): • The window that opens should be related to range or obstruction factors, try moving the computer to a position between five and 10 feet from the ...router (or access point) in order to which you are wireless networks to see "Securing your wireless router. If you are NOT using a Dynex 802.11b router, the default name should have concerns about your network's performance that your Wireless Networking Utility (WNU) software by clicking on ...

User Manual (English)
Page 23
... Panel, Network Connections, then double-click your card's connection. Changing the wireless channel - In the Properties dialog, select the Configure button on the General tab (Windows 98 users will be that connection speed may choose from the wireless router. Troubleshooting 23 Check the SSID settings to see your router's (or access...
... Panel, Network Connections, then double-click your card's connection. Changing the wireless channel - In the Properties dialog, select the Configure button on the General tab (Windows 98 users will be that connection speed may choose from the wireless router. Troubleshooting 23 Check the SSID settings to see your router's (or access...
User Manual (English)
Page 24
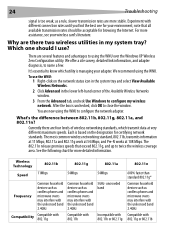
...the WNU to know which transmit data at very different maximum speeds. 24 Troubleshooting signal is unchecked, click OK to close the window. For more detailed information. It's essential to configure the network adapter. Each is managing your adapter. There are four levels ...faster than standard 802.11g* Common household devices such as a rule, slower transmission rates are now using the WNU over the Windows XP Wireless Zero Configuration utility. See the following chart for browsing the Internet. We recommend using the WNU. Experiment with different connection...
...the WNU to know which transmit data at very different maximum speeds. 24 Troubleshooting signal is unchecked, click OK to close the window. For more detailed information. It's essential to configure the network adapter. Each is managing your adapter. There are four levels ...faster than standard 802.11g* Common household devices such as a rule, slower transmission rates are now using the WNU over the Windows XP Wireless Zero Configuration utility. See the following chart for browsing the Internet. We recommend using the WNU. Experiment with different connection...

