
User Manual (English)
Page 2
ii Dynex DX-32L151A11/DX-37L130A11 32" and 37" LCD TVs Contents CHILD SAFETY 1 Important safety instructions ...Programming a universal remote control to work with your TV 8 Making connections 8 Selecting a location 8 Connecting the power 8 Connecting an HDMI device 9 Connecting a component video device 9 Connecting an antenna, cable TV, or satellite TV box 9 Connecting a VCR, camcorder,... time 11 Understanding the basics 12 Turning your TV on or off 12 Selecting the video input source 12 Selecting a channel 12 Adjusting the volume 13 Displaying program information 13 On-screen ...
ii Dynex DX-32L151A11/DX-37L130A11 32" and 37" LCD TVs Contents CHILD SAFETY 1 Important safety instructions ...Programming a universal remote control to work with your TV 8 Making connections 8 Selecting a location 8 Connecting the power 8 Connecting an HDMI device 9 Connecting a component video device 9 Connecting an antenna, cable TV, or satellite TV box 9 Connecting a VCR, camcorder,... time 11 Understanding the basics 12 Turning your TV on or off 12 Selecting the video input source 12 Selecting a channel 12 Adjusting the volume 13 Displaying program information 13 On-screen ...

User Manual (English)
Page 11
...as sunshine, fire, or other heat sources. Using the remote control DX-32L151A11/DX-37L130A11 7 Item Name Description 3 HDMI Press once to select a device connected to display the information banner. For more information, see "Selecting the video input source" on page 12. You can cause a rash. Press to ...the HDMI 1 jack. symbols on -screen menu. 22 SLEEP Press to excessive heat such as they become ...
...as sunshine, fire, or other heat sources. Using the remote control DX-32L151A11/DX-37L130A11 7 Item Name Description 3 HDMI Press once to select a device connected to display the information banner. For more information, see "Selecting the video input source" on page 12. You can cause a rash. Press to ...the HDMI 1 jack. symbols on -screen menu. 22 SLEEP Press to excessive heat such as they become ...
User Manual (English)
Page 13
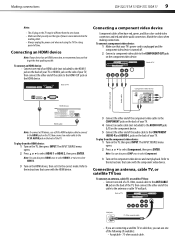
... of the TV. To play from the component video device: 1 Turn on the component video device. The INPUT SOURCE menu opens. 2 Press or to select Component, then press ENTER. Making connections DX-32L151A11/DX-37L130A11 9 Notes: • The AC plug on the TV may be different from the one shown. &#...8226; Make sure that you only use the type of power source indicated on the TV, then press INPUT. Connecting an HDMI device Note: If your TV.
... of the TV. To play from the component video device: 1 Turn on the component video device. The INPUT SOURCE menu opens. 2 Press or to select Component, then press ENTER. Making connections DX-32L151A11/DX-37L130A11 9 Notes: • The AC plug on the TV may be different from the one shown. &#...8226; Make sure that you only use the type of power source indicated on the TV, then press INPUT. Connecting an HDMI device Note: If your TV.
User Manual (English)
Page 14
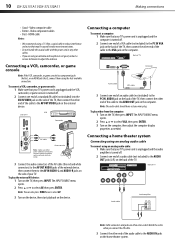
...then connect the other end of the cable to the AUDIO IN jacks on the TV, then press INPUT. The INPUT SOURCE menu opens. 2 Press or to the AUDIO OUT jack on the computer. Connecting a home ...composite cable • Better - To connect a VCR, camcorder, or game console: 1 Make sure that your TV. The INPUT SOURCE menu opens. 2 Press or to connectors. VCR Side of a audio cable (not included) to adjust the antenna.... AV cable Game console Note: Cables are often color-coded. 10 DX-32L151A11/DX-37L130A11 Making connections AV IN VIDEO L AUDIO R HDMI 2 SERVICE PORT • Good -
...then connect the other end of the cable to the AUDIO IN jacks on the TV, then press INPUT. The INPUT SOURCE menu opens. 2 Press or to the AUDIO OUT jack on the computer. Connecting a home ...composite cable • Better - To connect a VCR, camcorder, or game console: 1 Make sure that your TV. The INPUT SOURCE menu opens. 2 Press or to connectors. VCR Side of a audio cable (not included) to adjust the antenna.... AV cable Game console Note: Cables are often color-coded. 10 DX-32L151A11/DX-37L130A11 Making connections AV IN VIDEO L AUDIO R HDMI 2 SERVICE PORT • Good -

User Manual (English)
Page 15
...HDMI 2 SERVICE PORT Digital optical cable 3 Connect the other end of the audio cable to a comfortable level. To connect headphones: • Plug the headphones (not included) into the (headphone) jack on the side of the TV. Back of TV Digital sound system Turning on your TV for the first time DX-32L151A11/DX...program to watch. 2 Turn on the home theater system and select the TV sound source, then adjust the volume to the digital optical input jack on the digital audio system. Connecting headphones Warning: When using a digital optical cable: 1 Make sure that you have inserted the ...
...HDMI 2 SERVICE PORT Digital optical cable 3 Connect the other end of the audio cable to a comfortable level. To connect headphones: • Plug the headphones (not included) into the (headphone) jack on the side of the TV. Back of TV Digital sound system Turning on your TV for the first time DX-32L151A11/DX...program to watch. 2 Turn on the home theater system and select the TV sound source, then adjust the volume to the digital optical input jack on the digital audio system. Connecting headphones Warning: When using a digital optical cable: 1 Make sure that you have inserted the ...

User Manual (English)
Page 16
...are using the following remote control buttons: • VIDEO-Press switch to AV input. • HDMI-Press repeatedly to cycle between HDMI inputs. • TV-Press to switch to TV mode. • COMP-Press to switch to Component input. OR - Notes: • During auto scan, digital programs will be ... channel, then press the dot (.) button, then the number buttons again to your TV through the INPUT SOURCE menu. Note: If your TV, it automatically goes into standby mode. 12 DX-32L151A11/DX-37L130A11 Understanding the basics 9 Press or to close the menu. While scanning, the TV displays a...
...are using the following remote control buttons: • VIDEO-Press switch to AV input. • HDMI-Press repeatedly to cycle between HDMI inputs. • TV-Press to switch to TV mode. • COMP-Press to switch to Component input. OR - Notes: • During auto scan, digital programs will be ... channel, then press the dot (.) button, then the number buttons again to your TV through the INPUT SOURCE menu. Note: If your TV, it automatically goes into standby mode. 12 DX-32L151A11/DX-37L130A11 Understanding the basics 9 Press or to close the menu. While scanning, the TV displays a...

User Manual (English)
Page 33
... apparatus complies with a soft, dry cloth. Appareil de réception télévision ordinaire, Canada BETS-7 / NTMR-7 HDMI HDMI, the HDMI logo, and High-Definition Multimedia Interface are extremely dirty, use alcohol, paint thinner, or benzine. • Before using these ...Receiving channels Audio multiples Audio out Power requirement Power consumption Dimensions (W × H × D with stand) Weight Input terminals Output terminals Control terminals LCD 32-inch TFT LCD (DX-32L151A11) 37-inch TFT LCD (DX-37L130A11) NTSC-M, ATSC VHF: 2 - 13 UHF: 14 - 69 CATV: 1 - 125 CADTV: 1-135 ...
... apparatus complies with a soft, dry cloth. Appareil de réception télévision ordinaire, Canada BETS-7 / NTMR-7 HDMI HDMI, the HDMI logo, and High-Definition Multimedia Interface are extremely dirty, use alcohol, paint thinner, or benzine. • Before using these ...Receiving channels Audio multiples Audio out Power requirement Power consumption Dimensions (W × H × D with stand) Weight Input terminals Output terminals Control terminals LCD 32-inch TFT LCD (DX-32L151A11) 37-inch TFT LCD (DX-37L130A11) NTSC-M, ATSC VHF: 2 - 13 UHF: 14 - 69 CATV: 1 - 125 CADTV: 1-135 ...


