
Firmware Installation Guide (English)
Page 1
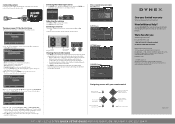
...Note: File needs to open the rubber flap (See photo below do not help, call Dynex Customer Support at (800) 305‐2204 for TV Models: DX‐15L150A11, DX‐19L150A11, DX‐22L150A11, DX‐40L150A11 System requirements: a computer with an open USB port on your computer. 3. ... broadband connection). 5. After saving the firmware to your product model number; If the instructions provided below ). Insert USB flash drive into the TV's USB service port located on the root directory. Note: File size is 1‐2 minutes (with a bit rate lower than 256kbps. Note...
...Note: File needs to open the rubber flap (See photo below do not help, call Dynex Customer Support at (800) 305‐2204 for TV Models: DX‐15L150A11, DX‐19L150A11, DX‐22L150A11, DX‐40L150A11 System requirements: a computer with an open USB port on your computer. 3. ... broadband connection). 5. After saving the firmware to your product model number; If the instructions provided below ). Insert USB flash drive into the TV's USB service port located on the root directory. Note: File size is 1‐2 minutes (with a bit rate lower than 256kbps. Note...
Firmware Installation Guide (English)
Page 2
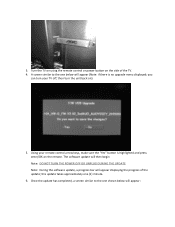
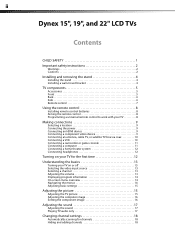
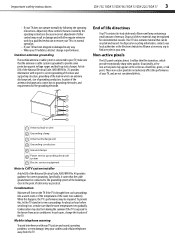
..., then turn your remote control arrow keys, make sure the "Yes" button is no upgrade menu displayed; Turn the TV on using the remote control or power button on ): 5. The software update will then begin Note: DO NOT TURN THE POWER OFF OR UNPLUG DURING ... press enter/OK on the remote. Once the update has completed, a screen similar to the one shown below will appear displaying the progress of the TV. 4. this update takes approximately one (1) minute. 6. you can turn the unit back on the side of the update; 3.
..., then turn your remote control arrow keys, make sure the "Yes" button is no upgrade menu displayed; Turn the TV on using the remote control or power button on ): 5. The software update will then begin Note: DO NOT TURN THE POWER OFF OR UNPLUG DURING ... press enter/OK on the remote. Once the update has completed, a screen similar to the one shown below will appear displaying the progress of the TV. 4. this update takes approximately one (1) minute. 6. you can turn the unit back on the side of the update; 3.
Firmware Installation Guide (English)
Page 3
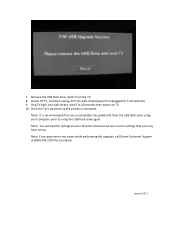
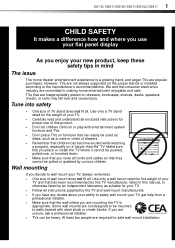
...up the process is recommended that you experience any issues while performing this upgrade, call Dynex Customer Support at (800) 305‐2204 for 5‐10 seconds). 9. Note: It is complete. January 2011 7. Plug TV back into wall socket, wait 5 to using your computer prior to 10 seconds ...then power on TV. 10. Remove the USB flash drive (stick) from wall socket (keep TV unplugged for assistance. Note: You will need to reprogram your favorite channels and any custom settings that you erase/delete...
...up the process is recommended that you experience any issues while performing this upgrade, call Dynex Customer Support at (800) 305‐2204 for 5‐10 seconds). 9. Note: It is complete. January 2011 7. Plug TV back into wall socket, wait 5 to using your computer prior to 10 seconds ...then power on TV. 10. Remove the USB flash drive (stick) from wall socket (keep TV unplugged for assistance. Note: You will need to reprogram your favorite channels and any custom settings that you erase/delete...
Quick Setup Guide (English)
Page 1
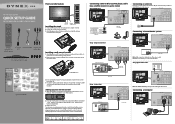
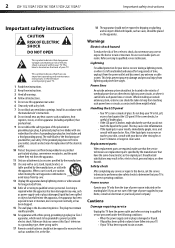
15"/19"/22" LCD TV QUICK SETUP GUIDE DX-15L150A11/DX-19L150A11 /DX-22L150A11 Front and side features Power Remote indicator control sensor Installing the stand 1 Remove the stand from damages and scratches. 2 Remove the three screws holding the TV to its stand column, then remove the stand column. symbols ...in the battery compartment. 3 Replace the cover. Match the colors when you have problems programming your new Dynex TV, see the table below for common codes. Connecting a DVD or Blu-ray DVD player, cable box, satellite receiver or game station ...
15"/19"/22" LCD TV QUICK SETUP GUIDE DX-15L150A11/DX-19L150A11 /DX-22L150A11 Front and side features Power Remote indicator control sensor Installing the stand 1 Remove the stand from damages and scratches. 2 Remove the three screws holding the TV to its stand column, then remove the stand column. symbols ...in the battery compartment. 3 Replace the cover. Match the colors when you have problems programming your new Dynex TV, see the table below for common codes. Connecting a DVD or Blu-ray DVD player, cable box, satellite receiver or game station ...
Quick Setup Guide (English)
Page 2
...you are asked to close the menu. 15" • 19" • 22" LCD TV I QUICK SETUP GUIDE I DX-15L150A11/DX-19L150A11 /DX-22L150A11 English 09-1037 09-0xxx E XIT Press to highlight Home Mode (recommended) or Retail Mode....and resolution. • Digital mode information-Displays the channel number, station name, channel label, broadcast program name,TV rating, signal type, audio information, resolution, CC mode, current time, and current program start and end ... on . The initial Setup Wizard opens. Av. DYNEX is a trademark of the video source buttons directly. Navigating menus with your...
...you are asked to close the menu. 15" • 19" • 22" LCD TV I QUICK SETUP GUIDE I DX-15L150A11/DX-19L150A11 /DX-22L150A11 English 09-1037 09-0xxx E XIT Press to highlight Home Mode (recommended) or Retail Mode....and resolution. • Digital mode information-Displays the channel number, station name, channel label, broadcast program name,TV rating, signal type, audio information, resolution, CC mode, current time, and current program start and end ... on . The initial Setup Wizard opens. Av. DYNEX is a trademark of the video source buttons directly. Navigating menus with your...
User Manual (English)
Page 2
ii Dynex 15", 19", and 22" LCD TVs Contents CHILD SAFETY 1 Important safety instructions 2 Warnings 2 Cautions 2 Installing and removing the stand 4 Installing the stand 4 Installing a wall-mount bracket 4 TV components 5 Accessories 5 Front 5 Back 6 Side 6 Remote control 7 Using the remote control 8 Installing remote control batteries...a computer 11 Connecting a home theater system 12 Connecting headphones 12 Turning on your TV for the first time 12 Understanding the basics 13 Turning your TV on or off 13 Selecting the video input source 13 Selecting a channel 13 Adjusting...
ii Dynex 15", 19", and 22" LCD TVs Contents CHILD SAFETY 1 Important safety instructions 2 Warnings 2 Cautions 2 Installing and removing the stand 4 Installing the stand 4 Installing a wall-mount bracket 4 TV components 5 Accessories 5 Front 5 Back 6 Side 6 Remote control 7 Using the remote control 8 Installing remote control batteries...a computer 11 Connecting a home theater system 12 Connecting headphones 12 Turning on your TV for the first time 12 Understanding the basics 13 Turning your TV on or off 13 Selecting the video input source 13 Selecting a channel 13 Adjusting...

User Manual (English)
Page 3
...parental control levels 21 Using closed captioning 24 Turning closed captioning on or off 24 Selecting the closed captioning mode 24 Customizing digital TV closed captioning styles 24 Adjusting time settings 25 Setting the clock 25 Setting the sleep timer 26 Adjusting menu settings 26 Selecting the... 27 Restoring default settings 27 Troubleshooting 28 Video and audio 28 Remote control 28 General 29 Maintenance 29 Cleaning the TV cabinet 29 Cleaning the TV screen 29 Specifications 29 Legal notices 29 One-year limited warranty 31 US and Canada Markets 31 Mexico Market 31
...parental control levels 21 Using closed captioning 24 Turning closed captioning on or off 24 Selecting the closed captioning mode 24 Customizing digital TV closed captioning styles 24 Adjusting time settings 25 Setting the clock 25 Setting the sleep timer 26 Adjusting menu settings 26 Selecting the... 27 Restoring default settings 27 Troubleshooting 28 Video and audio 28 Remote control 28 General 29 Maintenance 29 Cleaning the TV cabinet 29 Cleaning the TV screen 29 Specifications 29 Legal notices 29 One-year limited warranty 31 US and Canada Markets 31 Mexico Market 31
User Manual (English)
Page 4
... play with steel studs or cinder blocks. DX-15L150A11/DX19L150A11/DX-22L150A11 1 f CHILD SAFETY It makes a difference how and where you use of this manual, or otherwise listed by an independent laboratory as a crate or chest of drawers. • Remember that they cannot be heavy. TVs that the wall where you decide to making...
... play with steel studs or cinder blocks. DX-15L150A11/DX19L150A11/DX-22L150A11 1 f CHILD SAFETY It makes a difference how and where you use of this manual, or otherwise listed by an independent laboratory as a crate or chest of drawers. • Remember that they cannot be heavy. TVs that the wall where you decide to making...
User Manual (English)
Page 5
...requiring service Unplug this Class I apparatus, which needs to rain or water. If the provided plug does not fit into your TV. • If your outlet, consult an electrician for replacement of the obsolete outlet. 10 Protect the power cord from being ... and consult with the apparatus. A polarized plug has two blades with them might be taken to qualified service personnel. 2 DX-15L150A11/DX19L150A11/DX-22L150A11 Important safety instructions Important safety instructions CAUTION RISK OF ELECTRIC SHOCK DO NOT OPEN This symbol indicates that dangerous voltage constituting a ...
...requiring service Unplug this Class I apparatus, which needs to rain or water. If the provided plug does not fit into your TV. • If your outlet, consult an electrician for replacement of the obsolete outlet. 10 Protect the power cord from being ... and consult with the apparatus. A polarized plug has two blades with them might be taken to qualified service personnel. 2 DX-15L150A11/DX19L150A11/DX-22L150A11 Important safety instructions Important safety instructions CAUTION RISK OF ELECTRIC SHOCK DO NOT OPEN This symbol indicates that dangerous voltage constituting a ...
User Manual (English)
Page 6
... 5 Ground clamps 6 Power service grounding electrode system 7 Electric service equipment Note to grounding electrodes, and requirements for correct grounding. Important safety instructions DX-15L150A11/DX19L150A11/DX-22L150A11 3 • If your TV, make sure that the room temperature rises gradually. Your TV also contains material that can be impaired. Specifically, it on the screen as practical.
... 5 Ground clamps 6 Power service grounding electrode system 7 Electric service equipment Note to grounding electrodes, and requirements for correct grounding. Important safety instructions DX-15L150A11/DX19L150A11/DX-22L150A11 3 • If your TV, make sure that the room temperature rises gradually. Your TV also contains material that can be impaired. Specifically, it on the screen as practical.
User Manual (English)
Page 7
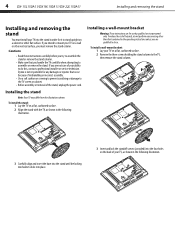
... If you are qualified to mount your TV on the back of hazards, do this, contact a professional installer or service technician. Dynex is not responsible for any servicing other flat surface. 4 DX-15L150A11/DX19L150A11/DX-22L150A11 Installing and removing the stand Installing and removing... the stand You must install your TV into the four holes on a wall or ...
... If you are qualified to mount your TV on the back of hazards, do this, contact a professional installer or service technician. Dynex is not responsible for any servicing other flat surface. 4 DX-15L150A11/DX19L150A11/DX-22L150A11 Installing and removing the stand Installing and removing... the stand You must install your TV into the four holes on a wall or ...
User Manual (English)
Page 8
... the next channel. Unplug the power cord to select the previous channel. In TV mode, press to disconnect power. In menu mode, press to move up. TV components DX-15L150A11/DX19L150A11/DX-22L150A11 5 4 Secure the wall-mount bracket to the back of your TV: • Remote control • Component video cable and audio cable L and R •...
... the next channel. Unplug the power cord to select the previous channel. In TV mode, press to disconnect power. In menu mode, press to move up. TV components DX-15L150A11/DX19L150A11/DX-22L150A11 5 4 Secure the wall-mount bracket to the back of your TV: • Remote control • Component video cable and audio cable L and R •...

User Manual (English)
Page 9
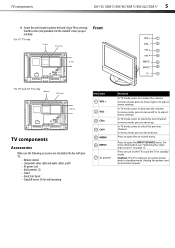
..." on page 9. For more information, see "Connecting using digital audio cable" on page 10. 4 PC IN VGA connection Connect a computer to a digital sound system. 6 DX-15L150A11/DX19L150A11/DX-22L150A11 TV components Back Side 1 45 1 6 2 2 7 3 ANT/CABLE IN 8 3 4 10 9 Item Name Description Connect an S-Video device to this jack. For more information, see "Connecting an...
..." on page 9. For more information, see "Connecting using digital audio cable" on page 10. 4 PC IN VGA connection Connect a computer to a digital sound system. 6 DX-15L150A11/DX19L150A11/DX-22L150A11 TV components Back Side 1 45 1 6 2 2 7 3 ANT/CABLE IN 8 3 4 10 9 Item Name Description Connect an S-Video device to this jack. For more information, see "Connecting an...
User Manual (English)
Page 10
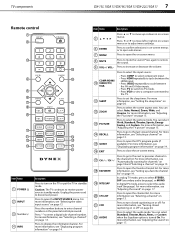
...Press to open the channel list. Press or to move up a favorite channel list" on page 13. For more information, see "Adjusting the TV picture" on -screen menus or to adjust menu settings. Unplug the power cord to restore the sound. 9 VOL+ / VOL- You can ... program guide (if available). Press to enter a digital sub-channel number. For more information, see "Setting the sleep timer" on the TV or put the TV in standby mode. TV components DX-15L150A11/DX19L150A11/DX-22L150A11 7 Remote control 1 2 3 14 4 15 5 6 7 16 8 9 17 18 10 11 19 12 20 13 21 22 Item...
...Press to open the channel list. Press or to move up a favorite channel list" on page 13. For more information, see "Adjusting the TV picture" on -screen menus or to adjust menu settings. Unplug the power cord to restore the sound. 9 VOL+ / VOL- You can ... program guide (if available). Press to enter a digital sub-channel number. For more information, see "Setting the sleep timer" on the TV or put the TV in standby mode. TV components DX-15L150A11/DX19L150A11/DX-22L150A11 7 Remote control 1 2 3 14 4 15 5 6 7 16 8 9 17 18 10 11 19 12 20 13 21 22 Item...
User Manual (English)
Page 11
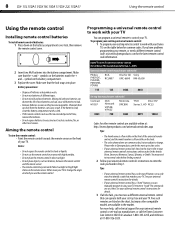
...remote sensor on the front of the universal remote control, and the model number is not used for common codes. 8 DX-15L150A11/DX19L150A11/DX-22L150A11 Using the remote control Using the remote control Installing remote control batteries To install remote control batteries: 1 Press down on ...are subject to control your universal remote control or set -top box and your universal remote control's instructions for details. 3 If all Dynex TVs manufactured after Jan. 1, 2007) Universal remote control manufacturer and model Philips PHDVD5, PH5DSS, PMDVR8, PDVR8 RCA RCU807 One for All ...
...remote sensor on the front of the universal remote control, and the model number is not used for common codes. 8 DX-15L150A11/DX19L150A11/DX-22L150A11 Using the remote control Using the remote control Installing remote control batteries To install remote control batteries: 1 Press down on ...are subject to control your universal remote control or set -top box and your universal remote control's instructions for details. 3 If all Dynex TVs manufactured after Jan. 1, 2007) Universal remote control manufacturer and model Philips PHDVD5, PH5DSS, PMDVR8, PDVR8 RCA RCU807 One for All ...

User Manual (English)
Page 12
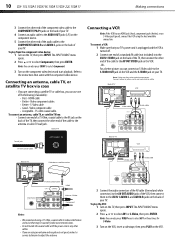
.... To connect a component video device: 1 Make sure that your TV's power cord is unplugged and the component video device is turned off and that the power cords are unplugged. Making connections DX-15L150A11/DX19L150A11/DX-22L150A11 9 Making connections Before you make any connections: • Check the... plugs on the ends of cables to make sure that the TV and the device are turned off . 2 Connect a component ...
.... To connect a component video device: 1 Make sure that your TV's power cord is unplugged and the component video device is turned off and that the power cords are unplugged. Making connections DX-15L150A11/DX19L150A11/DX-22L150A11 9 Making connections Before you make any connections: • Check the... plugs on the ends of cables to make sure that the TV and the device are turned off . 2 Connect a component ...
User Manual (English)
Page 13
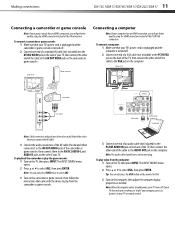
...end of a standard AV cable (not included) into the AV IN 1 VIDEO jack on the back of the TV, then connect the other end of your TV. 10 DX-15L150A11/DX19L150A11/DX-22L150A11 Making connections 3 Connect the other end of the component video cable to the COMPONENT Y/Pb/Pr jacks on the ...back of your TV. 4 Connect an audio cable to the AUDIO OUT jacks (L/R) on the component device. 5 Connect the...
...end of a standard AV cable (not included) into the AV IN 1 VIDEO jack on the back of the TV, then connect the other end of your TV. 10 DX-15L150A11/DX19L150A11/DX-22L150A11 Making connections 3 Connect the other end of the component video cable to the COMPONENT Y/Pb/Pr jacks on the ...back of your TV. 4 Connect an audio cable to the AUDIO OUT jacks (L/R) on the component device. 5 Connect the...
User Manual (English)
Page 14
... the camcorder or game console, then follow the instructions that came with the device to play from the computer: 1 Turn on your TV or remote control. Making connections DX-15L150A11/DX19L150A11/DX-22L150A11 11 Connecting a camcorder or game console Note: If your game console has an HDMI connection, you will get better quality using...
... the camcorder or game console, then follow the instructions that came with the device to play from the computer: 1 Turn on your TV or remote control. Making connections DX-15L150A11/DX19L150A11/DX-22L150A11 11 Connecting a camcorder or game console Note: If your game console has an HDMI connection, you will get better quality using...
User Manual (English)
Page 15
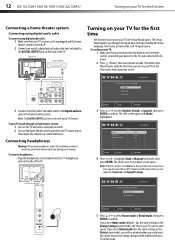
... options you have inserted the batteries in this mode, because no energy savings will be asked whether you really want this mode. 12 DX-15L150A11/DX19L150A11/DX-22L150A11 Turning on your TV for the first time The first time you turn on the home theater system. To configure your... TV: 1 Make sure that your TV's power cord is unplugged and the home theater system is set to the Choose your menu language screen. Connecting headphones Warning: When ...
... options you have inserted the batteries in this mode, because no energy savings will be asked whether you really want this mode. 12 DX-15L150A11/DX19L150A11/DX-22L150A11 Turning on your TV for the first time The first time you turn on the home theater system. To configure your... TV: 1 Make sure that your TV's power cord is unplugged and the home theater system is set to the Choose your menu language screen. Connecting headphones Warning: When ...
User Manual (English)
Page 16
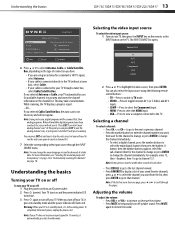
... on page 26 or "Automatically scanning for available channels in your TV, it and the TV will not appear. Adjusting the volume To adjust the volume: • Press VOL+ or VOL- Understanding the basics DX-15L150A11/DX19L150A11/DX-22L150A11 13 Selecting the video input source To select the video input source:... 1 Turn on your TV, then press the INPUT key on the remote, or the INPUT button on page 18. ...
... on page 26 or "Automatically scanning for available channels in your TV, it and the TV will not appear. Adjusting the volume To adjust the volume: • Press VOL+ or VOL- Understanding the basics DX-15L150A11/DX19L150A11/DX-22L150A11 13 Selecting the video input source To select the video input source:... 1 Turn on your TV, then press the INPUT key on the remote, or the INPUT button on page 18. ...


