User Guide
Page 3
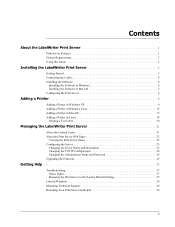
... Windows XP 9 Adding a Printer in Windows Vista 13 Adding a Printer in Mac OS 17 Adding a Printer in Linux 18 Printing a Test Label 20 Managing the LabelWriter Print Server 21 About the Control Center 21 About the Print Server Web Pages 22 Viewing the Print Server Status 23 Configuring the Server 23 Changing the Server Name and Description 23 Changing the TCP/IP Configuration 24 Changing the Administrator Name and Password 24 Upgrading the Firmware 25 Getting Help 27 Troubleshooting 27 Status Lights 27 Restoring the Print Server to the Factory Default Settings...
... Windows XP 9 Adding a Printer in Windows Vista 13 Adding a Printer in Mac OS 17 Adding a Printer in Linux 18 Printing a Test Label 20 Managing the LabelWriter Print Server 21 About the Control Center 21 About the Print Server Web Pages 22 Viewing the Print Server Status 23 Configuring the Server 23 Changing the Server Name and Description 23 Changing the TCP/IP Configuration 24 Changing the Administrator Name and Password 24 Upgrading the Firmware 25 Getting Help 27 Troubleshooting 27 Status Lights 27 Restoring the Print Server to the Factory Default Settings...
User Guide
Page 5
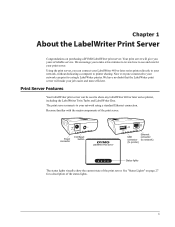
... the print server. Chapter 1 About the LabelWriter Print Server Congratulations on page 27 for your print server. Now everyone connected to your job easier and more efficient. We have no doubt that the LabelWriter print server will give you can print to printer sharing. The print server connects to network) POWER LINK ACTIVE USB Status lights The status lights visually show the current state of the print server. DC-IN Power connector Init/Reset button LAN USB USB connector (to printer) Ethernet...
... the print server. Chapter 1 About the LabelWriter Print Server Congratulations on page 27 for your print server. Now everyone connected to your job easier and more efficient. We have no doubt that the LabelWriter print server will give you can print to printer sharing. The print server connects to network) POWER LINK ACTIVE USB Status lights The status lights visually show the current state of the print server. DC-IN Power connector Init/Reset button LAN USB USB connector (to printer) Ethernet...
User Guide
Page 6
... installing and using the print server. See "Adding a Printer in features, procedures, or commands are unable to solve a problem, this User Guide may not apply to your computer. Getting Help Technical and Certification Information This chapter offers suggestions for the DYMO LabelWriter print server on the Windows, Macintosh, and Linux platforms. For the most part, the software operates in the same way on all platforms. Any differences in Linux" on changing the server configuration...
... installing and using the print server. See "Adding a Printer in features, procedures, or commands are unable to solve a problem, this User Guide may not apply to your computer. Getting Help Technical and Certification Information This chapter offers suggestions for the DYMO LabelWriter print server on the Windows, Macintosh, and Linux platforms. For the most part, the software operates in the same way on all platforms. Any differences in Linux" on changing the server configuration...
User Guide
Page 7
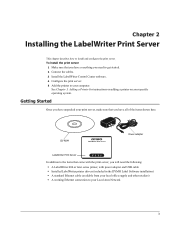
... print server 1 Make sure that you will need to get started. 2 Connect the cables. 3 Install the LabelWriter Control Center software. 4 Configure the print server. 5 Add the printer to the items that you have everything you need the following: • A LabelWriter 400 or later series printer, with power adapter and USB cable • Installed LabelWriter printer drivers (included in the DYMO Label Software installation) • A standard Ethernet cable (available from your local office supply and other retailers) • A working Ethernet connection to install and configure the print...
... print server 1 Make sure that you will need to get started. 2 Connect the cables. 3 Install the LabelWriter Control Center software. 4 Configure the print server. 5 Add the printer to the items that you have everything you need the following: • A LabelWriter 400 or later series printer, with power adapter and USB cable • Installed LabelWriter printer drivers (included in the DYMO Label Software installation) • A standard Ethernet cable (available from your local office supply and other retailers) • A working Ethernet connection to install and configure the print...

User Guide
Page 8
... print server gives you need to configure and manage your CD-ROM drive. Installing the Software The Control Center software included with your network. After a few seconds, the installation screen appears. The Run dialog box appears. Installing the LabelWriter Print Server Connecting the Cables The print server connects directly to your printer is the letter assigned to the CD-ROM drive) and click OK. 2 Click Install Application and follow the instructions in Windows XP and Windows Vista. POWER LINK ACTIVE USB...
... print server gives you need to configure and manage your CD-ROM drive. Installing the Software The Control Center software included with your network. After a few seconds, the installation screen appears. The Run dialog box appears. Installing the LabelWriter Print Server Connecting the Cables The print server connects directly to your printer is the letter assigned to the CD-ROM drive) and click OK. 2 Click Install Application and follow the instructions in Windows XP and Windows Vista. POWER LINK ACTIVE USB...
User Guide
Page 10
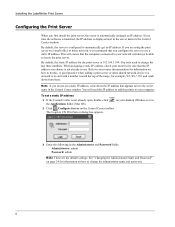
... Control Center window. You only need this . Administrator: admin Password: admin Note These are using the print server on the Control Center toolbar. Refer to your desktop (Windows) or in the Administrator and Password fields. By default, the server is to change the last three numbers. To set a static IP address, write down from there. The Login to automatically get an IP address. A good practice when adding a print server or other shared network device to a network is configured to LW Print Server dialog box...
... Control Center window. You only need this . Administrator: admin Password: admin Note These are using the print server on the Control Center toolbar. Refer to your desktop (Windows) or in the Administrator and Password fields. By default, the server is to change the last three numbers. To set a static IP address, write down from there. The Login to automatically get an IP address. A good practice when adding a print server or other shared network device to a network is configured to LW Print Server dialog box...

User Guide
Page 11
... to your specific operating system. 7 you will need to add the printer to close the TCP/IP Configuration dialog box. See Chapter 3, Adding a Printer for information on adding the printer in your computer. Next, you want to use in the Control Center window. Configuring the Print Server 5 Select Static IP. 6 Enter the IP address you need this IP address; 4 Click Login. Note Write down this IP address to add the printer to the server name in...
... to your specific operating system. 7 you will need to add the printer to close the TCP/IP Configuration dialog box. See Chapter 3, Adding a Printer for information on adding the printer in your computer. Next, you want to use in the Control Center window. Configuring the Print Server 5 Select Static IP. 6 Enter the IP address you need this IP address; 4 Click Login. Note Write down this IP address to add the printer to the server name in...

User Guide
Page 13
... tape printer to add a printer. Click Next. 9 The printer drivers are included in Windows XP, Windows Vista, Mac, and Linux. The Add Printer Wizard starts. 3 Click Next. 4 On the Local or Network Printer page, do the following: a. You must have the LabelWriter printer drivers installed on your local computer to your computer. Select Local printer attached to your network. c. Chapter 3 Adding a Printer In order to print to the LabelWriter printer that is connected to the print server...
... tape printer to add a printer. Click Next. 9 The printer drivers are included in Windows XP, Windows Vista, Mac, and Linux. The Add Printer Wizard starts. 3 Click Next. 4 On the Local or Network Printer page, do the following: a. You must have the LabelWriter printer drivers installed on your local computer to your computer. Select Local printer attached to your network. c. Chapter 3 Adding a Printer In order to print to the LabelWriter printer that is connected to the print server...

User Guide
Page 14
... Settings. 10 Adding a Printer 5 On the Select a Printer Port page, do the following : a. Click Next. Select Create a new port. Choose Standard TCP/IP Port from the Type of port list. The port name is filled in the Port Name field. b. b. (Optional) Enter a new name for the port in automatically. c. When adding a LabelWriter Duo printer, you wrote down when configuring the print server. In the Printer Name or IP Address field, enter the IP address...
... Settings. 10 Adding a Printer 5 On the Select a Printer Port page, do the following : a. Click Next. Select Create a new port. Choose Standard TCP/IP Port from the Type of port list. The port name is filled in the Port Name field. b. b. (Optional) Enter a new name for the port in automatically. c. When adding a LabelWriter Duo printer, you wrote down when configuring the print server. In the Printer Name or IP Address field, enter the IP address...
User Guide
Page 18
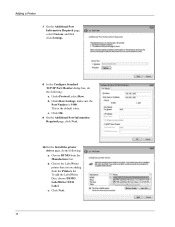
.... 14 Adding a Printer 7 On the Additional Port Information Required page, select Custom, and then click Settings. 8 In the Configure Standard TCP/IP Port Monitor dialog box, do the following : a. Click OK. 9 On the Additional Port Information Required page, click Next. 10 On the Install the printer driver page, do the following : a. Choose DYMO from the Printers list. b. Under Raw Settings, make sure the Port Number is the default value...
.... 14 Adding a Printer 7 On the Additional Port Information Required page, select Custom, and then click Settings. 8 In the Configure Standard TCP/IP Port Monitor dialog box, do the following : a. Click OK. 9 On the Additional Port Information Required page, click Next. 10 On the Install the printer driver page, do the following : a. Choose DYMO from the Printers list. b. Under Raw Settings, make sure the Port Number is the default value...
User Guide
Page 19
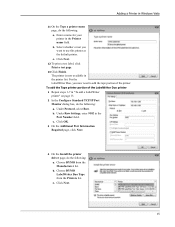
... your printer in the Port Number field. The printer is now available in "To add a LabelWriter printer" on page 13. 2 In the Configure Standard TCP/IP Port Monitor dialog box, do the following : a. Choose DYMO from the Printers list. c. Adding a Printer in Windows Vista 11 On the Type a printer name page, do the following: a. b. Click OK. 3 On the Additional Port Information Required page, click Next. 4 On the Install the printer driver page...
... your printer in the Port Number field. The printer is now available in "To add a LabelWriter printer" on page 13. 2 In the Configure Standard TCP/IP Port Monitor dialog box, do the following : a. Choose DYMO from the Printers list. c. Adding a Printer in Windows Vista 11 On the Type a printer name page, do the following: a. b. Click OK. 3 On the Additional Port Information Required page, click Next. 4 On the Install the printer driver page...

User Guide
Page 21
... the Apple menu. 2 Click Print & Fax. 3 Click at the bottom of the Printers list. 2 Click Default on the toolbar. 5 Select lw print server-nnn-usb1 from the Printer Name list. For the LabelWriter Duo, you will add this printer later. The Print Using field is filled in automatically. 4 (Optional) Enter a name for the printer. 7 Click Add. Note If you are adding a LabelWriter Duo printer, you now need to add...
... the Apple menu. 2 Click Print & Fax. 3 Click at the bottom of the Printers list. 2 Click Default on the toolbar. 5 Select lw print server-nnn-usb1 from the Printer Name list. For the LabelWriter Duo, you will add this printer later. The Print Using field is filled in automatically. 4 (Optional) Enter a name for the printer. 7 Click Add. Note If you are adding a LabelWriter Duo printer, you now need to add...

User Guide
Page 22
... the Model list, and then click Add Printer. However, the steps in Linux DYMO does not officially support installing the print server on a Linux system. If you see the Tape printer and not the Label printer in the Available Printers list, click Reload until the Label printer is displayed in the list. 4 Make any Web browser and go to the CUPS Home Page, http://localhost:631. 2 Select the Administration tab...
... the Model list, and then click Add Printer. However, the steps in Linux DYMO does not officially support installing the print server on a Linux system. If you see the Tape printer and not the Label printer in the Available Printers list, click Reload until the Label printer is displayed in the list. 4 Make any Web browser and go to the CUPS Home Page, http://localhost:631. 2 Select the Administration tab...
User Guide
Page 25
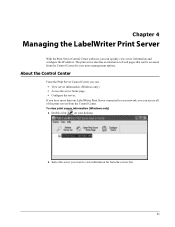
... more than one LabelWriter Print Server connected to view information for from the servers list. 21 About the Control Center From the Print Server Control Center you can access all of web pages that can be accessed from the Control Center. To view print server information (Windows only) 1 Double-click on your desktop. 2 Select the server you want to your network, you can quickly view server information and configure the IP address.
... more than one LabelWriter Print Server connected to view information for from the servers list. 21 About the Control Center From the Print Server Control Center you can access all of web pages that can be accessed from the Control Center. To view print server information (Windows only) 1 Double-click on your desktop. 2 Select the server you want to your network, you can quickly view server information and configure the IP address.
User Guide
Page 26
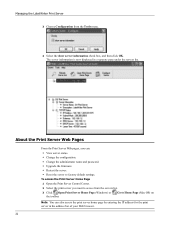
... Page (Mac OS) on Note You can : • View server status. • Change the configuration. • Change the administrator name and password. • Upgrade the firmware. • Restart the server. • Reset the server to access from the Tools menu. 4 Select the show server information check box, and then click OK. About the Print Server Web Pages From the Print Server Web pages, you want to factory default settings. To access the Print Server Home Page 1 Open the Print Server Control Center...
... Page (Mac OS) on Note You can : • View server status. • Change the configuration. • Change the administrator name and password. • Upgrade the firmware. • Restart the server. • Reset the server to access from the Tools menu. 4 Select the show server information check box, and then click OK. About the Print Server Web Pages From the Print Server Web pages, you want to factory default settings. To access the Print Server Home Page 1 Open the Print Server Control Center...

User Guide
Page 27
... the print server. To access the print server Configuration page 1 Click Config at the top of the Configuration page. 2 Enter a new name for the server in the Server Name field. 3 Enter a new description for information on the left side of the Print Server home page. See "Changing the Administrator Name and Password" on page 24 for the server in the Administrator and Password fields, and then click Login. Administrator: admin Password: admin Note These are updated...
... the print server. To access the print server Configuration page 1 Click Config at the top of the Configuration page. 2 Enter a new name for the server in the Server Name field. 3 Enter a new description for information on the left side of the Print Server home page. See "Changing the Administrator Name and Password" on page 24 for the server in the Administrator and Password fields, and then click Login. Administrator: admin Password: admin Note These are updated...

User Guide
Page 28
... need to change the administrator name and password 1 Click User Accounts on the Configuration page. 2 Select Static IP. 3 Enter the IP address you choose is not already in use. Administrator: admin Password: admin To change the last three numbers. The administrator name and password are set to start with a number toward the top of the Configuration page. 2 Select Automatically get IP by default. Managing the LabelWriter Print Server Changing the TCP/IP Configuration You can change the administrator name or password...
... need to change the administrator name and password 1 Click User Accounts on the Configuration page. 2 Select Static IP. 3 Enter the IP address you choose is not already in use. Administrator: admin Password: admin To change the last three numbers. The administrator name and password are set to start with a number toward the top of the Configuration page. 2 Select Automatically get IP by default. Managing the LabelWriter Print Server Changing the TCP/IP Configuration You can change the administrator name or password...
User Guide
Page 29
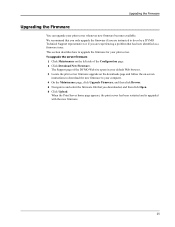
... is upgraded with the new firmware. 25 Upgrading the Firmware Upgrading the Firmware You can upgrade your print server. The Support page of the Configuration page. 2 Click Download New Firmware. This section describes how to upgrade the firmware for your print server whenever new firmware becomes available. To upgrade the server firmware 1 Click Maintenance on -screen instructions to download the new firmware to your default Web browser. 3 Locate the print server firmware upgrade on the downloads page and follow the on the left side of the DYMO Web...
... is upgraded with the new firmware. 25 Upgrading the Firmware Upgrading the Firmware You can upgrade your print server. The Support page of the Configuration page. 2 Click Download New Firmware. This section describes how to upgrade the firmware for your print server whenever new firmware becomes available. To upgrade the server firmware 1 Click Maintenance on -screen instructions to download the new firmware to your default Web browser. 3 Locate the print server firmware upgrade on the downloads page and follow the on the left side of the DYMO Web...
User Guide
Page 31
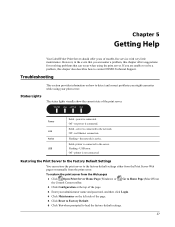
POWER LINK ACTIVE USB Power Link Active USB Solid - the network is connected. Restoring the Print Server to the Factory Default Settings You can occur when using your print server. Troubleshooting This section provides information on the left side of the page. 3 Enter your administrator name and password, and then click Login. 4 Click Maintenance on how to load the factory default settings. 27 Status Lights The status lights visually show the current state of trouble-free service with very little maintenance...
POWER LINK ACTIVE USB Power Link Active USB Solid - the network is connected. Restoring the Print Server to the Factory Default Settings You can occur when using your print server. Troubleshooting This section provides information on the left side of the page. 3 Enter your administrator name and password, and then click Login. 4 Click Maintenance on how to load the factory default settings. 27 Status Lights The status lights visually show the current state of trouble-free service with very little maintenance...
User Guide
Page 32
... instructions. You can obtain additional information and assistance from DYMO. Getting Help When the Print Server home page appears, the print server has been restored to the factory default settings. The print server is covered in the documentation. If you cannot resolve your LabelWriter Print Server. To restore the print server manually 1 Unplug the print server power adapter. 2 Press and hold the Init/Reset button until the Power and USB status lights flash. 4 Unplug the print server power adapter, and then plug the print server power adapter...
... instructions. You can obtain additional information and assistance from DYMO. Getting Help When the Print Server home page appears, the print server has been restored to the factory default settings. The print server is covered in the documentation. If you cannot resolve your LabelWriter Print Server. To restore the print server manually 1 Unplug the print server power adapter. 2 Press and hold the Init/Reset button until the Power and USB status lights flash. 4 Unplug the print server power adapter, and then plug the print server power adapter...