User Manual
Page 4
... Do not place product on stairs. Brushroll continues to continuing use. • Do not pull or carry by cord, use without filters and/or dirt cup in this manual. Do not place cleaner on cord. Not intended for inspection prior to rotate when in . To avoid injury or damage, keep... and moving parts. WARNING: TO REDUCE THE RISK OF FIRE, ELECTRIC SHOCK OR INJURY: • Fully assemble before unplugging. • Use extra care when cleaning on cord. To unplug, grasp the plug, not the cord. • Do not handle plug or appliance with any openings. • Use only as ...
... Do not place product on stairs. Brushroll continues to continuing use. • Do not pull or carry by cord, use without filters and/or dirt cup in this manual. Do not place cleaner on cord. Not intended for inspection prior to rotate when in . To avoid injury or damage, keep... and moving parts. WARNING: TO REDUCE THE RISK OF FIRE, ELECTRIC SHOCK OR INJURY: • Fully assemble before unplugging. • Use extra care when cleaning on cord. To unplug, grasp the plug, not the cord. • Do not handle plug or appliance with any openings. • Use only as ...
User Manual
Page 5
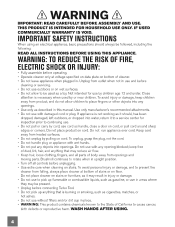
...needs servicing. 5 A NOTICE A THERMAL PROTECTOR HAS BEEN DESIGNED INTO YOUR CLEANER TO PROTECT IT FROM OVERHEATING. Empty dirt cup. 3. Inspect the nozzle inlet, hose connector, hose, dirt cup inlet, cyclonic filter, rinsable filter, and HEPA filter. WARNING: To reduce the risk of electric shock, this...time, as they may continue. Do not expose machine to freezing temperatures. • Do not use . This plug will deactivate and cleaning may cause damage. • Store appropriately indoors in a polarized outlet only one way. SAVE THESE INSTRUCTIONS !' WHEN THE THERMAL PROTECTOR ...
...needs servicing. 5 A NOTICE A THERMAL PROTECTOR HAS BEEN DESIGNED INTO YOUR CLEANER TO PROTECT IT FROM OVERHEATING. Empty dirt cup. 3. Inspect the nozzle inlet, hose connector, hose, dirt cup inlet, cyclonic filter, rinsable filter, and HEPA filter. WARNING: To reduce the risk of electric shock, this...time, as they may continue. Do not expose machine to freezing temperatures. • Do not use . This plug will deactivate and cleaning may cause damage. • Store appropriately indoors in a polarized outlet only one way. SAVE THESE INSTRUCTIONS !' WHEN THE THERMAL PROTECTOR ...

User Manual
Page 6
SECURE YOUR HOSE HERE AND HERE. NOW, WRAP THE CORD AROUND CORD HOOKS! 6 00 RDO@IT\K Off' A D ) INSERT CLEANING WAND INTO TOP OF VAC.
SECURE YOUR HOSE HERE AND HERE. NOW, WRAP THE CORD AROUND CORD HOOKS! 6 00 RDO@IT\K Off' A D ) INSERT CLEANING WAND INTO TOP OF VAC.
User Manual
Page 8
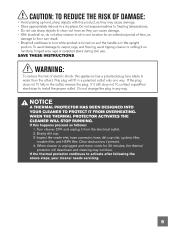
... setting. rm .1.... -""a• ..... ''''7%7......r...-........7..,m.-. ..-.mv L.7.7..:.,r.. : r.z.z M.•.....y=.. ......-m m••m••lm w ,••• .. 4. I k. • • • THE FOLLOWING HEIGHT SETTINGS ARE RECOMMENDED FOR MAXIMUM CLEANING PERFORMANCE. 1. MF..• O.a..F. •M• ANFAMA. ..r, y I ./..N. ...... .....d.... .•-m. .1 rm a•i1 d....... J ; .- 4....-.."....IP.a..la. High Carpet Setting: Great for tile, hardwood, linoleum and more. , .m ....MN...
... setting. rm .1.... -""a• ..... ''''7%7......r...-........7..,m.-. ..-.mv L.7.7..:.,r.. : r.z.z M.•.....y=.. ......-m m••m••lm w ,••• .. 4. I k. • • • THE FOLLOWING HEIGHT SETTINGS ARE RECOMMENDED FOR MAXIMUM CLEANING PERFORMANCE. 1. MF..• O.a..F. •M• ANFAMA. ..r, y I ./..N. ...... .....d.... .•-m. .1 rm a•i1 d....... J ; .- 4....-.."....IP.a..la. High Carpet Setting: Great for tile, hardwood, linoleum and more. , .m ....MN...
User Manual
Page 9
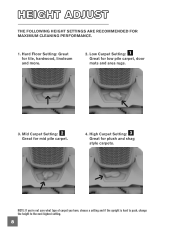
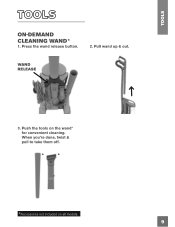
Push the tools on all models. When you're done, twist & pull to take them off. *Accessories not included on the wand* for convenient cleaning. 0 0 ON-DEMAND CLEANING WAND* 1. WAND RELEASE 3. Press the wand release button. 2. Pull wand up & out.
Push the tools on all models. When you're done, twist & pull to take them off. *Accessories not included on the wand* for convenient cleaning. 0 0 ON-DEMAND CLEANING WAND* 1. WAND RELEASE 3. Press the wand release button. 2. Pull wand up & out.
User Manual
Page 10
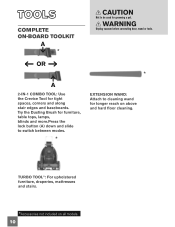
TURBO TOOL®: For upholstered furniture, draperies, mattresses and stairs. *Accessories not included on above and hard floor cleaning. 0 0 COMPLETE ON-BOARD TOOLKIT A L. Try the Dusting Brush for furniture, table tops, lamps, blinds and more.Press the lock button (A) down and ...slide to switch between modes. * EXTENSION WAND: Attach to be used for longer reach on all models. CAUTION Not to cleaning wand for grooming a pet. WARNING Unplug vacuum before connecting hose, wand or tools. 1. 11 A 2-IN-1 COMBO TOOL: Use the Crevice Tool for tight...
TURBO TOOL®: For upholstered furniture, draperies, mattresses and stairs. *Accessories not included on above and hard floor cleaning. 0 0 COMPLETE ON-BOARD TOOLKIT A L. Try the Dusting Brush for furniture, table tops, lamps, blinds and more.Press the lock button (A) down and ...slide to switch between modes. * EXTENSION WAND: Attach to be used for longer reach on all models. CAUTION Not to cleaning wand for grooming a pet. WARNING Unplug vacuum before connecting hose, wand or tools. 1. 11 A 2-IN-1 COMBO TOOL: Use the Crevice Tool for tight...
User Manual
Page 11
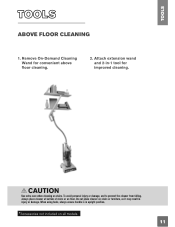
O CAUTION Use extra care when cleaning on floor. To avoid personal injury or damage, and to prevent the cleaner from falling, always place cleaner at bottom of stairs or on stairs. Do not place cleaner on stairs or furniture, as it may result in upright position. *Accessories not included on all models. When using tools, always ensure handle is in injury or damage. Remove On-Demand Cleaning Wand for improved cleaning. 0 0 ABOVE FLOOR CLEANING 1. Attach extension wand and 2-in-1 tool for convenient above floor cleaning. 2.
O CAUTION Use extra care when cleaning on floor. To avoid personal injury or damage, and to prevent the cleaner from falling, always place cleaner at bottom of stairs or on stairs. Do not place cleaner on stairs or furniture, as it may result in upright position. *Accessories not included on all models. When using tools, always ensure handle is in injury or damage. Remove On-Demand Cleaning Wand for improved cleaning. 0 0 ABOVE FLOOR CLEANING 1. Attach extension wand and 2-in-1 tool for convenient above floor cleaning. 2.
User Manual
Page 12
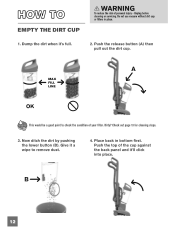
...it a wipe to check the condition of your filter. Push the release button (A) then pull out the dirt cup. Now ditch the dirt by pushing the lower button (B). B-> al 12 Check out page 13 for cleaning steps. 3. MAX FILL LINE OK This would be a good point to remove dust. 4. Push the... top of personal injury - m 0 0 EMPTY THE DIRT CUP inWARNING To reduce the risk of the cup against the back panel and it 's full. 2. Unplug before cleaning or servicing. Dump the dirt when it 'll click into place. Place back in place. 1.
...it a wipe to check the condition of your filter. Push the release button (A) then pull out the dirt cup. Now ditch the dirt by pushing the lower button (B). B-> al 12 Check out page 13 for cleaning steps. 3. MAX FILL LINE OK This would be a good point to remove dust. 4. Push the... top of personal injury - m 0 0 EMPTY THE DIRT CUP inWARNING To reduce the risk of the cup against the back panel and it 's full. 2. Unplug before cleaning or servicing. Dump the dirt when it 'll click into place. Place back in place. 1.
User Manual
Page 13
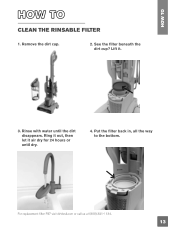
L 3. Put the filter back in, all the way to the bottom. • For replacement filter F97 visit dirtdevil.com or call us at (800) 321-1134. m 0 0 CLEAN THE RINSABLE FILTER 1. Rinse with water until dry. 4. Lift it air dry for 24 hours or until the dirt disappears. See the filter beneath the dirt cup? Remove the dirt cup. 2. Ring it out, then let it .
L 3. Put the filter back in, all the way to the bottom. • For replacement filter F97 visit dirtdevil.com or call us at (800) 321-1134. m 0 0 CLEAN THE RINSABLE FILTER 1. Rinse with water until dry. 4. Lift it air dry for 24 hours or until the dirt disappears. See the filter beneath the dirt cup? Remove the dirt cup. 2. Ring it out, then let it .
User Manual
Page 14
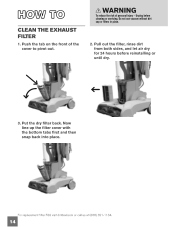
WARNING To reduce the risk of the cover to pivot out. Unplug before reinstalling or until dry. I. 3. Do not use vacuum without dirt cup or filters in place. 2. Pull out the filter, rinse dirt from both sides, and let air dry for 24 hours before cleaning or servicing. Put the dry filter back. m 0 0 CLEAN THE EXHAUST FILTER 1. Push the tab on the front of personal injury - Now line up the filter cover with the bottom tabs first and then snap back into place. r so. ■ • For replacement filter F86 visit dirtdevil.com or call us at (800) 321-1134. 14
WARNING To reduce the risk of the cover to pivot out. Unplug before reinstalling or until dry. I. 3. Do not use vacuum without dirt cup or filters in place. 2. Pull out the filter, rinse dirt from both sides, and let air dry for 24 hours before cleaning or servicing. Put the dry filter back. m 0 0 CLEAN THE EXHAUST FILTER 1. Push the tab on the front of personal injury - Now line up the filter cover with the bottom tabs first and then snap back into place. r so. ■ • For replacement filter F86 visit dirtdevil.com or call us at (800) 321-1134. 14
User Manual
Page 15
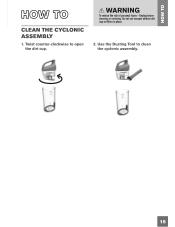
Twist counter-clockwise to clean the cyclonic assembly. ,i,,,.....5 WARNING To reduce the risk of personal injury - Use the Dusting Tool to open the dirt cup. Unplug before cleaning or servicing. Do not use vacuum without dirt cup or filters in place. 2. m 0 0 CLEAN THE CYCLONIC ASSEMBLY 1.
Twist counter-clockwise to clean the cyclonic assembly. ,i,,,.....5 WARNING To reduce the risk of personal injury - Use the Dusting Tool to open the dirt cup. Unplug before cleaning or servicing. Do not use vacuum without dirt cup or filters in place. 2. m 0 0 CLEAN THE CYCLONIC ASSEMBLY 1.
User Manual
Page 16
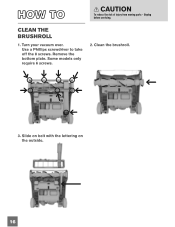
CLEAN THE BRUSHROLL 1. Use a Phillips screwdriver to take off the 8 screws. Unplug before servicing. Turn your vacuum over. Some models only require 6 screws. 4, 0„ •....Q11, 411 4 -Mai 2. Clean the brushroll. • I tif ri. m 16 Remove the bottom plate. Slide on belt with the lettering on the outside. m 0 0 en. CAUTION To reduce the risk of injury from moving parts - Mies -• V 3.
CLEAN THE BRUSHROLL 1. Use a Phillips screwdriver to take off the 8 screws. Unplug before servicing. Turn your vacuum over. Some models only require 6 screws. 4, 0„ •....Q11, 411 4 -Mai 2. Clean the brushroll. • I tif ri. m 16 Remove the bottom plate. Slide on belt with the lettering on the outside. m 0 0 en. CAUTION To reduce the risk of injury from moving parts - Mies -• V 3.
User Manual
Page 18
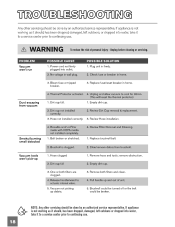
...WARNING To reduce the risk of unit. 5. Thermal Protector activated. 4. Dirt cup not installed correctly. 3. Brushroll is not working as it to a service center prior to continuing use . Review Filter Removal and Cleaning. 1. Vacuum tools won 't run POSSIBLE CAUSE 1. remove obstruction. ...plugged into water, take it to a service center prior to continuing use . Hose clogged 2. Plug unit in home. Dirt cup full. 1. Empty dirt cup. 2. Review Dirt Cup removal & replacement. 3. Belt broken or stretched. 2. Replace brushroll belt. 2. POSSIBLE SOLUTION 1. Replace fuse/reset ...
...WARNING To reduce the risk of unit. 5. Thermal Protector activated. 4. Dirt cup not installed correctly. 3. Brushroll is not working as it to a service center prior to continuing use . Review Filter Removal and Cleaning. 1. Vacuum tools won 't run POSSIBLE CAUSE 1. remove obstruction. ...plugged into water, take it to a service center prior to continuing use . Hose clogged 2. Plug unit in home. Dirt cup full. 1. Empty dirt cup. 2. Review Dirt Cup removal & replacement. 3. Belt broken or stretched. 2. Replace brushroll belt. 2. POSSIBLE SOLUTION 1. Replace fuse/reset ...

