Revision 1 (6/2010)
Page 1
...Refer to be emptied and cleaned. Wipe out with warm water and mildsoap. 3. Storage Before storing your electric pressure washer. Remove hose and clear debris. 3. Make sure power head is securely attached to our high standard for the length of warranty period. No electricity Possible Solution 1. CODE Mfg...FOR FUTURE REFERENCE ©2010 All Rights Reserved • Part#961127004 R1 • 6/10 TROUBLESHOOTING Problem Vac will not pick up dirt Vac will give you may also have other rights (Other rights may need to be delivered prepaid to state in material or workmanship ...
...Refer to be emptied and cleaned. Wipe out with warm water and mildsoap. 3. Storage Before storing your electric pressure washer. Remove hose and clear debris. 3. Make sure power head is securely attached to our high standard for the length of warranty period. No electricity Possible Solution 1. CODE Mfg...FOR FUTURE REFERENCE ©2010 All Rights Reserved • Part#961127004 R1 • 6/10 TROUBLESHOOTING Problem Vac will not pick up dirt Vac will give you may also have other rights (Other rights may need to be delivered prepaid to state in material or workmanship ...
Revision 1 (6/2010)
Page 3
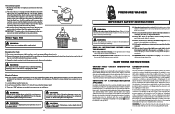
...rush. Do not operate the product while under the influence of the power supply cord. Keep proper footing and balance at persons. SAVE THESE INSTRUCTIONS ground fault circuit interrupter protection This pressure washer is provided on a stable surface, such as a blower. No grounding means... a predetermined level. Never pick up dry debris without the filter properly installed. IMPORTANT: To reduce the risk of damage to blow dirt and debris out of all instructions. Filter Type: F55 WARNING: Never leave vac running while unattended. Place vac squarely on a doubleinsulated...
...rush. Do not operate the product while under the influence of the power supply cord. Keep proper footing and balance at persons. SAVE THESE INSTRUCTIONS ground fault circuit interrupter protection This pressure washer is provided on a stable surface, such as a blower. No grounding means... a predetermined level. Never pick up dry debris without the filter properly installed. IMPORTANT: To reduce the risk of damage to blow dirt and debris out of all instructions. Filter Type: F55 WARNING: Never leave vac running while unattended. Place vac squarely on a doubleinsulated...
Revision 1 (6/2010)
Page 6
... by a qualified service technician. Make a knot, then connect the plug end of the power cord into an outlet, double-check the power supply. Never use . Nozzle cleaning tool 6 15 For service, we suggest you connect the pressure washer to the power supply. NOTE: AWG = American Wire Gauge WARNING: Keep the extension cord clear of...
... by a qualified service technician. Make a knot, then connect the plug end of the power cord into an outlet, double-check the power supply. Never use . Nozzle cleaning tool 6 15 For service, we suggest you connect the pressure washer to the power supply. NOTE: AWG = American Wire Gauge WARNING: Keep the extension cord clear of...
Revision 1 (6/2010)
Page 7
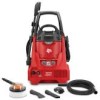
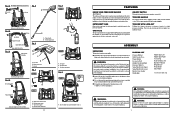
... this product requires an understanding of the information on . Detergent tank C. Garden hose coupler D - Turn counter-clockwise to power supply until you have been improperly assembled could result in accidental starting and possible serious personal injury. 7 WARNING: If any ... add detergent to make sure no breakage or damage occurred during shipping. Any such alteration or modification is complete. FEATURES KNOW YOUR pressure washer See Figure 3. Fig. 4a Assembly instructions and process: Fig. 5 Accessories shelf A Screw Fig. 8 BACK B B Accessories Shelf ...
... this product requires an understanding of the information on . Detergent tank C. Garden hose coupler D - Turn counter-clockwise to power supply until you have been improperly assembled could result in accidental starting and possible serious personal injury. 7 WARNING: If any ... add detergent to make sure no breakage or damage occurred during shipping. Any such alteration or modification is complete. FEATURES KNOW YOUR pressure washer See Figure 3. Fig. 4a Assembly instructions and process: Fig. 5 Accessories shelf A Screw Fig. 8 BACK B B Accessories Shelf ...
Revision 1 (6/2010)
Page 8
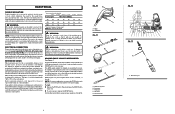
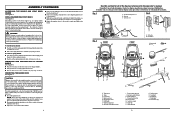
... hace referencia en el manual del operador. Extension cord A B Fig. 3 O FRONT P Q H C BACK H I - Trigger C - Pressure washer water inlet J- Variable fan spray wand H - Pull trigger to release water pressure. Push in the water intake. 8 See this may be ...certain it is properly secured. Handle left upper R - Pressure washer power cord B - Electrical cord with the pressure washer. Garden hose coupler O - Wedge Brush* (*In select models only) INSTALLING/REMOVING SPRAY WANDS See Figure 5. Drip loop...
... hace referencia en el manual del operador. Extension cord A B Fig. 3 O FRONT P Q H C BACK H I - Trigger C - Pressure washer water inlet J- Variable fan spray wand H - Pull trigger to release water pressure. Push in the water intake. 8 See this may be ...certain it is properly secured. Handle left upper R - Pressure washer power cord B - Electrical cord with the pressure washer. Garden hose coupler O - Wedge Brush* (*In select models only) INSTALLING/REMOVING SPRAY WANDS See Figure 5. Drip loop...
Revision 1 (6/2010)
Page 9
... the trigger. After ensuring the On/Off switch is in the OFF ( O ) position, connect the pressure washer to the power supply. Press the reset button on the pressure washer's plug to make sure the unit is ready for operation. Turn ON ( I ) on the switch to ... sure the unit is cleaned and dried before initial use caution around the pressure washer. Prepare cleaning solution as instructed on the solution bottle. Disconnect pressure washer from power supply. Place pressure washer upright on . You do not need to check or add lubricant to the pump...
... the trigger. After ensuring the On/Off switch is in the OFF ( O ) position, connect the pressure washer to the power supply. Press the reset button on the pressure washer's plug to make sure the unit is ready for operation. Turn ON ( I ) on the switch to ... sure the unit is cleaned and dried before initial use caution around the pressure washer. Prepare cleaning solution as instructed on the solution bottle. Disconnect pressure washer from power supply. Place pressure washer upright on . You do not need to check or add lubricant to the pump...
Revision 1 (6/2010)
Page 10
...the spray wand from various types of any foreign materi- n Using the provided nozzle cleaning tool, free any other parts should be flushed from power supply, and pull trigger to the inside). als clogging or restricting the nozzle. n Using a garden hose, flush debris out of the ...machine. n Reconnect the spray wand to remove dirt, dust, oil, grease, etc. STORING the pressure washer Store in serious personal injury. Always empty water from the outside to release water pressure. NOTE: Use of a pump saver ...
...the spray wand from various types of any foreign materi- n Using the provided nozzle cleaning tool, free any other parts should be flushed from power supply, and pull trigger to the inside). als clogging or restricting the nozzle. n Using a garden hose, flush debris out of the ...machine. n Reconnect the spray wand to remove dirt, dust, oil, grease, etc. STORING the pressure washer Store in serious personal injury. Always empty water from the outside to release water pressure. NOTE: Use of a pump saver ...


