Revision 1 (5/2004)
Page 2
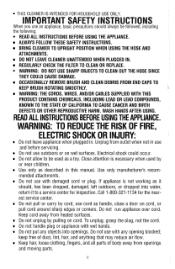
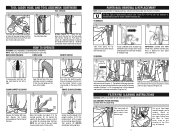
...hands. Do not handle plug or appliance with damaged cord or plug. ALWAYS FOLLOW THESE SAFETY INSTRUCTIONS. BRING CLEANER TO UPRIGHT POSITION WHEN USING THE HOSE AND ATTACHMENTS. OCCASIONALLY REMOVE BRUSH AND CLEAN DEBRIS FROM END CAPS TO KEEP BRUSH ROTATING SMOOTHLY. 1 WARNING: THE CORDS, WIRES, AND/OR ...keep free of body away from openings and moving parts. 2 DO NOT LEAVE CLEANER UNATTENDED WHEN PLUGGED IN. REGULARLY CHECK THE FILTER TO CLEAN OR REPLACE. Use only as a toy. Do not use and before servicing. Do not run appliance over cord. Do not unplug by cord, use an ...
...hands. Do not handle plug or appliance with damaged cord or plug. ALWAYS FOLLOW THESE SAFETY INSTRUCTIONS. BRING CLEANER TO UPRIGHT POSITION WHEN USING THE HOSE AND ATTACHMENTS. OCCASIONALLY REMOVE BRUSH AND CLEAN DEBRIS FROM END CAPS TO KEEP BRUSH ROTATING SMOOTHLY. 1 WARNING: THE CORDS, WIRES, AND/OR ...keep free of body away from openings and moving parts. 2 DO NOT LEAVE CLEANER UNATTENDED WHEN PLUGGED IN. REGULARLY CHECK THE FILTER TO CLEAN OR REPLACE. Use only as a toy. Do not use and before servicing. Do not run appliance over cord. Do not unplug by cord, use an ...
Revision 1 (5/2004)
Page 4
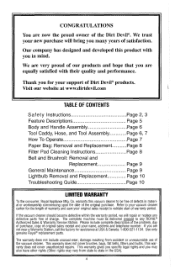
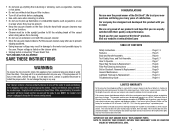
... Page 6 Tool Caddy, Hose, and Tool Assembly Page 6, 7 How To Operate Page 7 Paper Bag: Removal and Replacement...........Page 8 Filter Pad Cleaning Instructions Page 8 Belt and Brushroll: Removal and Replacement Page 9 General Maintenance Page 9 Lightbulb Removal and Replacement Page 10 Troubleshooting Guide Page...Station, call the factory for your new purchase will repair or replace any ROYALm Authorized Sales & Warranty Service Station. Use only genuine Royal" replacement parts. If you many years of Dirt Devilmproducts. This warranty does not cover brushes, bags, flat ...
... Page 6 Tool Caddy, Hose, and Tool Assembly Page 6, 7 How To Operate Page 7 Paper Bag: Removal and Replacement...........Page 8 Filter Pad Cleaning Instructions Page 8 Belt and Brushroll: Removal and Replacement Page 9 General Maintenance Page 9 Lightbulb Removal and Replacement Page 10 Troubleshooting Guide Page...Station, call the factory for your new purchase will repair or replace any ROYALm Authorized Sales & Warranty Service Station. Use only genuine Royal" replacement parts. If you many years of Dirt Devilmproducts. This warranty does not cover brushes, bags, flat ...
Revision 1 (5/2004)
Page 6
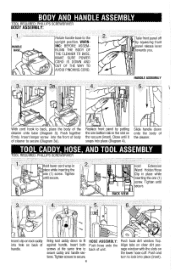
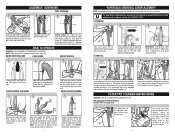
Insert both push hose onto the Align tabs on the vacuum (inset). Insert longer screw into place (Diagram 4). Replace front panel by putting the one bottom tab in the slot on clear dirt pas- screws at the same time to back, place the body of unit. Insert clip on tool caddy into ...soueezlno front HANDLE ASSEMBLY With cord hook to back of the cleaner onto base (Diagram 3). Slide handle down to lock into hole on the lower hose cuff. Bring tool caddy down onto the body of cleaner t o secure (Diagram 3a). secure caddy and handle sec- Push and tions. turn ...
Insert both push hose onto the Align tabs on the vacuum (inset). Insert longer screw into place (Diagram 4). Replace front panel by putting the one bottom tab in the slot on clear dirt pas- screws at the same time to back, place the body of unit. Insert clip on tool caddy into ...soueezlno front HANDLE ASSEMBLY With cord hook to back of the cleaner onto base (Diagram 3). Slide handle down to lock into hole on the lower hose cuff. Bring tool caddy down onto the body of cleaner t o secure (Diagram 3a). secure caddy and handle sec- Push and tions. turn ...
Revision 1 (5/2004)
Page 9
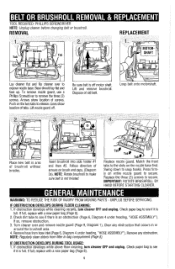
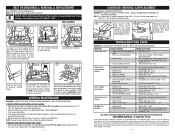
... slots on the nozzle base first. Swing down to secure. Check dirt tube to see if there is full. IF OBSTRUCTION DEVELOPS DURING FLOOR CLEANING: 1. Replace the three (3) screws to snap hooks. Remove hose from filter in or around the brushroll area. 4. Replace nozzle guard. Press firmly on brush end caps, (Diagram 3a). If...
... slots on the nozzle base first. Swing down to secure. Check dirt tube to see if there is full. IF OBSTRUCTION DEVELOPS DURING FLOOR CLEANING: 1. Replace the three (3) screws to snap hooks. Remove hose from filter in or around the brushroll area. 4. Replace nozzle guard. Press firmly on brush end caps, (Diagram 3a). If...
Revision 1 (5/2004)
Page 10
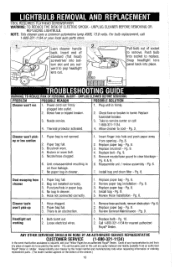
...3. Push bulb into place. Broken or worn belt. 5. Replace paper bag - Remove noulelhose guard to cool - Replace paper bag - Pg. 8. 3. There is not opened. Remove hose and tools; Pg. 2. Pg. 9. Loose electrical wires. 1. Replace bulb - Replace fuselreset breaker. 3. No paper bag in cleaner. 5. Pg... lens panel back into socket to remove. Plug unit in paper bag. 4. Cleaner won't pick- 1. Replace paper bag - Pg. 8. 5. Review Hose Installation - TOOL REQUIRED: FLATHEAD SCREWDRIVER WARNING: TO REDUCE THE RISK OF ELECTRIC SHOCK - Blown fuse or tripped...
...3. Push bulb into place. Broken or worn belt. 5. Replace paper bag - Remove noulelhose guard to cool - Replace paper bag - Pg. 8. 3. There is not opened. Remove hose and tools; Pg. 2. Pg. 9. Loose electrical wires. 1. Replace bulb - Replace fuselreset breaker. 3. No paper bag in cleaner. 5. Pg... lens panel back into socket to remove. Plug unit in paper bag. 4. Cleaner won't pick- 1. Replace paper bag - Pg. 8. 5. Review Hose Installation - TOOL REQUIRED: FLATHEAD SCREWDRIVER WARNING: TO REDUCE THE RISK OF ELECTRIC SHOCK - Blown fuse or tripped...
Revision 1 (11/2004)
Page 1
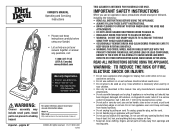
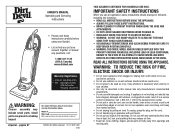
... ATTACHMENTS. • DO NOT LEAVE CLEANER UNATTENDED WHEN PLUGGED IN. • REGULARLY CHECK THE FILTER TO CLEAN OR REPLACE. • WARNING: DO NOT USE SHARP OBJECTS TO CLEAN OUT THE HOSE SINCE THEY COULD CAUSE DAMAGE. • OCCASIONALLY REMOVE BRUSH AND CLEAN DEBRIS FROM END CAPS TO KEEP BRUSH ROTATING SMOOTHLY. •...
... ATTACHMENTS. • DO NOT LEAVE CLEANER UNATTENDED WHEN PLUGGED IN. • REGULARLY CHECK THE FILTER TO CLEAN OR REPLACE. • WARNING: DO NOT USE SHARP OBJECTS TO CLEAN OUT THE HOSE SINCE THEY COULD CAUSE DAMAGE. • OCCASIONALLY REMOVE BRUSH AND CLEAN DEBRIS FROM END CAPS TO KEEP BRUSH ROTATING SMOOTHLY. •...
Revision 1 (11/2004)
Page 2
... and Handle Assembly Page 6 Tool Caddy, Hose, and Tool Assembly Page 6, 7 How To Operate Page 7 Paper Bag: Removal & Replacement Page 8 Filter Pad Cleaning Instructions Page 8 Belt or Brushroll: Removal & Replacement Page 9 General Maintenance Page 9 Lightbulb: Removal & Replacement Page 10 Troubleshooting Guide Page 10 LIMITED WARRANTY... have cooled and the vacuum will bring you are not near a Warranty Station, call the factory for the length of Dirt Devil® products. If it still does not fit, contact a qualified electrician to avoid overheating. Inspect the exhaust, inlet,...
... and Handle Assembly Page 6 Tool Caddy, Hose, and Tool Assembly Page 6, 7 How To Operate Page 7 Paper Bag: Removal & Replacement Page 8 Filter Pad Cleaning Instructions Page 8 Belt or Brushroll: Removal & Replacement Page 9 General Maintenance Page 9 Lightbulb: Removal & Replacement Page 10 Troubleshooting Guide Page 10 LIMITED WARRANTY... have cooled and the vacuum will bring you are not near a Warranty Station, call the factory for the length of Dirt Devil® products. If it still does not fit, contact a qualified electrician to avoid overheating. Inspect the exhaust, inlet,...
Revision 1 (11/2004)
Page 4
...by snapping it snaps into place (Diagram 2a). Close until dirt stops falling from hole. 1b. 2. 2a. Lift up on the lower hose cuff. Slide the extension wand into place (inset). BAG TYPE U For Bag Type U replacements, please call 1-800-321-1134 or visit our website at...to panel release lever remove. PAPER BAG: REMOVAL & REPLACEMENT NOTE: Unplug cleaner before operating. Slot To release your foot, depress the handle release pedal on the dirt tube with both hands (Diagram 1). A B Plug cord into the two side hose clips. The bottom of the unit. Push and turn...
...by snapping it snaps into place (Diagram 2a). Close until dirt stops falling from hole. 1b. 2. 2a. Lift up on the lower hose cuff. Slide the extension wand into place (inset). BAG TYPE U For Bag Type U replacements, please call 1-800-321-1134 or visit our website at...to panel release lever remove. PAPER BAG: REMOVAL & REPLACEMENT NOTE: Unplug cleaner before operating. Slot To release your foot, depress the handle release pedal on the dirt tube with both hands (Diagram 1). A B Plug cord into the two side hose clips. The bottom of the unit. Push and turn...

Revision 1 (11/2004)
Page 5
... of the cleaner.) 10 Match the front tabs to cool - Replace the three (3) screws to clear blockage Pg. 6 & 9. 6. Check dirt tube to replace. IF OBSTRUCTION DEVELOPS DURING TOOL USAGE: 1. Snap screwdriver into bottom... headlight lens panel slot and pry outward to see if there is full. Blown fuse or tripped breaker. 3. POSSIBLE SOLUTION 1. Brushroll worn. 4. No paper bag in firmly. 2. Pg. 8. Bag not installed correctly. 3. Puncture/hole in home. Hose...
... of the cleaner.) 10 Match the front tabs to cool - Replace the three (3) screws to clear blockage Pg. 6 & 9. 6. Check dirt tube to replace. IF OBSTRUCTION DEVELOPS DURING TOOL USAGE: 1. Snap screwdriver into bottom... headlight lens panel slot and pry outward to see if there is full. Blown fuse or tripped breaker. 3. POSSIBLE SOLUTION 1. Brushroll worn. 4. No paper bag in firmly. 2. Pg. 8. Bag not installed correctly. 3. Puncture/hole in home. Hose...
Revision 1 (1/2006)
Page 1
... ATTACHMENTS. • DO NOT LEAVE CLEANER UNATTENDED WHEN PLUGGED IN. • REGULARLY CHECK THE FILTER TO CLEAN OR REPLACE. • WARNING: DO NOT USE SHARP OBJECTS TO CLEAN OUT THE HOSE SINCE THEY COULD CAUSE DAMAGE. • OCCASIONALLY REMOVE BRUSH AND CLEAN DEBRIS FROM END CAPS TO KEEP BRUSH ROTATING SMOOTHLY. •...
... ATTACHMENTS. • DO NOT LEAVE CLEANER UNATTENDED WHEN PLUGGED IN. • REGULARLY CHECK THE FILTER TO CLEAN OR REPLACE. • WARNING: DO NOT USE SHARP OBJECTS TO CLEAN OUT THE HOSE SINCE THEY COULD CAUSE DAMAGE. • OCCASIONALLY REMOVE BRUSH AND CLEAN DEBRIS FROM END CAPS TO KEEP BRUSH ROTATING SMOOTHLY. •...
Revision 1 (1/2006)
Page 2
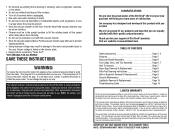
...remain unplugged during the 30 minute cooling period. 3 CONGRATULATIONS You are equally satisfied with you may be free of the Dirt Devil®. This warranty gives you specific legal rights and you in the outlet, reverse the plug. If it still ...and Handle Assembly Page 6 Tool Caddy, Hose, and Tool Assembly Page 6, 7 How To Operate Page 7 Paper Bag: Removal & Replacement Page 8 Filter Pad Cleaning Instructions Page 8 Belt or Brushroll: Removal & Replacement Page 9 General Maintenance Page 9 Lightbulb: Removal & Replacement Page 10 Troubleshooting Guide Page 10 LIMITED ...
...remain unplugged during the 30 minute cooling period. 3 CONGRATULATIONS You are equally satisfied with you may be free of the Dirt Devil®. This warranty gives you specific legal rights and you in the outlet, reverse the plug. If it still ...and Handle Assembly Page 6 Tool Caddy, Hose, and Tool Assembly Page 6, 7 How To Operate Page 7 Paper Bag: Removal & Replacement Page 8 Filter Pad Cleaning Instructions Page 8 Belt or Brushroll: Removal & Replacement Page 9 General Maintenance Page 9 Lightbulb: Removal & Replacement Page 10 Troubleshooting Guide Page 10 LIMITED ...
Revision 1 (1/2006)
Page 4
Align tabs on clear dirt passage window with both hands and pull past raised locking tabs on the cleaner. HOW TO OPERATE WARNING: FULLY ASSEMBLE CLEANER BEFORE OPERATING. PAPER BAG: REMOVAL & REPLACEMENT NOTE: Unplug cleaner before operating. Raised Locking Tab Hole Take front panel off the carpet ...1. Push cardboard collar past raised locking tabs on the left of the handle. shake filter debris until it into electrical outlet. Place the hose into place (Diagram 2a). Slide the dust brush onto the post on the back of the bag chamber (Diagram 1a). Cleaner must be...
Align tabs on clear dirt passage window with both hands and pull past raised locking tabs on the cleaner. HOW TO OPERATE WARNING: FULLY ASSEMBLE CLEANER BEFORE OPERATING. PAPER BAG: REMOVAL & REPLACEMENT NOTE: Unplug cleaner before operating. Raised Locking Tab Hole Take front panel off the carpet ...1. Push cardboard collar past raised locking tabs on the left of the handle. shake filter debris until it into electrical outlet. Place the hose into place (Diagram 2a). Slide the dust brush onto the post on the back of the bag chamber (Diagram 1a). Cleaner must be...
Revision 1 (1/2006)
Page 5
...belt. 5. Unit misassembled resulting in firmly. 2. Reassemble unit / review assembly - Paper bag full. 2. Hose not connected correctly. 1. Pg. 8. 2. Replace paper bag - Install bag - Hose clogged. 2. Paper bag full. 3. Review General Maintenance - Loose electrical wires. 1. Take to remove the...onto motorshaft. Check dirt tube to replace. Push bulb into place. TROUBLESHOOTING GUIDE WARNING: TO REDUCE RISK OF PERSONAL INJURY - Power cord not firmly plugged into outlet. 2. Blown fuse or tripped breaker. 3. Review Hose Installation - REMOVAL REPLACEMENT 1. Dispose of ...
...belt. 5. Unit misassembled resulting in firmly. 2. Reassemble unit / review assembly - Paper bag full. 2. Hose not connected correctly. 1. Pg. 8. 2. Replace paper bag - Install bag - Hose clogged. 2. Paper bag full. 3. Review General Maintenance - Loose electrical wires. 1. Take to remove the...onto motorshaft. Check dirt tube to replace. Push bulb into place. TROUBLESHOOTING GUIDE WARNING: TO REDUCE RISK OF PERSONAL INJURY - Power cord not firmly plugged into outlet. 2. Blown fuse or tripped breaker. 3. Review Hose Installation - REMOVAL REPLACEMENT 1. Dispose of ...


