
Revision 1 (5/2004)
Page 2
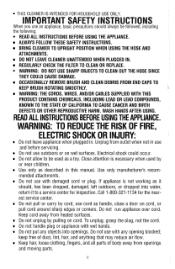
...near children. Call 1-800-321-1134 for inspection. ALWAYS FOLLOW THESE SAFETY INSTRUCTIONS. WARNING: DO NOT USE SHARP OBJECTS TO CLEAN OUT THE HOSE SINCE THEY COULD CAUSE DAMAGE. WARNING: TO REDUCE THE RISK OF FIRE, ELECTRIC SHOCK OR INJURY: Do not leave appliance when plugged in... fingers, and all parts of dust, lint, hair, and anything that may reduce air flow. BRING CLEANER TO UPRIGHT POSITION WHEN USING THE HOSE AND ATTACHMENTS. WASH HANDS AFTER USING. mended attachments. IMPORTANT SAFETY INSTRUCTIONS When you use cord as it to be followed, including the following: ...
...near children. Call 1-800-321-1134 for inspection. ALWAYS FOLLOW THESE SAFETY INSTRUCTIONS. WARNING: DO NOT USE SHARP OBJECTS TO CLEAN OUT THE HOSE SINCE THEY COULD CAUSE DAMAGE. WARNING: TO REDUCE THE RISK OF FIRE, ELECTRIC SHOCK OR INJURY: Do not leave appliance when plugged in... fingers, and all parts of dust, lint, hair, and anything that may reduce air flow. BRING CLEANER TO UPRIGHT POSITION WHEN USING THE HOSE AND ATTACHMENTS. WASH HANDS AFTER USING. mended attachments. IMPORTANT SAFETY INSTRUCTIONS When you use cord as it to be followed, including the following: ...
Revision 1 (5/2004)
Page 4
... in mind. Please include complete description of the problem, day of purchase, copy of original sales receipt and your support of Dirt Devilmproducts. Refer to your vacuum cleaner carton for the length of warranty and save your new purchase will repair or replace any...you for assistance at www.dirtdevil.com TABLE OF CONTENTS Safety Instructions Page 2, 3 Feature Descriptions Page 5 Body and Handle Assembly Page 6 Tool Caddy, Hose, and Tool Assembly Page 6, 7 How To Operate Page 7 Paper Bag: Removal and Replacement...........Page 8 Filter Pad Cleaning Instructions Page 8 Belt and...
... in mind. Please include complete description of the problem, day of purchase, copy of original sales receipt and your support of Dirt Devilmproducts. Refer to your vacuum cleaner carton for the length of warranty and save your new purchase will repair or replace any...you for assistance at www.dirtdevil.com TABLE OF CONTENTS Safety Instructions Page 2, 3 Feature Descriptions Page 5 Body and Handle Assembly Page 6 Tool Caddy, Hose, and Tool Assembly Page 6, 7 How To Operate Page 7 Paper Bag: Removal and Replacement...........Page 8 Filter Pad Cleaning Instructions Page 8 Belt and...

Revision 1 (5/2004)
Page 5
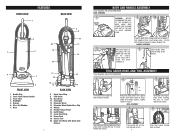
Front Panel 4. Extension Wand 13. OnIOff Pedal 17. Crevice Tool 20. Headlight 5. Tool Caddy 12. Wheels 15. Power Cord 19. Upper Cord Wrap with Quick Cord Release Handle Release Pedal 16. FRONT VlEW BACK VlEW 1 FRONT VlEW 1. Handle Grip 2. Bumper 6. Cord Guide 10. Extension Wand HolderIHose Clip 14. Upper Hose Wrap 9. Front Panel Release Handle 3. Clear Dirt Window 7. Hose BACK VlEW 8. Dust Brush 11. Lower Cord Wrap 18.
Front Panel 4. Extension Wand 13. OnIOff Pedal 17. Crevice Tool 20. Headlight 5. Tool Caddy 12. Wheels 15. Power Cord 19. Upper Cord Wrap with Quick Cord Release Handle Release Pedal 16. FRONT VlEW BACK VlEW 1 FRONT VlEW 1. Handle Grip 2. Bumper 6. Cord Guide 10. Extension Wand HolderIHose Clip 14. Upper Hose Wrap 9. Front Panel Release Handle 3. Clear Dirt Window 7. Hose BACK VlEW 8. Dust Brush 11. Lower Cord Wrap 18.
Revision 1 (5/2004)
Page 6
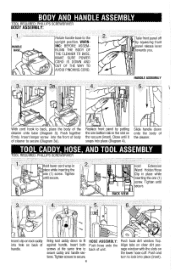
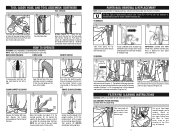
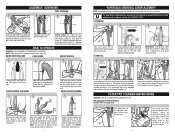
... to the u ~ r l a h t~osltion.WARN- IUY ASStIVIBLY: Rotate handle base to lock into place (inset). 6 Insert longer screw into hole on the lower hose cuff. Bring tool caddy down onto the body of unit. Take front panel off bv soueezlno front HANDLE ASSEMBLY With cord hook to back of...into place (Diagram 4). against handle. Push together firmly. Insert both push hose onto the Align tabs on the vacuum (inset). Push and tions. secure caddy and handle sec- Tighten screws to fit HOSE ASSEMBLY: Push back dirt window flap. sage window with the slots on back of the cleaner onto...
... to the u ~ r l a h t~osltion.WARN- IUY ASStIVIBLY: Rotate handle base to lock into place (inset). 6 Insert longer screw into hole on the lower hose cuff. Bring tool caddy down onto the body of unit. Take front panel off bv soueezlno front HANDLE ASSEMBLY With cord hook to back of...into place (Diagram 4). against handle. Push together firmly. Insert both push hose onto the Align tabs on the vacuum (inset). Push and tions. secure caddy and handle sec- Tighten screws to fit HOSE ASSEMBLY: Push back dirt window flap. sage window with the slots on back of the cleaner onto...
Revision 1 (5/2004)
Page 7
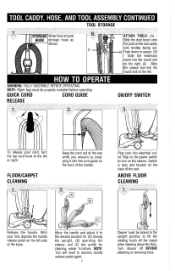
...is arev and located on the cleaner. CLEANING Keep the cord out of the handle. Move the handle and adjust it into electrical outlet. War, hose around storage hook as jhown. TOOL STORAGE NOTE: Paper bag must be properly installed before operating. ABOVE FLOOR CLEANING L Release the handle. Step on ... of the way while you vacuum by snapping it to turn the top cord hook to lift the rotating brush off BEFORE attaching or removing hose. NOTE: You will need to depress handle release pedal again. 7 J Cleaner must be locked in the upright position to the left side of the...
...is arev and located on the cleaner. CLEANING Keep the cord out of the handle. Move the handle and adjust it into electrical outlet. War, hose around storage hook as jhown. TOOL STORAGE NOTE: Paper bag must be properly installed before operating. ABOVE FLOOR CLEANING L Release the handle. Step on ... of the way while you vacuum by snapping it to turn the top cord hook to lift the rotating brush off BEFORE attaching or removing hose. NOTE: You will need to depress handle release pedal again. 7 J Cleaner must be locked in the upright position to the left side of the...
Revision 1 (5/2004)
Page 9
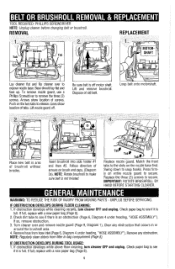
... is off . If obstruction develops while above floor cleaning, turn cleaner OFF and unplug. Replace the three (3) screws to snap hooks. Check dirt tube to expose nozzle base. IF OBSTRUCTION DEVELOPS DURING TOOL USAGE: 1. Dispose of brushroll without bristles. Place new belt in area of old belt.... Push on brush end caps, (Diagram 3a). Check paper bag to remove the three (3) screws. Arrows show location of screws. Remove hose from filter in or around the brushroll area. 4. Lift nozzle guard off motor shaft. UNPLUG BEFORE SERVICING. Base should lay flat and face up...
... is off . If obstruction develops while above floor cleaning, turn cleaner OFF and unplug. Replace the three (3) screws to snap hooks. Check dirt tube to expose nozzle base. IF OBSTRUCTION DEVELOPS DURING TOOL USAGE: 1. Dispose of brushroll without bristles. Place new belt in area of old belt.... Push on brush end caps, (Diagram 3a). Check paper bag to remove the three (3) screws. Arrows show location of screws. Remove hose from filter in or around the brushroll area. 4. Lift nozzle guard off motor shaft. UNPLUG BEFORE SERVICING. Base should lay flat and face up...
Revision 1 (5/2004)
Page 10
...paper away from cleaner 1. Replace brushroll - Remove noulelhose guard to cool - Pg. 6. 7. Bag not installed correctly. 3. Pg. 8. 5. Review Hose Installation - Hose clogged. 2. remove obstruction - Pg. 8. 3. Call 1-800-321-1134 for arIauthorized Roval" Dealer. Insert end of anv transoortation to replace. Thermal...call 1-800-321-1134 or vour local auto Darts store. up 1. Pg. 9. 4. Puncturelhole in firmly. 2. Pg. 8. 4. Remove hose and tools; Pg. 8. Replace paper bag - Replace paper bag - back. Needs service. 4. Replace belt - No bag in air ...
...paper away from cleaner 1. Replace brushroll - Remove noulelhose guard to cool - Pg. 6. 7. Bag not installed correctly. 3. Pg. 8. 5. Review Hose Installation - Hose clogged. 2. remove obstruction - Pg. 8. 3. Call 1-800-321-1134 for arIauthorized Roval" Dealer. Insert end of anv transoortation to replace. Thermal...call 1-800-321-1134 or vour local auto Darts store. up 1. Pg. 9. 4. Puncturelhole in firmly. 2. Pg. 8. 4. Remove hose and tools; Pg. 8. Replace paper bag - Replace paper bag - back. Needs service. 4. Replace belt - No bag in air ...
Revision 1 (11/2004)
Page 1
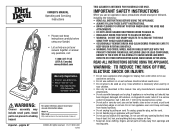
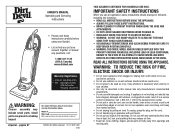
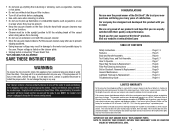
... • READ ALL INSTRUCTIONS BEFORE USING THE APPLIANCE. • ALWAYS FOLLOW THESE SAFETY INSTRUCTIONS. • BRING CLEANER TO UPRIGHT POSITION WHEN USING THE HOSE AND ATTACHMENTS. • DO NOT LEAVE CLEANER UNATTENDED WHEN PLUGGED IN. • REGULARLY CHECK THE FILTER TO CLEAN OR REPLACE. • WARNING: ...DO NOT USE SHARP OBJECTS TO CLEAN OUT THE HOSE SINCE THEY COULD CAUSE DAMAGE. • OCCASIONALLY REMOVE BRUSH AND CLEAN DEBRIS FROM END CAPS TO KEEP BRUSH ROTATING SMOOTHLY. • WARNING: THE...
... • READ ALL INSTRUCTIONS BEFORE USING THE APPLIANCE. • ALWAYS FOLLOW THESE SAFETY INSTRUCTIONS. • BRING CLEANER TO UPRIGHT POSITION WHEN USING THE HOSE AND ATTACHMENTS. • DO NOT LEAVE CLEANER UNATTENDED WHEN PLUGGED IN. • REGULARLY CHECK THE FILTER TO CLEAN OR REPLACE. • WARNING: ...DO NOT USE SHARP OBJECTS TO CLEAN OUT THE HOSE SINCE THEY COULD CAUSE DAMAGE. • OCCASIONALLY REMOVE BRUSH AND CLEAN DEBRIS FROM END CAPS TO KEEP BRUSH ROTATING SMOOTHLY. • WARNING: THE...
Revision 1 (11/2004)
Page 2
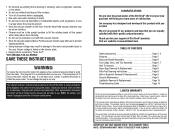
..., and filters for assistance at www.dirtdevil.com TABLE OF CONTENTS Safety Instructions Page 2, 3 Features Page 5 Body and Handle Assembly Page 6 Tool Caddy, Hose, and Tool Assembly Page 6, 7 How To Operate Page 7 Paper Bag: Removal & Replacement Page 8 Filter Pad Cleaning Instructions Page 8 Belt or Brushroll:...and save your support of warranty period. Refer to your vacuum cleaner carton for your original sales receipt to validate start of Dirt Devil® products. Please include complete description of the problem, day of purchase, copy of original sales receipt and your new ...
..., and filters for assistance at www.dirtdevil.com TABLE OF CONTENTS Safety Instructions Page 2, 3 Features Page 5 Body and Handle Assembly Page 6 Tool Caddy, Hose, and Tool Assembly Page 6, 7 How To Operate Page 7 Paper Bag: Removal & Replacement Page 8 Filter Pad Cleaning Instructions Page 8 Belt or Brushroll:...and save your support of warranty period. Refer to your vacuum cleaner carton for your original sales receipt to validate start of Dirt Devil® products. Please include complete description of the problem, day of purchase, copy of original sales receipt and your new ...
Revision 1 (11/2004)
Page 3
... 1 BACK VIEW 8 9 2 10 20 11 3 19 7 12 18 6 4 5 FRONT VIEW 1. Dust Brush 11. Extension Wand 13. Extension Wand Holder/Hose Clip 14. Close until it snaps into hole on by putting the one bottom tab in place while inserting the one (1) screw. HANDLE ASSEMBLY 4. Bring... 3). Insert both screws to secure. STORAGE HOOK BACK VIEW Hold Extension Wand Holder/Hose Clip in place while inserting the one (1) screw. Push together firmly. Clear Dirt Window 7. Crevice Tool 20. Upper Hose Wrap 9. On/Off Pedal 17. Slide handle down to secure (Diagram 2a). ...
... 1 BACK VIEW 8 9 2 10 20 11 3 19 7 12 18 6 4 5 FRONT VIEW 1. Dust Brush 11. Extension Wand 13. Extension Wand Holder/Hose Clip 14. Close until it snaps into hole on by putting the one bottom tab in place while inserting the one (1) screw. HANDLE ASSEMBLY 4. Bring... 3). Insert both screws to secure. STORAGE HOOK BACK VIEW Hold Extension Wand Holder/Hose Clip in place while inserting the one (1) screw. Push together firmly. Clear Dirt Window 7. Crevice Tool 20. Upper Hose Wrap 9. On/Off Pedal 17. Slide handle down to secure (Diagram 2a). ...
Revision 1 (11/2004)
Page 4
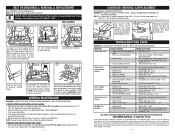
... & REPLACEMENT NOTE: Unplug cleaner before operating. Turn cleaner off 2. Be sure paper bag is grey and located on the lower hose cuff. BAG CHAMBER FILTER (INTERNAL) Located under furniture. HOW TO OPERATE WARNING: FULLY ASSEMBLE CLEANER BEFORE OPERATING. Raised Locking Tab ...front panel by squeezing front and pull towards you . C Release the handle. Close until dirt stops falling from hole. 1b. 2. 2a. Take front panel off BEFORE attaching or removing hose. With your cord, turn the top cord hook to the desired position for (A) storing ...
... & REPLACEMENT NOTE: Unplug cleaner before operating. Turn cleaner off 2. Be sure paper bag is grey and located on the lower hose cuff. BAG CHAMBER FILTER (INTERNAL) Located under furniture. HOW TO OPERATE WARNING: FULLY ASSEMBLE CLEANER BEFORE OPERATING. Raised Locking Tab ...front panel by squeezing front and pull towards you . C Release the handle. Close until dirt stops falling from hole. 1b. 2. 2a. Take front panel off BEFORE attaching or removing hose. With your cord, turn the top cord hook to the desired position for (A) storing ...

Revision 1 (11/2004)
Page 5
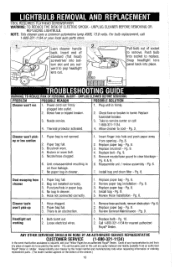
... tabs to the slots on the two tabs to and from any obstruction. Replace the three (3) screws to cool - Check dirt tube to back into side holder #1 and then #2. Snap screwdriver into bottom headlight lens panel slot and pry outward to see...flat head) socket to remove the three (3) screws. Needs service. 4. Paper bag is full. Review paper bag installation - Install bag - Review Hose Installation - Paper bag full. 3. IMPORTANT: Rotate brushroll by the model number and manufacturing code when requesting information or ordering replacement parts. (The model...
... tabs to the slots on the two tabs to and from any obstruction. Replace the three (3) screws to cool - Check dirt tube to back into side holder #1 and then #2. Snap screwdriver into bottom headlight lens panel slot and pry outward to see...flat head) socket to remove the three (3) screws. Needs service. 4. Paper bag is full. Review paper bag installation - Install bag - Review Hose Installation - Paper bag full. 3. IMPORTANT: Rotate brushroll by the model number and manufacturing code when requesting information or ordering replacement parts. (The model...
Revision 1 (1/2006)
Page 1
... • READ ALL INSTRUCTIONS BEFORE USING THE APPLIANCE. • ALWAYS FOLLOW THESE SAFETY INSTRUCTIONS. • BRING CLEANER TO UPRIGHT POSITION WHEN USING THE HOSE AND ATTACHMENTS. • DO NOT LEAVE CLEANER UNATTENDED WHEN PLUGGED IN. • REGULARLY CHECK THE FILTER TO CLEAN OR REPLACE. • WARNING: ...DO NOT USE SHARP OBJECTS TO CLEAN OUT THE HOSE SINCE THEY COULD CAUSE DAMAGE. • OCCASIONALLY REMOVE BRUSH AND CLEAN DEBRIS FROM END CAPS TO KEEP BRUSH ROTATING SMOOTHLY. • WARNING: THE...
... • READ ALL INSTRUCTIONS BEFORE USING THE APPLIANCE. • ALWAYS FOLLOW THESE SAFETY INSTRUCTIONS. • BRING CLEANER TO UPRIGHT POSITION WHEN USING THE HOSE AND ATTACHMENTS. • DO NOT LEAVE CLEANER UNATTENDED WHEN PLUGGED IN. • REGULARLY CHECK THE FILTER TO CLEAN OR REPLACE. • WARNING: ...DO NOT USE SHARP OBJECTS TO CLEAN OUT THE HOSE SINCE THEY COULD CAUSE DAMAGE. • OCCASIONALLY REMOVE BRUSH AND CLEAN DEBRIS FROM END CAPS TO KEEP BRUSH ROTATING SMOOTHLY. • WARNING: THE...
Revision 1 (1/2006)
Page 2
..., and filters for assistance at www.dirtdevil.com TABLE OF CONTENTS Safety Instructions Page 2, 3 Features Page 5 Body and Handle Assembly Page 6 Tool Caddy, Hose, and Tool Assembly Page 6, 7 How To Operate Page 7 Paper Bag: Removal & Replacement Page 8 Filter Pad Cleaning Instructions Page 8 Belt or Brushroll...To reduce the risk of electric shock, this vacuum cleaner to pick up anything that you are now the proud owner of the Dirt Devil®. warrants this appliance has a polarized plug (one way. IMPORTANT: USE ONLY GENUINE ROYAL® REPLACEMENT PARTS. Please include ...
..., and filters for assistance at www.dirtdevil.com TABLE OF CONTENTS Safety Instructions Page 2, 3 Features Page 5 Body and Handle Assembly Page 6 Tool Caddy, Hose, and Tool Assembly Page 6, 7 How To Operate Page 7 Paper Bag: Removal & Replacement Page 8 Filter Pad Cleaning Instructions Page 8 Belt or Brushroll...To reduce the risk of electric shock, this vacuum cleaner to pick up anything that you are now the proud owner of the Dirt Devil®. warrants this appliance has a polarized plug (one way. IMPORTANT: USE ONLY GENUINE ROYAL® REPLACEMENT PARTS. Please include ...

Revision 1 (1/2006)
Page 3
...while inserting one (1) screw. Handle Grip 2. Tighten screws to secure caddy and handle sections. Cord Guide 10. Tighten until secure. 6. Upper Hose Wrap 9. Handle Release Pedal 16. Power Cord 19. Close until it snaps into slot above screw holes on the vacuum (inset). Front ... on tool caddy into place (Diagram 3). Bring tool caddy down onto the body of the cleaner. 3. Hose 17 13 16 15 14 14 BACK VIEW 8. Crevice Tool 20. Clear Dirt Window 7. Upper Cord Wrap with Quick Cord Release 5 HOW TO ASSEMBLE TOOL REQUIRED: PHILLIPS SCREWDRIVER BODY ASSEMBLY...
...while inserting one (1) screw. Handle Grip 2. Tighten screws to secure caddy and handle sections. Cord Guide 10. Tighten until secure. 6. Upper Hose Wrap 9. Handle Release Pedal 16. Power Cord 19. Close until it snaps into slot above screw holes on the vacuum (inset). Front ... on tool caddy into place (Diagram 3). Bring tool caddy down onto the body of the cleaner. 3. Hose 17 13 16 15 14 14 BACK VIEW 8. Crevice Tool 20. Clear Dirt Window 7. Upper Cord Wrap with Quick Cord Release 5 HOW TO ASSEMBLE TOOL REQUIRED: PHILLIPS SCREWDRIVER BODY ASSEMBLY...
Revision 1 (1/2006)
Page 4
... and located on the left or right. shake filter debris until it to panel release lever remove. Slide the extension wand into the two side hose clips. PAPER BAG: REMOVAL & REPLACEMENT NOTE: Unplug cleaner before operating. TO REMOVE 1. 2. 3. Raised 1a. Press in the upright position to depress... bag chamber (Diagram 1a). ATTACH TOOLS: (A) - Slide the dust brush onto the post on the tool caddy with the slots on the dirt tube. Push down to clear paper away from the filter. Slide the crevice tool into place (inset). HOW TO OPERATE WARNING: FULLY ASSEMBLE ...
... and located on the left or right. shake filter debris until it to panel release lever remove. Slide the extension wand into the two side hose clips. PAPER BAG: REMOVAL & REPLACEMENT NOTE: Unplug cleaner before operating. TO REMOVE 1. 2. 3. Raised 1a. Press in the upright position to depress... bag chamber (Diagram 1a). ATTACH TOOLS: (A) - Slide the dust brush onto the post on the tool caddy with the slots on the dirt tube. Push down to clear paper away from the filter. Slide the crevice tool into place (inset). HOW TO OPERATE WARNING: FULLY ASSEMBLE ...
Revision 1 (1/2006)
Page 5
...Bag not installed correctly. 3. Puncture/hole in cleaner. 1. Review Hose Installation - Remove hose and tools; Replace paper bag - Tab 1. Base should lay flat and face up. Check dirt tube to be paid by the owner. Remove hose from filter in this unit are to see your local auto parts... store. 1. 2. Needs service. 4. Hose not connected correctly. 1. Pg. 8. 3. Always identify your cleaner by ...
...Bag not installed correctly. 3. Puncture/hole in cleaner. 1. Review Hose Installation - Remove hose and tools; Replace paper bag - Tab 1. Base should lay flat and face up. Check dirt tube to be paid by the owner. Remove hose from filter in this unit are to see your local auto parts... store. 1. 2. Needs service. 4. Hose not connected correctly. 1. Pg. 8. 3. Always identify your cleaner by ...


